User's Guide - System Administration
This user's guide is for System Administrators. It introduces
you to the areas in Collect! where you can define default operation
parameters, setups, create new users, codes of all types, design new
reports/letters and gain access to system level tasks.
The System Administration menu is accessed by clicking the System
drop-down from your Top Menu or clicking the System Administration
button on the Main Menu.
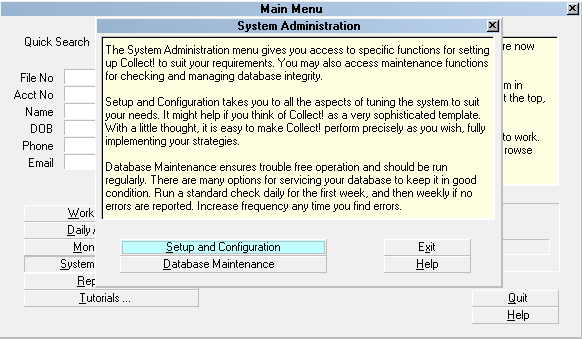
System Administration menu
System administration comprises a number of areas.
Setup and Configuration
Use this option to access setup areas for all the feature
configuration sub- menus.
Database Maintenance
Use this option to access system maintenance functions.
System setups are necessary before you begin using your system
for the first time. By completing the requisite fill-in screens
and decisioning how you want your essential default settings to be
configured, you will start with a clean installation that operates
exclusively on your company's preferences. Not reviewing these
options now can result in features seeming not to function to your
satisfaction when in fact, they are performing as per the shipping
default settings.
This manual is for executive management who wish to be aware of the
functionalities and setting options which exist as well as the personnel
who will be responsible in the organization for maintaining all feature
settings, user logins/securities, and running all maintenance functions.
Setup And Configuration
The System Setup menu shows options for all the setup areas in
the system.
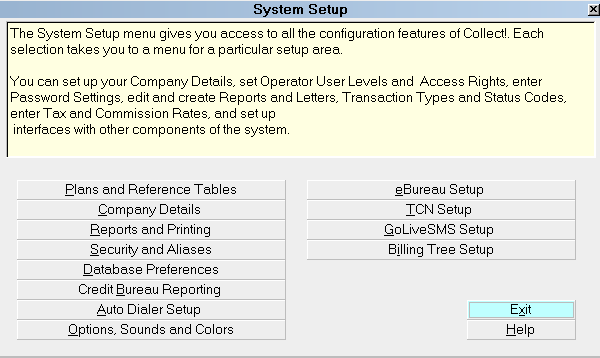
System Setup menu
Plans and Reference Tables
Use this option to set up contact plans, transaction types,
payment posting automation defaults, commission rate tables,
payment plan defaults, debtor status codes, WIP list default
settings and account matching criteria.
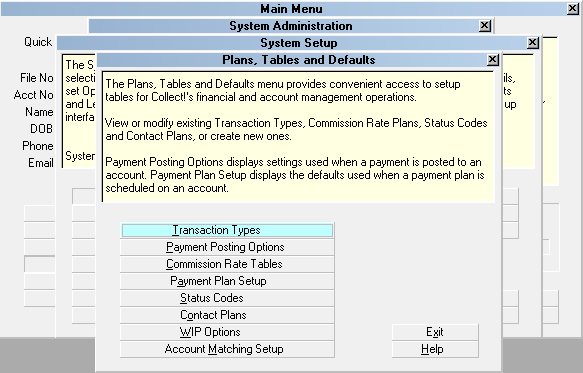
Plans, Tables and Defaults menu
Contact Plans are your automations, i.e. workflows,
letter series, inventory management, account closure routines or any
other defined events you have set up to be enacted on individual or
groups of accounts.
Transaction Types is the list of codes that defines the
payment types you will use when posting financial transactions. It is
important to note that the system ships with a default payment breakdown
hierarchy of Fees, Interest, Principal, Legal, Misc then Other. If you
will use commission rate tiers and order of operations matters in how payment
funds are disbursed amongst the figure types which comprise your balance,
then you will want to ensure that your 100 series transaction types, excluding
194, 195, 196 and 197 are adjusted accordingly from the shipping defaults.
Codes 194/195 pertain to new Judgment entries and codes 196/197 pertain to
new principal and interest assigned.
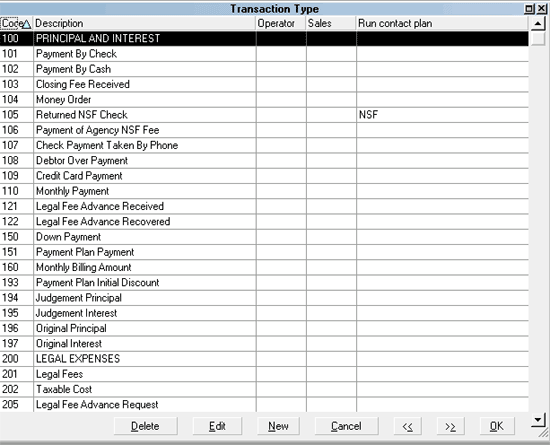
The Transaction Type List
 WARNING: Unless there is a specific reason to do so, codes 194
through to 197 inclusive should not be modified from the
shipping default settings. These transaction codes are
not meant to reflect revenue nor are they intended to
appear on client transaction detail reporting.
WARNING: Unless there is a specific reason to do so, codes 194
through to 197 inclusive should not be modified from the
shipping default settings. These transaction codes are
not meant to reflect revenue nor are they intended to
appear on client transaction detail reporting.
See the Help pages for more detailed information.
The Payment Posting Options menu is where you define any
global automations that are to be invoked on Promise or Payment Plan accounts.
It is also where you decision whether you wish Auto-manage of Promises
to take place. If this is checked ON, then data entry of any transaction
will automatically advance promise dates in your Promise Contacts by the
schedule defined for that contact. You may also select contact plans to run,
for instance, when an account is paid in full, or a promised payment is missed.
Automatically close accounts, and set other related options.
WARNING: Data Entry personnel need to be aware in an auto-managed
promise site that if they delete a transaction and
re-enter it, they are advancing a collector's promise date.
They need to enter the Contact Tab and reset the promise
date back 1 cycle if they inadvertently jumped the collector's
promise date too far due to user error.
Commission Rate Tables is where you set up any special rate
tiers or contingency types for your clients such as rates by Age of the account in
your agency, rates by Listed Amount, rates by total amount Paid, etc. It is
important to set up special rate plans before entering the client that will
need to use said special rate in their Advanced Settings screen. See Help topics
on Commission Rate Plans for more detailed information.
Payment Plan Setup is where you setup the transaction code
and contact plan defaults that your site will use when collectors invoke a
Payment Plan from a debtor screen. See the Help pages on Payment Plans for
more in-depth discussion.
Status Codes is the setup and storage of all Status codes
that your system shipped with. If there are any that are unique to your
site, you may enter them here. Shipping default codes may be used, changed
or deleted as per your sites needs.
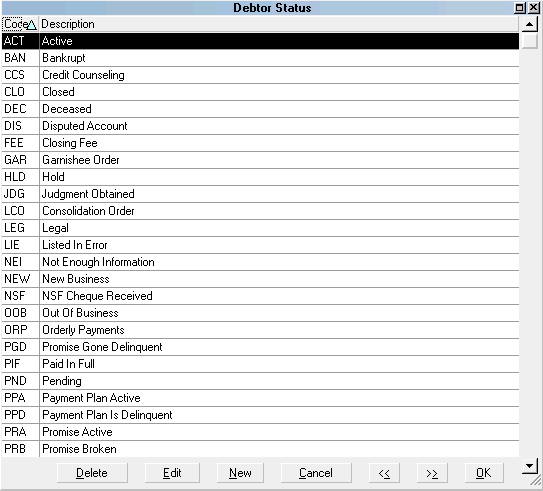
Debtor Status Codes
Contact Plans are the workflow automations you can set up
to assist your workplans and inventory management. The shipping defaults
are there for your reference and to serve as examples of how to make these
processes work. You may add, modify, delete these codes as per your site's
preferences.
Contact plans are the vectors you use to insert your dunning letter
series, insert telephone events so that the account will appear in
your collector's WIP list with a scheduled work date, set up Reviews,
initiate status changes, automate notes and other activities which
need to be scheduled for specific future dates.
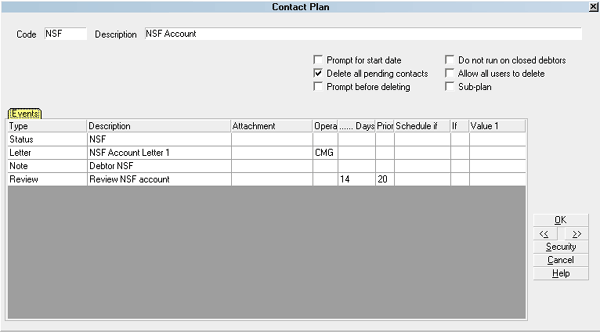
The Contact Plan form
Code
This is a short code for your reference.
Description
This is a brief description of the plan.
Prompt for Start Date
When setting up a contact plan, you may set this option to prompt
for a date.
Delete all Pending Contacts
You may set this switch to delete any pending contacts. This
commonly used when it is an automated account closure contact plan.
Prompt Before Deleting
This option will prompt if it is about to delete any pending
contacts.
Event
This is a list of events scheduled for this plan. Press F3,
Ctrl+N or click New to enter a new event to the workflow.
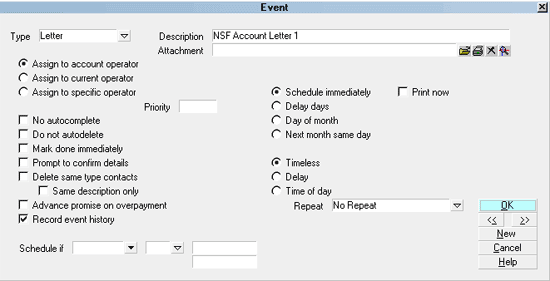
The Event screen/strong>
Type
This is the type of event - Letter, Phone, Review or other
activity such as modify Status.
Once you select the event type, there will be some which require
you to make another selection of the choices pertaining to that type.
Example: if you select Letter, you must click the drop-down arrow at the
end of the Description field to select the specific letter from the print
menu that you want the contact plan to send. If you select Phone as the
event type, you must click the drop-down arrow at the end of the Description
field to select which of the phones the contact is aimed at such as Home, or
Work. As this is a user define pick list, you may add to the choices.
Some event types allow a free-form entry in the Description field, such as
Review, Note and Promise.
Delay
You may enter a Delay period between the time and day when you assign a
contact schedule and when the given event is to occur.
For more in-depth Contact Plan details, see the Help pages.
WIP Options are the series of defaults you can set as a
global company standard or for individual collector IDs. These settings
will determine what degree of freedom (or not) or collectors have while
working their Work In Progress lists. See the Help pages or press F1 on
an individual switch setting to access more information.
Account Matching Setup are the defaults you will set
for your account grouping. These may be updated and modified as needed.
Additionally, if you have a client who has segregation security
requirements, it is also possible to adjust settings for individual
new business batches so that the grouping criteria is correct for that
batch, but which is completely different than the norm applied to other
clients. See Help topics on Account Matching for more details.
Company Details
Use this option to enter your company information and default
global settings. The company name/address/phone fields are
required in order for basic reports/letters and statements/ invoices
to output correctly.
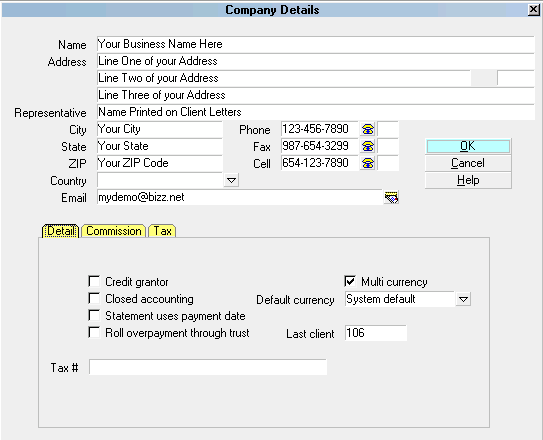
Company Details
Reports and Printing
Use this option to enter global printing settings, modify existing
reports/letters or to create new templates.
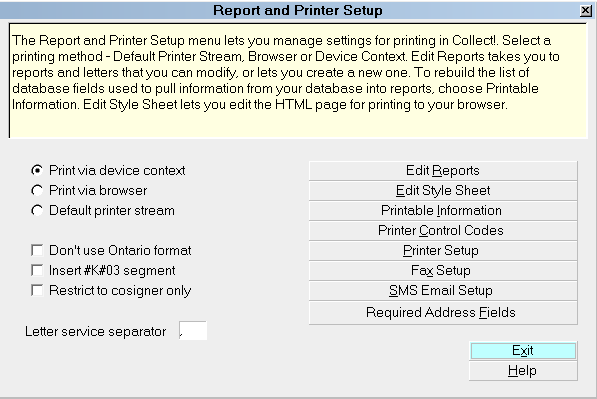
Report and Printer Setup
Security and Aliases
This option navigates you to operator setup, access rights settings,
user level setups and password defaults.
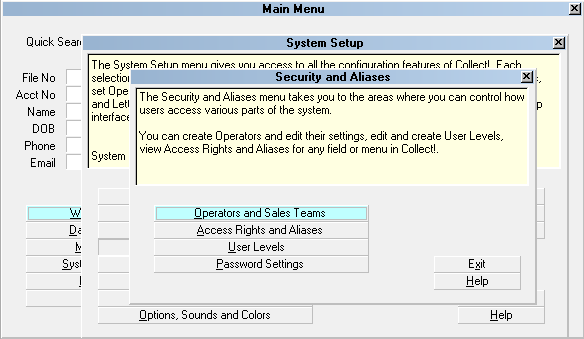
Security and Aliases menu
Database Preferences
This option lets you set global defaults for several system and
network settings.
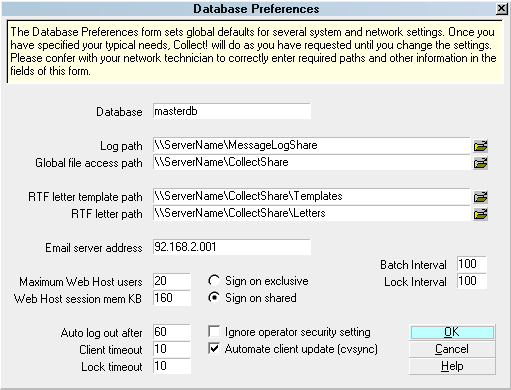
Database Preferences
Credit Bureau Reporting
This option lets you enter details necessary for reporting to
credit bureaus.
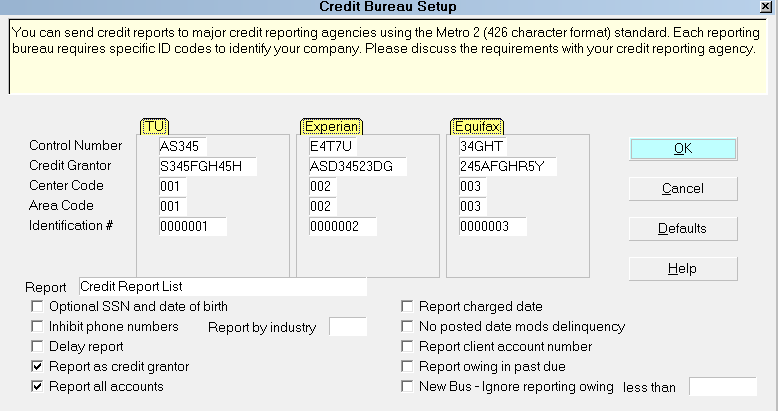
Credit Bureau Setup
Auto Dialer Setup
This option should not be confused with contact dialer functionality.
This feature is a dial-from- clipboard function which can be configured
with your phone system to allow staff to point/click an icon on debtor
or client screens and have their phones automatically dial the number
as it appears in the field. This saves time and the potential for
human error in manual mis-dials.

Auto Dialer Preferences
Options, Sounds and Colors
This option allows you to set a variety of software switches
that affect individual site preferences and pertain to defaults
affecting global operating of the software.
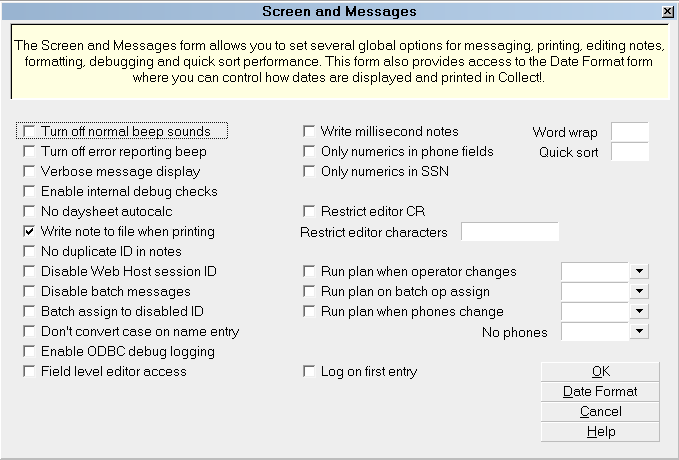
Screen and Messages

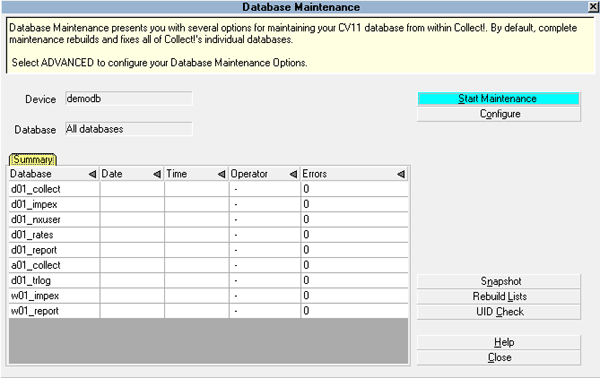
Database Maintenance
The Database Maintenance menu displays options for
all maintenance functions. For in-depth explanations
and details, see the Help pages for Maintenance topics.
Database Maintenance menu
Configure
Opens the Database Maintenance Options window and offers
you the choices of what steps may be run.
Snapshot
This option creates a copy of your core database files which
are saved in a compressed format in your Snapshot folder. It is
possible to unzip and restore a system from a snapshot. It is
not a replacement for a full system backup as the Snapshot folder
exists on the same disk as your program files. It is intended to
provide data rollback capability in the event of any issue which
compromises the working database, inclusive of end-user error.
Rebuild Lists
This option rebuilds internal meta data tables. Import definitions,
printable information and access rights lists are rebuilt.
UID Check
This option checks the integrity of your database.
Tools Menu
The Tools menu may most often be accessed by office
administrators and system administrators. Depending on the
size of the agency, one department may be responsible for
both sets of job tasks and thus, the Tools menu was created to
contain the items a blended department may require for their
day-to-day operations.
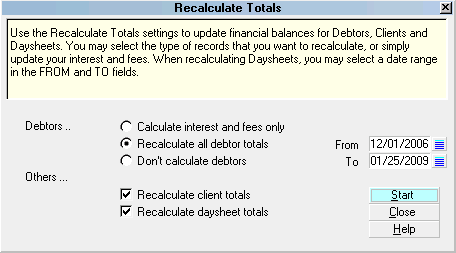
RECALCULATE
This option navigates you to the Recalculate Totals menu
where you may choose to update debtors, clients, and daysheets.
Recalculate Totals
Calculate Interest and Fees
This function scans through all debtors and processes
those with interest switched on. Interest is calculated
for all debtors with an interest rate and an interest
calculation Start Date defined.
The default is leaving this unchecked as the next option,
Recalculate All Debtor Totals has replaced it.
Recalculate All Debtor Totals
This function will recalculate all debtor balances for
accounts with an Active mode. Closed accounts are
not recalculated.
Recalculate Client Totals
This function will recalculate accounting totals for
all clients.
Recalculate Daysheet Totals
This function will recalculate all daysheet totals or
a selected date range of daysheets. Recalculating daysheets
updates the totals calculated for each date. The system
maximum for daysheet recalculation is 2 years.
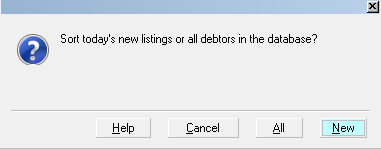
SORT ACCOUNTS
Debtors are automatically sorted in the master lists, but
not in the client lists. The Tools menu, Sort Accounts option
enables you to sort the accounts in your database by name or
client account number. If you have a client who has a preference
for one sort over an other, you can invoke the sort on that client
alone by entering the individual client's Debtors Tab and proceeding
with the Tools sort command.
Sort Accounts
The Sort Accounts command lets you choose between sorting only new
debtors or all debtors in the system. New debtors may be sorted as
they are entered daily. This will keep every client's debtor list in
the order that they prefer to see on reports or statements/invoices.
All sorts all accounts in the database.
New sorts only accounts listed today.
You are given the option of sorting by name or account
number.
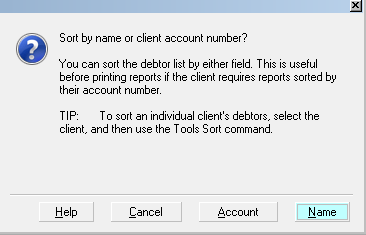
Sort by Name or Account Number
Account sorts by the debtor's client account
number.
Name sorts by the debtor's Name.
SCHEDULER
This is an add-on module which requires separate licensing. See
Help pages for in-depth reference and usage instruction.
UTILITIES
The Tools, Utilities sub-menu will be a resource for needed tools
from time to time, but does not contain anything necessary for
initial setup. See Help pages on Utilities for more in-depth
information.
System Menu
The System menu is access to many of the same features as
discussed above from the System Administration menu button.
Discussed in this section will be those options not offered
from the Systems Administration button, that are necessary to
review for initial configuration settings.
System Menu
Change Password
This option displays the Change Your Password popup window
where the operator who is signed in may enter a new password
to use the next time they login.
Company Details
This options was discussed previously and is required entry
material for reports/letters as well as statements/invoices
and checks to output correctly.
Rights
This option will pass you to side of sub-menus where you may
enter user, user level and access rights/permissions setups.
See How To Setup Operators in the Help pages for in-depth
discussion.
Layout and Languages
This option will pass you to side of sub-menus that access
permissions you wish operator levels to have in specific fields
and screens throughout the system.
The more direct method to altering user level permissions for
fields and screens is to right-click your mouse on the area of
interest that you wish to modify user permissions on. This will
open the Access Rights screen specifically for that area and
eliminate the need to scroll through a long list of field and
form level entries. Excepting where permissions are being
increased or decreased within a full menu of items, most needs
will be met by the right-click method. If you do not achieve the
desired result, it is possible that multiple fields require
modification to achieve the singular result. Consult the Help
pages or contact Tech Support for advice.
Financial Settings
This option was discussed previously and takes you to setup
areas for Transaction Types, Payment Posting, Commission Rate
Plans, Payment Plans and Credit Bureau setups.
Contact Management Settings
This option was discussed previously and takes you to setup
areas for Status Codes, Contact Plans, Work In Progress,
Account Matching and Auto Dialer setups.
Network and Environment
This option takes you to Network, Archiving and Database Change
Logging configuration, Web Host Security settings and Messaging.
The side sub-menus have uses for systems administrators. If you
are getting messages that there are users being refused logins
because there are not enough licenses but you know you have enough
licenses to cover all your users, you can verify whether some users
may have multiple sessions open by clicking Active Users. This will
display a window showing all current sessions open insofar as the
RDS Server is concerned. If you see multiple sessions for any
users, you can ask them to logout of the extra sessions they have
open to free up user login license space. You also have the ability
to prevent users from having multiple logins at the Operator setup
level. See Operator topics in the Help pages for details.
Diagnostics
This option will primarily be used when you need to view the
Application Log or the Credit Bureau Log. These are not necessary
for the initial setup of your system. See the Help pages on the log
topics for more details for later usage in areas of tracking and
troubleshooting.
Software License
This option displays the details of your licensing agreement.
Send Database via FTP
This option enables you to send database files to Collect! for
technical support.
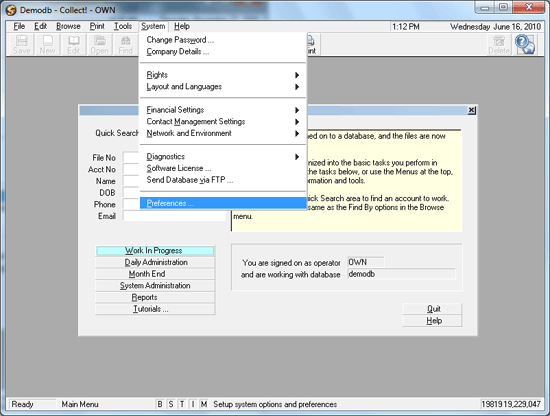
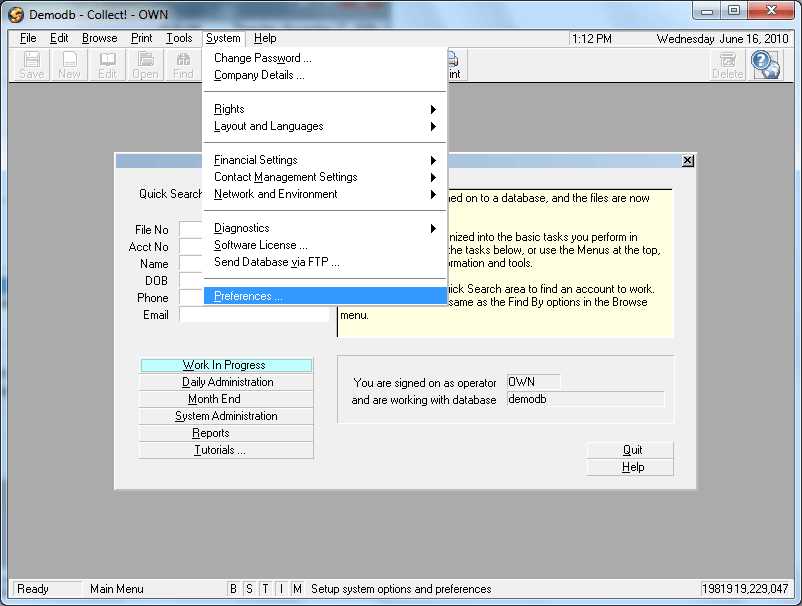
Preferences
This option opens the System Setup sub-menu, all options of which
were discussed previously.
System Security
Collect! has multi-tiered security features which allow
you to control both the access and degree of access
your users will be granted within the system.
The permissions hierarchy is determined by;
1. Operator Type
2. Operator Security Switches
3. User Level
4. Access Rights on Menus, Forms and individual Fields.
The software ships with a series of pre-set logins which
are configured with default settings as examples of what
each general type permits. These logins match general
duties such as junior or senior collector, data entry,
office manager, etc. You may modify permissions on the
default Levels to meet your individual site needs OR,
as we recommend, make copies of the defaults and THEN
modify. This latter allows you to retain a working
exemplar of the default settings in case needed at a
later date.
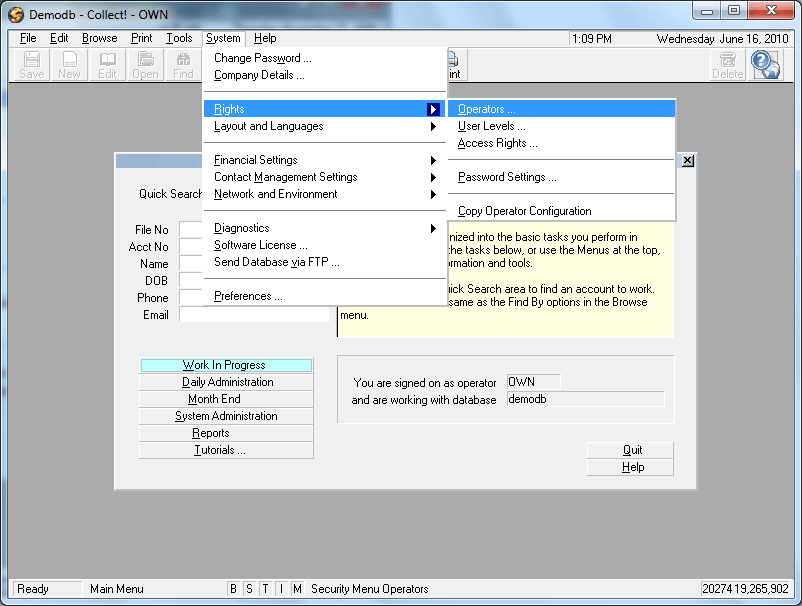
To access user setup menus, select System from the top
menu bar and then select Rights from the drop-down choices.
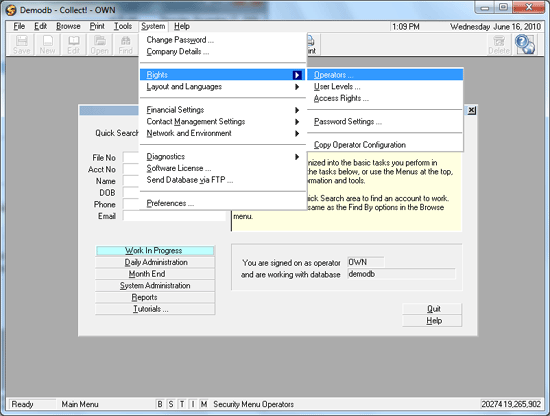
The System Menu - Rights
Operators
This option lets you create and edit logins. It is where
you select your user Type which predicates menu access, enter
user ID/name and other internal contact details, assign special
security controls such as account or portfolio restriction,
password controls, team membership, session permissions and
and experience level.
User Levels
This option ascribes a set of user permissions which dictates
what menu combinations a user will be granted access to. Each
User Level contains pre-configured settings that are by design
intended to allow general permissions relative to job duties.
You are able to expand or tighten the permission degrees to
suit your individual site preferences. Permissions on menus,
forms and fields are in the 4 categories of Full, No Delete,
Read Only or No Access.
Access Rights
This option lists all forms and menus in the system. It
shows which user levels are allowed to access them and
what the current degree of access is; Full, No Delete,
Read Only or No Access.
Password Settings
This setup screen allows you to stipulate Password
standards for number of characters, numeric/special character
requirements, lock-out after "X" failed attempts and renewal
frequencies. If your site does not require tight security to
meet internal or client directives, these settings do not
need to be defined.
The links below provide detailed instruction on setting up
Operators, User Levels and customizing Access Rights.
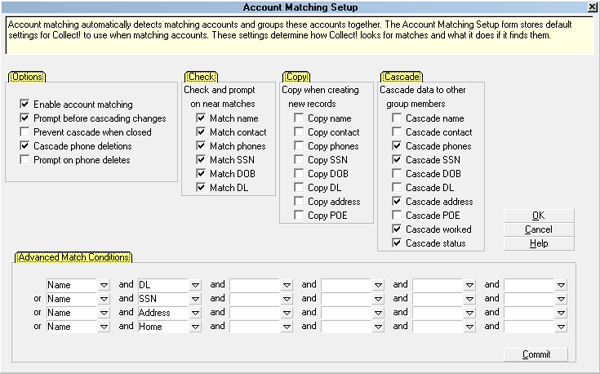
Account Matching And Grouping
Accounts can be grouped together automatically and
manually, and can optionally share information so that
when you make a change in one account the change
also appears in other accounts in the group. It is recommended
to review the shipping defaults and make any changes that are
necessary to accommodate your individual site's needs.
The Matching Account setup screen is located on the menu path
"System\Preferences\ Plans and Reference Tables\ Account Matching
Setup".
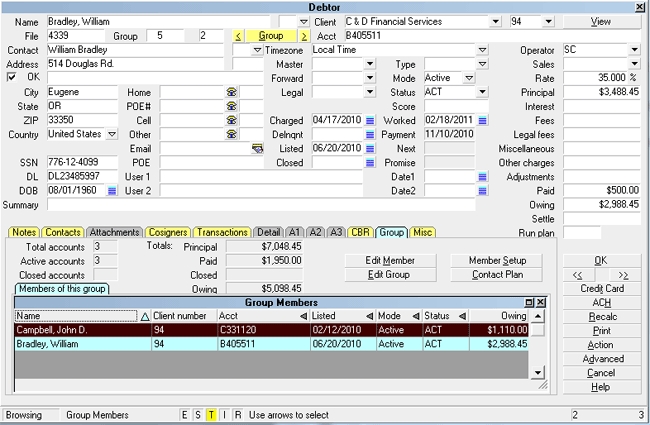
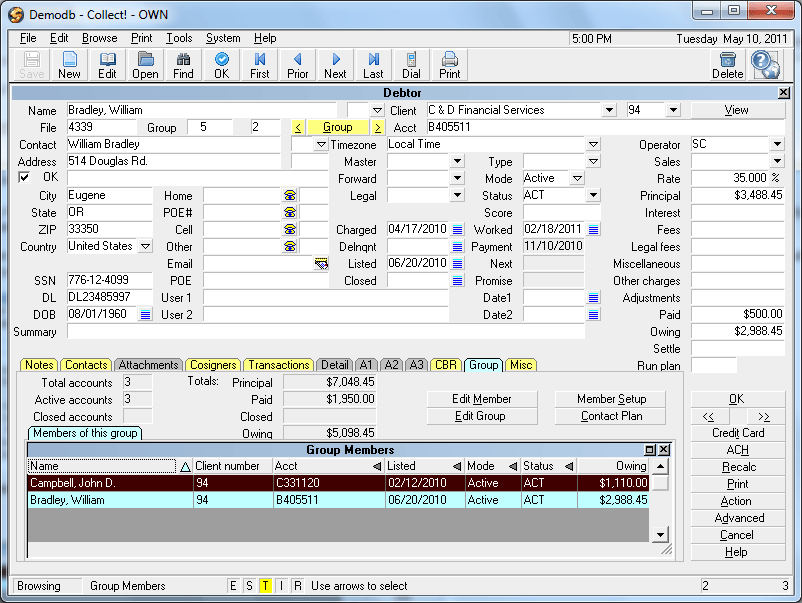
Matching Accounts
When you are on any member of a group, you have instant
access to other members of the group, plus a summary of all
accounts in the group.
Account Matching Setup
 Account Matching Setup" /> Account Matching Setup" />
Account Matching Setup
| Turn on this switch | To enable this function |
|---|
| Enable account matching |
This is a master control to turn on and off the
automatic account matching functions when entering new debtors. |
| Prompt before copying |
Adds an extra prompt before cascading changes
across to other group members after you've made changes to a debtor
within a group. |
| Check and prompt on close matches |
When you enter data into a checked field, Collect!
searches the database for a matching record or a close match. You can
choose from the matching list to group the new and old
records together. |
| Copy when creating new debtors |
When you group debtors, you can control which
fields are copied from the existing debtor to the new debtor. Check
the fields that you want copied. This setting requires
consideration and caution. Once enabled, it will overwrite data
fields on other accounts potentially preventing more current information
from being introduced since existing data may be invalid and new,
incoming data may be more current. |
| Cascade data to other group members |
When you make a change to selected information
on a debtor that is a member of a group, you can have the system
automatically update other members of the group. Check the
fields that you want to be automatically updated. |
Beyond The Basics
More in-depth and advanced topics are listed below:
| Feature | Usage |
|---|
| Report Writer |
Our built-in Report Writer offers flexible
output, including graphics. |
| Archiving |
Old accounts may be moved easily to the
archive database to free up space and improve performance. |
| Messaging |
Instant operator messaging may be
used to alert your operators to special conditions. |
| Web Host |
This access portal can be used by your clients
for on-demand review of accounts they have listed with your
company. It provides a secure portal that ensures portfolio
segregation on a client by client basis. It is also possible to
configure logins for your staff to work from home needing only
an internet connection in order to utilize this portal. |
| Credit Bureau Reporting |
This is an add-on module which allows your
company to report collection items to Trans Union, Equifax and
Experian. |
| Automatic Scheduler |
This is an add-on module which enables you to
pre-schedule a variety of tasks to take place unattended, freeing
up your staff to take on other tasks. Tasks which may be configured
to run on prescribed days and times include reports, imports,
recalculating totals, archiving, database snapshots, maintenance,
letter batch printing and more. |
| TCN Service |
You can schedule call campaigns and
process results using Collect!'s batch processing. All you
need is an account set up with TCN and the add-on import
module. |
| Billing Tree |
This add-on module is an integrated interface
to the payment processing provider Billing Tree which allows
you to process Credit Card and ACH payments electronically. |
Designing Letters And Reports
You can design your own reports and letters to print from
Collect! in addition to modifying external reports that ship
with the software or which have been downloaded from the
Member Center.
To Edit Reports And Letters
1. Click the Print drop-down menu from the top of your screen.
2. Select Customize Printing, then Edit Report Templates.
3. Select the report or letter which you wish to edit and click on it
to open it, OR click New to open a fresh report template to be designed.
Your F3 key can be used as a quick key to create a new template.
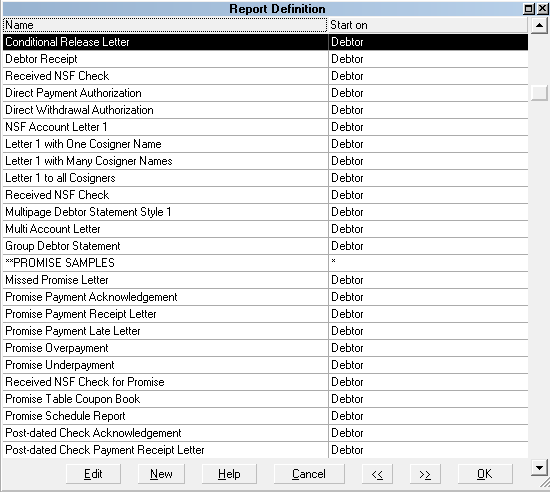
Selecting A Report
Reports can print any database information co-mingled with
static text and graphics. You can also choose font types and
size to output in your created documents.
 For best results, consult the Help documentation for
detailed assistance with Report Writer Topics.
For best results, consult the Help documentation for
detailed assistance with Report Writer Topics.
To add a field code, date, page break or formatting code, place
your cursor where you want the item to display or occur and
press F2. Key in the parameter you wish to place or select a
printable field code from the list pop-up you receive after
pressing F2.
Flexible Queries
If you need to create an ad hoc report and wish to manipulate the
data yourself in a spreadsheet environment, you can Browse any of
the record types stored, use the Find feature to include or exclude
records based specific criteria then Quick Print to results out to
spreadsheet. For example, Collect! will display all debtors with a given
status or all contacts on a certain date or, it will list all clients
with less than 10 accounts, and whose listings total less
that $10,000. Once you have entered your selection criteria
and reduced the list, you can print reports on just the
selected records.
Here is an example:
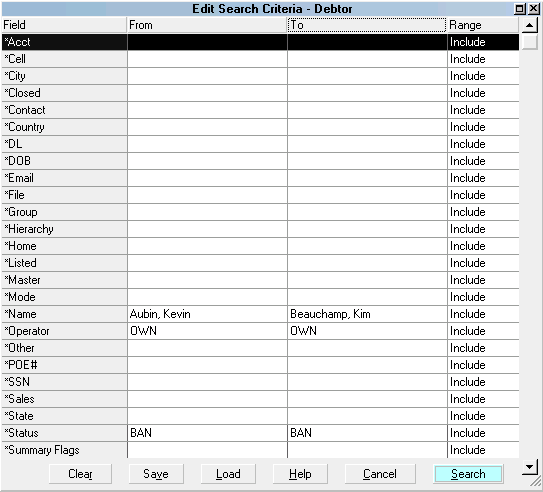
Edit Search Criteria Query Screen
Adding Or Changing Pick Lists
Pick lists give you a list of choices to pick from when you
enter data into a field. When you pick an item in the list, it is
entered into the system as if you had typed it. You can
assign pick lists to virtually any field on any main screen.
To Add Or Change A Pick List
1. Click the field you want to edit.
2. Choose Field Properties in the System, Layout and Languages
menu.
3. Double-click the Pick List File field in the displayed
form and follow the instructions displayed on your screen.
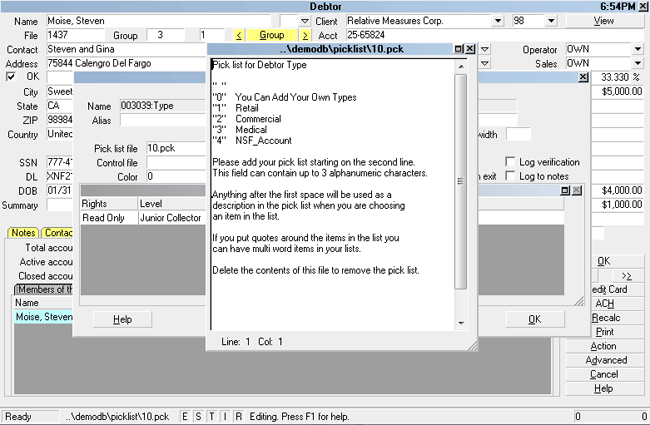
Editing A Pick List
To get even more flexibility from your pick lists, add a
blank item that you can type information into.
In the list add the item " " at the bottom of the
list. There must be a space between the quotation marks.
Changing Field Labels
If you wish to rename a field on a debtor or client screen to
reflect what is most meaningful for your site, this may be
accomplished by renaming it with an Alias field label. For
example, if you want to rename the debtor screen User 1 field
to be OrigCred to stand for Original Creditor, the steps are as
follows:
To Change Field Labels
1. Mouse into the field you want to edit and right click.
2. You will get a pop-up window with one option being Properties.
Click Properties to open the Access Rights pop-up.
3. In the upper right corner beneath the actual field name, is a
field called Alias. Input the new field label you want to have
displayed on screen in the Alias field, then click the OK button
to save your change.
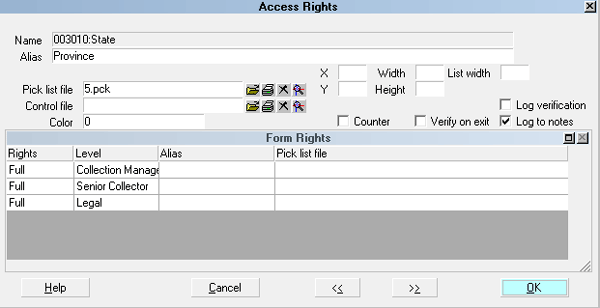
Changing A Field Label
 A relabeled field retains its original field name and
printable field code when being called upon in the
body of a report or letter. For example, if you
wish to have the User 1 field from the debtor screen
be expressed in a letter after you renamed it to be
OrigCred, you would still use the code @de.u1 to
get output in your letter.
A relabeled field retains its original field name and
printable field code when being called upon in the
body of a report or letter. For example, if you
wish to have the User 1 field from the debtor screen
be expressed in a letter after you renamed it to be
OrigCred, you would still use the code @de.u1 to
get output in your letter.
See Also
- Setup Topics
- System Administration Topics
- Database Topics
- Database Maintenance Topics
- Networking Topics
- Management Topics
- Operators
- Access Rights Topics
| 
 Account Matching Setup
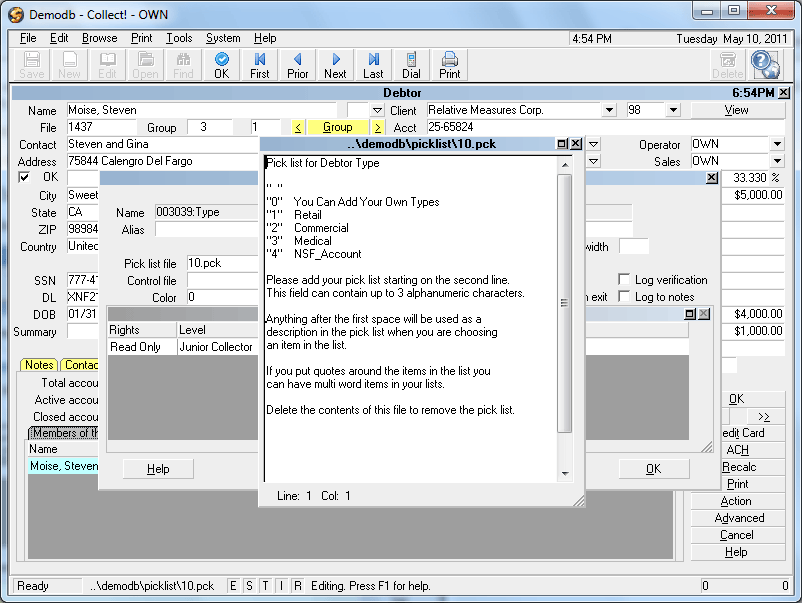

Was this page helpful? Do you have any comments on this document? Can we make it better? If so how may we improve this page.
Please click this link to send us your comments: helpinfo@collect.org