Event
The Event form is used to define actions executed
when a contact plan runs. Each Event in a contact plan
schedules a contact with the settings you choose in the
Event form. The Event form displays fields and pick lists
for all the possible settings, allowing you to create any
type of contact.
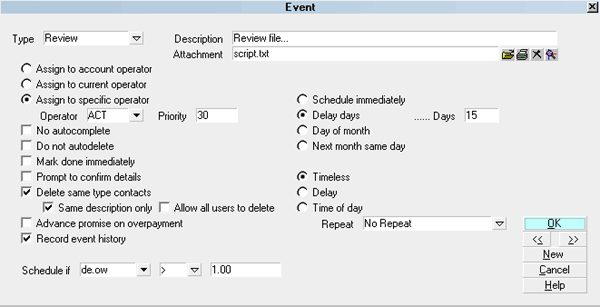
The Event form
You can define letters, phone calls, file reviews, status
changes, promises, post transactions, write notes to the
Debtor record, or make one or more changes to a Debtor
record. You can activate or close an account, assign
accounts to an operator, set a commission rate or plan.
You can even cause another contact plan to be executed
on some future date.
Events can be scheduled to occur on certain dates.
You can set the number of days delay before an Event
in the contact plan occurs. For example, you could
schedule Letter 1 to be sent today, and Letter 2 to be
sent in 10 days, based on a condition you set.
The Event form is accessed through the Contact Plan form.
To activate the Event sub window, click into
the Event sub window, or press F5. If this is a new contact
plan and there are no events showing in the list, you
will be prompted to create one. Select YES. If there are
events showing in the list of an existing plan, you may
select an Event to view, or press F3 to create a new one.
Type
The Type field sets the type of contact Event that you
are scheduling. Press F2 or select the down arrow to
view the list of contact types that you can choose.
The Type of event determines a general action. For
instance, Letter means print a letter, while Operator
means assign an Operator to the account. Other
settings on the Event form define the details, such as
which letter to print, or which Operator to assign to the
account.

Event Types
There are several kinds of events, one for each type of
contact in the system.
Basically, Event Types fall into two groups:
Operator Assisted Contacts, such as
phone calls, requiring Operator intervention. These
will appear in the Operator's Work In Progress
To Do List.
Automatic Contacts, such as letters, which are
automatically processed by Collect! in batches.
Please refer to the Help topic Event Types for
details about entering settings for of the many
types of events.
Description
The Description field defines the details of the Event.
The functionality of the Description field changes
depending on the Type of Event that is chosen. For
example, if you schedule a Letter Event, the
Description field becomes a pick list where you can
choose the letter you want printed from the list of
all reports in the system. Press F2 from the
Description field to display the list. For a Note Event,
you type the actual text that you want written to the
debtor's Notes into the Description field.
Please refer to each Event Type for details about
what to enter in the Description field for that type
of Event.
Attachment
This field may be used to attach a file to this contact
event. The field will hold a short filename up to 12
characters, including the dot. (i.e. 12345678.123)
The filed entered here will be entered into the
Attachment field of the Contact that is created when
the Contact Plan runs.
When you attempt to open the attached file, Collect!
will look for a folder for the debtor in the ATTACH folder
in CV11\bin\global\masterdb\attach\debtor, provided you have
named a file that starts with the debtor's File Number.
For example, 1025.123, where 1025 is the debtor's File
Number and a file named 1025.123 has been placed in
the CV11\bin\global\masterdb\attach\debtor\1000\1025 folder.
If the file is not named with a debtor File Number, or
contains the phrase " email", then Collect! expects it to
be placed in the STYLES folder, for example,
CV11\styles\email5.txt.
Assign To Account Operator
Switch ON Assign to Account Operator if you
want this Event to be scheduled for the operator
who is assigned to the debtor. When the plan
is run on an account, the Operator ID from the
Debtor form is entered automatically into the
contact's Collector field. The contact will show
up in the account operator's WIP To Do List.
To switch this ON, select the radio button
next to this field to place a dot in it.
Assign To Current Operator
Switch ON Assign to Current Operator if you
want this Event to be scheduled for the operator
who is currently signed on. When the plan
is run on an account, the Operator ID of the
operator who is signed on is entered automatically
into the contact's Collector field. The contact will
show up in the current operator's WIP To Do List.
To switch this ON, select the radio button
next to this field to place a dot in it.
Assign To Specific Operator
Switch ON Assign to Specific Operator if you
want this Event to be scheduled for an operator
of your choice. When the plan is run on an
account, the Operator ID of the operator you
selected is entered automatically into the contact's
Collector field. The contact will show up in that
specific operator's WIP To Do List.
To switch this ON, select the radio button
next to this field to place a dot in it. The Operator
field will appear. Press F2 to select from the list
of operators.
Operator
The Operator field is visible only when you
switch ON 'Assign to specific operator'.
Press F2 from the Operator field to pick from
the list of operators.
Priority
The Priority field allows you to enter a priority
for this contact Event. Priority may be used to
organize your WIP List, or to alert an operator
to the importance of a particular contact. In
the WIP List you can easily display contacts
in order of priority.
Priority levels in the WIP List are as follows.
66 to 99 High
34 to 65 Medium
1 to 33 Low
No Autocomplete
In WIP Options, the setting 'Automatically mark
contacts done' can be set so that Collect! marks
contacts as Done when they are worked from the
WIP List. To override this global setting for a
particular contact Event, switch ON 'No
Autocomplete'.
To switch this ON, select the check box next to
this field to place a check mark in it.
Do Not Autodelete
Switch ON 'Do not autodelete' to prevent autodeletion
of this contact Event. This is useful for overriding events
in other contact plans with ' Delete pending contacts'
selected. There may be cases where you do not
want pending contacts of this type to be deleted
when one of your other contact plans is run.
To switch this ON, select the check box next to this field
to place a check mark in it.
 This also affects behavior when an account is
closed manually. Contacts with "Do not
autodelete" switched ON are not deleted.
However, Promises and Transactions will
be marked done when accounts are closed,
regardless of this switch setting.
This also affects behavior when an account is
closed manually. Contacts with "Do not
autodelete" switched ON are not deleted.
However, Promises and Transactions will
be marked done when accounts are closed,
regardless of this switch setting.
Mark Done Immediately
Switch ON 'Mark done immediately' to mark the contact
done immediately after it is created. This is used to
record an event in the debtor's history. For instance, you
might want to keep track of the fact that a phone
conversation was held on a particular day. The contact
will never appear in a WIP List.
To switch this ON, select the check box next to
this field to place a check mark in it.
Prompt To Confirm Details
Switch ON 'Prompt to confirm details' to allow the
user to check and edit details of the contact before
it is saved. This enables the user to change any
setting of the scheduled contact. For example, for
a Phone contact, the user might modify the Due Date.
Or, for a Transaction contact, the Amount may be
entered. For a Review, a particular Description might
be typed in.
To switch this ON, select the check box next to
this field to place a check mark in it.
This switch is ignored in batch processing.
Delete Same Type Contacts
Switch ON 'Delete same type contacts' to delete
any pending contacts of this same contact Type
when the plan is run. This is useful to prevent
mistakenly scheduling two same type contacts
for a debtor, or to update a certain contact to
the current date.
For example, if a debtor has a Phone contact
scheduled, you could create another Phone
contact when a Phone contact plan is run.
This might result in a second unintended phone
call to the Debtor. To make sure this doesn't
happen, switch on 'Delete same type contacts'
in your phone Event. When the plan is run, Collect!
checks the Debtor's scheduled contacts, and
any pending Phone contacts will be deleted
when the current one is scheduled.
To switch this ON, select the check box next to
this field to place a check mark in it.
Same Description Only
Switch ON 'Same description only' to limit the
pending contacts that are deleted when a plan
is run. Now the contact will only be deleted if the
Description in the existing contact is exactly
the same as the contact you are about to schedule.
This switch only works when 'Delete same type
contacts' is enabled. Same type contacts are
not deleted if the Description is not identical.
To switch this ON, select the check box next to
this field to place a check mark in it.
Allow All Users To Delete
Switch this ON with a check mark if you want to ensure
that this contact is deleted no matter who runs the
contact plan.
 WARNING: Careful! This switch overrides access
rights. That means ANY user level who runs
this plan will delete same type contacts on the
account, even if their access rights level does
not allow editing or deleting contacts.
WARNING: Careful! This switch overrides access
rights. That means ANY user level who runs
this plan will delete same type contacts on the
account, even if their access rights level does
not allow editing or deleting contacts.
Advance Promise On Overpayment
When you create a Promise Event, you can switch
ON 'Advance promise on overpayment' to control
how Collect! manages promise overpayments. The
corresponding switch on the Promise Contact will be
set when the contact is scheduled.
This setting causes Collect! to consider overpayments
of promises as prepayments against future promises.
For instance, if a Debtor promises to pay $100 per
month, and actually makes a payment of $200, the
contact's Promise Date will move ahead two payment
periods when the transaction for $200 is posted.
If 'Advance promise on overpayment' is switched OFF,
the Promise Date moves ahead only one period
whenever an overpayment is posted.
To switch this ON, select the check box next to
this field to place a check mark in it.
Record Event History
Switch this ON if you want Collect! to create a contact on the
account when this event is executed. This is useful for recording
the event as history on the account for reporting purposes.
Certain types of events, such as Letter, Review, Phone, Export,
Email and Other have this switch set to ON by default
You can also switch this OFF to prohibit creating a contact,
provided you are scheduling the event to occur immediately.
When scheduling events that do not occur
immediately, Collect! needs a contact to process
the event. Also, when scheduling Reviews, Phone
contacts and other events for your work queues,
Collect! needs a contact. In these cases where a
contact is necessary for your event to execute,
Collect! will switch ON Record Event History with
a Read Only check mark. This will ensure that a
contact is created as required.
Schedule Immediately
Switch ON 'Schedule immediately' to schedule the
Event as soon as you run the plan. The effect of this
depends on the Type of event. For example, if you
are scheduling a Review, the contact is created
right away for today's date. For a Transaction, the
Transaction is posted immediately. For a Plan within
the plan, the second plan is run immediately. For
Note, the debtor's Notes are written to immediately.
To switch this ON, select the radio button
next to this field to place a dot in it.
Print Now
Switch ON 'Print now' to print a letter immediately
as soon as you run the contact plan. This overrides
any delays set in the plan.
This switch is visible only when you are scheduling
a Letter Event and have enabled 'Schedule immediately'.
To switch this ON, select the check box next to
this field to place a check mark in it.
When you select "Print now," the "Create metafile"
check box becomes visible.
Create Metafile
Switch this ON to create and attach a METAFILE to
the Letter Contact when this Letter Event is executed.
This field is visible only if you have selected "Print now."
To create and attach a METAFILE, you
must also ensure that "Record event
history" is switched ON.
When a letter is printed via a "Print now" contact event
with the "Create metafile" switch enabled, the METAFILE
will be created and attached to the Letter contact, just as
it would if the report had been printed manually. This also
applies to letters printed to Email.
Collect! will not create a METAFILE if the
Client Settings switch "Disable metafiles" is
switched ON unless you are printing your
Scheduled Batch Letters.
No Note To File
Switch this ON with a check mark if you do not want
Collect! to print a line to the Notes when this Letter
event is executed. This will override the "Write note
to file when printing" setting in Screen and Messages.
This field is visible only if you have selected "Print now."
Delay Days
Switch ON 'Delay days' to schedule the Event to
occur a given number of days after the contact
plan is run. For example, if you enter a 7 day
delay, when the batch process is run on the
following Monday, the contact Event will occur.
To switch this ON, select the radio button
next to this field to place a dot in it. This will
make the 'Days' field visible. There you can
enter the number of days to delay the
Event.
You can further control this by switching ON 'Prompt
for start date' on the Contact Plan form. Then
the user will be prompted when the plan is run.
The date the user enters will be used as a reference
date. In the example above, the contact would
occur 7 days from the date entered by the user
when the plan is run.
Days
Enter the number of days to delay the Event, for
example, 30. This field is visible only when 'Delay days'
is enabled.
Day Of Month
Switch ON 'Day of month' to schedule the Event
for a particular day of the month. For example,
if you enter 15 as the day of the month, when the
batch process is run on the 15th of the month,
the contact Event will occur.
If the current date is after the 15th already, then
the Event is scheduled for the 15th of next month.
Since this is an absolute day of the month, it will
not be affected by setting the 'Prompt for start
date' for the contact plan.
To switch this ON, select the radio button next to
this field to place a dot in it. This will make
the 'DOM' field visible. There you can enter the day
of the month you want the Event to occur.
Dom
Enter the day of the month you want the Event
to occur. This field is visible only when 'Day of month'
is enabled.
Next Month Same Day
Switch ON 'Next month same day' to schedule the
Event for next month on the same day of the month
that the plan is run. For example, if you run the
plan on the 15th of November, when you run your
batch process on the 15th of December, the contact
Event will occur.
This is actually a very powerful control. Imagine a
contact plan with a Plan Event that calls the same
contact plan on the same day next month. This results
in a repeating contact plan. With conditional contact
scheduling as described below you can create a high
level of automation this way.
To switch this ON, select the radio button next to
this field to place a dot in it.
If a contact is scheduled to occur on
the 31st day of the month, and a month
does not have 31 days, the event will
occur on the last day of that month.
Timeless
This switch is ON by default. No specific time is
set for this Event.
To switch this ON, select the radio button
next to this field to place a dot in it.
Delay
Switch ON 'Delay' to schedule the Event to
occur after a given amount of time has passed.
For example, if you entered 1:00 in the time,
and you invoke this Contact Plan at 3:26:43 PM
or 15:26:43 hours, the resulting contact will be
scheduled for 4:26:43 PM or 16:26:43 hours.
We use a 24 hour clock.
To switch this ON, select the radio button
next to this field to place a dot in it. This will
make the 'Minutes' field visible. There you can
enter the number of minutes or hours to delay
the Event.
Minutes
Enter the number of minutes to delay the
Event. For example, 40 means 40 minutes,
while 1:00 means 60 minutes or 1 hour.
This field is visible only when 'Delay' is enabled.
The contact will be scheduled for the current
time when the plan is invoked, plus the number
of minutes specified here for delay.
Time Of Day
Switch ON 'Time of day' to schedule the Event
to occur at a particular time. For example, if you
enter 18:35 for the time, this contact Event
will be scheduled for 6:35 PM.
We use a 24 hour clock.
To switch this ON, select the radio button
next to this field to place a dot in it. This will
make the 'ToD' field visible where you can enter
the time of day for this Event.
Tod
Enter the time of day when you want this Event
to occur. The number of hours and minutes must
be entered in HH:MM format.
Time of day is in 24 hour format. In other words, if
you type 4 it's 4 AM. Type 16 for 4 PM, 18 for 6 PM
and so on. You can set the time to the minute. For
example, you could type 16:25 and the call will pop
up at 4:25 PM.
We use a 24 hour clock.
Schedule If
The 'Schedule if' field is used for specifying a condition
to base this Event on. Type in Collect!'s field code for
the field you want to use for your conditional test or
press F2 from the 'Schedule if' field to select from the
list of available fields.
Fields on the Debtor form work well for
setting conditions.
Please refer to Conditional Event Scheduling below
for important considerations when using this feature.
If
The 'If' field holds the condition that you are using
for your test. Press F2 when you are in the 'If'
field to choose from the list.
Your choices are:
= Equal to
> Greater than
< Less than
<> Not equal to
.. Within a range
>= Greater than or equal to
<= Less than or equal to
Value 1
Enter the value that the 'Schedule if' field is compared
to. When the 'If' field has "Within a range" selected,
the 'Value 1' field is the minimum value of the range.
This must be the same data type as the
field you are comparing to. Please refer
to Conditional Event Scheduling below for
further information.
This field has a character size of 10.
Value 2
Enter the maximum value that the 'Schedule if' field is
compared to. This field is visible only when the 'If' field
has "Within a range" selected.
This must be the same data type as the
field you are comparing to. Please refer
to Conditional Event Scheduling below for
further information.
This field has a character size of 10.
Repeat
The Repeat field allows you to automatically repeat
a contact Event. The repeat period is written to the
contact. Collect! reads it when the contact Event
occurs and forwards the contact to the next period.
This can be used, for example, to repeat printing a
letter or posting a promised payment. You can also
use conditional scheduling to determine whether or
not to process the Event. Repeat occurs when you
print a letter, post a promised payment or batch
process previously scheduled contacts.
Click the Repeat field to select a repeat period.
When you select a value, additional fields
become visible. When you select "Custom," the
Number of Days field becomes visible.
As of version CV11.6.2.9, the repeat intervals
of First Day of the Month and Last Day of the
Month are added as selections.
Max Intervals
This field is visible when you select a REPEAT
period. It will be written to the Contact and Collect!
will use it to determine the number of times this
Event is repeated.
Number Of Days
Enter the number of days to forward this contact.
When the contact Event occurs, this number of days
will be added to the Due Date of the repeating
contact. This field is visible only when 'Repeat' is
set to "Custom."
Create Copy On Repeat
This field is visible only when there is a value in
the Repeat field.
Switch this ON with a check mark to create a completed
copy of the Contact every time it is forwarded. This
allows you to track a past history of the Contact.
If the Contact is a Letter, Collect! will attach a Metafile
to the completed Contact if you have Metafiles enabled.
This switch is referenced when Promises are forwarded,
when previously scheduled transactions are batched,
when letters are batch printed, or when contacts are
worked through the WIP List.
This switch will also be referenced whenever you
process automatic contacts previously scheduled.
All automated types of contacts are handled. This
includes Activate, Commission, Rate Plan, Transaction,
Plan, Status, Operator, Sales, Edit, Note and Close.
Log Repeat To Notes
This field is visible only when there is a value in
the Repeat field.
Switch this ON with a check mark to write a line to the
debtor's Notes every time the Contact is forwarded.
The note is in the following format:
[Type] type contact [Description], due [Date] processed
by [Op ID]
This switch is referenced when Promises are forwarded,
when previously scheduled transactions are batched,
when letters are batch printed, or when contacts are
worked through the WIP List.
Promise
This field is visible only when the Event Type is Promise.
Enter a percentage amount for the Promise. Then
specify whether this is percent of Owing or percent of
Settlement.
 Promise Event
Of Owing
This field is visible only when the Event Type is Promise.
Select this to calculate the Promise percentage based
on the amount in the Debtor's Owing field.
Of Settle
This field is visible only when the Event Type is Promise.
Select this to calculate the Promise percentage based
on the amount in the Debtor's Settle field.
Delete
This button is visible only on the list of all Events. Select
this to delete the highlighted item from the list.
Edit
This button is visible only on the list of all Events. Select this
to open and modify the highlighted Event.
New
Select this button to save your changes and
open a new blank Event form.
Cancel
Select this button to discard any changes you made
and return to the previous form.
OK
Select this button to save any changes
you have made and return to the previous form.
<<
Select this button to go to the previous Event
in the contact plan's Event list.
>>
Select this button to go to the next Event in the
contact plan's event list.
Help
Select this button for help on the Event form and
links to related topics.
Conditional Event Scheduling
Conditional Event scheduling lets you put your own intelligence
into your contact plans. Events can be executed based on a
condition that you specify using the 'Schedule if' field on the
Event form. This feature gives you great flexibility and the
power to have Collect! make decisions for you automatically.
When you enter a SCHEDULE IF expression in the Event form,
the Event is evaluated based on this expression when the plan
is run. If the condition is not true, the Event is skipped.
To compare two fields of the same data type
SYNTAX: Schedule if: de.li < @de.ch
In this example, de.li is chosen from the pick list for
the 'Schedule If' field. Less than [<] is chosen from the
pick list for the 'If' field and @de.ch is entered manually
in the Value 1 field. Conditional comparisons only work
if both fields are the SAME DATA TYPE, for instance,
both dates, or both currency.
When using conditional scheduling, it is very important
to test your contact plan thoroughly so that you are sure
it is performing as you expect.
Fields on the Debtor record work well for setting
conditions. To conditionally create a contact based Client
number, don't use the code @cl.cl. Use @de.cl to reference
the Client associated with the contact's Debtor. The
code @cl.cl picks whatever the last Client's ID was, rather
than the Client belonging to the contact being processed.
Schedule If User Level
You can also schedule events to trigger on the User Level
of the Operator who owns the Debtor you are running the
plan on. Select os.ul from the Schedule
If pick list and for your criteria, use the number of the User
Level or range of numbers of User Levels.
Please refer to Help topic, Schedule If User Level for more
information.
 Examples of conditional events can be found in the
contact plans in the Demonstration database shipped with
Collect!.
Examples of conditional events can be found in the
contact plans in the Demonstration database shipped with
Collect!.
Also, please refer to the Help topic
How Collect! Executes Contact Plans Internally which
lays out the exact order in which events are executed
when a Contact Plan is run on an account. It makes a
difference if you are running complex plans!
See Also
- How To Manage Contacts
- How To Use Contact Plans
- How To Design New Contact Plans
| 
Was this page helpful? Do you have any comments on this document? Can we make it better? If so how may we improve this page.
Please click this link to send us your comments: helpinfo@collect.org