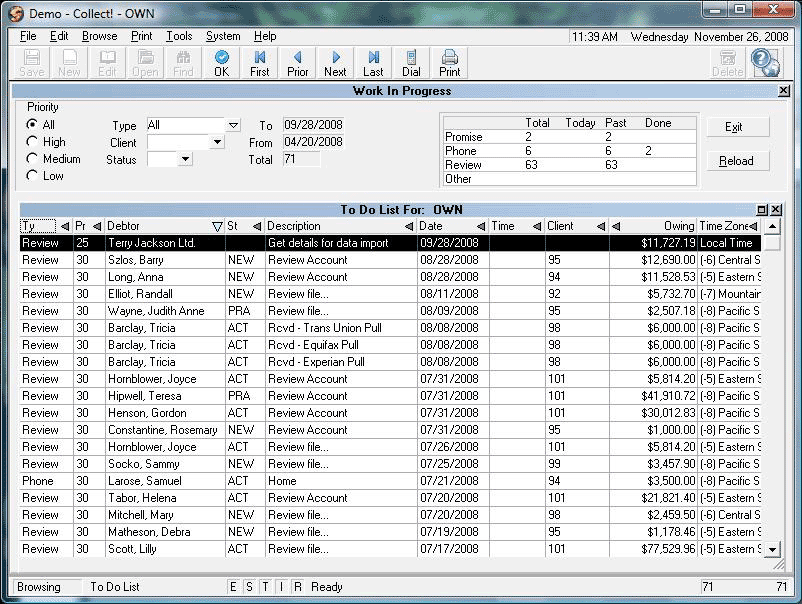
Work In Progress
The Work In Progress (WIP) list displays all the work one
operator has to do. If another operator signs on to Collect!,
this WIP List would display all of that operator's work.
The WIP List can show as many contacts as you need.
There are many possibilities for filtering the list and setting it
up to help you organize your work. It is very flexible yet
thorough and is directly linked to your entire web of contacts,
reviews, and follow-ups. Every contact scheduled for every
debtor is accessible from this list.
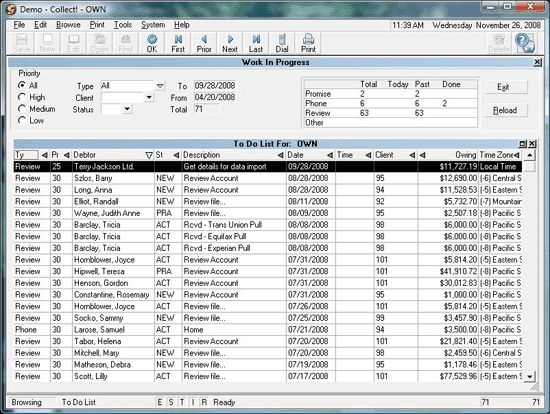
Work In Progress To Do List
 By default, contacts are loaded with today's date
at the top and then by oldest to newest dates. Contacts with
the same Date are subsorted by Priority, from oldest to newest.
Contacts with the same Priority are subsorted by Name and
then by Type. Timed contacts always go below normal
contacts and are sorted by Time.
By default, contacts are loaded with today's date
at the top and then by oldest to newest dates. Contacts with
the same Date are subsorted by Priority, from oldest to newest.
Contacts with the same Priority are subsorted by Name and
then by Type. Timed contacts always go below normal
contacts and are sorted by Time.
Selecting a column heading in the WIP List enables you
to sort and subsort contacts according to what you need.
You can also select choices to filter the list by Priority,
Status, Type or Client.
Supervisors may review the WIP List of any user by selecting
the RELOAD button.
If a debtor does not have a pending contact, they
will not show up on any operator's WIP List.
Accounts missing an In Progress Contact are
referred to as "orphaned" accounts.
There is an Internal report which can be located via the
menu path "Tools\ Utilities\ Orphaned Account Search" which is
designed to generate a report you can review on paper or to
file, and which offers you the option to assign these lost
accounts to one or more collector WIP lists with a Review
Contact containing the Description of "Forgotten".
Learning to use the WIP List efficiently is one of the best
ways to utilize Collect!'s robust contact management
aspects. There are so many possible ways of building
sub-WIP Lists to organize and arrange your work.
Contacts
Collect! calls every interaction that you schedule with your
debtors a "Contact." It some other systems this is referred to
as a "tickler."
Some types of contacts that can be scheduled include:
* Letter - Put a letter in the Daily Print queue to be printed and sent to a Debtor.
* Review -- Review a Debtor's account.
* Promise -- Set up promised payments from a Debtor.
* Phone -- Set up phone calls to contact a Debtor.
* Other -- Used for any purpose that you can think of.
For an explanation of all the contact types and help on
scheduling contacts for your Debtors, press F1 when you
are viewing the Contact form.

Contacts And The Work In Progress
Contacts are the backbone of the Work In Progress.
From this To Do List, you work your accounts by working
contacts. If you wish, you can build a sub-WIP List
by filtering the complete WIP List to show only
contacts meeting a certain set of criteria. Then you
can choose other criteria, and work those contacts.
Each contact has a date and time when it appears in
your WIP List, a type which indicates what type of Contact
you are dealing with, and a description of the Contact.
As you "work debtors" in your WIP List by "working" contacts,
you will schedule new contacts, and the contact you are
currently working will be marked as 'Done' to indicate that
you have completed the task. A contact that is 'Done'
disappears from the Work In Progress To Do List.
Only Active accounts appear in WIP Lists. Closed
or Suspended accounts do not show even if they have
contacts scheduled for the day. These modes are set in
the Debtor form's Mode field.
Loading Your WIP List
When you start your WIP List, all contacts that are
assigned to your ID will appear in your WIP List, based
on the settings used. A Debtor may have several
contacts assigned.
For example, a phone call could be scheduled for a
collector and then a few days later a review by a
supervisor. The contacts will appear in the WIP List
of the assigned person.
When you work an account, you run contact plans to
schedule contacts for your WIP List. When you use
contact plans, your To Do List is actively maintained so
that new contacts are entered into the list and appear
on the graph as they are scheduled, and completed
contacts are removed.
To view new contacts that fall into the criteria, reload.
By default, Collect! starts up by loading Promises,
Reviews, Others and Phone calls scheduled for today and
the past for your Operator ID from the database. You can
change load settings by selecting the Reload button.
List Of Contacts To Work
The part of the Work In Progress form that lists the contacts
is called the To Do List. Click on this list to activate it.
Each item in the list represents one contact.
You can select an item to view the complete details of the
contact, work the account, even begin a phone dialing
routine if you are setup for Auto Dialer.
 Click on black triangle at the extreme right of
any WIP field heading which shows this icon to
subsort your WIP list as per this column in ascending
or descending order.
Click on black triangle at the extreme right of
any WIP field heading which shows this icon to
subsort your WIP list as per this column in ascending
or descending order.
Work In Progress To Do List
Sub-WIP List
The upper left corner of the Work In Progress screen offers
quick filters by way of radio buttons under Priority and
drop-down pick lists under Type, Client and Status. Using
these filters can build a variety of sub-WIPs for the collector
to strategically work accounts in the order that is most
meaningful to each individual site.
Using these filters in combination allows the collector to
drill down even further when aiming to build a sub-WIP List.
Priority
Choose the priority of the contacts to display.
Choosing ALL ignores the contact Priority and
displays contacts regardless of Priority.
You can set a contact's priority level when you
schedule or edit a contact, and for individual
events within a contact plan when you set
up the plan.
Priority levels are as follows:
66 to 99 - High
34 to 65 - Medium
1 to 33 - Low
All
This selection displays ALL contacts regardless
of Priority. Choose contacts by priority to create
Sub WIP Lists. Press the Spacebar to select.
By default contacts are listed regardless of Priority.
High
Choose High to display contacts with Priority
from 66 to 99. Choose contacts by Priority to create
Sub WIP Lists. Press the Spacebar to select.
By default contacts are listed regardless of Priority.
Medium
Choose Medium to display contacts with Priority
from 34 to 65. Choose contacts by priority to create
Sub WIP Lists. Press the Spacebar to select.
By default contacts are listed regardless of Priority.
Low
Choose Low to display contacts with Priority
from 1 to 33. Choose contacts by Priority to create
Sub WIP Lists. Press the Spacebar to select.
By default contacts are listed regardless of Priority.
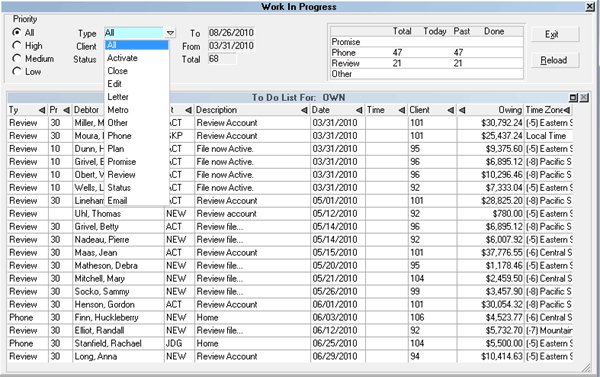
Type
Pick a Type of contact from the drop-down list
to filter for only contacts of that Type in your To
Do List. Use your Up and Down Arrow keys to
move the highlighted bar to your choice and
press the Enter key to select it.
If you can't find the contact types you are looking
for, select the Reload button and check the Types
you are loading by pressing WIP Filters to ensure
you have selected the Type you are attempting to
locate in your WIP list.
Client
You can create a sub-WIP List for a specific Client.
Simply select the down arrow to the right of the field
to select a Client. When you select a Client in the
Client list, your To Do List is automatically filtered to
display only contacts for that Client's Debtors.

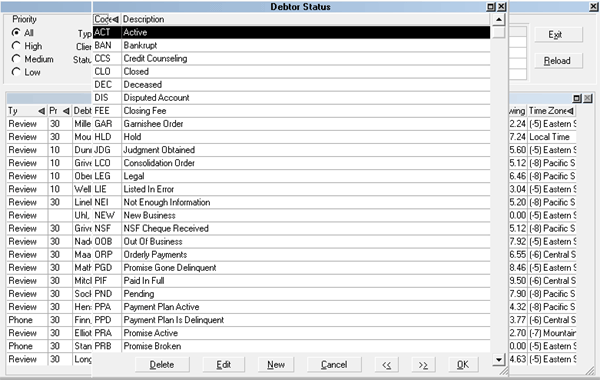
Status
Click the drop-down arrow to pick a Status Code.
When you pick a Status Code, the To Do list
will only display contacts with that specific
status. The list is updated as soon as you
make a choice.
To clear the status code selection, place
your cursor in the Status field and press
the Spacebar.
A yellow 'S' will display in the status bar at the
bottom of the Collect! screen, when the To Do List
you are viewing is a sub-WIP List and not the
complete list of contacts.
Date Range
You can view contacts scheduled for a single day,
or the date range of your choice.
This option is set in the Reload Work In
Progress List. Radio buttons are there to
select Contacts for today and past (i.e. priors),
Contacts for today only, Search all dates or
Search by Date Range.
The graph on the main screen of the WIP list
displays the Total/Today/Past/Done stats of
your current list.
From
This is the month of the earliest contact.
It's set to the first day of the month of the
earliest contact found.
To
This is usually today's date, and is the most
recent date the system has searched for contacts.
Start And End Dates
These dates are set automatically by Collect!
depending on the date range (see above).
When you change one of the dates, the other
will change appropriately, depending on the range
setting. Use the arrow buttons to the right of the
dates to change the dates.
Total
This field displays the total number of contacts
in your WIP List. This is the number of accounts
loaded into the list. The To Do List may contain
a Sub WIP, which will contain only some of the
items loaded based on your selection of Dates,
contact Types, Status and Priority.
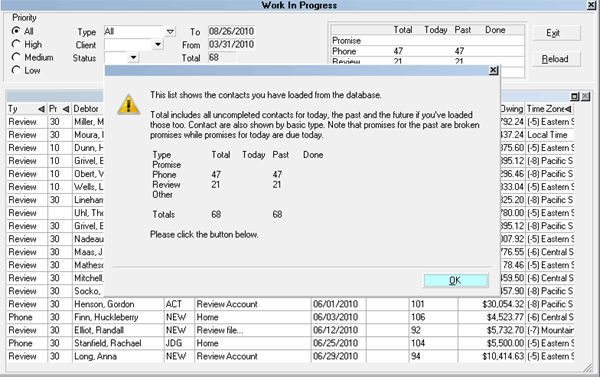
Graph
This list shows the contacts you have loaded
from the database.
Total includes all uncompleted contacts for
today, past, and the future if you've loaded
those too. Contacts are also shown by basic
type. Note that promises for the past are
broken promises while promises for today are
due today.
Work In Progress
The To Do List displays pending contacts assigned
to you. You can select which contacts are displayed
by choosing the various criteria shown at the top left
of the Work In Progress form or using the Reload
command. Press F5 to move to the To Do List and
then press the Enter key to open the Debtor form
associated with the contact or, select a contact to
open the Debtor form. Press F1 for help on the
To Do List when it is activated.
Press Escape to exit from the To Do List and move
onto the criteria selection controls in the top half of
the Work In Progress form.
Reload
Select this button to reload your current contact list
and load contacts for date ranges you specify, for
other operator IDs, for specific clients or other settings.
WIP Reload Filters and WIP Options are both accessed
through the Reload Work In Progress List form that opens
when you press the Reload button. You can also control the
behavior of the WIP List, for instance dial phone settings.
Exit
Select this button to close the Work In Progress form.
You will return to the Main Menu or the Welcome to Collect!
screen depending on your Access Rights.
If your supervisor has modified your system startup defaults,
a dialog may pop up stating that you have no rights to leave
this database.
See Also
- How To Start Using Collect!
- How To Use The WIP List
- How To Setup The WIP List
- How To Manage Contacts
- Reload Work In Progress List
- To Do List
- WIP Reload Filters
- WIP Options
- Auto Dialer Preferences
| 
Was this page helpful? Do you have any comments on this document? Can we make it better? If so how may we improve this page.
Please click this link to send us your comments: helpinfo@collect.org