How To Enter A New Client
If you are new to the system, we recommend keeping your
" Enable popup help" function ON while you are acclimating to
the system. It will help you become familiar with key Fields of
special importance so that you can make operational decisions
as to how your company wishes to use particular settings or user-defined
Fields with special properties.
On any screen, there are two types of online Help:
- Dynamic link to online Help Docs on our website.
By pressing F1 while clicked into a target field of interest on
your screen, you will see your web browser open and take you directly
to the spot in our online Help Docs which describes that field in detail.
You will find yourself on a page that relates entirely to the screen you are
working in. Links for additional pages of possible interest appear
at the bottom of the page you are taken to, if applicable.
- Popup Help screens. This requires that you
have your online Help function enabled via the menu path
\Help\Enable Popup Help. To use Popup help, allow your mouse
to hover a few seconds over any field, and a help box will appear on the
screen with information about that field or screen you are on.
To disable popup help, click the menu path "Help\Disable popup help".
Before you are ready to enter the Client into your system,
there are preliminary key details about your Client's operational
preferences that must be determined and decisioned within the
software prior to data entry of the Client information.
For example:
1. What are the contingency terms?
- Commission rate plan structure
- Legal/collection cost handling
- Remittance type Net/Gross/Combined
- Remittance Schedule Monthly/Weekly/Biweekly/ Daily
- New or different regional taxes to be applied
2. Are there specific Securities or Portfolio staffing mandates?
- Portfolio isolation
- Multiple accounts group within Client only OR across full database
- Collectors for the project are general or project-specific with
security settings
3. Are there custom letter or report requirements?
4. Do they intend to assign accounts on manual listing sheets OR
will they be giving you a text or spreadsheet file for electronic
data import?
5. Do they require electronic reporting, such as payment or
account activity data files in a specific layout from you on
a fixed or ad hoc basis?
6. Do they require a realtime login to your system to review/audit
their own Debtor accounts?
7. Will their accounts be reported to the Credit Bureau(s)?
8. If your Agency uses an Electronic Payment Processing
company for Credit Cards or ACH checks/debits, does the
Client permit or prohibit convenience fee charges?
9. Are there contractual workflow requirements or guarantees for
frequency of:
- Account activity
- Manager review
- Compliance audits
10. Do any of these requirements necessitate the creation of
Client-specific Contact (Action) Plans to ensure that workstandards
with Milestone Triggers reach the key personnel responsible for those
functions?
The answers to these questions determine how the Client is set up
in the system and what areas of the software will require
specific configuration to meet the Client's needs as well as Project
Requirements.
 Many default Operator IDs, Letters and Contact Plans
ship with Collect!. Upon review, you may find that these
provide the building blocks you need to get
started, OR, that you have a need to modify
these stock shipping items to suit your specific
operational needs. New items can be created and
changes can be made as needed.
Many default Operator IDs, Letters and Contact Plans
ship with Collect!. Upon review, you may find that these
provide the building blocks you need to get
started, OR, that you have a need to modify
these stock shipping items to suit your specific
operational needs. New items can be created and
changes can be made as needed.
 It is your responsibility to ensure that any letters
you send to Debtors or contact plan automations
you enact with the system are compliant to
legislation and regulations in your region with
respect to format, content and actions launched.
SAMPLE letters shipped with Collect! or available
on the Member Center are SAMPLE only and intended
to be rudimentary templates for your own
modification(s).
It is your responsibility to ensure that any letters
you send to Debtors or contact plan automations
you enact with the system are compliant to
legislation and regulations in your region with
respect to format, content and actions launched.
SAMPLE letters shipped with Collect! or available
on the Member Center are SAMPLE only and intended
to be rudimentary templates for your own
modification(s).
How To Enter A New Client
Having gathered all the information that you will need
to completely configure your new Client, you
can proceed with their entry into the system.
- If you have not yet created your own login, sign into
the system with the login ID "OWN" and the Password "own".
The password is case sensitive. This login ships with the
system and is available when you receive the product. It
is configured with Level 10 set of access
rights/permissions.
- Click the menu path \Browse\Clients from the
menu bar at the top of the screen. This will display the list of all
Clients in your database. Press F3 or the NEW button at the
bottom of this list to open an empty Client setup screen.
The Client Number field fills itself as the system
keeps track of what your next available number is. It is important
to make sure you don't allow duplicate Client Numbers. This
will cause data integrity corruption because the database will
have no way to distinguish between the two unrelated Clients
and the data for both of them will be intertwined.
- Fill in the business information that you have for this Client
along the left side of the screen. Navigate through the basic
intake Fields using your TAB or ENTER keys.
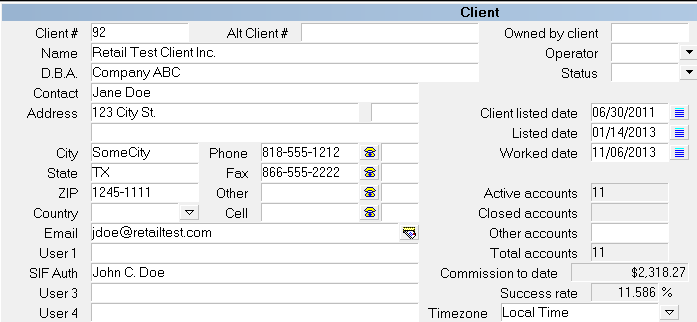
When you are done entering in your basic intake information, your
screen should look like this:

Client Basic Intake Information
The following are descriptions of Fields with special characteristics
or usages in Collect!:
D.B.A.
This acronym stands for "Doing Business As". Some Clients have
a corporate name to whom you are contracted but operate under
a trade or business name that is different. Use this field to
store that information.
If your Client uses this field and it is to be displayed in
Client reports and remittances, you must make sure that the field @cl.dba
is expressed in the requisite documents. Similarly, if your Client
requires that their name be fully expressed with the corporate name
and the D.B.A. trade name, then you must make sure that any letters
you send to their Debtors contain the Printable field Code @cl.dba beside
the field Code which outputs the Client name (@cl.na) for every
instance in letters you generate to their Debtors.
Contact
Use this field to input the name of the individual who is the
primary contact inside the Client company to communicate with
your Agency or receive statements/reports issued to the Client.
Remember to edit your reports to include an "Attention: @cl.co<"
line if you wish your reports to show an individual's name
with the company name/address that mailings are to be
directed to upon delivery.
User 1 to User 4
These are free-form Fields which you may use for
any purpose you require. You can relabel these
fields by mousing into the field of interest and
right-clicking. The popup offers you the highlighted
choice "Properties". Enter or click on selection
to enter the Access Rights window for this field.
Relabel the field by entering what you want to display
in the "Alias" field.
In the following example, the User 2 field was renamed
"SIF Auth" to indicate that a separate individual for
this Client is to be contacted for settlement authorizations.
User 2 Field Aliased as SIF Auth
The User 1 field is a 'special properties' field.
If one of your clients has multiple client numbers and wishes to
have access to your system to view ALL of their accounts, then the
User 1 field will be spoken for by the software for use as the
Group Client code which will need to be input into your system. For the
purposes of this example, this means that you may wish to hold this
field unused as a standard in the event you will be giving your clients
access to your system to view ALL of their accounts with a single login.
For more information on Client Groups and how this relates to the Client
and Operator setup windows, see the Help Page "How to Add a User To Web
Host", specifically "Add a Client Group" for more details. The
User 2 to 4 fields on the Client screen are not tied or committed to
any other system functionality and are open for site specific user
defined entry.
Owned By Client
Use this field when you have a Client which has multiple Client
Numbers in your office and they require any of:
- A single Invoice/Statement and Check for all their Client
Numbers.
- A single report to reflect inventory reporting, performance
metrics or other data that is compiled from information being
derived from multiple client account numbers sources.
Timezone
Collect! ships with embedded control files (scripts) that
read the area code of phone numbers on file for Clients
and Debtors. This logic will constantly make the comparison
between what is the timezone known constant for your location
and the Client (or Debtor) now on the screen. Your calculated
local time for the Client (or Debtor) currently on your screen
is displayed in title bar of the active window, on the extreme
right side. The title bar is the color tinted stripe which says
"Client" (or "Debtor").
Type
If you will be sending this Client's Debtors to any of the Credit
Bureaus, (Equifax, Trans Union or Experian), it is required that you
set the "Type" field in the upper right corner of the screen by
selecting one of the choices in the pick list.
These choices should NOT be modified as they represent
all the VALID Creditor Classification types that are defined by,
and recognized by the Credit Bureaus for reporting in a standard
Metro2 file format.
General Figure and Financial Fields Visible
As you complete the basic intake information on the left hand side
of the main Client screen, you will note that the Financial Fields
on the right hand side of the screen appear greyed out/Read Only.
They are blank this way when you do not have any Debtors entered.
It is recommended to run the batch process Recalculate
Client Totals daily to keep your figures up-to-date on-screen.
It is also possible to recalculate an individual Client ad hoc
by clicking the Recalc button in the lower
right corner.

Additional Setup Screens And Button Functions
In the lower right corner of the main Client Screen, you will
see a bank of buttons. Their purpose and general operation is
described as follows:
OK
Click here when you have completed entering all your Client
information to save any new or updated information you have
entered.
<< AND >>
The double arrow buttons will quick key you to the next Client
forwards and backwards in your Client list.
Recalc
Click this button to initiate an individual Client figure
recalculation of all financial Fields on the Client screen.
It is recommended that you update your Client figures
regularly but in particular, before running reports or
letters which will draw upon the data in the Client
stored figure buckets. This may be done as a batch
process through the menu path
\ Daily Administration\ Daily Batch Processing\Calculate
All Totals\Recalculate Client Totals. Examples of
processes that affect financials that require process Recalc
are new business entry, mass closeouts, writeback reports used
to adjust commissions.
If you prefer keyboard navigation to mouse point/click, then
observe which letter is underlined when entering menus or needing to
make a button choice. The letter in the item title that is underlined
is a quick key to enter the menu or screen. Quick key options are not
case sensitive. Example - to fast path into the Daily Administration
menu from the Main Menu, keyboard "D" or "d".
Advanced Client Settings
The Client Settings screen contains the many software switches
and preference settings that will determine how Collect! manages
this Client's data. Having these preferences auto-managed
streamlines your operations, optimizing both time efficiency
and quality control.
The Advanced screen must be completed before you begin
entering new Debtors.
Setting entries or updates made to Clients do not retroactively
update the Debtors already in the system. Instead of trying to
find a mass process or create a custom writeback report
after-the-fact, better to make sure you have thoroughly entered
all the requisite information for this Client from the outset.
The Advanced Settings Screen looks as follows:
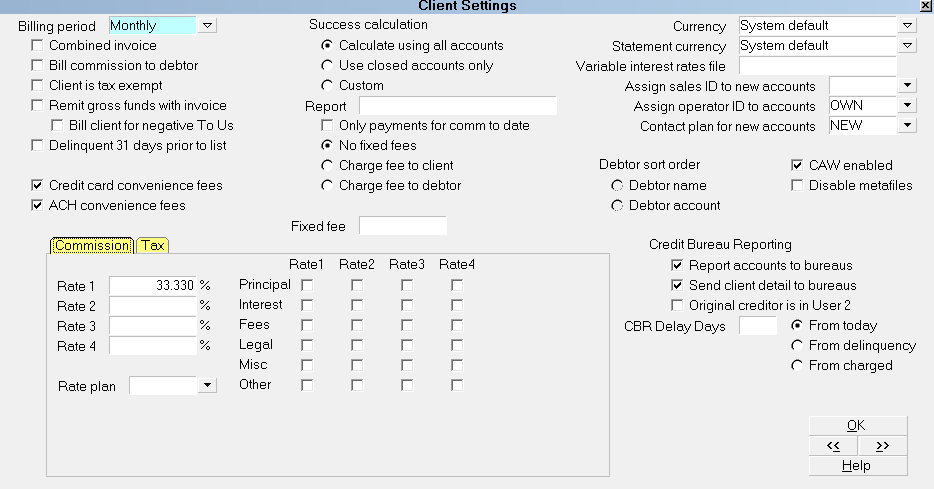
Advanced Client Settings
Before proceeding, it is necessary to have the following areas
preset as pertains to the Client you are about to enter so
that the information is readily available to the system and usable
in this setup where applicable. All of these should be accomplished
prior to entry of any Debtors for this Client.
Many default Operator IDs, Letters and Contact Plans
ship with Collect!. These are SAMPLE only. Some may be usable
for your purposes as is OR you can use the samples to assist in
creating your own customized items.
It is your responsibility to ensure that any letters
you send to Debtors or contact plan automations
you enact with the system are compliant to
legislation and regulations in your region with
respect to format, content and actions launched.
SAMPLE letters shipped with Collect! or available
on the Member Center are SAMPLE only and intended
to be rudimentary templates for your own
modification(s).
Getting Started
If you are not already situated on a Client Advanced Settings
screen, click the menu path of \Browse\Clients, select an
existing demo Client or create a New Client. Click the
Advanced button in the lower right corner of the main Client screen.
Be sure to have all your Client requirements available as covered
in the Overview section of this topic. Specifically,
- Details of your contingency terms for commission
- Requirements for charges, fees, and taxes
- Remittance Type and Frequency
- Credit bureau reporting requirements
The Client-specific defaults you select in the Client Settings
screen are automatically applied as applicable for every Debtor
entered under that Client and all processes which access this
Client's data for output of key information.
Billing, Reporting And Fees
You will notice that the left-most and middle columns of the
Client Settings window pertain to details of your contractual
agreement with your Client.
Remittance Options
Billing Period
This identifies which Remittance frequency on which your Client
wishes to receive their Invoice/Statement and Checks.It is NOT
recommended to leave this field blank. Even if your
current Client base is the same cycle, there may be a future point
in time where you have Clients with different remittance cycles and
have need for reporting purposes to have this field populated in all
your Clients.
The default Remit Type in the system is Net. There is no tangible
switch to set this preference. It is presumed in the absence of
either Combined or Gross being selected.
Choose to remit Net if your Client has not stipulated otherwise.
This means you deduct your commission right away on the
current Invoice/Statement instead of billing your client
for your fees and having to wait to be paid by them.
The calculation of the Net Remit is:
Check Sent to Client = Total Paid Agency - (Commissions + Fees due Agency
+ Taxes + Balances Past Due)
Net remittances use documents called "Statement" and "Check" in your
Print menu to create their output when invoked.
 WARNING: Switching from one type of remittance to the other can
produce undesirable results if you have already
generated invoices for this Client using the type you are
switching from. If your Client is current now, with no
outstanding amounts owing, and is always current, this
is not a problem. However, if your Client has amounts
outstanding, please see below for guidelines on making the
change from one type of remittance to the other.
WARNING: Switching from one type of remittance to the other can
produce undesirable results if you have already
generated invoices for this Client using the type you are
switching from. If your Client is current now, with no
outstanding amounts owing, and is always current, this
is not a problem. However, if your Client has amounts
outstanding, please see below for guidelines on making the
change from one type of remittance to the other.
Combined Invoice
Check this box if your Client requires the type of remittance
which treats Paid Agency funds as "Net" while treating
the Paid Client directs as "Gross". This means all Paid
Agency transactions are handled first with the Total Paid Agency
amount calculated. From that amount, any commissions/fees/charges/taxes
due the Agency will be subtracted and a check will be written for the
Net difference. The Client will be invoiced for any
commissions/fees/charges/taxes due to the Agency as a result of any
Paid Client directs reported in the same billing period.
If you use this setting, you must have a CStatement and
a CCheck report in your Print menu to use when generating
statements for this Client.
Bill Commission to Debtor
This switch is used if you add your commission to all
Debtors' balances as a Collection Charge for this Client.
You are responsible for using this switch ONLY if it is
permissible by law to apply Collection Charges in
your region.
Client is Tax Exempt
With this switch enabled, Collect! will not calculate tax on
any commission amounts from monies collected for this Client.
This can be overridden at the Debtor or Transaction level.
Remit Gross Funds with Invoice
All funds paid to the Agency are returned to the Client at the end
of the billing period and they are billed for any commission/fees/charges/
taxes due to the Agency as calculated on collections both 'To Agency' and
'To Client' direct. The system will create a check for the gross
collections recovered to be remitted to the Client.
If you use this setting, you must have a GStatement and a
GCheck report in your Print Menu.
This switch becomes nullified if you have checked the 'Combined Invoice'
field above.
There are times when you will have a Client who is going
to want to change their billing type. Since the
differences between the types radically depart from each
other in terms of how accounting calculations are computed,
it is recommended that you request your Client have a zero
balance forward before cutting them over to a different
billing type. If this is not possible to do, be aware that
you will need to make manual adjustments the first time the
statements are generated under the new billing type.
Bill Client for Negative To Us
Switch this ON for a Gross Client when you need your statements
to reflect amounts owed to you for transactions posted with a
NEGATIVE To Us amount, i.e. NSF. By default, Collect! does not
bill a Gross Client for a NEGATIVE amount.
Switching A Client To A Different Remittance Type
If you need to change your method of remitting funds to your
Client because they have requested or mandated the change,
there are some preliminary considerations to be made before
proceeding.
The cleanest way to accomplish such a modification is when
you are making a change for a Client who does NOT
owe you any money. If there is an existing 30/60/90+
past due amounts for this Client, there will be need to
modify figures at the invoice level so that the new cycle
will produce figures as expected once switched.
If your Client is adamant about the change and they owe you
for any past invoices, request that they bring their account
current/up-to-date in order for you to accommodate their request.
If they elect to not do so and require that you accommodate
their change request ahead of their account being brought
current, then you will be needed to migrate data in the last
invoice issued in your Invoices tab before you run your next
set of statements.
Artificially massaging figures into different Fields to
accommodate a new/different remittance type for any Client
is mechanically simple but rather detail complex. What
happens as a result of these manipulations will have impact
on future remittances. We strongly recommend that you contact
Tech Support for assistance. If you elect to attempt the
changes on your own, we recommend taking a Snapshot of your
database BEFORE any changes are made so that you have
rollback capability.
Reconstructing Client figures is a considered a
billable technical service. It is recommended
to consult Technical Services prior to attempting
these manipulations to Invoice line items on your
own or to contract Technical Services to do the
manipulations for you.
Report To Credit Bureaus
Report Accounts to Bureaus
This switch functions as an indicator that for this
Client ONLY, you are permitted to report Debtors to Credit Bureaus
as having an open Collection Item with your office.
It does NOT function as the trigger to activate
accounts for credit reporting when new accounts
are entered for this Client.
There are two ways to activate an account for credit reporting:
- Manually enter the CBR tab on a Debtor screen and check
the "Report to Credit Bureau" box, OR
- Via the batch process, "Prepare accounts for reporting
to credit bureaus"
At all times, Cosigners that you wish to report
MUST be manually activated in both the CBR tab AND in the
Cosigner window. The batch process activates ONLY the
primary Debtor on the account.
For more information on setting up credit reporting, refer
to Credit Bureau topics.
Send Client Detail to Bureaus
You must switch ON "Send Client detail to bureaus"
if you are reporting as a Collection Agency.
This is for legislative compliance to include the identity
of the original creditor with each Debtor that your Agency
reports to the Credit Bureau. In the Metro2 credit reporting
record layout, this is known as the F1 segment.
If you are the original Creditor and are reporting as first
party, you would leave this switch unchecked in the OFF
position. You would additionally need to ensure you have
checked the " Report as credit grantor" in the menu path
"Tools\Credit Reporting\ Credit Bureau Setup".
Original Creditor is in User 2
If your company is a Debt Purchaser AND you do not have the
original Creditor name entered in the Client Name
field in Collect!, check this switch ON to meet your F1 segment
compliance requirement. When you manually data enter OR
electronically import new Debtors, this switch relies on the
original creditor name being stored in the User 2 field on the
main Debtor screen.
Delinquent 31 Days Prior to List
The Credit Bureaus require a delinquency date for all Debtors
you will report and they will reject any record which comes
in with that field blank.
If your Client is not providing a Delinquency or Last Charged
date with the assignments, you may check this switch into the
ON position to write a date that is 31 days prior to listing
as the Credit Bureau required field when new accounts are being
reported.
If this switch is left unchecked in the OFF position, you must
include EITHER a delinquency OR last charge date when you
input new accounts. If you electronically import new Debtors
for this Client, make sure you MAP or SET at least one of the
two required Date Fields.
For legislative compliance, do NOT use the listing
date as the Delinquency or last Charge date
when you enter new Debtors.
Success Rate
On the main Client setup screen, you will notice that there is
a greyed out/read-only field labeled "Success Rate" that contains
a percentage figure. This is a system-generated liquidation
rate and you have control of the equation that calculates this figure.
There are software switches in the Advanced screen which offer
you three ways to calculate this field. The chosen calculation and
results displayed do not impact liquidation percentages calculated
elsewhere in reports. It is an internal measure for your company to
gauge performance that is meaningful to your Profitability Analysis
on a per Client basis.
The three options from which you can select your calculation
preferences are:
1. Calculate Using All Accounts: This calculation uses
data from all files assigned.
Equation: Gross Paid X 100 / ((All Listed + All Fees) - Adjustments)
- "All Listed" includes figures from closed accounts
- "All fees" includes Debtor and Client fees
- "Adjustments" includes all transaction series types 300's,
400's and 500's, if you are using the stock Transaction
Types that ship with Collect!
2. Use Closed Accounts Only: This calculation
uses data from MODE CLOSED accounts ONLY. An example of where
this calculation might be meaningful is if this Client is a
Pre-collect/Cure type portfolio where it isn't until an account
is closed that it is considered liquidated, this would be the
internal metric to use.
Equation: (All Paid (closed accounts) / All Listed (closed accounts)) X 100
3. Custom Success Rate: If you need your own custom
calculation for liquidation rate, click the radio button beside
"Custom" and enter the "Report" name you have created and stored
in your Print menu that performs the calculation / writeback to the
Success Rate field for this Client.
You may also use a control file on the Client screen
to change the liquidation rate to your custom
calculation. This would enable the field to
dynamically refresh every time the Client was
accessed.
If you are not familiar with creating reports and/or
control files, you may wish to contract us to
provide you with products to meet your needs
at the very reasonable rates for custom Technical
projects.
Fixed Fees
These switches govern whether there are any special fee
handling requirements for this Client.
Use this switch if you have contractual agreement with
your Client to impose a charge on them for each account
assigned OR if you are charging the Debtors for a specific
fee.
You are responsible for ensuring that any fees
you charge a Debtor are permitted by law
in your region.
No Fixed Fees
This is the default setting that should be selected if there are
no special fee handling requirements for this Client.
Charge Fee to Client
When you enter a new Debtor, the system will automatically
post a Transaction Type 397 for the amount determined here
that will appear on statements as a 'due Agency' charge billed
to your Client.
You will not see this fee in the Debtor balance breakdown.
You can see this charge if you click the Principal field on the
main Debtor screen and enter the " Financial Details\Fee" Tab.
Charge Fee to Debtor
When you enter a new Debtor, the system will automatically
post a Transaction Type 398 for the amount determined here
that will appear in the Debtor balance breakdown. You will
see it in the "Fee" field on the main Debtor screen. This
amount does become included in the Debtor's balance owing.
Commission And Tax
Commission and tax tabs in the lower portion of the
Client Settings screen are used in calculating the contingency
amounts due you when your run statements for this
Client.
Commission
If your contingency agreement with your Client has hierarchical
conditions for what rates are to be applied on what segment
of a balance is being paid (i.e. Principal versus Interest
verses Fees etc.), you may enter custom Client rate plans
with up to four levels of rates on a per Client basis in this tab.
These settings are embedded into each new Debtor you enter
into the system for the Client. If there are reasons to do
so, the default settings you affix to this Client can be
overridden at the Debtor or Transaction level on a per posting basis.
Rate
Decision which of the three possible methods for attaching
your contingency terms with your Client is the most applicable:
1. Individual, custom rate structure
To assign a flat commission rate for all accounts, enter
the commission percentage amount into the field under the label
Rate. You do not have to enter anything below
this amount if you have only one rate that will be charged.
To differentiate between where the money is being applied with
respect to the Debtors owing breakdown (i.e. principal, interest,
fees etc.), enter the applicable rate and check the box for the
financial type that rate is to apply against. For example:
- Rate: 25% on Rate 1: Principal
- Rate: 100% on Rate 2: Interest
- Rate: 0% on Rate 3: Fees
2. Company-wide flat commission rate
If your company charges all Clients the same flat rate, you can
fast path your Client and new Debtor entry by including this
flat contingency rate in your Company Details. If entered there,
you will see the Rate field populate automatically for every Client
and Debtor entered into the system, reducing the number of keystrokes
required to set them up.
3. Rate Plan
If you wish to define your commission structures in rate plans
that allow considerable fine tuning for contingencies on the
basis of assigned balance, remaining balance, age of account,
paid to date etc., you can set up such terms in the menu
path "System\ Financial Settings\ Commission Rate Plan" then
select the code for that plan using the pick list on this field.
It is recommended to use a Rate Plan as defined by
setup outside of the Client screen when there
are more than two rates to be applied.
If you are using method #1 or #3 above, it is important
to NOT input both a rate plan and a manual commission
structure in the Fee tab on the same Client. Leave
the Rate plan field blank if you are not using a plan.
Tax
The rules for setting up tax percentages follow the same
logic as discussed above for Commission. You have three
methods for how you want to affix a tax schedule:
- company-wide in Company Details
- on each Client separately
- at the Debtor payment level on a per transaction basis
In some regions, taxes may not be applicable and should be
left blank. In other regions, you may have different
tax percentage rates based on where the Debtor lives.
It is each Agency's responsibility to ensure that
they are compliantly charging and remitting taxes
to governing bodies in their region as per the laws
of their areas in which they do business.
Currency And Statement Currency
These Fields are only visible if you selected to turn ON
the "Multi- Currency" switch in the "System\Preferences\Company
Details"screen. If that switch is turned OFF, neither of these two
fields are visible in the Advanced Client setup screen.
At present, both serve informational display purposes only.
The default is "System Default" for both.
What the Multi-Currency switch in Company Details does presently
do if you have it turned ON, is it will auto-print North
American "$" signs before monetary Fields printed in reports
and letters. The dollar sign must be manually embedded if the
"Multi-Currency" switch in Company Details is turned OFF.
Sales ID
If your Company tracks revenue by Inside Sales Rep, this
field is where you will enter the salesperson's Operator
ID for tracking purposes. House Clients can be identified
by using the owner's ID or HSE as the salesperson.
This field may remain blank (or be used for alternate tracking
meaningful to your company) if you do not utilize inhouse sales
staff.
Operator ID
If all new accounts are initially assigned to any of the
following you may wish to enter that ID here to save steps
when new accounts are entered:
If there is an Operator ID on the Client, all new listings
will be assigned to that Operator when you enter them
manually or via import.
Operator ID settings embedded by the Client
when new accounts are listed may be
overridden by BOTH selection of a
different ID at time of manual or import
entry.
It is not mandatory to input anything into this field if you
utilize Account Toss batch processing to distribute your
new accounts to multiple collectors.
Contact Plan For New Accounts
It is not mandatory that a Contact Plan be run on new assignments.
However, if you wish to batch process a series of perfunctory
initialization steps, it is helpful to create a NEW Contact Plan
that does the minimum number of housekeeping steps. Example:
- Set Mode to Active
- Set Status to NEW
- Queues up your first dunning letter
- Inserts a Review or Phone contact so that the account will appear
in a collector's WIP list.
If you enter accounts either manually or by electronic
import and do not insert a Review/Phone contact on the
account, then you are creating Orphaned
Accounts which are on desks but NEVER appear in
anybody's WIP list. ALL accounts expected to appear
in a WIP list MUST have an In Progress contact event in
one of the default types being Review, Phone, Promise or
Other.
It is your responsibility to ensure that any letters
you send to Debtors or Contact Plans
you enact with the system are compliant to
legislation and regulations in your region with
respect to format, content and actions launched.
SAMPLE letters shipped with Collect! or available
on the Member Center are SAMPLE only and intended
to be modified by each site before usage.
Debtor Sort Order
This switch determines how accounts with payments will be presesnted
on Client Statements. Some Creditors have a preference which they
require their agencies adhere to. If your Client wants alphabetic
sorting on their statements, click the radio button beside "Debtor Name".
If your Client wants their statements to be numerically sorted by
their own account number, click the radio button beside "Debtor
Account".
Client Tabs - Description, Purpose And Use
All multi-part screens in Collect! with a Tab section will
evidence a visual signal indicating whether there is,
or is not, any data contained inside that tab. A Grey tab
contains no data. A Yellow tab means there is data inside.
A convenient way to train staff to watch for this is to
suggest if the Tab 'light' is ON, then something is in
there that can be viewed.
Debtors Tab
The left-most tab is labeled 'Debtors'. This is where you can
most directly access all Open,
Closed and Archived Debtors
for any given Client: . There are four key
ways that this tab is time-saving for staff
in areas of Clerical/Accounting, Administration, Client
Services, Sales and Operational/Project Management:
- It is possible to manually data enter new business for the Client
from the Debtor Tab. The Fields pertaining to Client Name and
Client Number in your system will be auto-filled, saving your entry
operator the redundant time of repeatedly entering the Client detail
with each piece of new business.
- It is the fastest way to create ad hoc batch letters for Debtors
belonging ONLY to a certain Client or run reports that will query the
Debtor File to gather data for a specific Client.
- It is the fastest way to run Contact Plans and Batch Processes
(such as Collector desk reshuffles, etc) that pertain only to Debtors
under a specific Client number.
- It is also the most convenient way for your Sales/Client Services
team to access Debtor accounts when Clients call in to request or provide
info about one of their accounts.
Invoices Tab
This tab contains the invoice/statement history of the Client.
The invoice/statement screens display all the line items from
each remittance as well as the 30/60/90 Accounts Receivable
balance forward(s) which the Client may have with your office.
From this tab, you are able to reprint a specific statement
for a Client, if needed.
You can adjust your List View options to add the 30/60/90
Fields so that from a Browse List of Invoice/Statements, you
are able to see at a glance if your Client owes you any
money and the age of that Receivable. To do this, click into
the tab so that you have a scrollable list showing you have
entered the sub-menu Invoices tab. Then Right click
in the list column header line to obtain the popup that
prompts you to do any of Edit/Move/Insert/Remove/Restore
Default.
The option to enable invoice #s to appear on your remittances
on a per Client basis is controlled from the invoice screens
contained in this tab. This latter is a 3-step process
discussed in detail under "How to create invoice numbers
for statements" in " Month End" topics.
If you are setting up a new Client and enter the Invoice tab
before any Statements have ever been generated, you will be
prompted to as to whether you want to create a new Invoice
if none exists. Click "NO". The only
place you can create/generate a Statement for a Client is
from the Month End menu, " Generate Statements" option.
Payments Tab
This is your historical listing of all Client payments, Client
reversals/charges and where you can post new Client transactions.
How To Post Client Payments / Receivables
The Month End process creates your Remittance Invoice/Statements
and Checks for your Clients. Irrespective of billing types
Net/Gross/Combined, there will be Invoices where your Client owes
your company for services/ costs/taxes. The Month End Invoice
will contain a dialog line "Please remit your check to Agency
for...." and state the amount which you are owed.
When your Client sends you the check for the Balance Due
for that remittance period, you will have a Client Payment
that needs to be applied in the system to offset their Account
Receivable on your books.
How to enter that Payment is as follows:
Payment Screen
Select the Payments tab in the lower portion of the Client
screen. This will display the Payment window. If you have
never entered a payment for this Client before, it will tell
tell you there are no payments and ask if you want to create
a new one. The screen stores the historical transaction
history of all payments the Client has sent you. If there
are payments for this Client already in the system, you will
get a display which looks like the transaction history on a
Debtor file which has financial history.
When you open a New Client Payment transaction window,
you are presented with a very simple input screen.
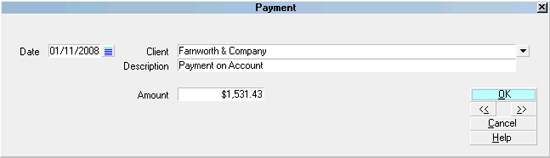
Client Payment Screen
Date
Enter the date you received the remittance from your Client
or the date you are applying a charge to your Client.
Client Name
If you are on a Client screen, this will auto-fill with the
Client Name on record. If you are in a Browse list of Client
payments, the Name field will be blank but offer you a dropdown
arrow to select the target Client from the pick list of Clients.
Description
This is where you enter a meaningful memo line to identify the
association of what the money was remitted for. Example:
"Payment for Sept 2013 Invoice".
Since this same screen would be used to charge-back to a Client
for an amount that is not associated with a specific Debtor,
your Description line could also be for a scenario such as
"Charge-back for Jan Invoice check accidentally stale-dated
Jan 2013"
Amount
Enter the amount of the remittance payment or charge to the Client.
Ensure you are correctly signing your amounts:
- Positive amount reflects a payment
received and reduces the Client's account receivable with your company.
- Negative amount reflects a reversal
and adds to the Client's account receivable with your company.
OK
Click OK to confirm acceptance and finalize the transaction in the
Client's Payment History.
Accessing Client Payments
You can navigate to Client Payments by four separate methods,
provided your Operator ID Access Rights permits you into
all of the areas. User level access rights is the reason
why we have multiple paths to the same information pool:
not all users who require access have the same menu
permissions or displays.
The following are the paths to access Client Payments:
- From the menu bar at the top of screen, click
Browse and you will be presented with a drop-down
menu. Select Payments.
This will provide a listing of all Client payment
transactions. In this list, it is possible to View,
Delete, Edit and enter New Client transactions.
- From the menu bar at the top of the screen, click
Browse to and you will be presented with a drop-down
menu. Select Daysheets.
Select a date of interest from the Daysheet calendar
and open the display.
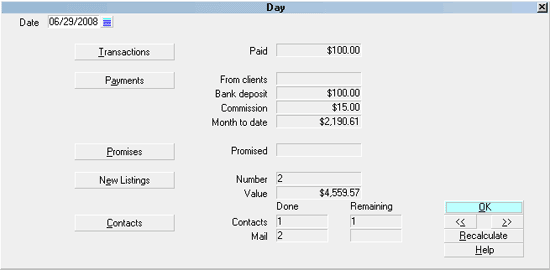
Daysheet, Individual Calendar Day
The Payments button below the Transaction button contains
all Client transactions received and posted from ALL Clients
that day.
- From the Main Menu, click Daily Administration to
display the Daily Administration menu. Click Payments
and Charges, then in the next menu popup, select
Client Payments and Charges. This navigates to the same
Browse Client transaction list as in #1 above.
- If you need to view/edit/delete or enter a new Client
transaction for a single Client only, you can lookup the
target Client from your Browse Clients list, select it and
enter into the Payments tab on that single Client's screen.
Notes Tab
This tab is a free-form note area where you can copy/ paste email
correspondence to/from the Client as well as keep a comprehensive
log of any information pertaining to individual Clients. Your
Sales Personnel and Client Services Reps can store their contact
notes from Client conversations in this tab.
Contacts Tab
If you have the Client Management option enabled with
your Collect! software license, you will see a "Contacts" tab.
This functions like the Contact tab on the Debtor screen, and
pertains to Client issues. In this tab you can schedule Client
mailings/emailings, reviews to CSRs who have follow-up calls
they want to make etc. Review and Phone events would create
a working WIP list and appear for the Operator for whom the
the contact event was assigned to. In this way, your staff in
any of Admin/Accounting/Client Services/Sales can use Collect!
to schedule Client specific tasks within the software without
having to rely on external calendars to prompt them.
This tab functions for Clients like the Contact tab does on Debtor
accounts. If your sales or CSR staff want to create a WIP list
for themselves regarding Clients, they can enter Review or Phone
Contacts on the Clients for whom they have reason to follow up.
This type of queuing can also be used for Client balance due
follow-up calls.
Letter/Report contacts can also be scheduled in this tab.
Example, if a Client requires a Client Status Report
every month, you can set up a repeating contact to automatically
queue up this report every month and have it created through
Batch Processing, Schedule Batch Letters for Clients whenever
you are ready to print them after each month end.
Attachments Tab
Like Contacts, this tab appears if you have the Client
Management option enabled in your software license.
This tab functions the same as it does on Debtor accounts.
You may use the free-form entry Fields in whatever manner you
choose and the tab provides a place to affix Client
correspondence or documents received that need to be
accessible on the Client's file history with your company.
You can customize the contents of this tab to suit your
needs. Unlimited Attachment entries categorized by user
defined Class, with or without the sub-category Type can
be created.
If you wish to make a global change to an Attachment field
label, meaning a designated field will be renamed for all
Attachment entries, then mouse into the field of interest
and Right click. You will get a popup asking you to select
what you want to do. Click on "Properties" to gain entry.
A more advanced utilization of this feature is for the field
name labels to be contingent on a specific Class, meaning the
same field can be used for different purposes depending on a
logic condition such as Class is "Contract" or Class is
"Correspondence". This is accomplished by creating a
script/ control file which defines what field Alias names are
displayed as a function of what Class of Attachment is selected.
Depending on what you need, you may find a script/control file
that is very close to your need on the Member Center which you
can download and install. Alternatively, if you would like
Tech Support to create a custom script/control file for you,
contact us for pricing.
Keep your Alias label names short enough to fit in
the physical screen space allotted for that field to avoid
cut off portions of word(s) and congested visuals presented
to your staff. Cluttered screens are hard on the eyes and make
it difficult to locate the information at-a-glance.
To make additions and customizations to the Class and/or Type
pick-lists, refer to " How To Use Pick Lists" for more detailed
instructions.
If you put a url in the File field, the system will
call your web browser and take you directly to
the website when you click on the 'File Folder'
icon (that you'd normally use to Open an attached
file) at the end of the File Name line.
See Also
- Client Topics
|
Was this page helpful? Do you have any comments on this document? Can we make it better? If so how may we improve this page.
Please click this link to send us your comments: helpinfo@collect.org