User's Guide - Orientation
This user's guide will introduces you to the user interface
and some of the details of operating in Collect!.
Introduction
Collect! is a flexible contact management and financial
system designed to be scalable for any size operation.
It allows you to input clients and debtors with a view to
tracking daily financial transactions, contacts, and other
receivable management milestone events. The objective being
to provide your company with an operational environment which
maximizes efficiency and productivity, providing you with
real-time metrics to assess the success of your strategies
and workflows.

Starting Collect!
If you are running Collect! on a network, please refer to the
Help page topic Network Setup for complete details on how to
configure and start Collect!. In order to begin using Collect!
on a network, the RDS Server must first be activated on your
main network server PC. This is the database engine which
writes your data to your files.
If you are running on a standalone PC station, the RDS Server
will open automatically when you click your desktop icon to
start the program.
Double-click the Collect! shortcut icon on your desktop and
the login screen will open.
If you are the first user to enter the system, you can
do so utilizing one of the shipping default logins. We have
included a sample sign-on for each user type the system supports
to provide you with a representative sample of what each type of
login allows a user to do in the software and what permissions are
inherent in each user level the system offers.
The ID for the 'owner', is a User Level 10, System type of user
which has full access to all areas and features in the software.
The ID to use is "OWN" and Password is lowercase "own". You will
be navigated to the Welcome To Collect! screen.
The system ships with 3 different databases for your use:
1. The "masterdb" will be your live production environment.
2. The "demodb" is a demonstration environment that you
can use for both training exercises and later as a testbed
environment where you can test drive any new process, report,
letter, import you design without reservation that you will
in any way impact your live production database.
3. The "prosdb" is intended for your inhouse sales personnel. It
provides an environment of their own to track their prospects,
utilizing all the same features and functions of the system with
the only salient difference being the renaming of fields and
menus to provide the specialized environment.
If you have been experimenting with a trial version of the product
before now and are ready to begin creating your live production
environment, then Select the Database to open as "masterdb"
and your Database Access as Shared if are on a network. If you
are on a standalone PC, the Access of Shared or Exclusive will
only matter if you are attempting to run specific maintenance
or upgrade processes discussed elsewhere in the Help pages.
If this is your first time viewing the software, you may wish to
Select Database as "demodb" as this database contains sample
data which will assist you in becoming familiar with the software.
Once you have selected the database you wish to open and the mode
in which you wish to function, click the Start button to proceed.
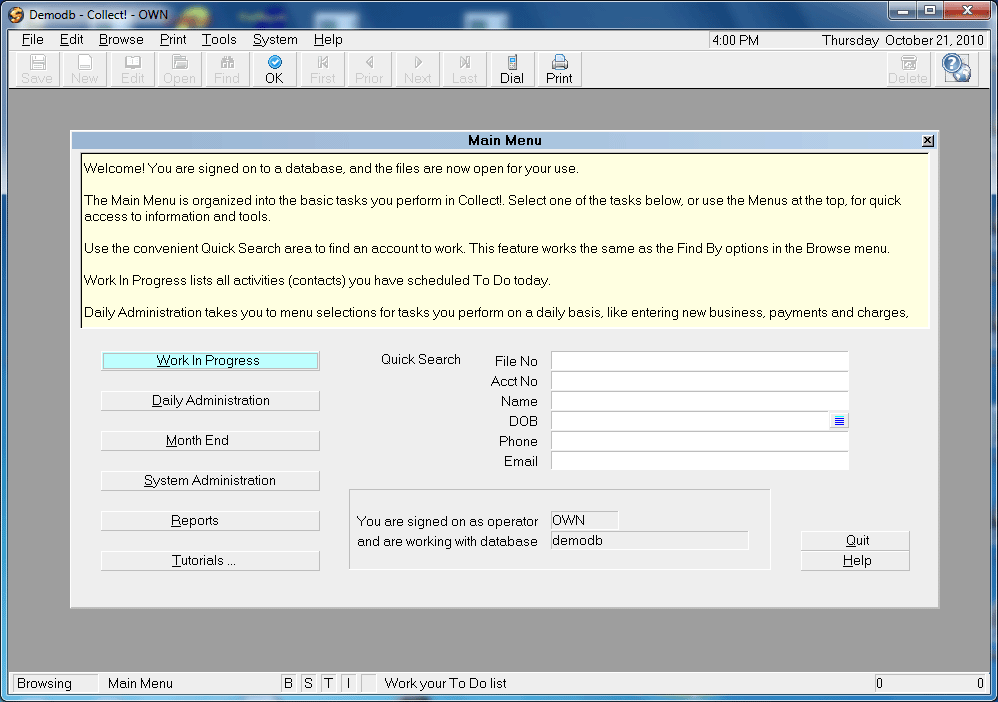
The next screen will be the Main Menu if you are a System type user,
which the "OWN" ID is. " Collector" type users are navigated directly
to their Work In Progress screens.
Management, Administrative, and Clerical logins have the the Quick
Search area on this screen to search debtors by the most frequently
used criteria; File Number, (client) Account Number, Name, DOB, Phone
Number and Email. This screen also positions the user to access all
feature menus with their underlying sub-menus.
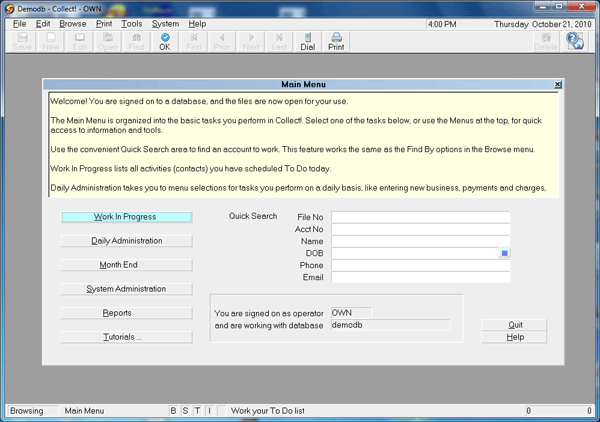
Main Menu
Exiting COLLECT!
Before proceeding into the use of the system, along with knowing how
to correctly enter the system, it is important to know how to exit
correctly to preserve the integrity of your data and database.
One should not power down their computer while a Collect! session
is open as this may cause database corruption.
This means in a network environment, the RDS Server should not be
closed or the main network server be rebooted if there are any active
Collect! sessions still open as this can cause loss of data and database
corruption.
Always exit gracefully by your preferred exit mode:
1. Click the Red X in the upper right corner of any screen and
follow the prompts to exit, or
2. Press your Escape key to navigate back to the Main Menu
and click Quit, or
3. Press Alt+F4 for an express exit.
Menus
Collect! uses 3 types of menus.
Full Screen Menus
When you click on a button on the Main Menu or make a selection
from a drop-down menu and are presented with a popup window
containing a list of sub-menu items to choose from, this is
called a Full Screen Menu.
The menus are organized to be consolidated by job function of the
user who would be most likely to be accessing these screens.
Example: The Daily Administration button on the Main Menu navigates
the user through a series of sub-menus for daily batch processes such
as account grouping, assigning accounts to collectors, running contact
plan automations, letter printing, figure recalculating. System
Administration menus lead to sub-menus pertaining to setups and
system configurations which are intended for your personnel who
manage operations/IT Techs. Collectors do not have access to either
of these areas.
Click on the menu of interest, then use Arrow keys or mouse clicks
to move and navigate between items. Press the the Enter key or click
your mouse to select a presented option.
Top Menu Bar
The Top Menu Bar provides quick access to several specific
command functions and sub-menus in the program.
Toolbar Menu
The Toolbar Menu provides quick access to basic actions like
Search, Print, go to First, go to Last, create a New record,
Edit an existing record. If the buttons are greyed out, then
they are not active for the screen you are currently on.
Collect! Help
The system ships with user Help access readily available
from anywhere in the system. Context sensitive Help is
available 2 ways.
1. Blue popup windows will present if your mouse is hovering
unmoving for a set number of seconds on a screen or field. The
system interprets this pause as the user being unsure of what
they want to do next and offers information about what the mouse
pointer is currently hovering over.
2. Pressing your F1 key on any field or screen in the system will
immediately trigger the opening of an internet browser on your
station and you will be navigated directly to an area in the Help
pages on our website that describes the use/purpose/function of
the field of screen you were on when you pressed F1.
For general access to reference material, your Help Menu drop-down
offers the following options:
Contents...
Takes you to the Help Contents page. This is the equivalent of
a table of contents to a full User's Manual organized in order
or operations from initial setups to usage of the system.
Quick User's Guide...
Takes you to a convenient user's guide that steps
through all the basic functions and features.
How To...
Displays a list of all the How To topics.
Keyboard Tips...
Shows you all the Quick Keys to navigate with.
Index...
Displays the Help Index, an alphabetical list of
all topics in the Help system. While there is standard
industry terminology, different regions and generations
of industry professionals have their own common names for
various aspects of the business. We have tried to insert
help terms with as many synonyms as possible so that no
matter what you call it, you can find Help about it
in the Index.
Disable popup help...
Allows you to Disable or Enable the Popup Help feature.
You may wish to leave popup help enabled while you are
getting started and disable it when you are acclimated
to the system's basics. Disabling the popup help feature
from the Help menu is for the active session only. It will
reset to Enable with your next login. You can turn it off
completely from a software switch in your Operator setup
screen discussed elsewhere in the Help pages.
Member Services...
Takes you to the Member Center on our website.
Training Videos...
Takes you to the Training area of the Member Center where you
can select tutorials in Flash video format.
Report Library...
Takes you to the Member Center Report Library where you can
view document samples and download templates to add to your
report libraries.
3rd Party EDI...
Takes you to the Member Center Electronic Data Interchanges area
where you can view details and download working versions of
import routines.
Upgrade Software...
Takes you to the Member Center Downloads area where you can review
your upgrade or patch update options, and view the latest new
features and revisions lists.
Version Check...
Compares the latest shipping version available online to the
version you are running. If there is an update available, a
message will display letting you know this. You can then select
the Upgrade Software option to proceed to the Member Center.
Renew Membership
Takes you to our website where you may renew your membership
with all the features and options you are currently licensed
for and purchase additional features. This option is only
displayed if you currently own a license to Collect!.
Order Now
Takes you to our website where you may purchase a license to
Collect!. This option is only displayed if you do not currently
own a license to Collect!.
About...
Displays information about the Collect! program. This
is useful for your Techs inhouse and our office to assist
you quickly and efficiently by being aware of what version
you are currently running.
Printing Help
You may print a Help topic by clicking File, then the Print
command from your internet browser when viewing the Help
topic of interest.
User Interface Screens
The software maintains consistent conventions throughout
the system to provide you with an intuitive, user friendly
environment. It is designed to accommodate users who favor
mouse point-and-click as well as keyboard control navigation.
Main Menu
The Top Menu Bar
This menu is topmost on your screen and contains a series of
drop-down lists containing the commands or sub-menu options
available for selection. A user's level and type determines
which of these are enabled for access or greyed out/inaccessible.
The Toolbar Menu
The Toolbar Menu is displayed at the top of the screen
and contains buttons for performing several basic
functions like enter a New entry, fast-path to the First or
Last record in a list, Edit an entry, etc.
Status Bar
A message line is displayed at the very bottom of the screen. In
the lower left corner is a word that identifies what you are
currently doing, i.e. Browsing or Editing. Next to the identification
of what you are currently doing, you will see a display of where you
are in the system at present, i.e. Debtor, meaning you are in a
debtor screen or debtor lookup list.
Continuing to the right along the Status Bar at the bottom of your
screen, you will see a series of capital letters. These are
indicators which become highlighted during various processes.
Their definitions are as follows:
B or E - Browsing mode, means you are in a list. Edit mode means
you have selected an item and can edit if you wish.
M or R - Modified and not yet written to disk. This indicator
changes to R for Ready when the system is waiting for you to
choose to do something.
S - Search criteria via clicking Find or F6 has been selected
and a search key set is currently active.
I or O - This indicator shows you whether you are in Insert
mode - input will move any existing data to the right as you
type OR Overstrike mode - input will overwrite existing data.
T - Indicator that there is currently an active Tagged list of
records.
In the extreme right corner of the the status bar, you will
find 2 counter fields. The right-most corner gives you the
total records counted in the list you are viewing or have
selected by search criteria. The sub-counter to the immediate
left displays where you are in the current list if you are
scrolling through.
Also in the status bar in the lower right of the screen, you
will notice a moving blue bar which is your indicator of
completion whenever any type of process is being run.
Navigation
Your keyboard contains both normal and extended keys used
to control the program. These may be used individually
and in combination throughout the system.
Normal Keys
Normal keys include the alphabetic and numeric
characters, the punctuation marks and the spacebar.
They are used for data entry but their use can be
modified when used in conjunction with the Extended or
Function keys.
Extended Keys
Extended keys are used to navigate within the program
and also to exercise control over the program. They
include any of the keys which are not ordinary data entry
keys.
Movement Keys
Tab Next field
Shift+Tab Prior field
Right Arrow Move 1 character right
Left Arrow Move 1 character left
Home Go to the start of field
End Go to the end of field
PgUp Next record
PgDn Prior record
Ctrl+PgUp First field
Ctrl+PgDn Last field
Ctrl+Home Go to the start of list
Ctrl+End Go to the end of list
Editing Keys
Enter Save field and go to next
Del Delete cursor character
Backspace Move cursor left, overstriking/removing data
Ins Insert/overstrike
Ctrl+Enter Save and exit
Ctrl+X Cut
Ctrl+C Copy
Ctrl+V Paste
Esc Discard changes
Control Keys
Alt Activate menus
Ctrl Activate buttons
Ctrl+A Select All
Ctrl+F Find. Equivalent to F6
Alt+X Exit the program
Function Keys
F1 Help
F2 Pick from list
F3 Create new record
F4 Edit field
F5 Open form detail
F6 Find record
F7 Delete current record
F8 Save and close
Shift+F1 Record macro
Shift+F2 Play macro
Shift+F3 Paste from the clipboard
Shift+F4 Copy record to clipboard
Shift+F5 Cut record to clipboard
Alt+F4 Exit the program
Alt+F6 Prior record
Functional Details
Buttons
Buttons and icons are available commands. Buttons contain
a label and icons present with a representative image of what
the icon is for - phone icon to dial, folder icon to save
a document, printer picture to print a document etc.
Clicking on a button or icon will open a sub-menu, initiate
a command, function or process.
Navigating in Lists
Arrow Keys To move up and down in a list and highlight records to be selected.
Enter To Select.
Esc To discard and exit.
Ctrl+PgUp Go to top of the list. Equivalent to clicking First button.
Ctrl+PgDn Go to bottom of the list. Equivalent to clicking Last button.
To Find A Record
From a List, arrow or click into the column header
containing the data you wish to search on, i.e. Debtor Name,
and type the name of the person you are looking up. The
software will fast-path you directly to this record if it exists
or to the record which most closely matches. The same method
may be used search a list by any criteria column your list
contains.
To Add A New Record
There are 3 ways to launch a new entry screen that are consistent
throughout the system:
1. Click the New button at the bottom of the window, or
2. Press Ctrl+N, or
3. Press F3.
To Edit a Record in the List
Select a record and press F4.
 WARNING: This is a full Edit mode that will have you making
a live change to the record in question without
opening the record. F4 while in a list is a
tool for line editing.
WARNING: This is a full Edit mode that will have you making
a live change to the record in question without
opening the record. F4 while in a list is a
tool for line editing.
To open the record before editing, select the record by
highlighting it with your arrow keys or by scrolling. You can
then choose your preference of clicking the Edit button, pressing
Enter or clicking on the record to open it to view. After making your
modification, you can then click OK or F8 to Save and Exit.
To Delete a Record
Select the record you want to delete. You may choose your
preference of pressing your F7 or Del keys or clicking the
Delete button at the bottom of the screen. You will be asked
to confirm your deletion. When prompted by the popup message
box to confirm, click Yes to proceed with the deletion or No to
cancel the command.
To Copy a Record
Select the record you want to copy. Press Ctrl+C to copy the
record to your clipboard and acknowledge the popup prompt that
your item is copied. Then press Ctrl+V to paste it.
If you have reason to place your copy in a different location in
the list, first navigate to where you want the copied item to
appear before executing the paste. Your copied record will be
inserted immediately BELOW where you have your highlighted bar
situated in the list.
 If you are undertaking a letter/report/import map
modification, it is always recommended to first
make a copy of the untouched original template for
rollback and/or audit trail.
If you are undertaking a letter/report/import map
modification, it is always recommended to first
make a copy of the untouched original template for
rollback and/or audit trail.
Alternatively, you can click the Edit drop-down menu from the top
of the screen and select the Copy and Paste options.
To Move a Record
Select the record you want to move. Press Ctrl+X to cut
the record, then navigate to where you want to reposition it and
press Ctrl+V to paste it.
Alternatively, you can click the Edit drop-down menu from the top
of the screen and select the Cut and Paste options.
WARNING: Do not use CUT as a substitute for Delete. This
creates records with data and no names, file numbers
or other details associated with them. The records
with null fields generated this way will be problematic
on a variety of levels.
What To Do Next
To install the program, refer to the Installation Guide.
To ensure that your system is correctly set up with appropriate
user logins and access rights, and that the name and address
of your company are correctly entered, refer to the User's
Guide - System Administration.
Once you know that these areas have been set up according to
your needs, the next step depends on the functions you want
to perform.
Refer to the User's Guide - System Administration for configuration
of functions and features.
Refer to the User's Guide - Office Administration/Clerical
for day-to-day data entry and clerical functions.
Refer to the User's Guide - Working Accounts for collector details.
| 
Was this page helpful? Do you have any comments on this document? Can we make it better? If so how may we improve this page.
Please click this link to send us your comments: helpinfo@collect.org