User's Guide - Office Administration/Clerical
This is a reference guide for administrative staff.
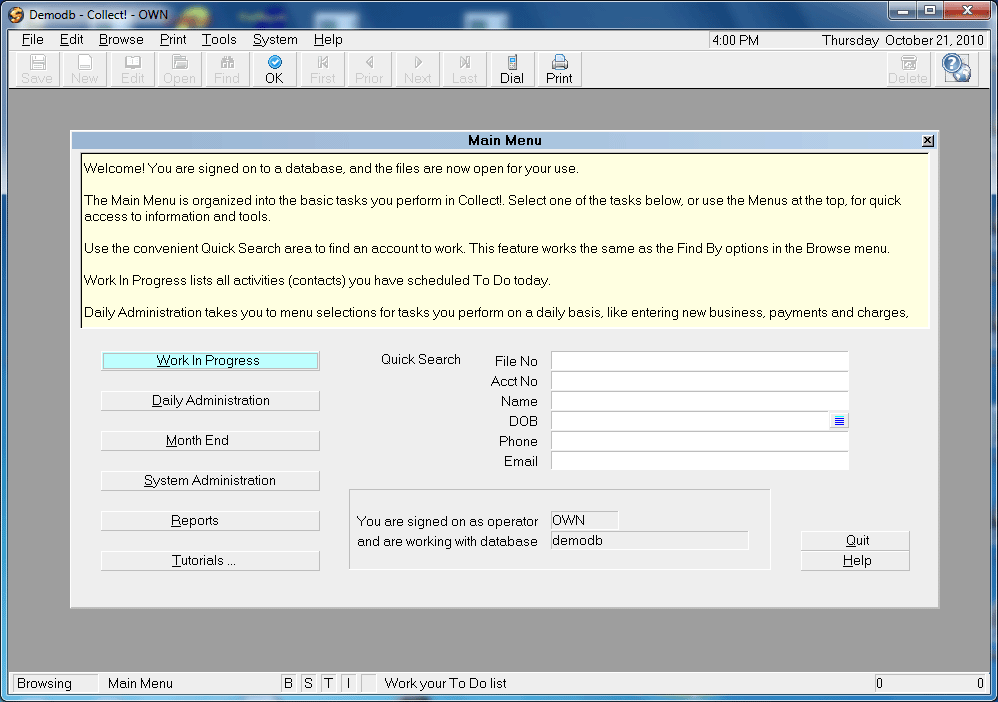
Main Menu
After signing into Collect!, you will navigated to the Main Menu.
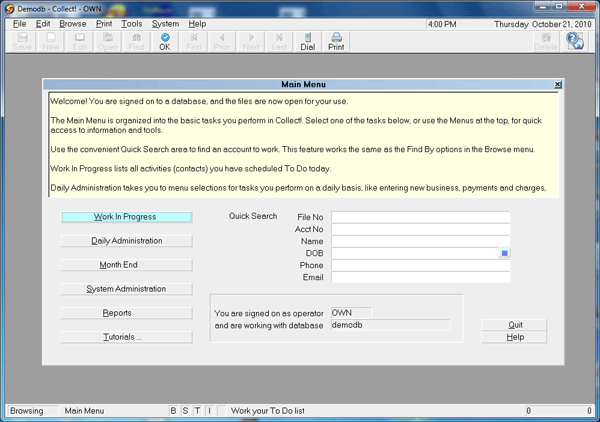
Main Menu
This screen shows you the areas of access. You have Search fields
in the lower right corner, Menu buttons on the left and Drop-down Menus
across the top of the screen. The reason why there is some overlap in
navigation paths through the system is because it allows different user
levels unique paths to areas they are permitted to access as well as
accommodate users who favor one access path over another.
The following is a brief description of the visible options offered
on the Main Menu.
QUICK SEARCH is 6 lookup fields where you can search for
debtor accounts by the most common lookups; file number,
( client) account number, name, DOB, phone and email. The Name
search will also look for any cosigner or associated party names
which you may store in Cosigner windows of any Class description.
WORK IN PROGRESS navigates you to the WIP lists in the system.
For non-collection personnel, this is the access point for all
WIP lists. Reloading and selecting the Operator ID of choice
will display that ID's working accounts and desk counts.
DAILY ADMINISTRATION navigates you to all data entry and batch
processing.
MONTH END navigates you through the options to generate client
remittance statements/ invoices and checks, and associated summary
reports.
SYSTEM ADMINISTRATION accesses system configuration and
database maintenance menus.
REPORTS provides access to all reports - those internal
to the Collect! program (hardcoded) as well as your company's
library of external and custom reports/letters. The
source code for external reports and custom letters/reports is
contained in the document body of each, as stored in your
Report library.
TUTORIALS takes you to our website for a demonstration of
basic functions and features.
QUIT exits the program.
The following are brief descriptions of feature usage. For
detailed instructions, see the link(s) trailing each topic.

Daily Administration
Click the Daily Administration menu button to access the sub-menus.
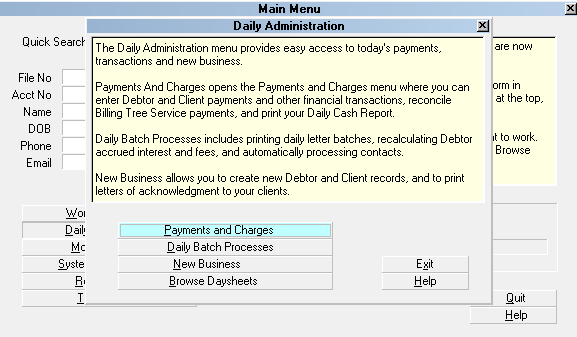
Daily Administration Menu
PAYMENTS AND CHARGES takes you to a transaction entry
area where you can apply payments/ charges to debtor
accounts and post payments from clients.
These tasks may also be performed directly from a debtor
or client screen.
DAILY BATCH PROCESSES is the sub-menu set from where you
may print letters, perform batch functions such as account
grouping or assign accounts to collector desks, or recalculate all
financial totals in the database for debtors/clients/ daysheets.
NEW BUSINESS is where you can enter new Client and Debtor records.
These tasks may also be performed directly from a Browse Debtor or
Browse Client list. Additionally, you can enter new debtors from
within the Client that the new accounts belong to. This saves keystrokes
by auto-populating the client number and client name as you enter
new debtors.
BROWSE DAYSHEETS lets you view summary information stored in
Collect! that reflects the day's accomplishments on a per
calendar day basis.
EXIT returns you to the Main Menu.
Introduction To Reports
Printing for daily and monthly activities is typically
done using the options displayed in the menus.
There are 3 types of reports available in the system:
- Internal Reports - This category defines reports which
are hardcoded in the software itself and the source code is
not available for modification. These are selected by name from
a system menu other than the Print Menu list of reports/letters and
are launched directly from that source. Examples are: Daily Cash Report,
Month End Payables and Receivables, Month Batch Analysis
- External Reports - These are documents for which the
report code is stored in the Print Menu list and these are
possible to modify for individual site needs. They are launched by
clicking into the Print menu and selecting by name from the available
reports/letters stored in your print library of documents. Examples are:
letters, statements, activity, commission and transaction summaries
- Quick Print Reports - These are the equivalent of ad hoc
queries where you may select the data set by first Browsing into
a list of the items interest (i.e. Debtors, Clients, Transactions)
and tagging them as a list. Requesting a Quick Print of these
records with All details or abbreviated output allows you to
export data into a csv spreadsheet where you may perform data
manipulations to meet your office's needs. Examples are: a
listing of all postings within a prescribed date range that
were applied with a specific Transaction Type (i.e. Court Costs
or Fees), create a list of debtors with specific balance and
list date range with a particular status code
Print Menu
The Print menu provides access to all the reporting functions
in the system.
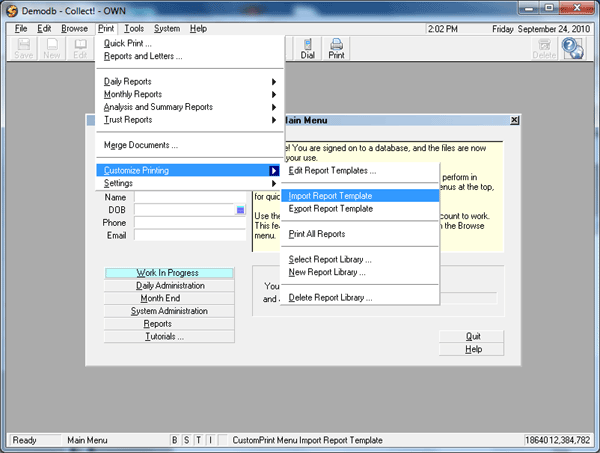
Print Menu
QUICK PRINT
Quick Print will output All or abbreviated data pertaining to
an individual screen or list of records currently displayed
on your screen.
REPORTS AND LETTERS
This option accesses modifiable reports and letters stored in
in your print library.
DAILY REPORTS
This option navigates you to a list of frequently used, standard
internal reports and tasks.
Letter Service Bureau
If your office is utilizing a letter service mailhouse
to generate and send your debtor letters, this option
will generate the daily letter file that you will send
to your provider.
Scheduled Batch Letters
Navigates you to the sub-menus from where you may launch
your letter batches for printing in your office. This is
the same sub-menu that can be reached from the Daily
Administration button on the Main Menu.
Client Acknowledgements
Generates a standard client new listing acknowledgement
for all clients who have assigned new accounts in the date
range selected. This report is also available as an
external type which may be modified for verbiage/content.
Daily Cash Report
Prints a summary of the day's financial transactions
including the bank deposit amount.
New Business Report
Outputs the new listings and totals for the selected
date range.
Work Cards
Outputs the equivalent of a debtor screenprint with
additional details included.
MONTHLY REPORTS
This option navigates you to the selection of monthend
related reports and tasks.
Generate Statements
Creates client invoices/statements and checks for the
collection period date range specified. This is the same
sub-menu that is accessible through the Month End button
on the Main Menu.
Statements
Prints the most currently created statements/invoices.
Checks
Prints the most currently created checks.
Client Status Reports
This is the equivalent of a debtor inventory report
which prints for each Client.
Payables
Outputs a summary of all clients for whom a trust
check was issued in the collection period specified. It is
the equivalent of a check register to simplify your
entry into your general accounting software outside of
Collect!.
Receivables
Outputs a list of clients who have a balance owing to
your company. Details are displayed with Current/30/60/Over 90
day aging. The report is selectable by user defined date range.
Operator Commissions
Outputs a summary of the collector commissions recovered
in the selected date range. Note: only transactions with a
commission amount (either positive or negative) are included.
This means that any payments or portions of payments which
were posted with zero commission will not be included in the
amounts output on this report.
ANALYSIS AND SUMMARY REPORTS
This option navigates you to a list of summary and
analysis reports.
Month Batch Analysis
Provides client recovery statistics on a month by month basis,
scanning back up to 2 years.
Transaction Analysis
Output layout of this report is the same report as the Operator
Commissions report above-captioned. The distinguishing
difference is that this version includes zero commission
transactions, including Adjustments.
Client Analysis
Generates a summary performance analysis report by client on
your selected date range, summarizing new business, debtor
payments, liquidation percentage, cost factor, number of
payments and number of new accounts on a monthly and year
to date basis.
Total Listed
Generates a historical totals summary of all accounts placed
with your office up to the report run date. It does not
detail by client.
Transaction Summary
Outputs paid agency and paid client totals within the
requested date range. It does not detail by client.
TRUST REPORTS
This option navigates you to the reports which pertain to
trust account balancing.
Trust Summary Report
Outputs on a selected date range and details paid agency,
NSF to agency and client remittance checks issued, arriving
at a closing trust activity balance for the requested period.
Client Trust Report
This report must be launched from an individual client
screen. It outputs a summary of all credits and debits
associated with the Client, along with a breakdown of
payments and charges.
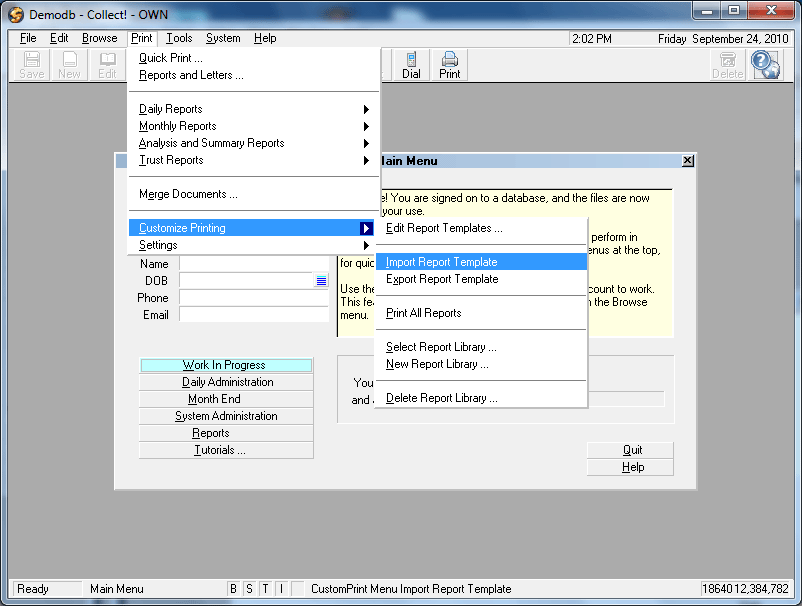
MERGE DOCUMENTS
This option allows you to select an externally created
template to use for your report layout. Data from your
Collect! database is used to auto-populate designated merge
fields. Please refer to the Help topic Merge Documents for
more detailed usage instructions.
CUSTOMIZE PRINTING
This option navigates you into the Print Menu in an
Edit mode where you may select an item from the reports/letters
library for modification or create a new letter or report.
Printing A Report
When you choose a report to print, you may receive a prompt
pop-up asking you to enter specific criteria of interest if
applicable, or if there are no parameters to be entered, you
will be advanced to the Print pop-up to complete the output
of your report.
From the Print pop-up, you can select your device or output
type. Examples: default or selected printer, spreadsheet, file,
email, browser, fax or other.
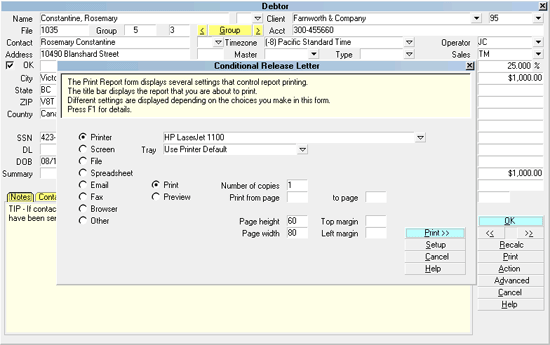
Print Report Screen
Clicking the Print>> button will execute your request as per
your selections in this window.
Report Destinations
PRINTER
Typically you send reports to a printer. You can select
from the list of printers installed on your PC.
Printer
This field displays the default printer. It may contain a
pick list that you can select from.
Tray
If your printer supports printing to different trays, you can
select a tray in this field. This is used with the @TRAY
command in the report writer.
Print
This selection prints directly to the printer.
Preview
This selection opens a Print Preview so that you can
preview your letter or report before sending it to the printer.
SCREEN
You can send the report to the Screen. This allows you
to quickly review the report. Control codes embedded in the
document will display in this view. Use Preview instead if
you wish to see a representative example of what the output
will look like when you send it to the printer.
This option is useful when you are executing a process that
requires a real-time run in order to complete contact events
but where you do not wish to generate actual paper output.
Preview does not mimic an actual execution and thus will not
mark contacts done where such is the objective.
FILE
Outputs to a file in the format you specify, with the name you
select and writes to the path destination of your choice.
File extensions should be .htm, .txt or .csv. After
clicking the radio button beside File, click the Browse button
to navigate to your file output destination and give the report
a name and file extension type.
SPREADSHEET
Choose this option to output a csv file to a spreadsheet
which you can open with your preferred program (i.e. Excel,
Open Office, UltraEdit, Notepad). Your file name and destination are selected
in the same manner as with File above, by clicking Browse.
Use file name extension .csv so that you are able to open it in
your program of choice.
EMAIL
Choose this option to print the report as an Email. The report
will automatically be sent through your Email program to the
address in the Debtor's or Client's Email field.
 Emailing through Collect! requires configuration prior
to usage. See your Systems Administrator to find
out if your office has been set up for email usage.
Emailing through Collect! requires configuration prior
to usage. See your Systems Administrator to find
out if your office has been set up for email usage.
FAX
Choose this option to print the report as a Fax. The report
will automatically be sent through your Fax modem to the
phone number you choose in the Fax # field.
BROWSER
This selection will print the report to an html document which
can be previewed and/or printed from your default web browser.
OTHER
Choose this option to print the report to an alternate word
processor, such as WordPad or Word.
Other Print Options
Other print options allow you to specify page size and margins,
and also which pages of the report you want to print.
Number of Copies
Enter the number of copies you want to print. It is prefilled
with the default 1 copy. No change is required if this is your
selection.
Print From Page
This setting specifies the starting page number of the report.
If the report is 20 pages long and you want to start printing
on the 10th page, enter 10 in this field. This field is
blank by default.
To Page
This specifies the ending page number of the report. If the report
is 20 pages long and you only want to print the first 5 pages, type
5 in this field. This field is blank by default.
Page Height
The page height lets you specify the number of lines that will be
printed on each page before the form feed function advances to the
next page. It is defaulted to the correct number for a standard,
portrait orientation page output.
Page Width
This will determine where printed lines wrap automatically.
This is especially important for the Quick Print option. 66
is a standard width. It is defaulted to the correct number for
a standard, portrait orientation page output.
Top Margin
This specifies the number of blank lines printed at the top of
each page. It is blank by default. Most letters/reports contain
individual document format codes as part of the source they are
written with. It is not necessary to place an entry in this field.
Left Margin
This specifies the number of spaces left blank on the left side
of each page. Most letters/reports contain individual document
format codes as part of the source they are written with. It is
not necessary to place an entry in this field.
Canceling A Report
You can back out of the print process by selecting the Cancel button
on the Print Report pop-up or by pressing any key if the print job
is in progress.
The program will pause and ask if the report should be cancelled.
YES - Stops printing the report.
NO - Continues printing the report.
MAILING LABELS
Mailing labels can be printed for debtors and clients. Before
printing your daily reports, you will be asked to choose to
print either the letters or mailing labels. Please be sure you
have the appropriate paper in the printer. If you have a separate
printer for labels, you will be able to select that printer before
the printing begins.
Order of operations is to print Mailing Labels before
batch letters so that your obtain your labels before
the process of the actual letters completes the letter
contact event.
You can modify the label format by using the Print menu,
Customize Printing, Edit Report Templates option. For
Debtor labels, the report is named Debtor
Mailing Label. For the clients, the report is
named Client Mailing Label.
See Also
- Data Entry Topics
- Letter Printing Topics
- Report Sample
- Accounting Topics
- Batch Processing Topics
- Contact Plan Topics
- Topics Collections
| 
Was this page helpful? Do you have any comments on this document? Can we make it better? If so how may we improve this page.
Please click this link to send us your comments: helpinfo@collect.org