Client Contact
Collect! enables you to schedule contacts for your Clients
in the same manner that is used in the Debtor area of the
software. It is possible for your Admin/CSRs/inside sales
teams to have their own WIP lists comprised of Client
Contacts to be managed in the same manner that collectors
work their designated account responsibilities.
From a Client perspective, sending out email blasts, reminders
for new placement batches, invites to corporate functions,
news letters, schedule a Clients monthly reports on a repeating
schedule such as Client Status Reports. There are no limitations.
Whatever you can do with respect to Debtor accounts can be
accomplished with Clients.
Your Sales Team can even use it for personal touches with your
Clients like keeping track of birthdays, anniversaries or
other important milestone dates that they may wish to
acknowledge as part of their Client servicing.
The Client Contact screen is used to define contacts and other
actions scheduled to occur on specific dates. Several different
types of contacts may be scheduled. The Client Contact screen
displays Fields and pick lists for all the possible settings that
you can choose from.
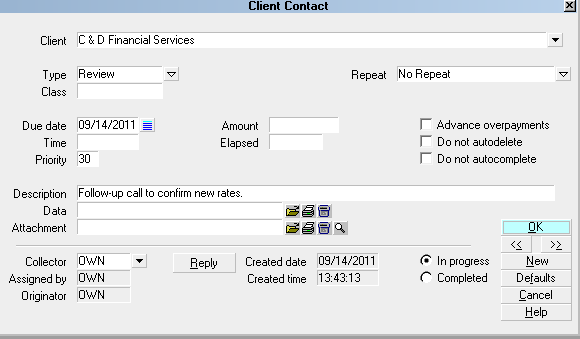
Client Contact Screen
When you are working your WIP list, Client Contacts will
be displayed along with any other current Debtor Contacts.
When you select a Client Contact, you will be taken
to the Client screen. The current contact will be highlighted
in the list of Client Contacts.
Accessing Client Contact
To access the Client Contact screen, select the Contact
tab when you are viewing the Client window. If you do not
see this Tab on your Client window, contact us to
discuss your upgrade options. The following are the
Fields associated with the Client Contact screen.

Type
The Type field sets the type of contact that
you are scheduling. Press F2 or click the drop
down arrow to view the list of contact types
that you can choose from.
The Type of contact determines a general action.
For instance, Letter means print a letter, while
Review means schedule a Review on the account.
Other settings on the Contact screen define the
details, such as which letter to print, or an
free-hand user entered Description for the Review
to serve as a reminder to yourself as to what
you wish to accomplish when this contact reaches
its due date.
The use of the Description field changes
depending on the Type you select in the Type
field.
Types Of Contacts
When you choose a Contact Type, other Fields
on the Contact screen change according to the
Type you select. The following is a list of
predefined Contact Types with details of how
your choice of Type affects the Contact screen
and the way the system handles the contact.
Commission
The Commission Contact sets a commission
rate in the Advanced Client Settings. This
rate applies on a go forward basis for all
new accounts entered for this Client. In the
Description field, enter the percentage as a
number. For example, 33 means 33% and 12.5
means 12.5%.
Letter
The Letter Contact schedules a letter to be
queued for printing in your daily batch. Press
F2 or click the drop-down arrow on the Description
field to view the list of all letters and
reports in your system. Select the letter
to be printed.
When your daily letter batch runs, the batch
process uses the Description field of each
Letter contact to locate the letter to print.
Please be aware that changing the name of
a letter may result in Collect! not being
able to process a Letter contact when the
batch is run.
When you print a Client or Debtor letter, the
batch process will attach a Metafile to the
Letter Contact.
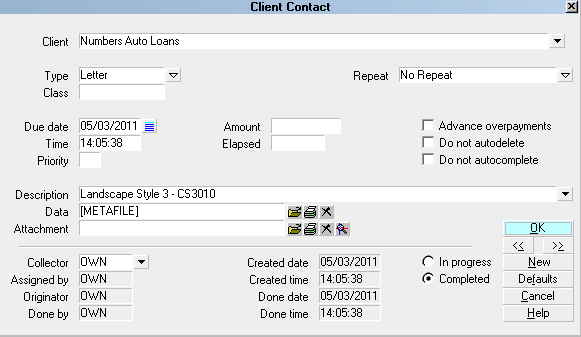
Client Contact with Metafile
If the Client Settings have disabled
metafiles, then the system will not save the
metafile.
Note
The Note Contact writes one line into the
Client Note Tab. In the Description field,
enter the text you want written into the
Client's notes.
If an asterisk [*] is the first character in the
Description, an asterisk will be placed at the
beginning of the noteline causing it to be
held at the top of the Notes as an Important
noteline.
Operator
The Operator Contact sets the operator in the
Client Settings field labeled 'Assign operator
ID to accounts'. This Operator ID will be
assigned to all new accounts entered for this
Client on a go forward basis. The Collector field
holds the Operator ID to be set in the Client
Settings when this Operator contact is processed.
Other
For general use, write a note in the
Description field.
Phone
The Phone Contact schedules a phone call to
the Client. A drop-down arrow appears in the
Description field allowing you to choose from
available phone locations for this Client. When
you choose Dial A Number from the Tools Menu,
Collect! reads the Phone contact's Description field
and the phone number is displayed automatically.
If you have the Auto Dialer option configured
and functioning on your site, this phone number
will be dialed automatically when you
enter this Contact when working your WIP.
Plan
The Plan Event type is a contact plan that will call
another contact plan. Complex strategies often
require nested plans using conditional logic
with the 'Schedule if' fields. Press F2 or click
the drop-down arrow at the end of the Description
field to choose which ID from your Contact
Plan menu to run.
Rate Plan
The Rate Plan Contact sets a Commission Rate
Plan in the Client Settings. This rate plan
applies on a go forward basis for all new
accounts entered for this Client. Press F2 or
click the drop-down arrow at the end of the
Description field to choose a commission Rate
Plan ID from your existing list of Rate Plans.
Review
The Review Contact schedules a review of the
account or client. Enter a free-form
Description which will appear with this
contact in the Operator's WIP list.
Sales
The Sales Contact sets the operator in the
Client Settings field labeled 'Assign sales
ID to new accounts'. This operator ID will
be assigned as the Sales ID for any new
accounts entered for this Client on a go
forward basis. The "Collector" field in
the Contact event should be selected with
which Sales ID you wish to have to be set
in the Client Settings when this Sales
contact is processed. The Sales Contact
changes the Sales Team ID assigned to new
Debtors entered in your system. Select the
Sales ID from the pick list in the Collector
field.
Client
This is the Client whose account is being
worked. You may want to send a letter to
this Client, make a phone call, write a
note or several other actions.
Due Date
This is the scheduled date for the contact
activity. The Due Date determines when this
contact shows up in an operator's WIP List.
For batch processing, the Due Date is the
date that the contact will be processed.
Time
This is the scheduled Time for the contact
activity in 24 hour format. Meaning, if you
input 4, then this is 4 AM. Input 16 for 4 PM,
18 for 6 PM and so on. You can set the time
to the minute. For example, you could enter
16:25 and the call will pop up at 4:25 PM.
It is not compulsory to enter a time.
Timed contacts are important when you
must deal with a Client at a specific
time. Then you would enter 19:00 in
the time field of the contact and it
will popup on your screen at that time.
If you do not need a time prompt for
this account, it is recommended that
you leave the time field blank.
Repeat
The Repeat field allows you to automatically
forward the date of a contact. This
function is activated when you batch process
your automatic contacts.
Press F2 or click the drop-down arrow beside
this field to select a repeat cycle. When
a repeat period is selected, other Fields
become visible.
When this field is set to Custom, the
Number of Days field becomes visible.
Max Intervals
This field is visible when you select a Repeat
value. The system uses it to determine how many
times this Contact is to be done over.
Priority
The Priority field allows you to enter a
user defined numeric value that can be used
to indicidate different orders of operation
or other significance in your office. Because
one can segment High/Low or sort Ascending/
Descending, this is an aid that will be used
by the WIP list when selecting accounts to
feed an Operator when they are using the >>
arrow keys to advance to their next Contact.
Priority levels in the WIP list are as follows.
66 to 99 - High
34 to 65 - Medium
1 to 33 - Low
Class
The Class field is for your own use. You
can use it to further categorize a
particular type of contact. So used,
you would have another variable that could
be utilized in a custom report to drill
down to custom/specific data in selecting or
excluding accounts in a report.
Amount
The Amount field is used to store a dollar
amount. You can use it for any purpose.
However, for certain types of contacts, it
has a special purpose.
Number Of Days
The Number of Days field holds the user defined
number of days the Contact due date is to be
forwarded when the Contact is processed.
This field is only displayed when the Repeat
field is set to "Custom."
Description
The Description field either a pick list
selected or user defined free-hand text that
defines the purpose/details of what is to be
accomplished with the Contact event.
Example: you may have the Description set
to " New Business" on your Review contacts
imbedded when you enter new listings into
the system so that your collectors see
this and recognize the priority. Contact
types such as Phone require that you select
which type of phone (home/poe etc.) is
intended for calling. It is not necessary to
enter multiple Phone contact events if
you want your Operators to call every
number if the debtor has been reached.
Each site can individualize how they wish
their staff to use the Description fields.
Attachment
The Attachment field is typically used
to store documents or other file types that
are related to a particular contact event;
i.e. a WAV file from a Dialer Campaign or a
recorded complaint call saved with the Phone
Contact it pertains to. This is not a mandatory
field and is most often left blank.
To the right of this field, there are four icons.
The Folder icon is to Open or create an
Attachment.
The Printer icon is used to Print an existing
attachment's contents.
The Trash bin icon is used to delete the existing
Attachment.
The Magnifying glass icon is used to navigate
to where the file or document is stored so
that it may be saved as an Attachment with
this contact event.
Defaults
Select the 'Defaults' button to open the
WIP Options screen where you can modify
the settings for the default behavior of
your Work In Progress.
Collector
This is the Operator ID assigned to this
Contact event: whose WIP list this contact
will appear in. For a Client contact event
that is meant to be worked by inside sales,
the ID to select in this field is that of the
sales person who is to action the Client
Contact event so that it will appear in their
WIP. If it is a clerical task that
you want another employee to action, then their
user ID would go into the Collector ID
field in the contact event.
Assigned By
This is the operator who sent you the contact.
This would ordinarily be the same as the
Originator. However, when the contact has been
forwarded, this could be a different operator.
Originator
This is the operator who created the contact.
Done By
This is the operator who completed the
contact. This field is visible only when a
contact is marked "Completed."
Created Date
This is the date the contact was created.
Created Time
This is the time the contact was created.
Done Date
This is the date the contact was done. This
field is only visible when a contact is
marked "Completed."
Done Time
This is the time the contact was done. This
field is only visible when a contact is
marked "Completed."
In Progress
A mark in the radio button beside this field
means that the contact has not been done.
The contact will be loaded into your WIP list
until the contact is marked completed.
Completed
A mark in the radio button beside this field
means that the contact has been completed.
The contact will no longer show up in the
WIP list of the party who completed the
single event unless there is another
In Progress event type that will appear in
someone's WIP on a future date.
See WIP List topics for more details.
Do Not Autodelete
Switch this ON to prevent autodeletion of
this contact. This is useful for overriding
events in contact plans that delete pending
contacts.
No Autocomplete
In WIP Options, the setting 'Automatically mark
contacts done' can be set so that Contacts are
marked as Done when they are worked from the
WIP List. To override this global setting for this
particular contact, switch ON 'No Autocomplete'.
Elapsed
This is the amount of time that you have
spent on the contact. You can enter an amount
in hh:mm:ss time format (for example, 00:01:53
is 1 minute and 53 seconds.) Or, you can set a WIP
Options preference to "Enable elapsed time
counter" to enter a value for you automatically.
Time tracking is recorded only when contacts are
worked from the WIP List and are displayed
cumulatively. Total time spent will reflect
repeated visits via the same contact. It is
not presently tracked how many times the
Operator came back to this contact event
throughout the day.
Delete
This button is visible only on a list of
contacts. Select it to delete the highlighted
contact from the database.
Edit
This button is visible only on a list of
contacts. Select it to open and edit the
highlighted contact.
New
Select this button to save any changes
you may have made to current contact and
then create a new blank contact for you
to set your next work date.
Help
Select this button for help on the Client
Contact screen and links to related topics.
Cancel
Select this button to ignore any changes
you may have made to this contact
and return to the previous screen.
OK
Select this button to save any changes
you have made to this contact and return
to the previous screen.
<<
Select this button to view the previous
contact in the list.
>>
Select this button to view the next contact
in the list.
Contact Attachment Field
As described above, to the right of the
Attachment field there are four icons:
Open/Create is a Folder icon, Print is a
Printer icon, Delete is a Trash bin icon
and Search/Select is a Magnifying glass
icon.
Open Or Create An Attachment
To create an attachment, click the Folder
icon and a Windows file explorer popup will
appear. Navigate to where your document or
file is stored on your PC or Network and select
the filename to be attached. Once selected,
click the Open button to save. You will be
prompted if you wish to save the file to the
"global" path. Unless your inhouse Systems
Administrator has indicated otherwise, the
response to this prompt is Yes.
If you are clicking on the Folder icon and
a file is already saved as an Attachment,
it will open the file or document with
the configured application reader on your
system that is associated for that file
type.
Print An Attachment
If there is a filename displayed in the
attachment field, you can click the Print
icon to print the filename's contents. If
applicable, select the printer from your
list of configured printers that you wish
to direct the print job to be completed on.
Delete An Attachment
If there is a filename displayed in the
Attachment field, you can click on the
Trash bin icon (or "X" icon for versions
CV12 and higher) to delete the attachment.
Attach Existing File
To attach an existing file to this contact,
click the Magnifying Glass icon. This
feature allows you attach any kind of file
to your accounts without opening it. As long
as Windows is set up to handle that file
type, you can instantly display or print any
type of original information about any account.
You can print Contact attachments in reports
and letters using the @File command in your
report templates. However, the attachment file
can ONLY be a text file.
If you put a URL in this field, the
system will use your web browser to go
to the website when you select the
Open icon.
Importing Client Contacts
As of version CV11.4.3, you can import and export
Client Notes, Client Attachments, Client Contacts and
Payments. This requires that you are licensed for Collect!'s
optional Import/Export module.
Sample import maps are shipped with Collect! and are available for
download from the Member Center on our website.
See Also
- Client Topics
- Batch Processing
|
Was this page helpful? Do you have any comments on this document? Can we make it better? If so how may we improve this page.
Please click this link to send us your comments: helpinfo@collect.org