How To Setup And Configure Collect!
This page outlines the reference materials available for you to
properly setup and configure your Collect! system.
Setup Checklist
When your installation of Collect! was completed, you were
navigated to a Help page entitled " Setup Checklist". If you
did not print that page out at the time and would like to
reference it again, you will find it at this link:
Setup Checklist
The Setup Checklist provides you with a topical overview of
the areas in the software that require your input of data
or setting of preferences prior to initiating active working
within the system.
Each area to be setup can be examined in detail through
links from the Setup Checklist Help page.

Collect! Tutorials
This presentation demonstrates basic functions you will use
in normal course daily operations.
When you select the link, the presentation starts immediately.
Play Tutorials.
Exploring Collect!
Explore the features, create your own experimental scenarios
and processes, all without the fear of compromising your
live database. This is an area in which we are unique. We
provide you with an extra database exclusively for your safe
testing of new ideas or procedures that you may wish to try
out with complete isolation from your working database.
After you've confirmed in test that the process being attempted
meets with expected results, you can reproduce the same in your
working database, called masterdb. This may be a Contact Plan,
Report or Letter, Control File, Client setup with switch settings
you've not used before, etc.
Starting Off Right
Have you completed all of the necessary preliminary setups so that
Collect! has the information it needs to function in the manner that
is required for your individual site?
For best results, we cannot stress enough how important
it is to ensure your mandatory setup data, system preferences
and access privileges are all decided and filled out in the
software BEFORE you go live with working accounts and posting
payments.
Follow the Setup Checklist to setup
Collect! in the proper order (as outlined in the training videos).
Order of operations matters since the settings in one area of Collect!
are used by and/or impact many other areas. The following is an example
of the order of operations we are referring to:
1. System and Preference Settings
Company Details. This is a very important setup screen as many
reports and functions, i.e. credit reporting, rely and use the
information stored here.
See the Help page called Company Details.
The personnel who will be functioning as your Systems
Administration/IT team need to become familiar with the function
and feature preference screens. Combinations of these switch
settings will change the behavior of Collect! and it is best to
become familiar with these to ensure from cutover, you have your
system operating in exactly the manner that is right for your
business.
See the Help page and associated links called User's Guide - System
Administration.
2. Operator setup, if you use unmanned storage desks, like Admin,
Bankruptcy verifications, House etc, these must also be set up prior
to their being available for you to transfer accounts onto.
See the Help pages How To Set Up Operators and Access Rights - Default
Settings.
3. Reports and Letters. Particular emphasis on your initial
collection letters that need to be ready to be inserted on
new accounts. The SAMPLE letters which ship with Collect! are
NOT intended to be used as is; they are exemplars of how to set
letters up.
 Each licensed site is responsible for ensuring that all
correspondence sent to debtors is compliant with
the legislation of their region for form and
content.
Each licensed site is responsible for ensuring that all
correspondence sent to debtors is compliant with
the legislation of their region for form and
content.
Aesthetics are important. In addition to the various straight
text outputs, you do have the ability to have your company
logos, other images, pen/line/shapes/boxes, and color added
to your reports and letters. These are advanced features of
the ad hoc Report Writer. You may wish to embark on these
embellishments on your own or contract our Technical Services
team to prepare your letter/report layouts for you. To obtain
pricing for custom letters/reports, please email
support@collect.org with your request, attaching mock-up samples
of what you want the document(s) to look like and we will be
pleased to provide you with pricing.
See the Help page How To Setup Reports and Letters and Report
Writer Topics. These links cover introductory to advanced
usage of the Collect! proprietary ad hoc report generator.
4. Rate Plans. Are your clients needing any complex tiered
commission plans or are they all flat rates. If tiered rate
plans are going to be needed, set them up in advance so that
as you data enter your clients, the codes for these are available
for streamlined use as you input clients.
See the Help page called Commission Rate Plan Basics and the
associated link at the bottom of this page.
5. Pick-lists. Collect! has many drop-down fields which enable
you to classify accounts and specific aspects within accounts with
categorical designators that can then be harvested in reports for
your metrics and analytics. Explore the system taking note of
where these are and if more choices in any drop-down are needed,
have them inserted and ready to go before you begin the entry of
all your data. Key fields you may wish to have this categorical
segmenting are in Cosigners, Attachments both for Class and Type
designators, as well as debt Type.
 WARNING: If you are a credit reporting agency, the single
pick list that should NOT be modified is the
Type field that exists in the uppermost right
corner of the Client Setup screen. This one
field is the Creditor Classification codes that
are acceptable and readable by the credit bureaus
when you report accounts. Choices should not be
added nor should existing categories be modified
as to how they are worded.
WARNING: If you are a credit reporting agency, the single
pick list that should NOT be modified is the
Type field that exists in the uppermost right
corner of the Client Setup screen. This one
field is the Creditor Classification codes that
are acceptable and readable by the credit bureaus
when you report accounts. Choices should not be
added nor should existing categories be modified
as to how they are worded.
See the Help page How To Use Pick Lists.
6. Transaction Types. Have you reviewed them all to ensure that
default settings are in keeping with how you want them to function?
Some have automated contact plans attached, i.e. Type 105 (NSF).
Others are designated to be considered non-payment type transactions
which may not be how your company views the same transaction. Most
importantly, if you are using payment disbursement hierarchy, have
you reviewed the system default as compared to your preference?
Specifically, the payment breakdown shipping defaults by which
left unchanged, Collect! will disburse payment dollars is first to
Fees, followed by Interest, Principal, Legal, Misc, Other. If
your preference is any other order of operations, then all you need
to do is re-order the fields to your preference for each Financial
Type "Payment" transaction code that you will use.
There are also preset designations as to which Transaction Types
are omitted from client statements and/or Daily Cash Reports. These
as well can be edited to fit your operations model as well by clicking
or unclicking checkboxes and radio buttons in the Transaction code
settings screen.
See the Help page Transaction Type Basics and the associated links
at the bottom of this page.
7. Contact Plans. In Collect!, Contact Plans are your action plan
automations. Examples of typical usage are:
- Insertion of a dunning letter series on new accounts
- Set the initial account Review for appearance in a collector
WIP List
- Preset manager/auditor reviews
- Age-out and Close-out criteria
- Collection phase desk migrations, i.e. Frontline has an
account for 45 days. If no payment, send to Tier 2 collector desk.
- Action/Results codes for collector quick- notes, i.e. Tel
Res - No Answer
- Situational cascade of events, i.e. an NSF plan can
post an NSF charge to the balance, update the Status Code,
write a noteline for the collector, insert a Review event with
an NSF Alert description into the collector's WIP List etc. If you
choose to use a Payment Posting Option called "Automatically manage
promises when posting", there are 8 separate contact plans that
can be triggered by the making or breaking of a promise or payment
plan
- Complex inventory management strategies, i.e. legal accounts,
trace accounts
This is just to name a few of the uses. If you can create a
flowchart of the events you want to take place and the logical
conditions that will trigger one path versus another, you will be
able to use Contact Plans (and nested plans) to carry out your
strategies.
In getting started with Collect!, the first Contact Plan you will
likely use first ships with some events preset for you. Its code is
NEW in your "System\ Contact Management Settings\View Contact Plans"
menu. This plan needs to be reviewed for each site's initialization
preference: the shipping default inserts a Collect! SAMPLE letter
series on a predefined schedule, creates a collector WIP List Review
event with a 10 day delay from listed date, and
updates the status to NEW. You may update/add to/omit from these
events and contents to suit your individual site operations.
See the Help page called Contact Plan Topics.
8. Clients need to be set up before Debtors can be input.
See Help pages and associated links called Client Topics and
How To Enter A New Debtor.
Making Changes To Your Settings Later
Collect! is flexible. You can modify settings at a later date as
situations change or your preferences need to be modified.
Getting Help
In addition to detailed Help pages and Member Center training
materials, you always have Help sources right at hand.
- Context sensitive Help by pressing your F1 key in any screen or
specific field on a screen will navigate you directly to our
webpage Help system where you will land on the precise spot
that describes the feature or function you are interested in.
- Automatic Popup Help. All Operator IDs ship with Popup Help
Enabled. While using Collect!, it will interpret your mouse pausing
or hovering on any area more than a few seconds as a need for help
and will popup a blue box window that describes the screen, field
or feature that you mouse is poised over. In your early stages of
Collect! usage, you may find it particularly educational to leave
this feature On.
There are two ways to turn it Off; temporarily for the current
session and permanently (unless desired again to be On). Click
the Help menu drop-down and scroll to Disable Popup Help. This
will turn the blue box popups off until your next login. To
turn it off more permanently, update the Operator's setup screen
in the Detail Tab. The switch is called "Disable popup help" and
is located in the first bank of checkboxes in the middle of the
display.
- Click the Help drop-down menu at the top of your screen to
see the hyperlinks to the subject specific Help menu. These
links will navigate you to the appropriate page on our website.
- On the Help page at www.collect.org, you also may input
keywords or phrase into the Search bar which will query ALL
our Help pages and return a Google list of matches for you to
choose from. The search engine will respond to topical
words, with or without comma separation, as well as short
phrases prefixed with "How to".
- Two pages of considerable resource are the Help Contents
and Help Index. The Contents page shows you a subject organized
layout of the topics available on the website. Essentially the
online equivalent of a textbook Table of Contents. The Index
page will respond to word searches by alphabet. We have arranged
the material so that one topic that may be described in the
industry by more than one word, will recognize as many
synonyms as we could think of to include. If you have any
difficulty finding something and discover it was a covered
topic but not searchable by the word you were using to find it,
please let someone on our Management Team know so that we can
add that context search into our Indexed library in the Help
pages.
How To Cutover To Collect!
This document describes important items to be aware of and to
attend to both before, during and after you cutover to Collect!.
This document is in addition to the setup routines described in
the Setup Checklist and How to Setup and Configure Collect!.
Please set up your system using the aforementioned pages before
pursuing the activities described here.
If you are coming to Collect! from another application,
and our Conversion and Implementation team has been contracted
to convert your data, our first milestone is to obtain your data
to create a 'test' conversion for your review. All data as mapped
during consults between yourself and our team for intended relocation
will be presented to you in a test installation. You will be asked
to carefully compare all aspects of the data in the system to verify
the accuracy and completeness of the test conversion.
This will most often include a 'test' monthend performed for the
last complete billing month PREVIOUS to the 'test' installation
you will be reviewing. In addition to general data transported
across, you will want to verify statements/checks generated by
your previous application to those which were generated in
Collect! for system-to-system parity. Once we have your
statements generated and verified as accurate for that
month, we can show you how to enter your client balance forwards
from that remittance cycle OR, if we were contracted to do so,
we will input that accounting detail for you, where applicable.
This will build your A/R in Collect! on a go forward basis. It is
rarely possible to retroactively rebuild receivables history;
debtor accounts with their transaction history archived/purged/deleted
is but one way that negates company life-to-date accounting as
being possible to rebuild from day 1 of operation.
Similarly, historical client financials, performance reports,
collector reports, archived inventory not being converted etc.
from your previous application will be your responsibility to
extract and retain.
Your final cutover will typically be scheduled for a future
end of month that occurs chronologically after the date you
confirm that the converted data is correct as to form and
content as compared to live data in your current system.
This will be subject to scheduling with Technical Services and
timeline agreements established between yourselves and Comtech in
your Purchase or Hosting agreement.
You will be responsible for providing Comtech with data extracted
from your existing system at the point in time where ALL information
from the last live month on your previous application is concluded.
This includes client statements/checks, credit reporting, client
reporting, debtor letters (hardcopy or letter service data file),
mandatory closeouts and/or other key reporting that you may need
to perform for your clients that needs to be completed up to the
cutover date.
If you are manually data entering all your own data, we would
recommend that for the first month, that you run both systems
in parallel with respect to your financials to ensure you have
brought everything across that you needed to. Balancing your
client statements/checks between your old and new systems will
show you, at least in the financials, if you missed or misapplied
anything.
Debtor And Client Information
When you are converting to a new system, it is a good time to clean
house.
Are there accounts and clients of such an age and dormant/closed
that you'll never need to access them? You may wish to backup such
data for storage but not convert it to your new system. We
recommend retention of data that is compliant with legislation in
your region should you be called upon to produce records by a client
or a state/province/federal governing body.
Entering Pre-Conversion Financials
You will want to ensure that Collect! has the correct values for
Original Principal and Interest, and all payments made since assignment
so that the correct and current amount Owing will be reached when
converted accounts are entered and recalculated. It is also necessary
to identify the Interest Rate and Last Interest Date so Collect! has
a date to take over charging interest from to keep your balances
accurate.
If you are entering Payment Transactions as part of your conversion,
the following fields are important:
1. Use the correct Transaction Type codes to reflect your
pre-conversion payments.
2. Payment Date - when you received it.
3. Posted Date - when you finalized it in your system. Most often
is the same as the Payment Date. This is a very important date in
Collect!. It is the date that will make the payment eligible to
be included on a client remittance. When Statements run, they
are always looking at Posted Date UNLESS you set a company preference
to indicate that your statements would use Payment Date only.
4. Correctly designate whether the payment was "To Us" - Paid to
Agency, OR or "Direct" - Paid to Client. The accounting is
different depending on which and thus it is important to correctly
distinguish between the two payment methods.
5. The Transaction record includes a field to input the Collector
and Sales IDs who are to be given credit for that payment. If
these fields are blank for pre-conversion payments, you will not be
able to obtain even recent past collector or sales recovery/productivity
reports.
6. Commission Rate that was charged.
7. Taxes that were charged, if applicable.
Notes
Notes can be entered in free form or converted electronically from
your source file.
Statement/Invoices
Statement/ Invoices can be generated ad hoc on whatever your
client's remittance schedule requires. The most prevalent
being Monthly. During a statement run, the system gathers
all the debtor payments/directs, charges, fees, taxes, any
payments the client made during the billing cycle and then
computes what the clients' due amounts are, OR what amounts
the client owes you for the end of that remittance cycle.
The Invoices tab on the client screen stores the Aged Balance
Forward accounting and each time statements are generated, the
clients' accounting history with your company is updated.
See Client Topics for more details on Remit types and running
client Remittances.
You have two choices with a new installation.
- Print out your Accounts Receivable from your previous system
before converting, then start your statements from the first
month you are on Collect!. This will mean all the past history
stays with the old system and only new billing cycles will be
contained in Collect!. You will either:
- pursue any pre-cutover client balance forwards separately from
Collect! and post them in your General Ledger accounting
application ONLY since there will be no offsetting receivables
for those amounts in Collect!, OR
- contract us to input your last complete month's worth of
receivables into Collect! for you, OR
- input the client balance forwards yourself after one of
our technicians shows you how to do this data manipulation.
Depending on your installation agreement, this small training
session may be included or available for a small add-on Timed
Services fee.
- After converting your old accounts with all transactions,
generate statements for every billing cycle in that client's
history with your company to rebuild their A/R with your
office. Necessary for this to be accurate are complete
details for ALL past transactions for ALL debtors ever assigned
and ALL client payments/write-offs made towards ANY accounts
receivable that took place since you began doing business
with this client. We find in practice that it is rarely
possible to retroactively recreate a full financial history
with a company that has been doing business with their clients
over a considerable period of time. This being because ALL
of the information necessary to do so is rarely available
(and you would need to run 20 years worth of monthends either
incrementally or one very long, very computer performance taxing
single 20 year period if that's how long you've been doing
business with that client).
We recommend one of the flavors of Option #1 above.
Recalculating Your Totals
To update your system after entering all your clients,
debtors, transactions, closures etc., you will need to
recalculate all system totals to refresh the tally
fields in your clients, debtors and daysheets screens.
As a Collect! go forward operational rule of thumb, you
should run a batch Recalc daily to ensure your totals
everywhere are up to date. For example, if you have debtor
accounts that accrue interest, balances will not automatically
add that interest from the last date any was charged until
either a person opens that account on their screen or your
next batch Recalc which includes debtors is executed.
For a small to medium sized organization, this process will
not take more than seconds to a few minutes to complete. As such,
this task can be delegated to admin/clerical/inhouse IT personnel
to manage as a daily task. Many of our clients prefer end of
day or first thing in the morning to ensure outbound letters due
to be issued are calculated current to the cent before issuance.
Companies with very large databases may wish to purchase
our Scheduler module which would enable you to run this
process unattended and off-hours, along with a considerable
number of other features which can be redirected from
requiring an operator to being an unattended task. Alternatively,
those with large databases might also wish to consider
purchasing additional user licenses so that staff who are
responsible for the running of processes can have multiple
sessions of Collect! running concurrently: one for processes
and one to do actual hands-on work. Call Administration at
250-391-0466 option 3 for pricing on both add-ons above-mentioned.
See the Help pages called Recalculate Totals and Scheduler.
How To Enter Your License
When you have purchased Collect! for the first time, have added
feature modules, renewed your annual Membership or added more
user seat licenses to your system, Comtech Systems will
issue you a new License Code by email, fax or phone. This
new License Code must be entered to activate your new / updated
registration or to activate the changes that you have added.
License or verification codes will NOT
be provided to anyone who is not on record with
us as being an Authorized Contact for your company.
This is a security measure for your protection.
Preparing To Enter Your License
Your License Code must be entered from your Server PC. This is
the computer on which your Collect! system is actually
resident/installed. This means you should not attempt a
licensing from a workstation if you are in a networked
environment.
On the first occasion you load your official License, the
software will record specific ID info from inside your PC and
store it for future comparison. When you receive License renewals
or re-issues in the future, the License will look to match
information stored from the last time you entered a code.
If it cannot verify the machine it is being entered into,
the License will be rejected.
 Make sure to coordinate with our office in advance
if you plan to migrate your system onto a new
server at any point. Your License will need to
be re-issued.
Make sure to coordinate with our office in advance
if you plan to migrate your system onto a new
server at any point. Your License will need to
be re-issued.
If you receive your License Code by email or fax, it must be
entered by the date indicated in the instructions.
Your License Code must be entered in your active working
database. To be sure that you are entering your
license in the correct location, please sign into Collect! at
the Server, using the Desktop icon that was installed when
you installed Collect!
To make sure you are signed in to the correct location, using
the menu bar at the top of Collect! select Help to display the
drop down menu. Select About from this menu. Confirm that the
db path: displayed at the bottom of this screen
is the location of your active working database.
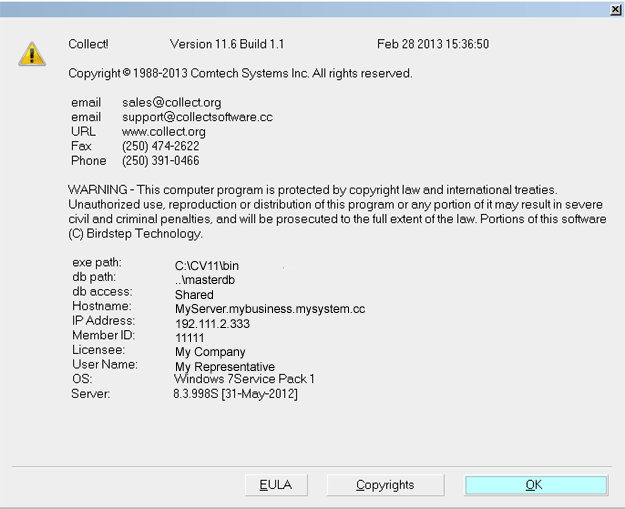
About Collect!
Examples:
C:\CV11\bin\CV11.exe
You can enter a license.
C:\CV11client\bin\CV11.exe
You cannot enter a license here. This is the Client install.
\\server\CV11\bin\CV11.exe
You cannot enter a license here. You are on a Workstation.
X:\bin\CV11.exe (X: is a mapped drive)
You cannot enter a license here. You are on a Workstation.
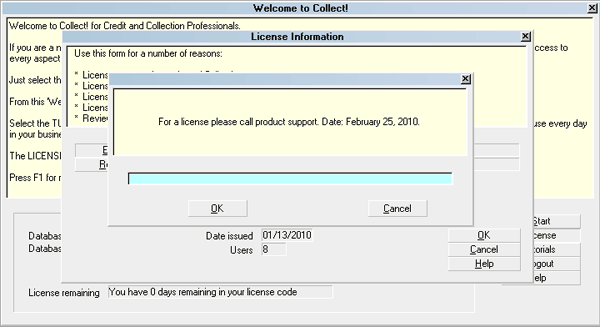
Accessing License Information
The License Code is entered from the License Information
screen.
Start Collect! and stop at the Welcome To Collect!
screen. Select the button labeled License to open the
License Information window. If Collect! opened bypassing the
Welcome To Collect! screen, please refer to Help
topic, Troubleshooting License.
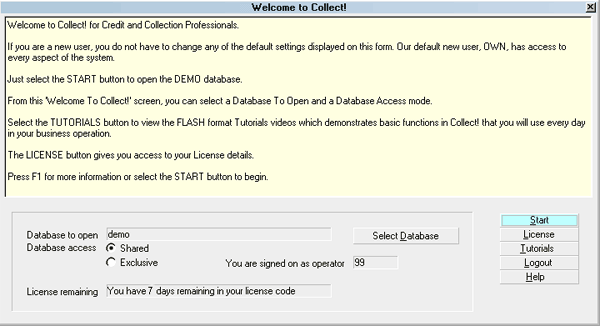
License Button
You will be at the License Information screen as
displayed below.
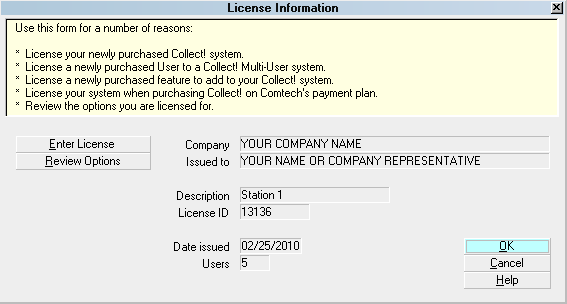
License Information Screen
The License Information screen displays the details of
your software registration. You will return to this
information later on to check its accuracy.
Entering License
Step 1 is optional, but recommended.
1. Get all users out of Collect! and go to the computer with
Collect! installed on it (your server). Shut down the Collect!
Server (Black DOS Window / RDS Server). Start the CV11
Server back up again, and open Collect!, stopping at
the Welcome to Collect! screen.
2. Select the button labeled Enter License.
This will display a large box where you will enter your new
License Code. The box also displays the system date.
Enter License Code prompt
Before entering the License Code, make
sure your computer System Date is the same
date as the date the License Code is issued for.
The date of the email, fax or phone call
that contained your License Code must match the
date that displays in the prompt. Please see
the example above.
3. Carefully enter your EXACT License Code. The easiest way
to ensure accurate transport of these codes which can be quite
long, is to copy/ paste using Ctrl+C to copy and Ctrl+V to paste.
Please watch for the placement of numbers and characters in the
License Code. Notice that zeros and O's look very similar.
Also, I's are similar to 1's.
4. After checking your completed entry carefully, select OK.
After you select OK, you may possibly be notified
if there were any errors entering your license.
Please refer to Troubleshooting License to find
out how to correct the issue. If your code has been
accepted, you will proceed to the next step.
5. Company Name
If your License Code has been accepted, you will be
presented with a box in which to enter your Company
Name. This is required to proceed. The information you
enter will be displayed in the License Information
screen. Select OK when you are finished.

Enter Company Name prompt
6. Your Name. Next, you will be presented
with a box where you will enter your Name. This is required
to proceed. It is usually the company owner or contact person.
The information you enter will be displayed in the
License Information screen. Select OK when you are finished.
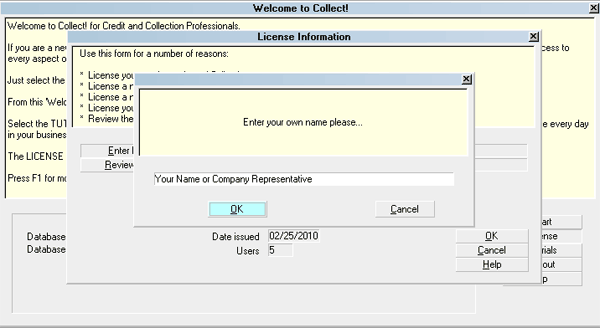
Enter Your Name prompt
Verification Code
When we issue your annual license, you will also require a
verification code to complete the licensing process. After
you enter your license code successfully, you will be shown
a message with your machine ID number. This is a network
card or an OEM number. Please phone or email this
machine ID number to Comtech Systems and we will give
you a verification code to complete entering your license.
Enter the verification code exactly and select OK to complete
the licensing process. If you enter the verification code
incorrectly, select OK and you will be prompted to enter
it again.
For security purposes, we may also require a
verification code in other circumstances,
such as unusually frequent requests for
a license.
License Recorded
If you skipped step 1, or entered the license with users in
the system, Collect! will prompt you to restart your server.
This is in reference to the CV11 RDS Server. You can select
'no' and do the restart after everyone is off of the system.
At this point, Collect! has all this information needed and
you will see the License Recorded message.
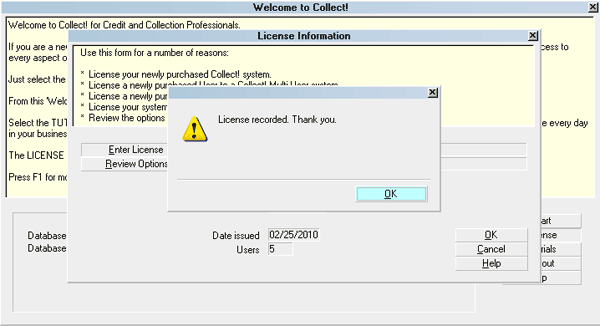
License Recorded
Select OK to return to the License Information screen.
Verify License Information
Check that the information entered in the License Information
window is accurate. Check that you are licensed for the correct
number of users.
License Information form
Review Options.
At this point, it is recommended that you review the options
that you are licensed for. To do this, when you are in the
License Information screen, select the button
labeled Review Options. The
Collect! Features window will appear. Please make sure that
the options you have purchased are checked.
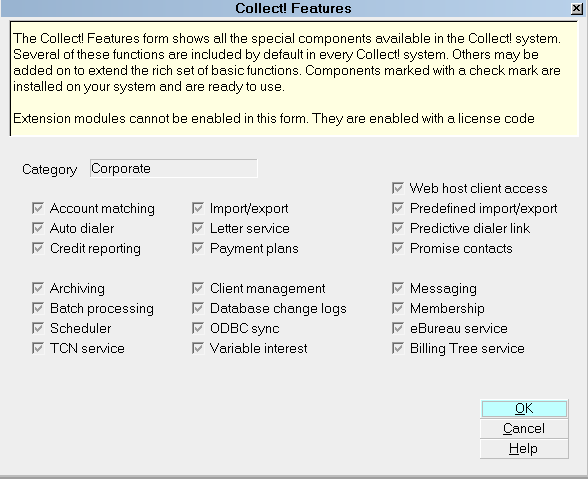
Collect! Features form
If you disagree with any of the information
that is registered for you, please call
Administration without delay at 250-391-0466
option 3.
Select OK to close the Collect! Features screen. Select OK to
close the License Information screen. You can now sign into
Collect! to take advantage of any new features or Users you
may have requested.
You may also load your License with the system
up and fully operational PROVIDED
you respond NO to shutting down the RDS Server
while users are in and using it. It is necessary
to ensure that you safely close the RDS Server
on your main PC at your end of day when everyone
is out and BEFORE midnight the
same day to commit the loaded License to the
database.
Please contact Administration if you need any assistance or
clarification regarding License entry.
Troubleshooting
If you encountered any difficulties entering your license,
please refer to Troubleshooting License.
See Also
- License Topics
|
Was this page helpful? Do you have any comments on this document? Can we make it better? If so how may we improve this page.
Please click this link to send us your comments: helpinfo@collect.org