Access Rights
The Access Rights form contains many settings that
control security and properties for menus, forms, fields
and buttons in Collect!. This provides great flexibility and
control over all aspects of your use of Collect!
Using the Access Rights form, you can change
form and field labels, set a field color, attach a pick list
or a control file. Read/write privileges for various user
levels can be set, including who is allowed to access
particular menus, form and fields in your system. You can
also switch on logging changes to notes or verify that
correct data is entered in a field.
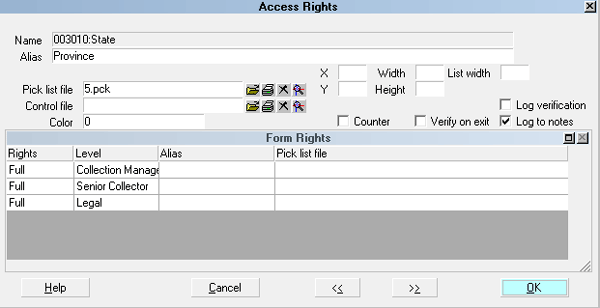
Access Rights form
 Please refer to Access Rights Basics for steps to
access this form.
Please refer to Access Rights Basics for steps to
access this form.
No Access Rights
When a user tries to perform function that they do not have
access rights to, Collect! will display a message indicating
the Access Rights number that you can change to grant
access to the particular function.
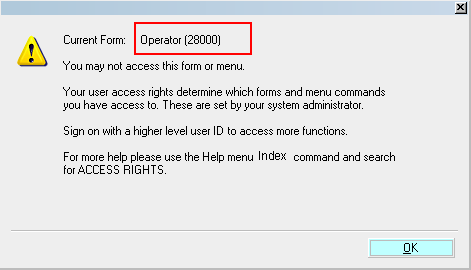
Access Rights Prompt
The Name and Number displayed in this message helps
you locate the particular form in the Access Rights list.
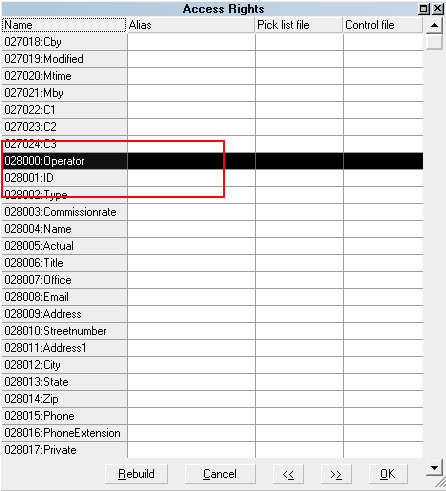
Access Rights Item in List
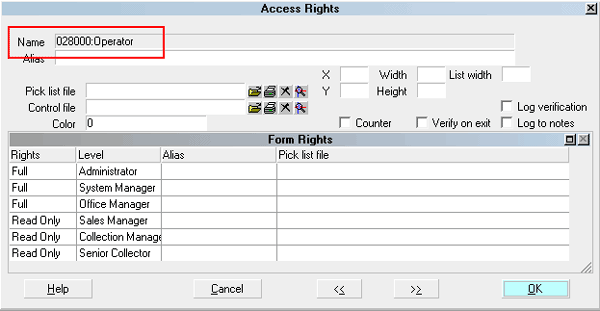
Access Rights Form Name

Name
This is the form, field or menu name.
For Forms, the name is shown on the top line of the
form. Field names are displayed to the left of the field,
and Menu names are as you see in the pull down Menus.
The Name field contains a list number and the
name of the item. For example: "01500: Main Menu"
is the Main Menu and its list number is "01500."
In the Access Rights form, the Name field is greyed
out and cannot be changed. Collect! needs to read
this information for its internal work. However, Collect!
allows you to change the name that is displayed for
the item.
To modify or change the name that appears
after Collect! is run, use the ALIAS field.
Alias
This is a name you can use to override the default form
or field name. If you enter a name into this field, the
name you enter will replace the default name ordinarily
displayed by Collect! for that item. The change will take
effect the next time you sign into Collect! This Alias can be
overridden on a User Level because there is also an Alias
field in the Form Rights form.
 WARNING: If you decide to use aliases,
DO NOT rebuild the form rights or
printable information lists when signed
in as a User with aliases.
WARNING: If you decide to use aliases,
DO NOT rebuild the form rights or
printable information lists when signed
in as a User with aliases.
All of the field control settings (such as coordinates and
widths) will only take effect if you enter an Alias too.
This is because the system reads all fields with aliases
(a fast index) whenever someone logs on and performs
settings only on fields with an Alias.
See Also:
- Aliases
Pick List File
Click one of the buttons on this field to select
a Pick List or edit one that is already attached
to this field.
Pick lists can be attached to just about any
field in the system. A Pick List gives the user
a list choices to choose from for the field.
See Also:
- How To Modify Or Create A Pick List
Control File
Click one of the buttons on this field
to select a Control File or edit one that
is already attached to this field.
Control Files can be attached to just about
any form or field in the system. A Control
File can cause actions to occur depending
on the value entered in the field. For
instance, if the user enters " New York", the
field could change color and a Contact Plan
could run.
See Also:
- How To Use Control Files
X
This specifies the x coordinate on the
screen where the field is located. This
allows you to move a field on a form.
Y
This specifies the y coordinate on the
screen where the field is located. This
allows you to move a field on a form.
Width
This is the number of character units
the field displays on the screen. This
allows you to change the displayed
width of a field on a form.
Height
This is the height of the field displayed
on the screen. This is only valid for lists.
It allows you to change the number of
rows that show when the list is displayed
on the screen.
List Width
This controls the display of the field in lists. Setting
this value to zero stops the field from displaying in
lists. Giving it a value causes the field to show up
in lists.
You can use this setting to cause a field of your
choice to show up in a list in Collect!. For instance,
the Debtor list could also display the Country
field.
Color
This controls the default background color of a field
when it is displayed. By default, this field is set to 0
which results in a white background. To change the
background color for a field, enter a valid six character
RGB color code in hexadecimal form, as in standard
HTML color usage.
 Please refer to
Changing Field Background Color
for more information.
Please refer to
Changing Field Background Color
for more information.
Counter
Switch ON the Counter switch to make the field
a counter.
Counter fields automatically increment by 1
when a new record of the given type is created.
Counters, if they are used, have a folder under
the database folder. In the counter folder, each
counter has a file named {form}{field}.cnt. The
file contains the next available count for the field.
When a new record is created, the system
checks the counter files for any counter fields
in the record, reads the file, updates the counter
and rewrites the file with the next available value.
Verify On Exit
Switch this ON with a check mark to prompt the user to
verify the data in this field before exiting the form. There
are a few steps necessary to perform this procedure.
Please refer to the Help topic
Prompt To Verify Field On Exiting A Form for details.
This will explain how to proceed with verification on the
field of your choice.
Log Verification
Switch this ON with a check mark to write to the debtor's
Notes whenever the user verifies the data in this field.
There are a few steps necessary to perform this procedure.
Please refer to the Help topic
Prompt To Verify Field On Exiting A Form for details.
This will explain how to proceed with verification on the
field of your choice.
Log To Notes
Switch this ON with a check mark to write to the
debtor's Notes whenever a change is made to
this field. Please refer to the Help topic
Log To Notes for details.
User Levels
The Form Rights list displays those Users who have rights
to access a given form, field, or menu, and the extent of
their rights.
Press F5 or select the Form Rights list to activate it.
Notice that its title bar changes color and buttons
appear at the bottom of the form. You may create a
new line or edit an existing line item. Press F1 for
help on the Form Rights form and fields.
RIGHTS
This field displays the Access Level rights
allowed to this field or form.
LEVEL
This column displays an Operator Level that
is allowed to access the item.
ALIAS
If you have changed the field label for this
item for a particular User group, the Alias
is displayed in this column.
PICK LIST FILE
If there is a Pick List file attached to this field
for a particular User group, it will be displayed
in this column.
Help
Press this button for help on the Access Rights
form and links to related topics.
Cancel
Select this button to ignore any changes
you have made and return you to the
previous form.
OK
Select this button to save any changes
you have made and return you to the
previous form.
<<
Select this button to go to the previous
record in the database.
>>
Select this button to go to the next record
in the database.
Rebuild
This choice is only available on the Access Rights List.
Select it to refresh the list. Please refer to
Rebuild Lists for more information.
See Also
- Access Rights Basics - Introduction/Accessing
- Access Rights Topics
| 
Was this page helpful? Do you have any comments on this document? Can we make it better? If so how may we improve this page.
Please click this link to send us your comments: helpinfo@collect.org