Contact
The Contact form is used to define contacts and other actions
scheduled to occur on specific dates. Several different types
of contacts may be scheduled. The Contact form displays fields
and pick lists for all the possible settings that you can choose.

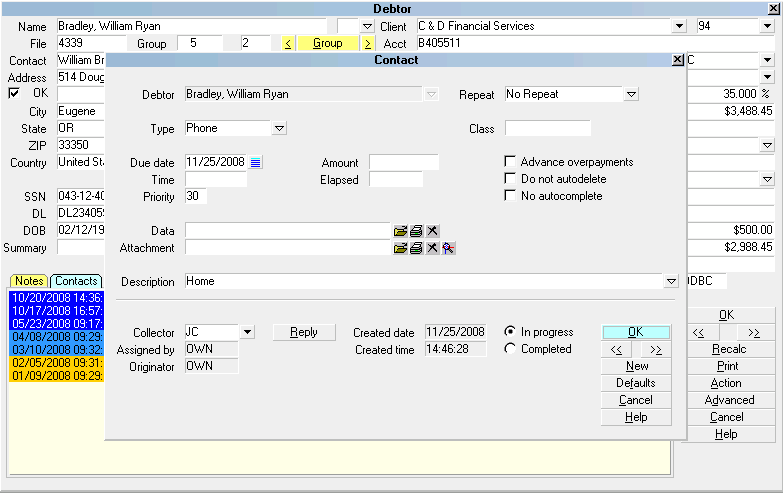
Contact form
 Please refer to Contact Basics for steps to access this form.
Schedule letters, phone calls, emails, and file reviews. Change
debtor status, execute a revolving promise payment, post transactions,
write notes to the Debtor record, or make one or more changes to a
Debtor record. Activate or close an account, assign accounts to an
operator, set a commission rate or plan. Schedule a contact plan to
be run on some future date.
Contacts may be scheduled to occur on a chosen date. Set the
number of days delay before a contact appears in an operator's
Work In Progress (WIP) List. Schedule contacts for other operators
and they will appear in the operators'' WIP lists on the date and time
you specify in the contact.
When you are working your WIP List, the current contact you are
working on is displayed on the Debtor form. When you select the
Debtor's Contacts tab, the list of contacts will highlight the one
you are working on.
Contacts have Type, Description, Due Date and Time, Priority,
a Debtor, an Operator or collector, and several other settings. The
date and time the contact is completed are recorded. A file can be
attached to a contact to include extra details. Contacts appear in
a collector's WIP List on the contact's Due Date, the day it is
scheduled to be done. For example, you may schedule a phone call
for two days hence. Then, when you load your WIP List for today, the
contact won't appear. In two days, it will be in your list. Settings for the
WIP List determine how many days' worth of contacts are displayed
when you load the list.
 Often, people mistakenly use the term Contact Plan
when referring to a single Contact. The term Contact
refers to a single scheduled event, while a Contact
Plan is a way to automate your contact management with a
sequence of contact Events. It is a very useful and
versatile feature of Collect!.
Often, people mistakenly use the term Contact Plan
when referring to a single Contact. The term Contact
refers to a single scheduled event, while a Contact
Plan is a way to automate your contact management with a
sequence of contact Events. It is a very useful and
versatile feature of Collect!.
See Also
- Contacts Versus Contact Plans for an overview

Type
The Type field sets the type of contact that you
are scheduling. Press F2 or select the down arrow
to view the list of contact types that you can
choose.
The Type of contact determines a general action. For
instance, Letter means print a letter, while Operator
means assign an operator to the account. Other
settings on the Contact form define the details, such
as which letter to print, or which operator to assign to
the account. Depending on the Type you choose,
certain fields on the Contact form are visible or hidden.
Also, the use of the Description field changes
depending on the Type you select in the Type field.
Please refer to each Type of contact for details.
Types Of Contacts
When you choose a Contact Type, other fields on the Contact form
change according to the Type you select.
The following is a list of predefined Contact Types with details of
how your choice of Type affects the Contact form and the way
Collect! handles the contact.
Activate
The Activate Contact automatically activates a Debtor when
processed. This means the Mode field on
the Debtor's account is set to ACTIVE and
the Closed Date field is hidden.
This will process all accounts regardless of the current
setting of the Mode when you want to set it to ACTIVE by
processing
The activation takes place when you process your
automatic contacts previously scheduled through
Tools, Batch Processing.
Close
The Close Contact automatically closes a Debtor when processed.
This means the Mode field on the Debtor's
account is set to CLOSED and any pending and incomplete
contacts are deleted, removing this Debtor from all To Do lists.
Any contacts with the switch "Do not autodelete" are NOT deleted.
In progress Promises and Transactions are marked 'Completed'.
The Closed Date field appears displaying the current date.
The closing of the account takes place when you process
your automatic contacts previously scheduled through
Tools, Batch Processing.
Commission
The Commission Contact sets a commission rate on the debtor's
account. In the Description field, enter the percentage as a number.
For example, 33 means 33% and 12.5 means 12.5%.
The assignment takes place when you process your
automatic contacts previously scheduled through
Tools, Batch Processing.
Edit
The Edit Contact allows you to modify any field related to the
Debtor form. In the Description field, you need to type in the field
name and its new value, i.e. field name=some value.
For example, the Description would contain Summary=Test note
if you wanted Test note to appear in the Debtor
Summary line. Or, you could use POE=Fred's Cleaners to
put Fred's Cleaners in the debtor's POE field.
The field name is the name that appears on the Debtor
form. This works for aliased fields as well. Or, you can use the
printable field code for the field. For example, @de.su=Test note
Any field of a related debtor record can be modified. For example,
on an interest-bearing account, you can change the date in
the Calculate interest from field in the Interest Detail
section of the Financial Detail form using the
format @id.cifd={date}, for
example, @id.cifd=12/12/2003. This can be
combined with a transaction that allows you to post the accrued
interest on an account. Please see Transaction Type - Percent of Interest
for details.
The field editing takes place when you process your
automatic contacts previously scheduled through
Tools, Batch Processing.
Email
The Email Contact lets you post an email to this Debtor. Use the
Description field to type in the Subject of the email. This
description will also be displayed in the Operator's WIP List. By
default, email is addressed to the Email Address stored in the
Debtor form in the Email field.
When the Send Mail form is opened by selecting the Email field
on the Debtor form, the email can be loaded, completed and
sent through Collect! using your email program. See Send Mail
for information about how the Email feature works.
The Email is sent when you run your daily letter batch.
Export
The Export Contact schedules the exporting of the records the
plan is run on. This can be used in conjunction with the Import/Export
module to automate scheduling of export activities.
Letter
The Letter Contact schedules a letter to be queued for printing in
your daily batch. Press F2 on the Description field to view the list
of all letters and reports in your system. Select the letter to
be printed.
When your daily letter batch runs, Collect! uses the Description
field of each Letter contact to locate the letter to
print. Please be aware that changing the name of
a letter may result in Collect! not being able to process
a Letter contact when the batch is run.
Metro
The Metro contact is scheduled when you choose to report a
debtor to the credit bureaus.
The Description field contains various codes representing the
choices you made describing the debt type, association code and
associated details for a Debtor. Collect! updates the Description
automatically whenever a reportable change is made to
the account.
When you send a credit report, Collect! scans the list of Metro
contacts and reports all Debtors with pending Metro contacts.
You must then set the contacts to Done, when the reporting
process has created its file for the bureau. For more information,
please refer to Credit Bureau Reporting.
Note
The Note Contact writes one line of notes into the Debtor notes.
In the Description field, enter the text you want written into the
Debtor's notes. Open a new attachment file if you want to include
more text.
The note line is written when you process your automatic contacts
previously scheduled through Tools, Batch Processing.
If an asterisk [*] is the first character in the Description,
an asterisk will be placed at the beginning of the note line
causing it to be at the top of the Notes.
ODBC
The ODBC Contact is a special type of contact used in the
ODBC Sync extension module. This is a licensed add-on module.
Please refer to Help topic, ODBC Sync for details.
Operator
The Operator Contact sets the operator assigned to the debtor.
Any pending contacts on the account that were assigned to the
previous operator will be assigned to the new operator. The Collector
field holds the Collector ID to be assigned to the Debtor.
The assignment takes place when you process your
automatic contacts previously scheduled through Tools,
Batch Processing.
Other
For general use, write a note in the Description field.
Phone
The Phone Contact schedule a phone call to the debtor. A drop-down
list arrow appears in the Description field allowing you to choose from
available phone locations for this Debtor. When you choose
Dial A Number from the Tools Menu, Collect! reads the Phone contact's
Description field and the phone number is displayed automatically.
This number will be dialed automatically when you enter this Contact
when working your WIP (if you have the Auto Dialer option).
You can also manually type in a phone number if you
want, or you can even type in text if you want. The Description field
will hold up to 79 characters.
Plan
The Plan Contact runs a contact plan. This is useful for scheduling
a contact plan to run at some future date. Press F2 on the Description
field to select a Contact Plan to run.
The Plan is run when you process your automatic
contacts previously scheduled through Tools,
Batch Processing.
Promise
The Promise Contact schedules a promised payment due on a
specific date. In the Amount field, enter the dollar amount of the
promise. Use the Description field for other details.
When a payment to the Debtor is posted, the transaction will
automatically display the amount of the promise. When the
promise date passes without a payment, this promise continues
to appear in the WIP List as a delinquent promise.
The 'Repeat' field enables you to schedule revolving promise
contacts. When a full payment of the dollar amount of the
promise is received within the selected Repeat period,
Collect! automatically forwards the contact. Additional options
are available for tracking the Promise history.
As of version CV11.6.2.9, the Repeat intervals of First Day of
the Month and Last Day of the Month have been added as selections.
The 'Create copy on repeat' creates a completed contact every
time a Promise is forwarded.
The 'Log repeat to notes' writes a line to the debtor's Notes
every time a Promise is forwarded.
The 'Advance overpayments' check box enables you to manage
overpayments. Switch it ON to consider overpayments as
fulfillment of future promises. Leave it switched OFF to forward
the Promise Due Date only one Repeat period, no matter how
much is overpaid.
When an account is CLOSED, In Progress Promise
contacts are marked 'Completed'.
Rate Plan
The Rate Plan Contact sets a Commission Rate Plan on the debtor's
account. Press F2 in the Description field to choose a commission
rate plan ID.
The assignment takes place when you process your
automatic contacts previously scheduled through
Tools, Batch Processing.
Review
The Review Contact schedules a review of the file. Enter a Description
which will appear with this contact in the Operator's WIP List. Open a
new attachment to add more information.
Sales
The Sales Contact changes the Sales Team ID assigned to the debtor.
Press F2 in the Collector field to select the Sales ID. This is very
powerful, providing for flexible commission rates.
The assignment takes place when you process your
automatic contacts previously scheduled through
Tools, Batch Processing.
Status
The Status Contact changes the debtor's Status Code. Press F2 in the
Description field to pick the Status Code to assign.
The assignment takes place when you process your
automatic contacts previously scheduled through
Tools, Batch Processing.
Transaction
The Transaction Contact posts a Transaction to an account. Press F2
in the Description field to select the ID of the Transaction Type. Set
the amount of the transaction in the Transaction Type settings, or in
the Amount field on the Contact form.
The Transaction is posted to the account when you
process your automatic contacts previously scheduled through
Tools, Batch Processing.
When an account is CLOSED, In Progress Transaction
contacts are marked 'Completed'.
Debtor
This is the Debtor whose account is being worked. You
may want to send a letter to this debtor, make a phone
call, post a promise payment or several other actions.
A contact is generally attached to a specific debtor.
Due Date
This is the Date the contact is due, the scheduled
date for the contact activity. The Due Date determines
when this contact shows up in an operator's WIP List.
For batch processing, the Due Date is the date that
the contact will be processed.
Time
This is the scheduled Time for the contact activity
in 24 hour format. In other words, if you type 4
it's 4 AM. Type 16 for 4 PM, 18 for 6 PM and so on.
You can set the time to the minute. For example, you could
type 16:25 and the call will pop up at 4:25 PM.
It is not compulsory to enter a time. Timed
contacts are important when you must deal
with a Debtor at a specific time. (Perhaps
he is only home at 7 PM to answer calls.)
Then you would enter 19:00 in the time field
of the contact and a prompt will pop up on your
screen at that time to go to the contact.
This only works when you are working accounts
from your WIP List.
If you do not need a time prompt for this account, it
is recommended that you leave the time field blank.
Priority
The Priority field allows you to enter a priority
for this Contact. Priority may be used to
organize your WIP List, or to alert an operator
to the importance of a particular contact. In
the WIP List you can easily display contacts
in order of priority.
Priority levels in the WIP List are as follows.
66 to 99 High
34 to 65 Medium
1 to 33 Low
Amount
The Amount field is used to store a dollar amount.
You can use it for any purpose. However, for certain
types of contacts, it has a special purpose.
For a Promise Contact, as described above,
the Amount field holds the dollar amount of the promise.
This amount is displayed automatically whenever a
payment transaction is posted to the account. Any
calculations of underpayment or overpayment of the
promise use this value.
For a Transaction Contact, the Amount field holds the
dollar value of the transaction to be posted.
Elapsed
This is the amount of time that you have spent on the
contact. You can enter an amount in hh:mm:ss time
format (for example, 00:01:53 is 1 minute and 53
seconds.) Or, Collect! can enter a value automatically.
To automatically keep track of time spent on
an account, switch ON 'Enable elapsed time
counter' in the WIP Options form. If an
operator stays on an account longer than 15
seconds or modifies the Debtor record, time
will be calculated when they exit from
the account.
Time tracking is recorded only when contacts are
worked from the WIP List. Intervals of less that 15
seconds are not recorded.
Please bear in mind that the time displayed is cumulative
and shows total time spent when this particular contact
took the operator to the account. Repeated visits via the
same contact will be added on to the Elapsed time.
Repeat
The Repeat field allows you to automatically forward the
date of a contact. This can be used, for example, to
repeat printing a letter or posting a promised payment.
One use of this is posting a revolving promised payment.
When the Contact occurs, Collect! reads the Repeat
value. If a full payment of the Promise dollar amount
has been received within the Repeat period, the
Contact is forwarded automatically to the next period.
As of version CV11.6.2.9, the repeat intervals of
First Day of the Month and Last Day of the Month
have been added as options.
Click the drop-down arrow beside the Repeat field to
select a repeat interval. When a repeat period is
selected, other fields become visible.
When this field is set to Custom, the Number of Days
field becomes visible.
Max Intervals
This field is visible when you select a REPEAT
value. Collect! uses it to determine how many
times this Contact is repeated.
Number Of Days
The Number of Days field holds the custom number
of days the Contact is forwarded when it is processed.
This field is only displayed when the Repeat field is
set to "Custom."
Class
The Class field is for your own use. You can use it to
further categorize a particular type of contact. Then a
report can be made to retrieve data or write back to
the account based on the Class field.
Advance Overpayments
This setting causes Collect! to consider overpayments
of promises as prepayments against future promises.
For instance, if a Debtor promises to pay $100 per
month, and actually makes a payment of $200, the
contact's Promise Date will move ahead two payment
periods when the transaction for $200 is posted.
If 'Advance overpayments' is switched OFF,
the Promise Date moves ahead only one period
whenever an overpayment is posted.
To switch this ON, select the check box next to
this field to place a check mark in it.
Do Not Autodelete
Switch this ON to prevent autodeletion of this contact.
This is useful for overriding events in contact plans that
delete pending contacts. There may be cases where
you do not want pending contacts to be deleted when
a contact plan is run.
To switch this ON, select the check box next to this field
to place a check mark in it.
This also affects behavior when an account is
closed manually. Contacts with "Do not
autodelete" switched ON are not deleted.
However, Promises and Transactions will
be marked done when accounts are closed,
regardless of this switch setting.
No Autocomplete
In WIP Options, the setting 'Automatically mark
contacts done' can be set so that Collect! marks
contacts as Done when they are worked from the
WIP List. To override this global setting for this
particular contact, switch ON 'No Autocomplete' .
To switch this ON, select the check box next to
this field to place a check mark in it.
Data
The Data field is typically used for information related
only to this particular contact. This information is stored
in a metafile within the contact record. This field will display
the file number by default, when you create a new entry.
You can change the filename displayed in the field to
anything you want, it is only a description. This field will
be empty if there is no additional information for this contact.
The Data field provides a convenient and flexible way
of passing messages around your office, or tracking
details of specific activity occurring on an account.
Adding information here keeps the related information
together. Perhaps you don't want to put it in the
Debtor's notes because it is not globally useful.
To the right of this field, there are three buttons. Use
these buttons to open, print or delete the information
contained in the metafile.
When you print letters through Collect!, the
Letter contact will save a copy of the letter
you printed and store it in this field. You
will see [METAFILE] displayed in the field.
You can view the letter by selecting the OPEN
button. Please refer to Help topic,
Comprehensive Correspondence History
for details.
If your letter is printed to Email, then you will
see "Email: {File Number} in this field.
Attachment
The Attachment field may be used to store an actual
file with this particular contact. The field contains the
full path to an already existing file on your system. You
cannot use this field to create a file. This field will display
the attachment filename if there is a file attached to
this contact. It will remain empty if there is no attachment
for this contact.
The contact Attachment may be used for attaching a
scanned document or any other correspondence that
you want to store with the account. This information
may be quickly retrieved and viewed by selecting one
of the buttons next to the field. The file opens in whatever
program your system has associated with the type of
file you have attached.
To the right of this field, there are four buttons. Use
these buttons to perform the following actions.
- OPEN or create an attachment
- PRINT an existing attachment's contents
- DELETE an existing attachment
- SELECT an existing file to attach to this contact
To attach an existing file to this contact, select
the Magnifying Glass button. This feature lets you
attach any kind of file to your accounts in Collect!.
As long as Windows is set up to handle that file
type, you can instantly display or print any type of
original information about any account.
You can print Contact attachments in
reports and letters using the @File
command in your report templates.
However, the attachment file can ONLY
be a text file.
If you put a URL in this field, Collect! will
use your web browser to go to the web
site when you select the OPEN button.
Description
The Description field defines the details of the Contact.
The functionality of the Description field changes
depending on the Type of Contact that is scheduled.
For example, if you schedule a Letter, the
Description field becomes a pick list where you can
choose the letter you want printed from the list of
all reports in the system. Press F2 from the
Description field to display the list. For a Note Contact,
you type the actual text that you want written to the
debtor's Notes into the Description field.
Please refer to each Contact Type for details about
what to enter in the Description field for that type
of Contact.
Create Copy On Repeat
This field is visible only when there is a value in
the Repeat field.
Switch this ON with a check mark to create a completed
copy of the Contact every time it is forwarded. This
allows you to track a past history of the Contact.
If the Contact is a Letter, Collect! will attach a Metafile
to the completed Contact if you have Metafiles enabled.
This switch is referenced when Promises are forwarded,
when previously scheduled transactions are batched,
when letters are batch printed, or when contacts are
worked through the WIP List.
This switch will also be referenced whenever you
process automatic contacts previously scheduled.
All automated types of contacts are handled. This
includes Activate, Commission, Rate Plan, Transaction,
Plan, Status, Operator, Sales, Edit, Note and Close.
Log Repeat To Notes
This field is visible only when there is a value in
the Repeat field.
Switch this ON with a check mark to write a line to the
debtor's Notes every time the Contact is forwarded.
The note is in the following format:
[Type] type contact [Description], due [Date] processed
by [Op ID]
This switch is referenced when Promises are forwarded,
when previously scheduled transactions are batched,
when letters are batch printed, or when contacts are
worked through the WIP List.
Collector
This is the Operator ID assigned to this Contact. The
contact will show up in this operator's WIP List on the
contact's Date Due. Usually this is the Operator assigned
to the Debtor, but could include supervisory personnel to
review files, or other members of your team.
Reply
You can construct a reply to a contact and select
the Reply button to send it back to the operator in
the Assigned By field.
Assigned By
This is the operator who sent you the contact. This would
ordinarily be the same as the Originator. However, when
the contact has been forwarded, this could be a different
operator.
Originator
This is the operator who created the contact.
Done By
This is the operator who completed the contact. This is
a useful field to note if you need to track account
activity. It tells you who worked the contact and marked
it done. This field is visible only when a contact is
marked "Completed."
Created Date
This is the date the contact was created.
Created Time
This is the time the contact was created.
Done Date
This is the date the contact was done. This field is only
visible when a contact is marked "Completed."
Done Time
This is the time the contact was done. This field is only
visible when a contact is marked "Completed."
In Progress
A mark in the radio button beside this field
means that the contact has not been done.
The contact will be loaded into your WIP List
until the contact is marked completed.
For example, if it's a Phone Contact, the call
hasn't been made yet, and the contact will show
up in the operator's WIP List. If it's a Review, the
file hasn't been reviewed. If a Promise, there is
still a balance owing on the account.
Select this field, or press Spacebar on it, to turn
this switch ON.
Completed
A mark in the radio button beside this field
means that the contact has been completed.
The contact will no longer show up in any
WIP List or be processed in any other way.
When the Completed field is selected, several
other fields appear on the Contact form, to
date and time stamp when the contact was done.
Also, the Done By field appears, displaying
the ID of the operator who completed the contact.
Copy
This field is only visible if the Contact was created
as a result of the "Create copy on repeat" switch.
It is a Read Only field with a check mark indicating
that it was created when the repeating Contact
was forwarded to the next Due Date. It can be used
as a criterion in searches or just to keep track of
the account's history.
OK
Select this button to save any changes you have
made to this contact and return to the previous form.
<<
Select the BACKWARD navigation button to
view the previous Contact in the list.
>>
Select the FORWARD navigation button to view
the next Contact in the list.
New
Select this button to save any changes you may
have made to this contact and then create a new
blank contact for you to fill out.
Defaults
Select the 'Defaults' button to open the WIP Options
form where you can change the settings for the default
behavior of your Work In Progress.
Cancel
Select this button to ignore any changes you may
have made to this contact and return to the
previous form.
Help
Select this button for help on the Contact form
and links to related topics.
Delete
This button is visible only on the list of all contacts.
Select it to delete the highlighted contact from
the database.
Edit
This button is visible only on the list of all contacts.
Select it to open and edit the highlighted contact.
Examples Of Contact Scheduling
The following are a few examples of the contact
scheduling process.
Schedule A Future Contact
To schedule a Contact for the future:
1. Press F3 to create a new Contact record.
A blank form is displayed.
2. Press F2 to change or assign a Debtor for
this Contact.
3. Press Tab to move to the Type field.
4. Press F2 to pick the type of Contact you
want to create.
5. Select Review, for example, and press Enter.
6. Pick a date to review the file.
7. Enter your own ID as the Operator assigned to
this Contact.
8. Select the OK button to save the Contact.
Schedule A Contact For Another Operator
To schedule a Contact for another Operator:
Do the same as the example above, just use that
Operator's ID rather than your own.
See Also
- Contact Basics - Introduction/Accessing
- How To Schedule Contacts
- How To Use The WIP List
- How To Manage Contacts
| 
Was this page helpful? Do you have any comments on this document? Can we make it better? If so how may we improve this page.
Please click this link to send us your comments: helpinfo@collect.org