Quick User's Guide
The User's Guides will provide you with a basic summary of the use of Collect! You can use this guide to guide yourself through
the program or to train new staff members in your organizations. For more detailed help, please refer to our
How to section in our help.
Working With Collect!
- User's Guide - Orientation
- The User's Guide begins a more in-depth coverage of the software, introducing you to the user interface and operational
details.
- User's Guide - System Administration
- This user's manual is for personnel who will be responsible for configuring your site's operational preferences and
day-to-day systems management.
- User's Guide - Office Administration/Clerical
- This user's manual is topically designed as instruction and reference materials for users whose job functions are in the
areas of support staff, clerical/data entry, accounting and office management.
- User's Guide - Working Accounts
- This manual is for collectors/tracers, collection managers, auditors, operations/project managers and all management
levels. It provides the fundamentals of debtor screen content and navigation as well as basics on the subject of working
accounts in a WIP list.

User's Guide - Orientation
This user's guide will introduces you to the user interface and some of the details of operating in Collect!.
Introduction
Collect! is a flexible contact management and financial system designed to be scalable for any size operation.
It allows you to input clients and debtors with a view to tracking daily financial transactions, contacts, and other receivable
management milestone events. The objective being to provide your company with an operational environment which maximizes
efficiency and productivity, providing you with real-time metrics to assess the success of your strategies and work flows.
Starting Collect!
If you are running Collect! on a network, please refer to the Help page topic How to Network Collect! for complete
details on how to configure and start Collect!.
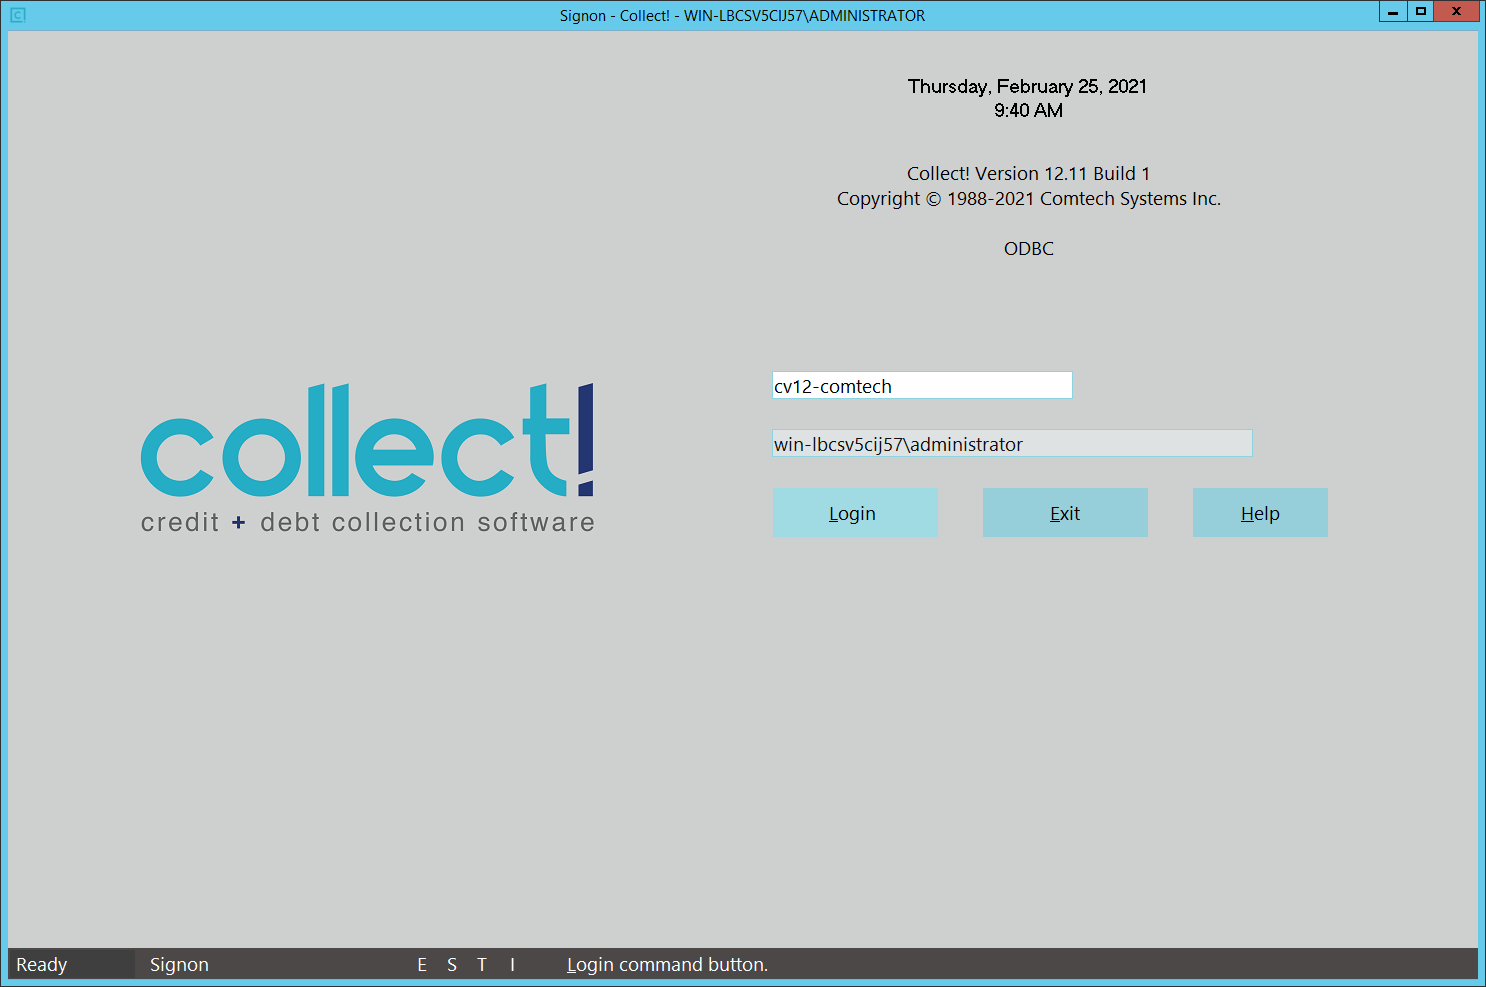
Double-click the Collect! shortcut icon on your desktop and the login screen will open.
If you are the first user to enter the system, you can do so utilizing one of the shipping default logins. We have included a
sample sign-on for each user type the system supports to provide you with a representative sample of what each type of login
allows a user to do in the software and what permissions are inherent in each user level the system offers.
The ID for the 'owner', is a User Level 10, System type of user which has full access to all areas and features in the software.
The ID to use is "OWN" and Password is lowercase "own". You will be navigated to the Welcome To Collect! screen.
The system ships with 2 different databases for your use:
1. The "masterdb" will be your live production environment.
2. The "demodb" is a demonstration environment that you can use for both training exercises and later as a testbed environment
where you can test drive any new process, report, letter, import you design without reservation that you will in any way impact
your live production database.
If you have been experimenting with a trial version of the product before now and are ready to begin creating your live
production environment, then Select the Database to open as "masterdb"
If this is your first time viewing the software, you may wish to Select Database as "demodb" as this database contains sample
data which will assist you in becoming familiar with the software.
Once you have selected the database you wish to open, click the Start button to proceed.
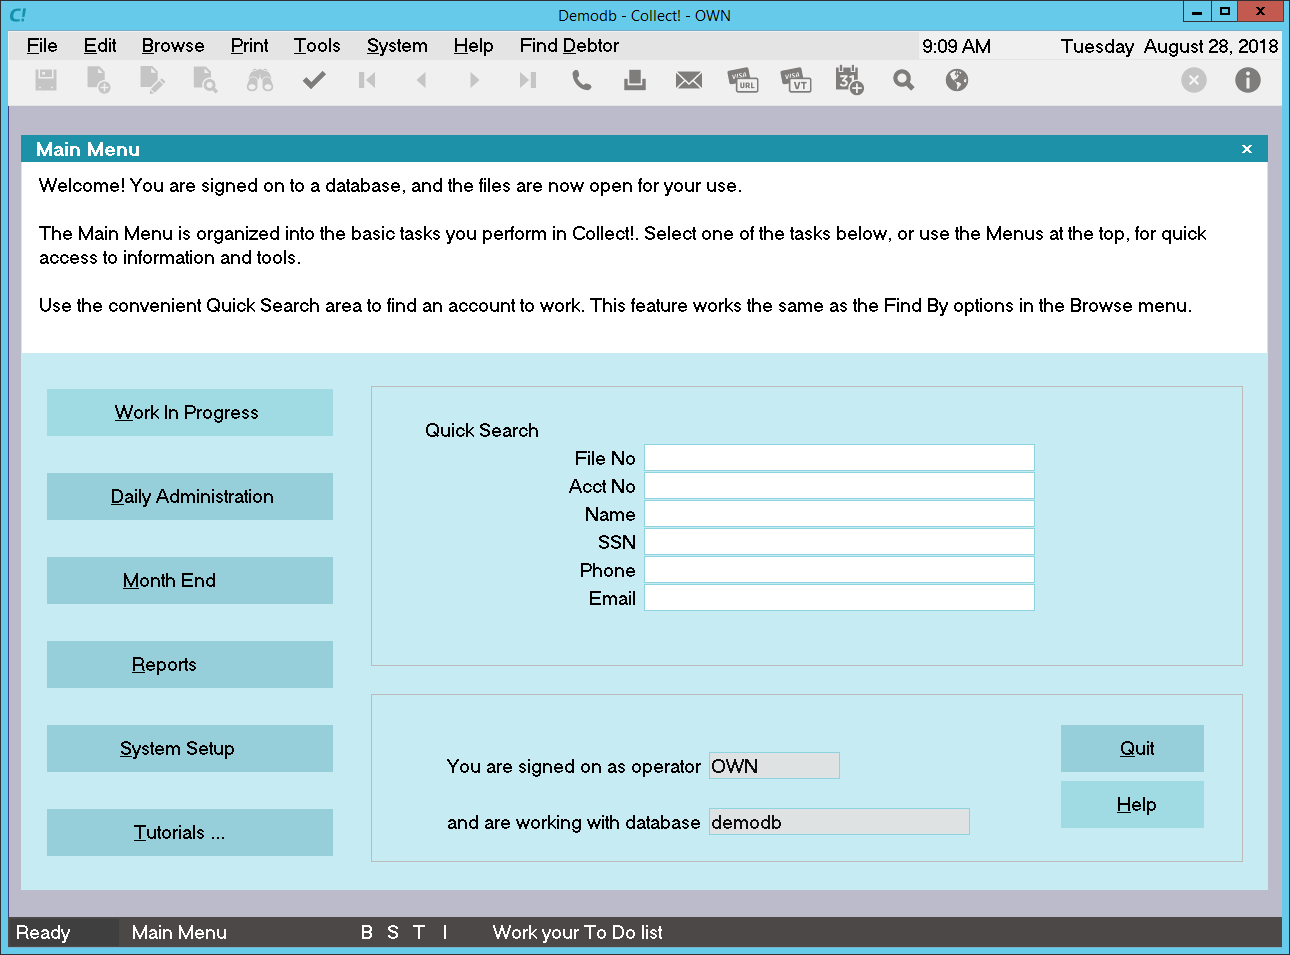
The next screen will be the Main Menu if you are a System type user, which the "OWN" ID is. "Collector" type users are navigated
directly to their Work In Progress screens.
Management, Administrative, and Clerical logins have the the Quick Search area on this screen to search debtors by the most
frequently used criteria; File Number, (client) Account Number, Name, DOB, Phone Number and Email. This screen also positions
the user to access all feature menus with their underlying sub-menus.
Main Menu
Exiting COLLECT!
Before proceeding into the use of the system, along with knowing how to correctly enter the system, it is important to know how
to exit correctly to preserve the integrity of your data and database.
One should not power down their computer while a Collect! session is open as this may cause database corruption.
Always exit gracefully by your preferred exit mode:
1. Click the Red X in the upper right corner of any screen and follow the prompts to exit, or
2. Press your Escape key to navigate back to the Main Menu and click Quit, or
3. Press Alt+F4 for an express exit.
Menus
Collect! uses 3 types of menus.
Full Screen Menus
When you click on a button on the Main Menu or make a selection from a drop-down menu and are presented with a popup window
containing a list of sub-menu items to choose from, this is called a Full Screen Menu.
The menus are organized to be consolidated by job function of the user who would be most likely to be accessing these screens.
Example: The Daily Administration button on the Main Menu navigates the user through a series of sub-menus for daily batch
processes such as account grouping, assigning accounts to collectors, running contact plan automations, letter printing, figure
recalculating. System Administration menus lead to sub-menus pertaining to setups and system configurations which are intended
for your personnel who manage operations/IT Techs. Collectors do not have access to either of these areas.
Click on the menu of interest, then use Arrow keys or mouse clicks to move and navigate between items. Press the the Enter key
or click your mouse to select a presented option.
Top Menu Bar
The Top Menu Bar provides quick access to several specific command functions and sub-menus in the program.
Toolbar Menu
The Toolbar Menu provides quick access to basic actions like Search, Print, go to First, go to Last, create a New record, Edit
an existing record. If the buttons are grayed out, then they are not active for the screen you are currently on.
Collect! Help
The system ships with user Help access readily available from anywhere in the system. Context sensitive Help is available 2 ways.
1. Blue popup windows will present if your mouse is hovering unmoving for a set number of seconds on a screen or field. The
system interprets this pause as the user being unsure of what they want to do next and offers information about what the mouse
pointer is currently hovering over.
2. Pressing your F1 key on any field or screen in the system will immediately trigger the opening of an internet browser on your
station and you will be navigated directly to an area in the Help pages on our website that describes the use/purpose/function of
the field of screen you were on when you pressed F1.
For general access to reference material, your Help Menu drop-down offers the following options:
Contents...
Takes you to the Help Contents page. This is the equivalent of a table of contents to a full User's Manual organized in order
or operations from initial setups to usage of the system.
Quick User's Guide...
Takes you to this guide.
How To...
Displays a list of all the How To topics.
Keyboard Tips...
Shows you all the Quick Keys to navigate with.
Index...
Displays the Help Index, an alphabetical list of all topics in the Help system. While there is standard industry terminology,
different regions and generations of industry professionals have their own common names for various aspects of the business. We
have tried to insert help terms with as many synonyms as possible so that no matter what you call it, you can find Help about
it in the Index.
Disable popup help...
Allows you to Disable or Enable the Popup Help feature. You may wish to leave popup help enabled while you are getting started
and disable it when you are acclimated to the system's basics. Disabling the popup help feature from the Help menu is for the
active session only. It will reset to Enable with your next login. You can turn it off completely from a software switch in
your Operator setup screen discussed elsewhere in the Help pages.
Member Services...
Takes you to the Member Center on our website.
Training Videos...
Takes you to the Training area of the Member Center where you can select tutorials in Flash video format.
Report Library...
Takes you to the Member Center Report Library where you can view document samples and download templates to add to your report
libraries.
3rd Party EDI...
Takes you to the Member Center Electronic Data Interchanges area where you can view details and download working versions of
import routines.
Upgrade Software...
Takes you to the Member Center Downloads area where you can review your upgrade or patch update options, and view the latest new
features and revisions lists.
Version Check...
Compares the latest shipping version available online to the version you are running. If there is an update available, a message
will display letting you know this. You can then select the Upgrade Software option to proceed to the Member Center.
Renew Membership
Takes you to our website where you may renew your membership with all the features and options you are currently licensed for
and purchase additional features. This option is only displayed if you currently own a license to Collect!.
Order Now
Takes you to our website where you may purchase a license to Collect!. This option is only displayed if you do not currently own
a license to Collect!.
About...
Displays information about the Collect! program. This is useful for your Techs inhouse and our office to assist you quickly and
efficiently by being aware of what version you are currently running.
Printing Help
You may print a Help topic by clicking File, then the Print command from your internet browser when viewing the Help topic of
interest.
User Interface Screens
The software maintains consistent conventions throughout the system to provide you with an intuitive, user friendly environment.
It is designed to accommodate users who favor mouse point-and-click as well as keyboard control navigation.
Main Menu
The Top Menu Bar
This menu is topmost on your screen and contains a series of drop-down lists containing the commands or sub-menu options
available for selection. A user's level and type determines which of these are enabled for access or grayed out/inaccessible.
The Toolbar Menu
The Toolbar Menu is displayed at the top of the screen and contains buttons for performing several basic functions like enter a
New entry, fast-path to the First or Last record in a list, Edit an entry, etc.
Status Bar
A message line is displayed at the very bottom of the screen. In the lower left corner is a word that identifies what you are
currently doing, i.e. Browsing or Editing. Next to the identification of what you are currently doing, you will see a display
of where you are in the system at present, i.e. Debtor, meaning you are in a debtor screen or debtor lookup list.
Continuing to the right along the Status Bar at the bottom of your screen, you will see a series of capital letters. These are
indicators which become highlighted during various processes. Their definitions are as follows:
B or E - Browsing mode, means you are in a list. Edit mode means you have selected an item and can edit if you wish.
M or R - Modified and not yet written to disk. This indicator changes to R for Ready when the system is waiting for you to
choose to do something.
S - Search criteria via clicking Find or F6 has been selected and a search key set is currently active.
I or O - This indicator shows you whether you are in Insert mode - input will move any existing data to the right as you
type OR Overstrike mode - input will overwrite existing data.
T - Indicator that there is currently an active Tagged list of records.
In the extreme right corner of the the status bar, you will find 2 counter fields. The right-most corner gives you the
total records counted in the list you are viewing or have selected by search criteria. The sub-counter to the immediate
left displays where you are in the current list if you are scrolling through.
Also in the status bar in the lower right of the screen, you will notice a moving blue bar which is your indicator of
completion whenever any type of process is being run.
Navigation
Your keyboard contains both normal and extended keys used to control the program. These may be used individually
and in combination throughout the system.
Normal Keys
Normal keys include the alphabetic and numeric characters, the punctuation marks and the spacebar. They are used for data entry
but their use can be modified when used in conjunction with the Extended or Function keys.
Extended Keys
Extended keys are used to navigate within the program and also to exercise control over the program. They
include any of the keys which are not ordinary data entry keys.
Movement Keys
Tab Next field
Shift+Tab Prior field
Right Arrow Move 1 character right
Left Arrow Move 1 character left
Home Go to the start of field
End Go to the end of field
PgUp Next record
PgDn Prior record
Ctrl+PgUp First field
Ctrl+PgDn Last field
Ctrl+Home Go to the start of list
Ctrl+End Go to the end of list
Editing Keys
Enter Save field and go to next
Del Delete cursor character
Backspace Move cursor left, overstriking/removing data
Ins Insert/overstrike
Ctrl+Enter Save and exit
Ctrl+X Cut
Ctrl+C Copy
Ctrl+V Paste
Esc Discard changes
Control Keys
Alt Activate menus
Ctrl Activate buttons
Ctrl+A Select All
Ctrl+F Find. Equivalent to F6
Alt+X Exit the program
Function Keys
F1 Help
F2 Pick from list
F3 Create new record
F4 Edit field
F5 Open form detail
F6 Find record
F7 Delete current record
F8 Save and close
Shift+F1 Record macro
Shift+F2 Play macro
Shift+F3 Paste from the clipboard
Shift+F4 Copy record to clipboard
Shift+F5 Cut record to clipboard
Alt+F4 Exit the program
Alt+F6 Prior record
Functional Details
Buttons
Buttons and icons are available commands. Buttons contain a label and icons present with a representative image of what
the icon is for - phone icon to dial, folder icon to save a document, printer picture to print a document etc.
Clicking on a button or icon will open a sub-menu, initiate a command, function or process.
Navigating in Lists
Arrow Keys To move up and down in a list and highlight records to be selected.
Enter To Select.
Esc To discard and exit.
Ctrl+PgUp Go to top of the list. Equivalent to clicking First button.
Ctrl+PgDn Go to bottom of the list. Equivalent to clicking Last button.
To Find A Record
From a List, arrow or click into the column header containing the data you wish to search on, i.e. Debtor Name, and type the
name of the person you are looking up. The software will fast-path you directly to this record if it exists or to the record
which most closely matches. The same method may be used search a list by any criteria column your list contains.
To Add A New Record
There are 3 ways to launch a new entry screen that are consistent throughout the system:
1. Click the New button at the bottom of the window, or
2. Press Ctrl+N, or
3. Press F3.
To Edit a Record in the List
Select a record and press F4.
 WARNING: This is a full Edit mode that will have you making a live change to the record in question without opening the
record. F4 while in a list is a tool for line editing.
WARNING: This is a full Edit mode that will have you making a live change to the record in question without opening the
record. F4 while in a list is a tool for line editing.
To open the record before editing, select the record by highlighting it with your arrow keys or by scrolling. You can then
choose your preference of clicking the Edit button, pressing Enter or clicking on the record to open it to view. After making
your modification, you can then click OK or F8 to Save and Exit.
To Delete a Record
Select the record you want to delete. You may choose your preference of pressing your F7 or Del keys or clicking the Delete
button at the bottom of the screen. You will be asked to confirm your deletion. When prompted by the popup message box to
confirm, click Yes to proceed with the deletion or No to cancel the command.
To Copy a Record
Select the record you want to copy. Press Ctrl+C to copy the record to your clipboard and acknowledge the popup prompt that
your item is copied. Then press Ctrl+V to paste it.
If you have reason to place your copy in a different location in the list, first navigate to where you want the copied item to
appear before executing the paste. Your copied record will be inserted immediately BELOW where you have your highlighted bar
situated in the list.
 If you are undertaking a letter/report/import map modification, it is always recommended to first make a copy of
the untouched original template for rollback and/or audit trail.
If you are undertaking a letter/report/import map modification, it is always recommended to first make a copy of
the untouched original template for rollback and/or audit trail.
Alternatively, you can click the Edit drop-down menu from the top of the screen and select the Copy and Paste options.
To Move a Record
Select the record you want to move. Press Ctrl+X to cut the record, then navigate to where you want to reposition it and
press Ctrl+V to paste it.
Alternatively, you can click the Edit drop-down menu from the top of the screen and select the Cut and Paste options.
WARNING: Do not use CUT as a substitute for Delete. This creates records with data and no names, file numbers or other
details associated with them. The records with null fields generated this way will be problematic on a variety
of levels.
User's Guide - System Administration
This user's guide is for System Administrators. It introduces you to the areas in Collect! where you can define default operation
parameters, setups, create new users, codes of all types, design new reports/letters and gain access to system level tasks.
The System Administration menu is accessed by clicking the System drop-down from your Top Menu or clicking the System
Administration button on the Main Menu.
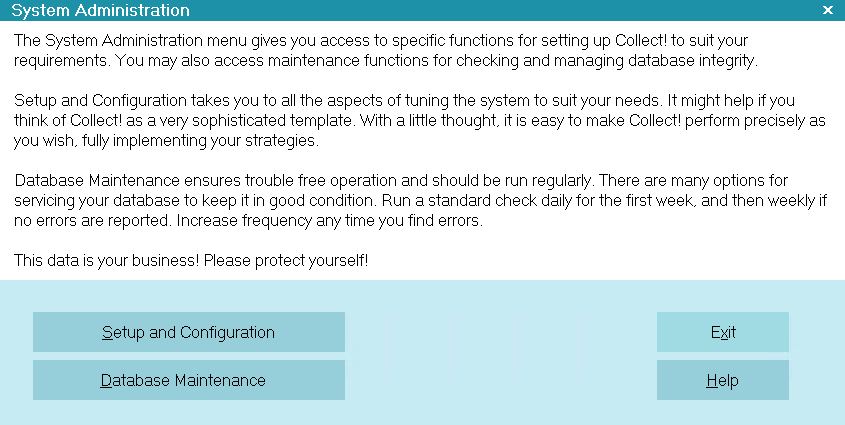
System Administration menu
System administration comprises a number of areas.
Setup and Configuration
Use this option to access setup areas for all the feature configuration sub-menus.
Database Maintenance
Use this option to access system maintenance functions.
System setups are necessary before you begin using your system for the first time. By completing the requisite fill-in screens
and decisioning how you want your essential default settings to be configured, you will start with a clean installation that
operates exclusively on your company's preferences. Not reviewing these options now can result in features seeming not to
function to your satisfaction when in fact, they are performing as per the shipping default settings.
This manual is for executive management who wish to be aware of the functionalities and setting options which exist as well as
the personnel who will be responsible in the organization for maintaining all feature settings, user logins/securities, and
running all maintenance functions.
Setup And Configuration
The System Setup menu shows options for all the setup areas in the system.
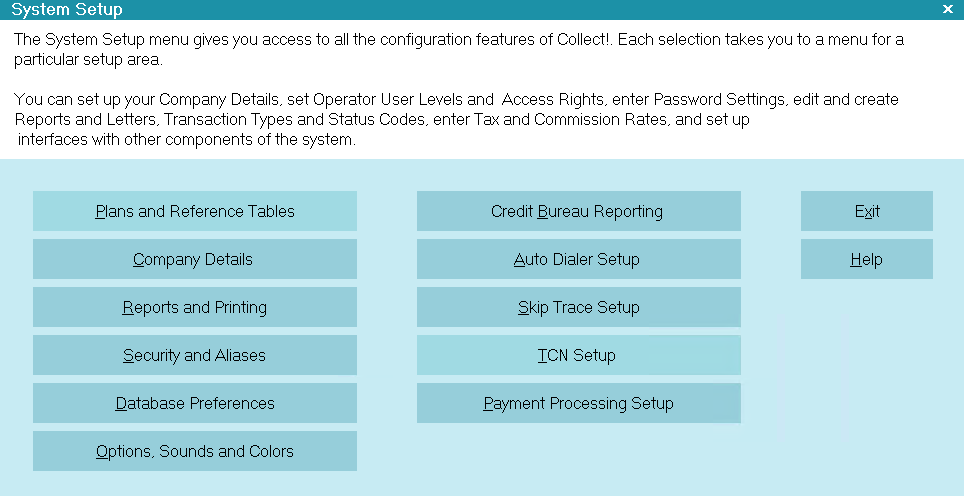
System Setup menu
Plans and Reference Tables
Use this option to set up contact plans, transaction types, payment posting automation defaults, commission rate tables,
payment plan defaults, debtor status codes, WIP list default settings and account matching criteria.
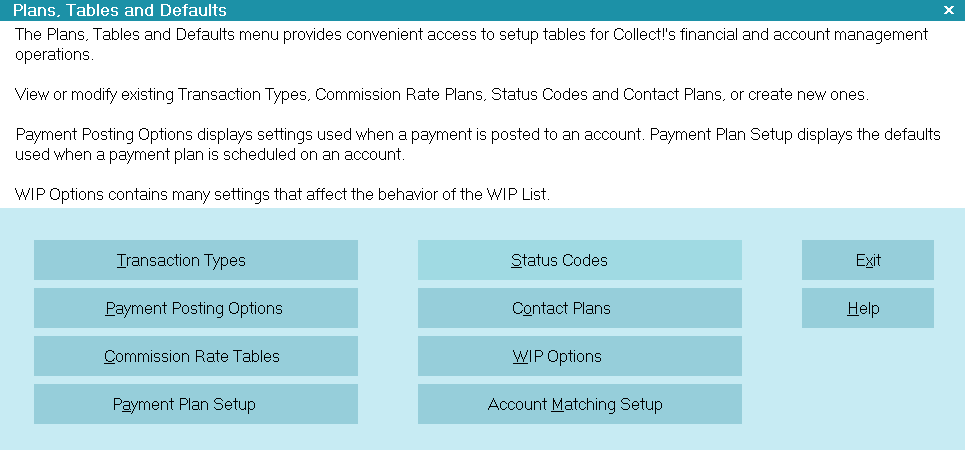
Plans, Tables and Defaults menu
Contact Plans are your automations, i.e. work flows, letter series, inventory management, account closure
routines or any other defined events you have set up to be enacted on individual or groups of accounts.
Transaction Types is the list of codes that defines the payment types you will use when posting financial
transactions. It is important to note that the system ships with a default payment breakdown hierarchy of Fees, Interest,
Principal, Legal, Misc then Other. If you will use commission rate tiers and order of operations matters in how payment
funds are disbursed amongst the figure types which comprise your balance, then you will want to ensure that your 100 series
transaction types, excluding 194, 195, 196 and 197 are adjusted accordingly from the shipping defaults. Codes 194/195 pertain
to new Judgment entries and codes 196/197 pertain to new principal and interest assigned.
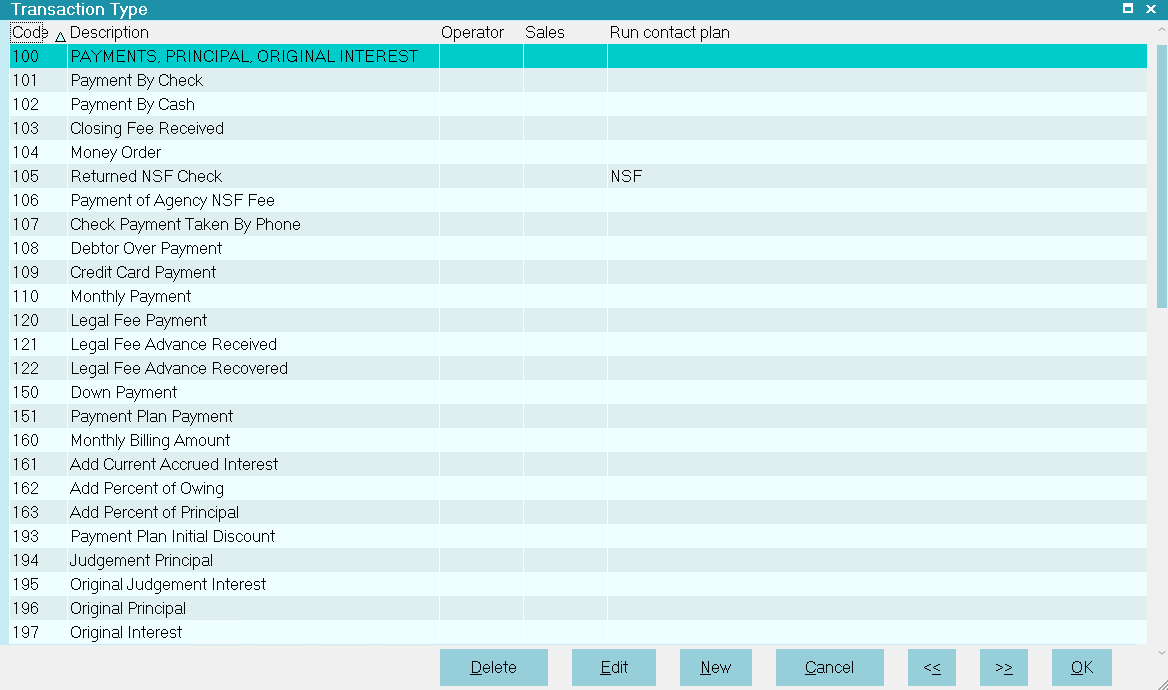
The Transaction Type List
WARNING: Unless there is a specific reason to do so, codes 194 through to 197 inclusive should not be modified from the
shipping default settings. These transaction codes are not meant to reflect revenue nor are they intended to appear on client
transaction detail reporting.
See the Help pages for more detailed information.
The Payment Posting Options menu is where you define any global automations that are to be invoked on Promise
or Payment Plan accounts. It is also where you decision whether you wish Auto-manage of Promises to take place. If this is
checked ON, then data entry of any transaction will automatically advance promise dates in your Promise Contacts by the schedule
defined for that contact. You may also select contact plans to run, for instance, when an account is paid in full, or a
promised payment is missed. Automatically close accounts, and set other related options.
With auto-managed promise enabled, please be aware that deleting a payment and re-entering it will do the following:
* With a repeating, in progress promise, Collect! will move the promise date back 1 period when the payment is deleted,
then move it ahead 1 period when the payment is re-posted
* With a completed promise, Collect! will mark the last promise as 'in progress' when the payment is deleted,
then mark it as 'completed' when the payment is re-posted
 If you are deleting and posting payments of different values or values that don't match the promised amount,
we advise that you check the promise contact on the Contacts tab when you are finished to ensure the promise
is set properly.
If you are deleting and posting payments of different values or values that don't match the promised amount,
we advise that you check the promise contact on the Contacts tab when you are finished to ensure the promise
is set properly.
Commission Rate Tables is where you set up any special rate tiers or contingency types for your clients such
as rates by Age of the account in your agency, rates by Listed Amount, rates by total amount Paid, etc. It is important to set
up special rate plans before entering the client that will need to use said special rate in their Advanced Settings screen.
See Help topics on Commission Rate Plans for more detailed information.
Payment Plan Setup is where you setup the transaction code and contact plan defaults that your site will use
when collectors invoke a Payment Plan from a debtor screen. See the Help pages on Payment Plans for more in-depth discussion.
Status Codes is the setup and storage of all Status codes that your system shipped with. If there are any that
are unique to your site, you may enter them here. Shipping default codes may be used, changed or deleted as per your sites needs.
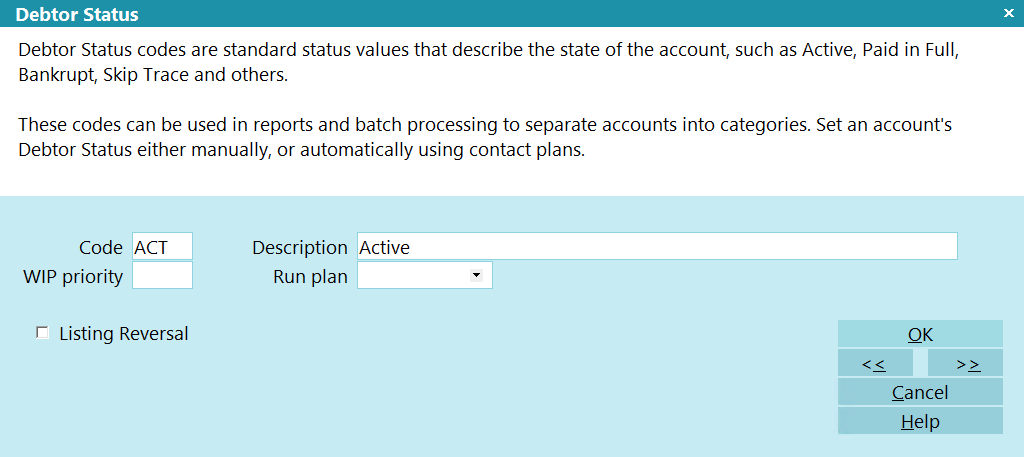
Debtor Status Codes
Contact Plans are the workflow automations you can set up to assist your work plans and inventory management.
The shipping defaults are there for your reference and to serve as examples of how to make these processes work. You may add,
modify, delete these codes as per your site's preferences.
Contact plans are the vectors you use to insert your dunning letter series, insert telephone events so that the account will
appear in your collector's WIP list with a scheduled work date, set up Reviews, initiate status changes, automate notes and
other activities which need to be scheduled for specific future dates.
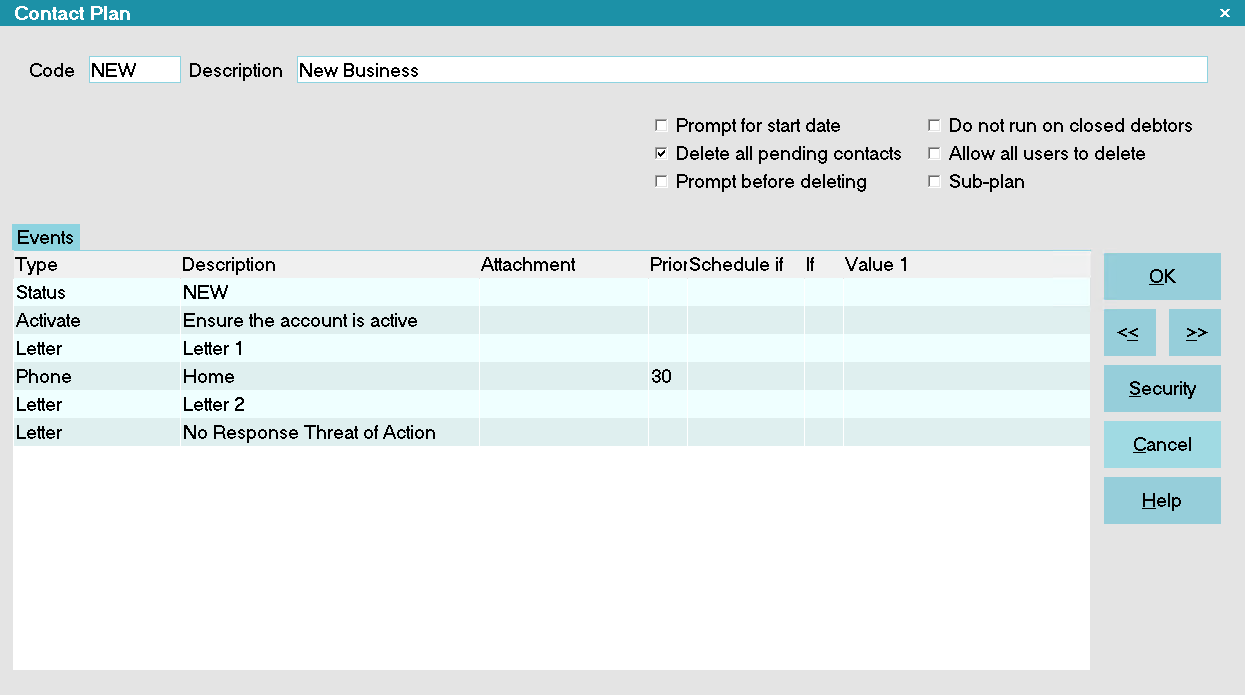
The Contact Plan form
Code
This is a short code for your reference.
Description
This is a brief description of the plan.
Prompt for Start Date
When setting up a contact plan, you may set this option to prompt for a date.
Delete all Pending Contacts
You may set this switch to delete any pending contacts. This commonly used when it is an automated account closure contact plan.
Prompt Before Deleting
This option will prompt if it is about to delete any pending contacts.
Event
This is a list of events scheduled for this plan. Press F3, Ctrl+N or click New to enter a new event to the workflow.
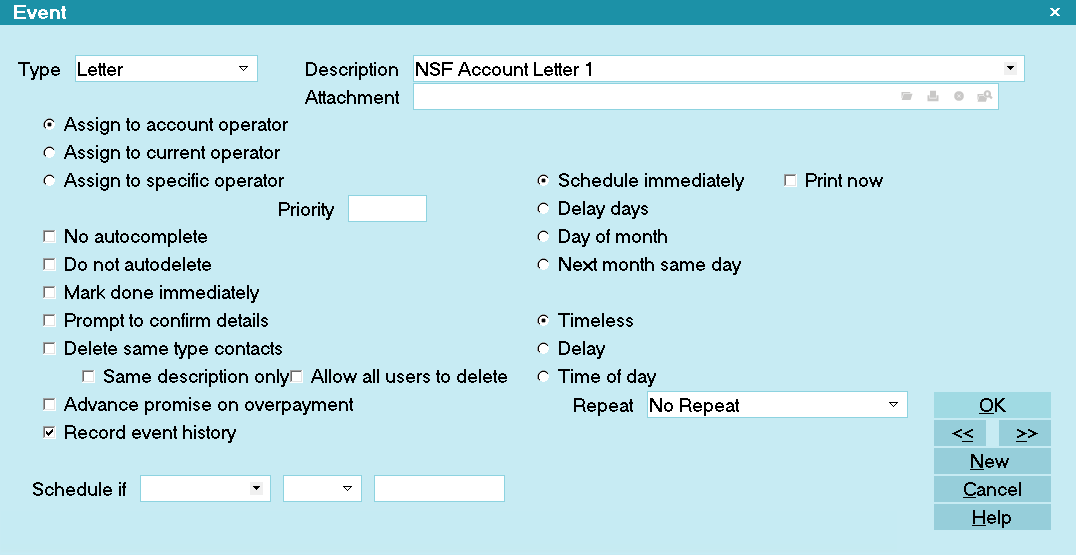
The Event screen
Type
This is the type of event - Letter, Phone, Review or other activity such as modify Status.
Once you select the event type, there will be some which require you to make another selection of the choices pertaining to
that type.
Example: if you select Letter, you must click the drop-down arrow at the end of the Description field to select the specific
letter from the print menu that you want the contact plan to send. If you select Phone as the event type, you must click the
drop-down arrow at the end of the Description field to select which of the phones the contact is aimed at such as Home, or Work.
As this is a user define pick list, you may add to the choices. Some event types allow a free-form entry in the Description
field, such as Review, Note and Promise.
Delay
You may enter a Delay period between the time and day when you assign a contact schedule and when the given event is to occur.
For more in-depth Contact Plan details, see the Help pages.
WIP Options are the series of defaults you can set as a global company standard or for individual collector IDs.
These settings will determine what degree of freedom (or not) or collectors have while working their Work In Progress lists.
See the Help pages or press F1 on an individual switch setting to access more information.
Account Matching Setup are the defaults you will set for your account grouping. These may be updated and
modified as needed. Additionally, if you have a client who has segregation security requirements, it is also possible to adjust
settings for individual new business batches so that the grouping criteria is correct for that batch, but which is completely
different than the norm applied to other clients. See Help topics on Account Matching for more details.
Company Details
Use this option to enter your company information and default global settings. The company name/ address/phone fields are
required in order for basic reports/letters and statements/ invoices to output correctly.
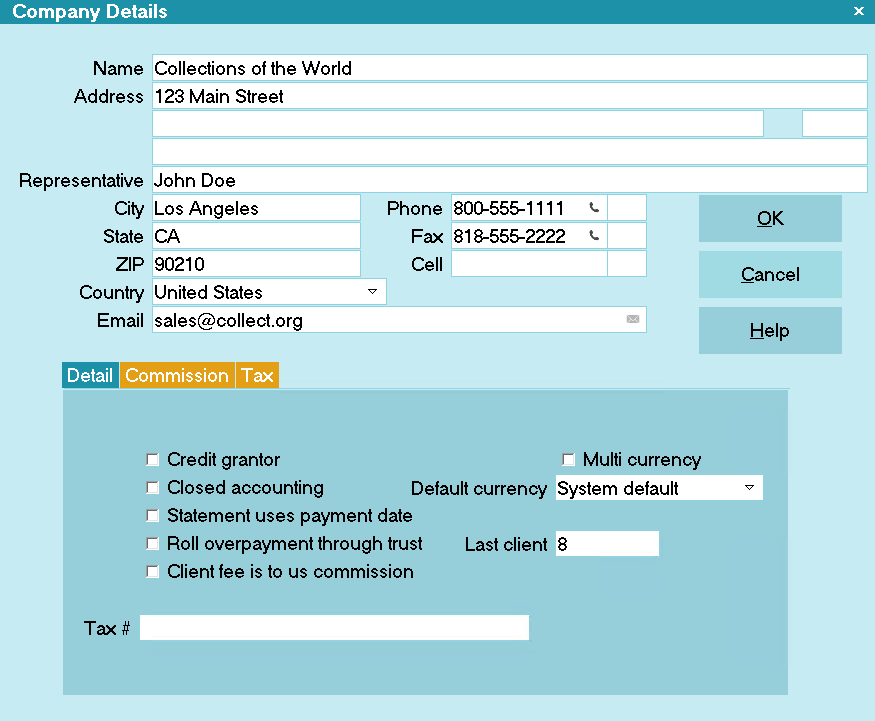
Company Details
Reports and Printing
Use this option to enter global printing settings, modify existing reports/letters or to create new templates.
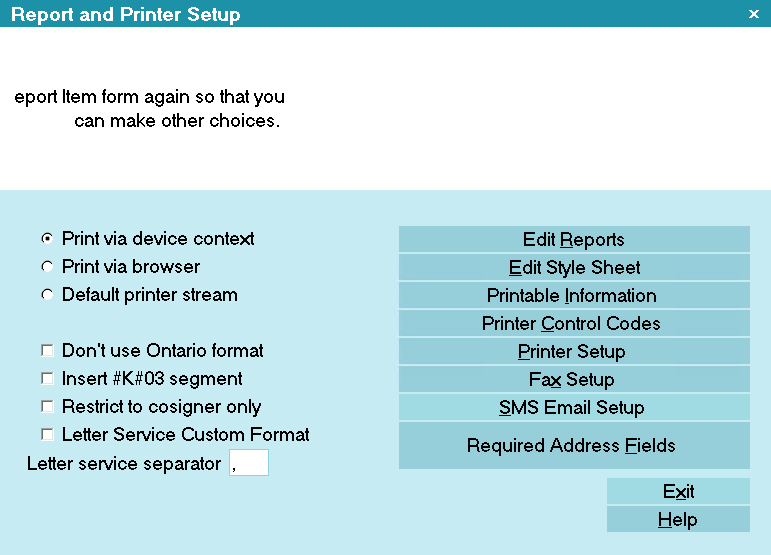
Report and Printer Setup
Security and Aliases
This option navigates you to operator setup, access rights settings, user level setups and password defaults.
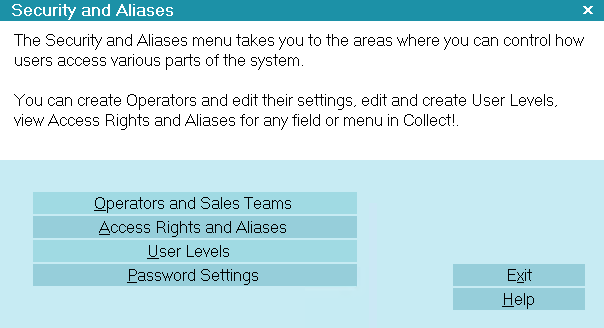
Security and Aliases menu
Database Preferences
This option lets you set global defaults for several system and network settings.
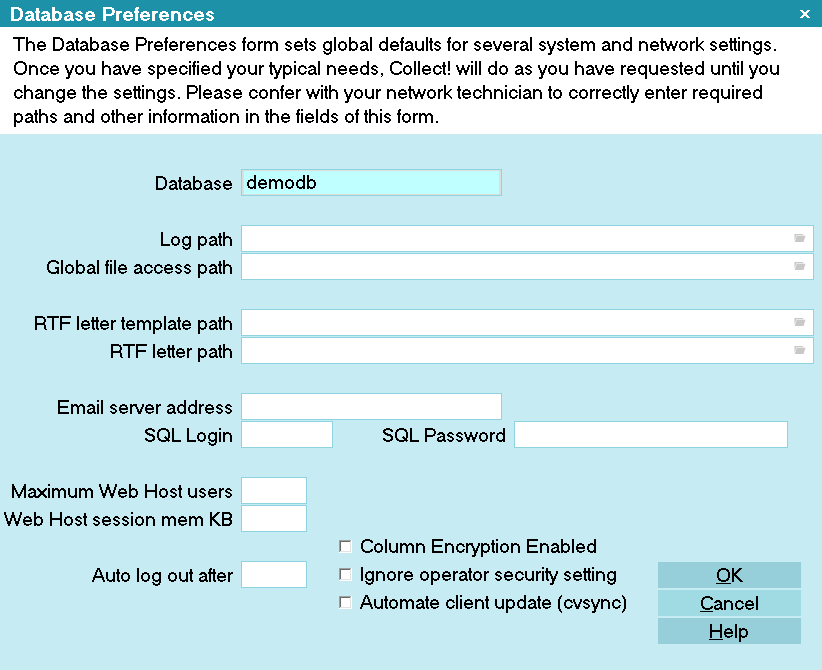
Database Preferences
Credit Bureau Reporting
This option lets you enter details necessary for reporting to credit bureaus.
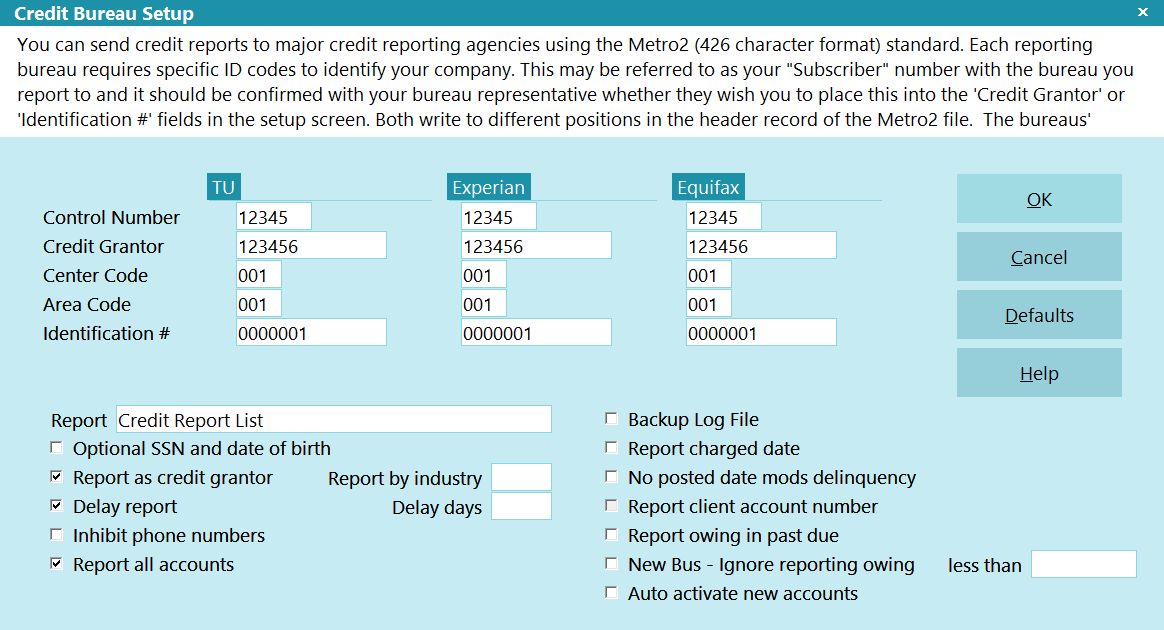
Credit Bureau Setup
Auto Dialer Setup
This option should not be confused with contact dialer functionality. This feature is a dial-from-clipboard function which can
be configured with your phone system to allow staff to point/click an icon on debtor or client screens and have their phones
automatically dial the number as it appears in the field. This saves time and the potential for human error in manual mis-dials.
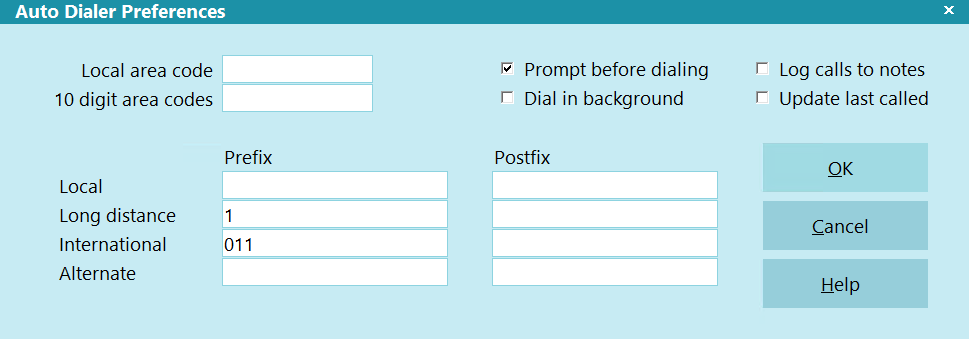
Auto Dialer Preferences
Options, Sounds and Colors
This option allows you to set a variety of software switches that affect individual site preferences and pertain to defaults
affecting global operating of the software.
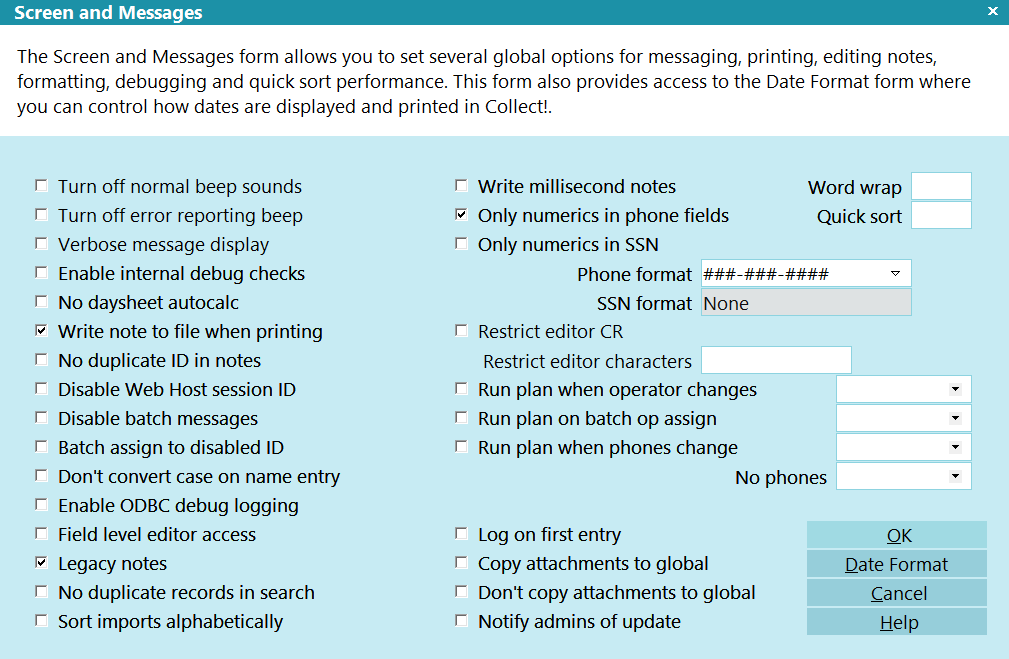
Screen and Messages
Tools Menu
The Tools menu may most often be accessed by office administrators and system administrators. Depending on the size of the
agency, one department may be responsible for both sets of job tasks and thus, the Tools menu was created to contain the items
a blended department may require for their day-to-day operations.
RECALCULATE
This option navigates you to the Recalculate Totals menu where you may choose to update debtors, clients, and daysheets.
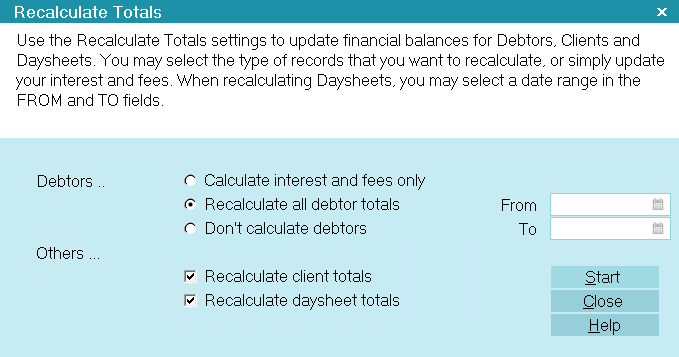
Recalculate Totals
Calculate Interest and Fees
This function scans through all debtors and processes those with interest switched on. Interest is calculated
for all debtors with an interest rate and an interest calculation Start Date defined.
The default is leaving this unchecked as the next option, Recalculate All Debtor Totals has replaced it.
Recalculate All Debtor Totals
This function will recalculate all debtor balances for accounts with an Active mode. Closed accounts are not recalculated.
Recalculate Client Totals
This function will recalculate accounting totals for all clients.
Recalculate Daysheet Totals
This function will recalculate all daysheet totals or a selected date range of daysheets. Recalculating daysheets
updates the totals calculated for each date. The system maximum for daysheet recalculation is 2 years.
SORT ACCOUNTS
Debtors are automatically sorted in the master lists, but not in the client lists. The Tools menu, Sort Accounts option enables
you to sort the accounts in your database by name or client account number. If you have a client who has a preference for one
sort over an other, you can invoke the sort on that client alone by entering the individual client's Debtors Tab and proceeding
with the Tools sort command.
Sort Accounts
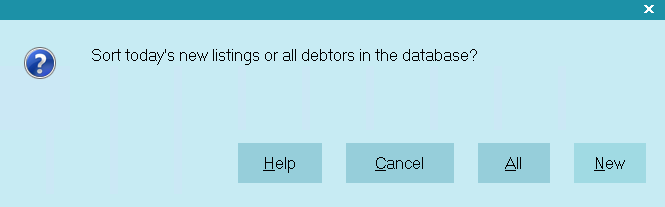
The Sort Accounts command lets you choose between sorting only new debtors or all debtors in the system. New debtors may be
sorted as they are entered daily. This will keep every client's debtor list in the order that they prefer to see on reports or
statements/invoices.
All sorts all accounts in the database.
New sorts only accounts listed today.
You are given the option of sorting by name or account number.
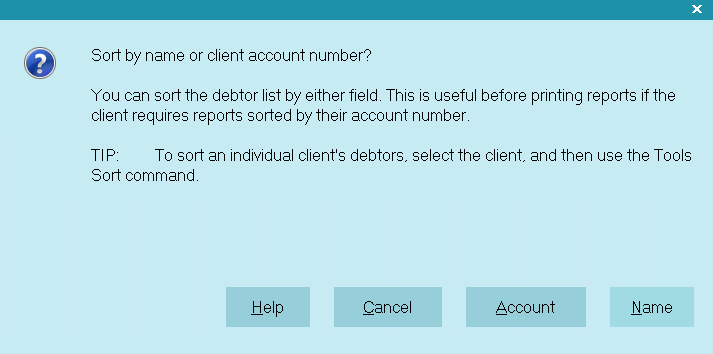
Sort by Name or Account Number
Account sorts by the debtor's client account number.
Name sorts by the debtor's Name.
SCHEDULER
This is an add-on module which requires separate licensing. See Help pages for in-depth reference and usage instruction.
UTILITIES
The Tools, Utilities sub-menu will be a resource for needed tools from time to time, but does not contain anything necessary for
initial setup. See Help pages on Utilities for more in-depth information.
System Menu
The System menu is access to many of the same features as discussed above from the System Administration menu button.
Discussed in this section will be those options not offered from the Systems Administration button, that are necessary to
review for initial configuration settings.
System Menu
Change Password
This option displays the Change Your Password popup window where the operator who is signed in may enter a new password
to use the next time they login.
Company Details
This options was discussed previously and is required entry material for reports/letters as well as statements/invoices
and checks to output correctly.
Rights
This option will pass you to side of sub-menus where you may enter user, user level and access rights/permissions setups.
See How To Setup Operators in the Help pages for in-depth discussion.
Layout and Languages
This option will pass you to side of sub-menus that access permissions you wish operator levels to have in specific fields
and screens throughout the system.
The more direct method to altering user level permissions for fields and screens is to right-click your mouse on the area of
interest that you wish to modify user permissions on. This will open the Access Rights screen specifically for that area and
eliminate the need to scroll through a long list of field and form level entries. Excepting where permissions are being
increased or decreased within a full menu of items, most needs will be met by the right-click method. If you do not achieve the
desired result, it is possible that multiple fields require modification to achieve the singular result. Consult the Help
pages or contact Tech Support for advice.
Financial Settings
This option was discussed previously and takes you to setup areas for Transaction Types, Payment Posting, Commission Rate Plans,
Payment Plans and Credit Bureau setups.
Contact Management Settings
This option was discussed previously and takes you to setup areas for Status Codes, Contact Plans, Work In Progress,
Account Matching and Auto Dialer setups.
Network and Environment
This option takes you to Network, Archiving and Database Change Logging configuration, Web Host Security settings and Messaging.
The side sub-menus have uses for systems administrators. If you are getting messages that there are users being refused logins
because there are not enough licenses but you know you have enough licenses to cover all your users, you can verify whether some
users may have multiple sessions open by clicking Active Users. This will display a window showing all current sessions open
insofar as the Collect! Server is concerned. If you see multiple sessions for any users, you can ask them to logout of the
extra sessions they have open to free up user login license space. You also have the ability to prevent users from having
multiple logins at the Operator setup level. See Operator topics in the Help pages for details.
Diagnostics
This option will primarily be used when you need to view the Application Log or the Credit Bureau Log. These are not necessary
for the initial setup of your system. See the Help pages on the log topics for more details for later usage in areas of
tracking and troubleshooting.
Software License
This option displays the details of your license.
Send Database via FTP
This option enables you to send database files to Collect! for technical support.
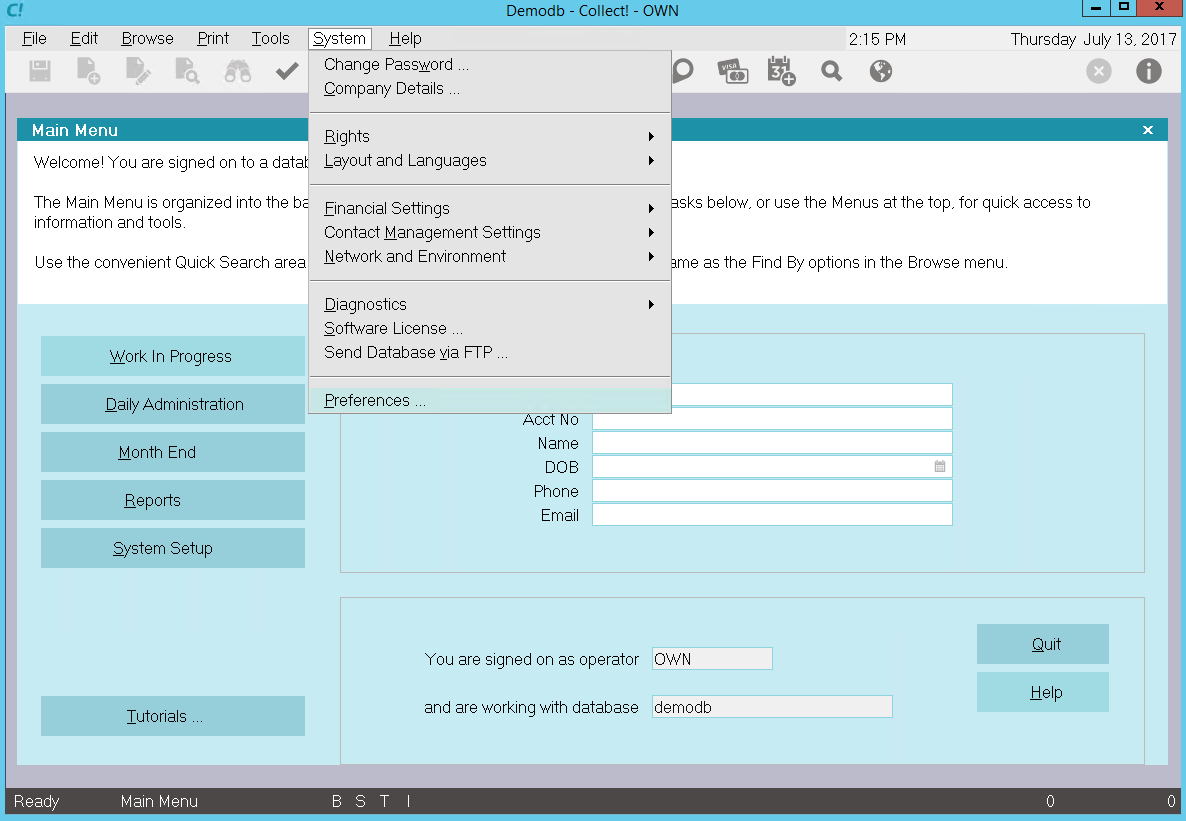
Preferences
This option opens the System Setup sub-menu, all options of which were discussed previously.
System Security
Collect! has multi-tiered security features which allow you to control both the access and degree of access
your users will be granted within the system.
The permissions hierarchy is determined by;
1. Operator Type
2. Operator Security Switches
3. User Level
4. Access Rights on Menus, Forms and individual Fields.
The software ships with a series of pre-set logins which are configured with default settings as examples of what each general
type permits. These logins match general duties such as junior or senior collector, data entry, office manager, etc. You may
modify permissions on the default Levels to meet your individual site needs OR, as we recommend, make copies of the defaults and
THEN modify. This latter allows you to retain a working exemplar of the default settings in case needed at a later date.
To access user setup menus, select System from the top menu bar and then select Rights from the drop-down choices.
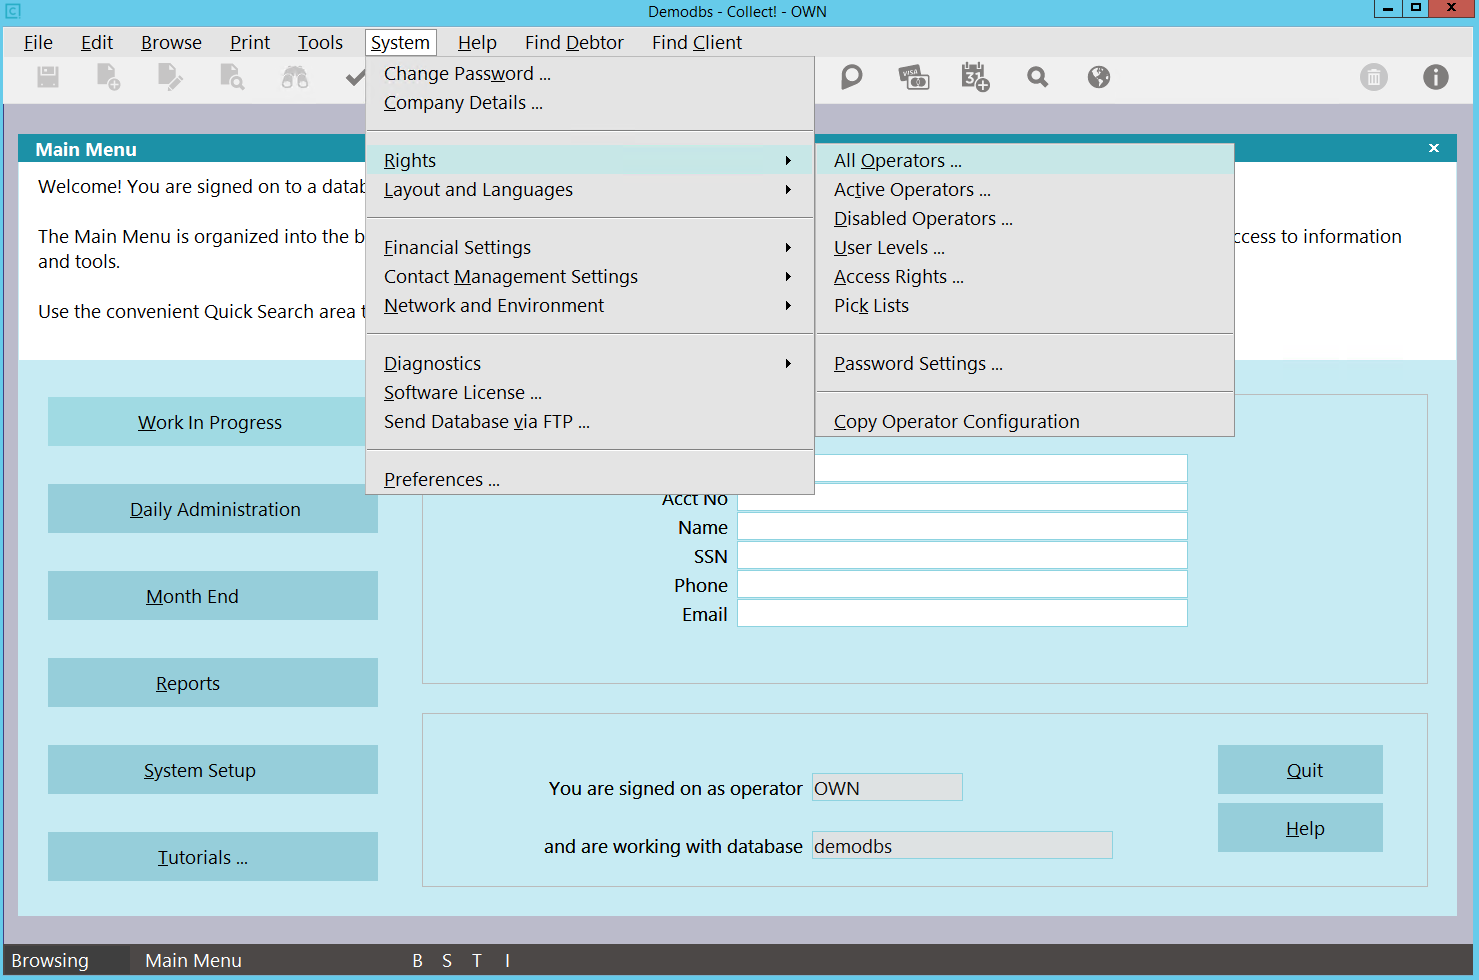
The System Menu - Rights
Operators
This option lets you create and edit logins. It is where you select your user Type which predicates menu access, enter
user ID/name and other internal contact details, assign special security controls such as account or portfolio restriction,
password controls, team membership, session permissions and experience level.
User Levels
This option ascribes a set of user permissions which dictates what menu combinations a user will be granted access to. Each
User Level contains pre-configured settings that are by design intended to allow general permissions relative to job duties.
You are able to expand or tighten the permission degrees to suit your individual site preferences. Permissions on menus,
forms and fields are in the 4 categories of Full, No Delete, Read Only or No Access.
Access Rights
This option lists all forms and menus in the system. It shows which user levels are allowed to access them and
what the current degree of access is; Full, No Delete, Read Only or No Access.
Password Settings
This setup screen allows you to stipulate Password standards for number of characters, numeric/special character
requirements, lock-out after "X" failed attempts and renewal frequencies. If your site does not require tight security to
meet internal or client directives, these settings do not need to be defined.
The links below provide detailed instruction on setting up Operators, User Levels and customizing Access Rights.
Account Matching And Grouping
Accounts can be grouped together automatically and manually, and can optionally share information so that
when you make a change in one account the change also appears in other accounts in the group. It is recommended
to review the shipping defaults and make any changes that are necessary to accommodate your individual site's needs.
The Matching Account setup screen is located on the menu path "System\Preferences\Plans and Reference Tables\
Account Matching Setup".
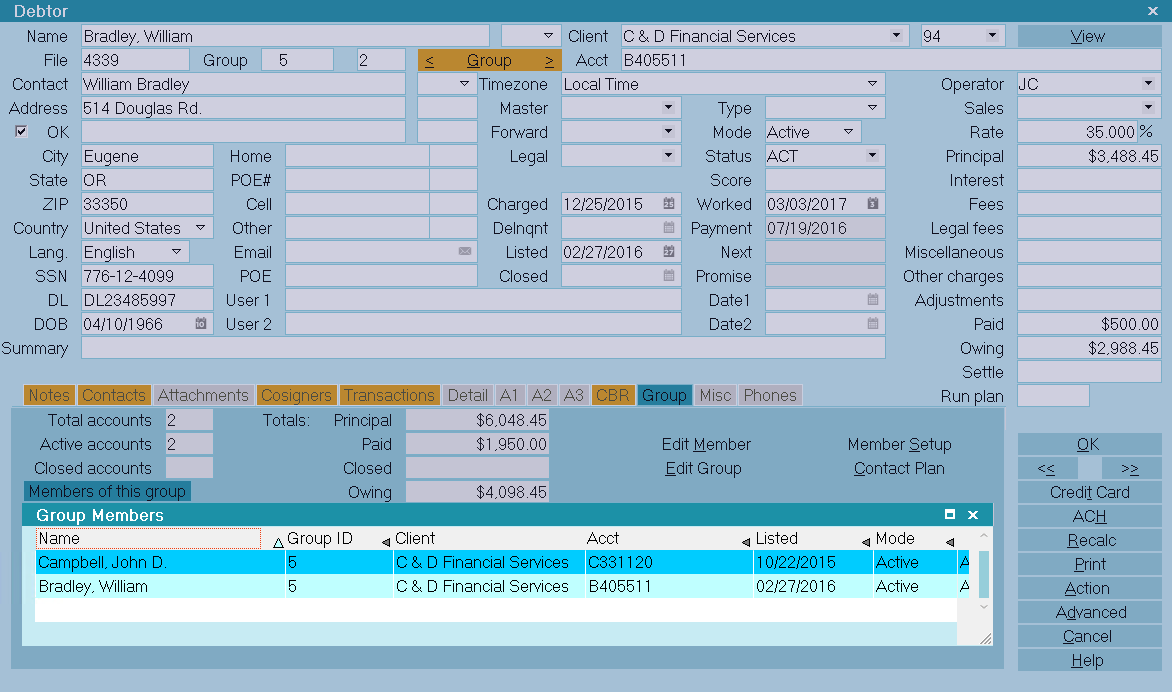
Matching Accounts
When you are on any member of a group, you have instant access to other members of the group, plus a summary of all
accounts in the group.
Account Matching Setup
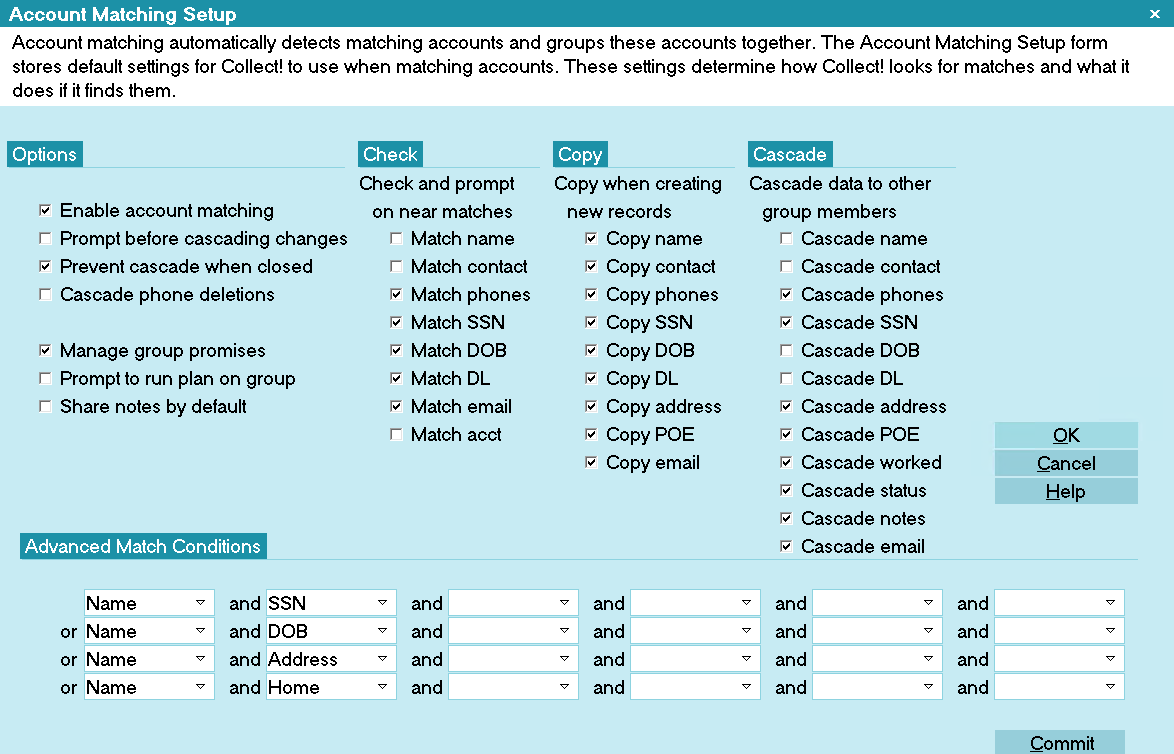
Account Matching Setup
| Turn on this switch | To enable this function |
|---|
| Enable account matching |
This is a master control to turn on and off the automatic account matching functions when entering new
debtors. |
| Prompt before copying |
Adds an extra prompt before cascading changes across to other group members after you've made changes to
a debtor within a group. |
| Check and prompt on close matches |
When you enter data into a checked field, Collect! searches the database for a matching record or a close
match. You can choose from the matching list to group the new and old records together. |
| Copy when creating new debtors |
When you group debtors, you can control which fields are copied from the existing debtor to the new
debtor. Check the fields that you want copied. This setting requires consideration and caution. Once enabled, it will
overwrite data fields on other accounts potentially preventing more current information from being introduced since
existing data may be invalid and new, incoming data may be more current. |
| Cascade data to other group members |
When you make a change to selected information on a debtor that is a member of a group, you can have the
system automatically update other members of the group. Check the fields that you want to be automatically updated.
|
Designing Letters And Reports
You can design your own reports and letters to print from Collect! in addition to modifying external reports that ship
with the software or which have been downloaded from the Member Center.
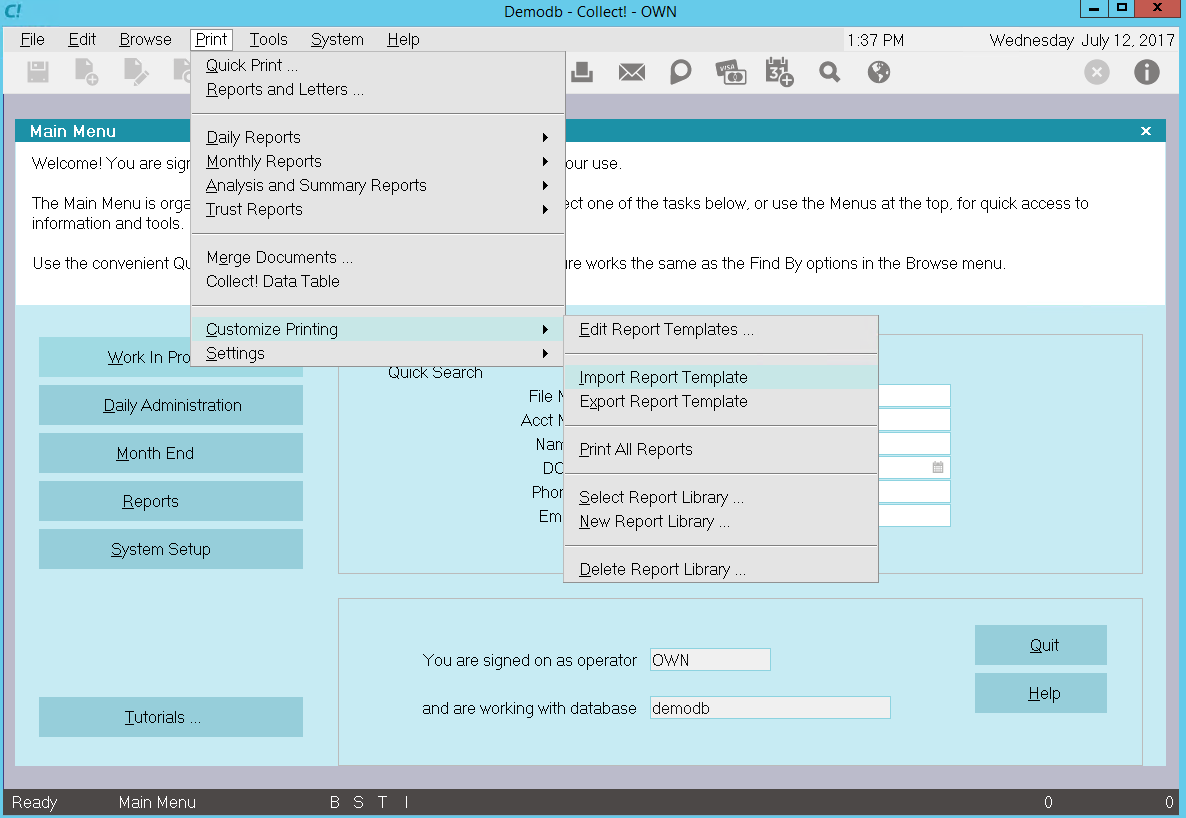
To Edit Reports And Letters
1. Click the Print drop-down menu from the top of your screen.
2. Select Customize Printing, then Edit Report Templates.
3. Select the report or letter which you wish to edit and click on it to open it, OR click New to open a fresh report template
to be designed. Your F3 key can be used as a quick key to create a new template.
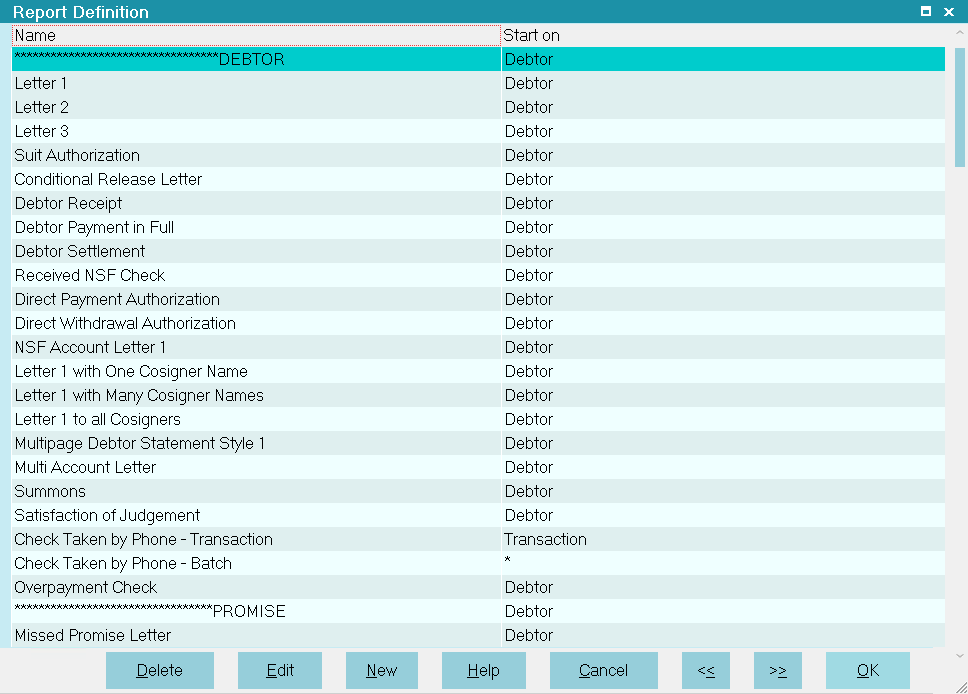
Selecting A Report
Reports can print any database information co-mingled with static text and graphics. You can also choose font types and
size to output in your created documents.
For best results, consult the Help documentation for detailed assistance with Report Writer Topics.
To add a field code, date, page break or formatting code, place your cursor where you want the item to display or occur and press
F2. Key in the parameter you wish to place or select a printable field code from the list pop-up you receive after pressing F2.
Flexible Queries
If you need to create an ad hoc report and wish to manipulate the data yourself in a spreadsheet environment, you can Browse any
of the record types stored, use the Find feature to include or exclude records based specific criteria then Quick Print to
results out to spreadsheet. For example, Collect! will display all debtors with a given status or all contacts on a certain
date or, it will list all clients with less than 10 accounts, and whose listings total less that $10,000. Once you have entered
your selection criteria and reduced the list, you can print reports on just the selected records.
Here is an example:
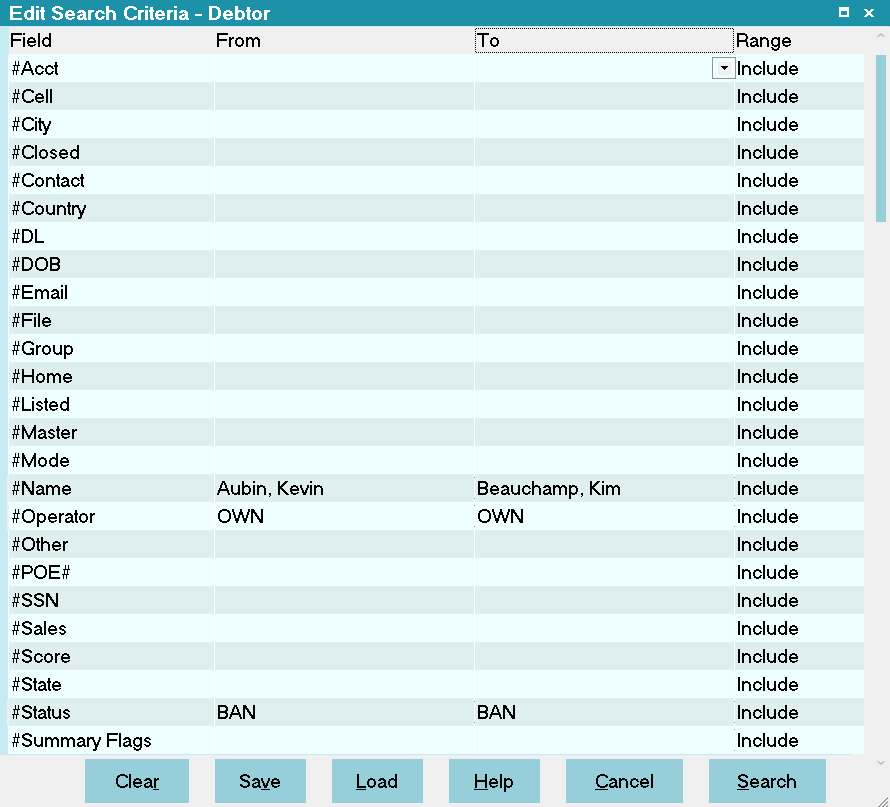
Edit Search Criteria Query Screen
Adding Or Changing Pick Lists
Pick lists give you a list of choices to pick from when you enter data into a field. When you pick an item in the list, it is
entered into the system as if you had typed it. You can assign pick lists to virtually any field on any main screen.
To Add Or Change A Pick List
1. Click the field you want to edit.
2. Choose Field Properties in the System, Layout and Languages menu.
3. Double-click the Pick List File field in the displayed form and follow the instructions displayed on your screen.
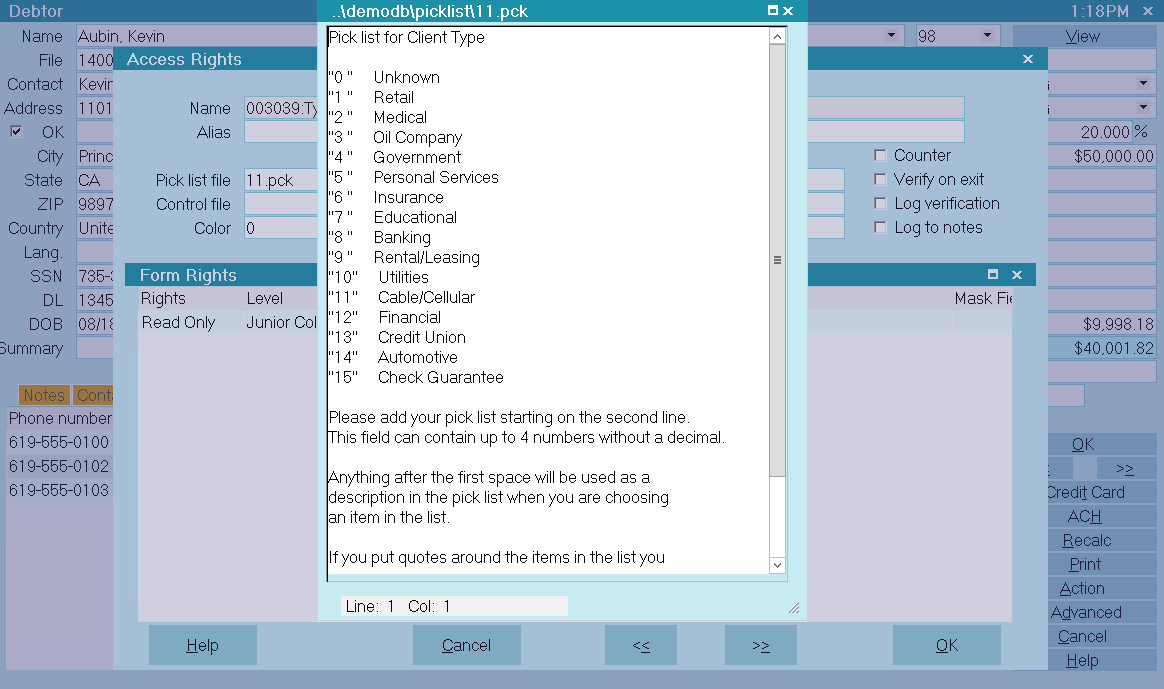
Editing A Pick List
To get even more flexibility from your pick lists, add a blank item that you can type information into. In the list
add the item " " at the bottom of the list. There must be a space between the quotation marks.
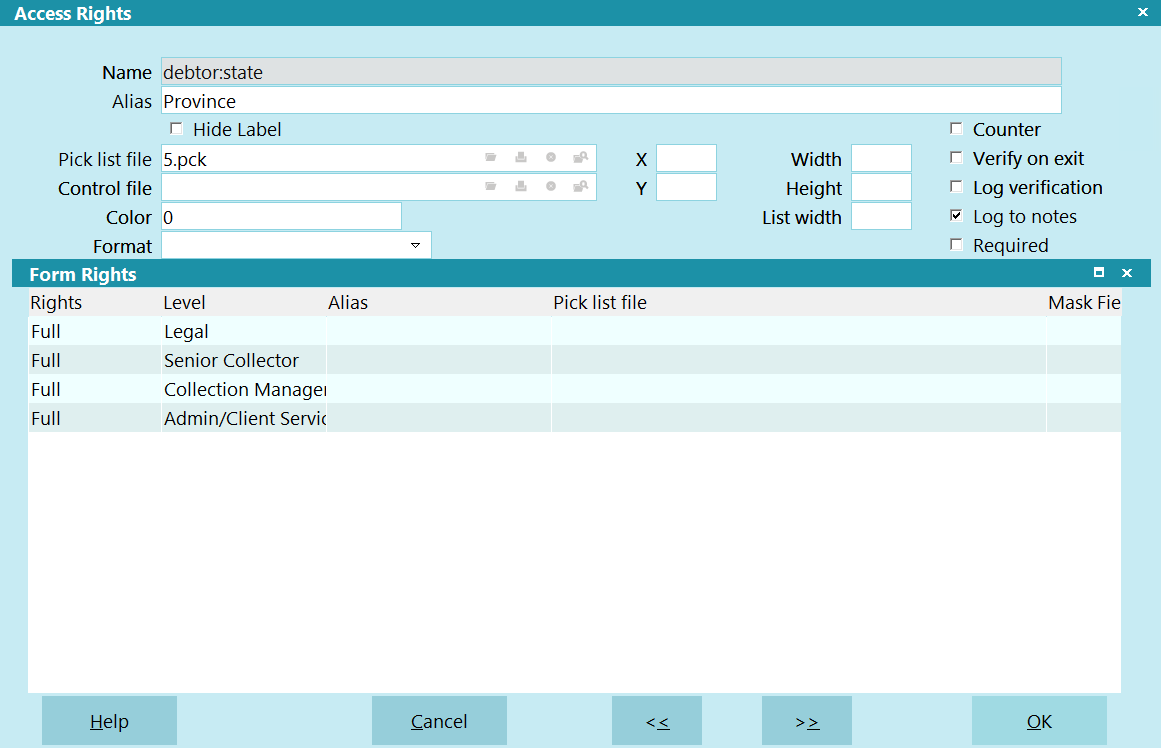
Changing Field Labels
If you wish to rename a field on a debtor or client screen to reflect what is most meaningful for your site, this may be
accomplished by renaming it with an Alias field label. For example, if you want to rename the debtor screen User 1 field
to be OrigCred to stand for Original Creditor, the steps are as follows:
To Change Field Labels
1. Mouse into the field you want to edit and right click.
2. You will get a pop-up window with one option being Properties. Click Properties to open the Access Rights pop-up.
3. In the upper right corner beneath the actual field name, is a field called Alias. Input the new field label you want to have
displayed on screen in the Alias field, then click the OK button to save your change.
Changing A Field Label
A relabeled field retains its original field name and printable field code when being called upon in the body of a
report or letter. For example, if you wish to have the User 1 field from the debtor screen be expressed in a letter
after you renamed it to be OrigCred, you would still use the code @de.u1 to get output in your letter.
User's Guide - Office Administration/Clerical
This is a reference guide for administrative staff.
Main Menu
After signing into Collect!, you will navigated to the Main Menu.
Main Menu
This screen shows you the areas of access. You have Search fields in the lower right corner, Menu buttons on the left and
Drop-down Menus across the top of the screen. The reason why there is some overlap in navigation paths through the system is
because it allows different user levels unique paths to areas they are permitted to access as well as accommodate users who
favor one access path over another.
The following is a brief description of the visible options offered on the Main Menu.
QUICK SEARCH is 6 lookup fields where you can search for debtor accounts by the most common look ups; file number, (client)
account number, name, DOB, phone and email. The Name search will also look for any cosigner or associated party names which
you may store in Cosigner windows of any Class description.
WORK IN PROGRESS navigates you to the WIP lists in the system. For non-collection personnel, this is the access point for all
WIP lists. Reloading and selecting the Operator ID of choice will display that ID's working accounts and desk counts.
DAILY ADMINISTRATION navigates you to all data entry and batch processing.
MONTH END navigates you through the options to generate client remittance statements/invoices and checks, and associated
summary reports.
SYSTEM ADMINISTRATION accesses system configuration and database maintenance menus.
REPORTS provides access to all reports - those internal to the Collect! program (hard-coded) as well as your company's library
of external and custom reports/letters. The source code for external reports and custom letters/reports is contained in the
document body of each, as stored in your Report library.
TUTORIALS takes you to our website for a demonstration of basic functions and features.
QUIT exits the database.
The following are brief descriptions of feature usage. For detailed instructions, see the link(s) trailing each topic.
Daily Administration
Click the Daily Administration menu button to access the sub-menus.

Daily Administration Menu
PAYMENTS AND CHARGES takes you to a transaction entry area where you can apply payments/charges to debtor accounts and post
payments from clients.
These tasks may also be performed directly from a debtor or client screen.
DAILY BATCH PROCESSES is the sub-menu set from where you may print letters, perform batch functions such as account grouping or
assign accounts to collector desks, or recalculate all financial totals in the database for debtors/clients/daysheets.
NEW BUSINESS is where you can enter new Client and Debtor records.
These tasks may also be performed directly from a Browse Debtor or Browse Client list. Additionally, you can enter new debtors
from within the Client that the new accounts belong to. This saves keystrokes by auto-populating the client number and client
name as you enter new debtors.
BROWSE DAYSHEETS lets you view summary information stored in Collect! that reflects the day's accomplishments on a per
calendar day basis.
EXIT returns you to the Main Menu.
Introduction To Reports
Printing for daily and monthly activities is typically done using the options displayed in the menus.
There are 3 types of reports available in the system:
- Internal Reports - This category defines reports which are hard-coded in the software itself and the source
code is not available for modification. These are selected by name from a system menu other than the Print Menu list of
reports/letters and are launched directly from that source. Examples are: Daily Cash Report, Month End Payables and
Receivables, Month Batch Analysis
- External Reports - These are documents for which the report code is stored in the Print Menu list and these
are possible to modify for individual site needs. They are launched by clicking into the Print menu and selecting by name
from the available reports/letters stored in your print library of documents. Examples are: letters, statements, activity,
commission and transaction summaries
- Quick Print Reports - These are the equivalent of ad hoc queries where you may select the data set by first
Browsing into a list of the items interest (i.e. Debtors, Clients, Transactions) and tagging them as a list. Requesting a
Quick Print of these records with All details or abbreviated output allows you to export data into a csv spreadsheet where
you may perform data manipulations to meet your office's needs. Examples are: a listing of all postings within a prescribed
date range that were applied with a specific Transaction Type (i.e. Court Costs or Fees), create a list of debtors with
specific balance and list date range with a particular status code
Print Menu
The Print menu provides access to all the reporting functions in the system.
Print Menu
QUICK PRINT
Quick Print will output All or abbreviated data pertaining to an individual screen or list of records currently displayed
on your screen.
REPORTS AND LETTERS
This option accesses modifiable reports and letters stored in in your print library.
DAILY REPORTS
This option navigates you to a list of frequently used, standard internal reports and tasks.
Letter Service Bureau
If your office is utilizing a letter service mail house to generate and send your debtor letters, this option will generate the
daily letter file that you will send to your provider.
Scheduled Batch Letters
Navigates you to the sub-menus from where you may launch your letter batches for printing in your office. This is the same
sub-menu that can be reached from the Daily Administration button on the Main Menu.
Client Acknowledgments
Generates a standard client new listing acknowledgment for all clients who have assigned new accounts in the date
range selected. This report is also available as an external type which may be modified for verbiage/content.
Daily Cash Report
Prints a summary of the day's financial transactions including the bank deposit amount.
New Business Report
Outputs the new listings and totals for the selected date range.
Work Cards
Outputs the equivalent of a debtor screen print with additional details included.
MONTHLY REPORTS
This option navigates you to the selection of month-end related reports and tasks.
Generate Statements
Creates client invoices/statements and checks for the collection period date range specified. This is the same
sub-menu that is accessible through the Month End button on the Main Menu.
Statements
Prints the most currently created statements/invoices.
Checks
Prints the most currently created checks.
Client Status Reports
This is the equivalent of a debtor inventory report which prints for each Client.
Payables
Outputs a summary of all clients for whom a trust check was issued in the collection period specified. It is
the equivalent of a check register to simplify your entry into your general accounting software outside of Collect!.
Receivables
Outputs a list of clients who have a balance owing to your company. Details are displayed with Current/30/60/Over 90
day aging. The report is selectable by user defined date range.
Operator Commissions
Outputs a summary of the collector commissions recovered in the selected date range. Note: only transactions with a
commission amount (either positive or negative) are included. This means that any payments or portions of payments which
were posted with zero commission will not be included in the amounts output on this report.
ANALYSIS AND SUMMARY REPORTS
This option navigates you to a list of summary and analysis reports.
Month Batch Analysis
Provides client recovery statistics on a month by month basis, scanning back up to 2 years.
Transaction Analysis
Output layout of this report is the same report as the Operator Commissions report above-captioned. The distinguishing
difference is that this version includes zero commission transactions, including Adjustments.
Client Analysis
Generates a summary performance analysis report by client on your selected date range, summarizing new business, debtor payments,
liquidation percentage, cost factor, number of payments and number of new accounts on a monthly and year to date basis.
Total Listed
Generates a historical totals summary of all accounts placed with your office up to the report run date. It does not detail by
client.
Transaction Summary
Outputs paid agency and paid client totals within the requested date range. It does not detail by client.
TRUST REPORTS
This option navigates you to the reports which pertain to trust account balancing.
Trust Summary Report
Outputs on a selected date range and details paid agency, NSF to agency and client remittance checks issued, arriving
at a closing trust activity balance for the requested period.
Client Trust Report
This report must be launched from an individual client screen. It outputs a summary of all credits and debits
associated with the Client, along with a breakdown of payments and charges.
MERGE DOCUMENTS
This option allows you to select an externally created template to use for your report layout. Data from your Collect! database
is used to auto-populate designated merge fields. Please refer to the Help topic How to Mail Merge from Collect! to Word for
more detailed usage instructions.
CUSTOMIZE PRINTING
This option navigates you into the Print Menu in an Edit mode where you may select an item from the reports/letters
library for modification or create a new letter or report.
Printing A Report
When you choose a report to print, you may receive a prompt pop-up asking you to enter specific criteria of interest if
applicable, or if there are no parameters to be entered, you will be advanced to the Print pop-up to complete the output
of your report.
From the Print pop-up, you can select your device or output type. Examples: default or selected printer, spreadsheet, file,
email, browser, fax or other.
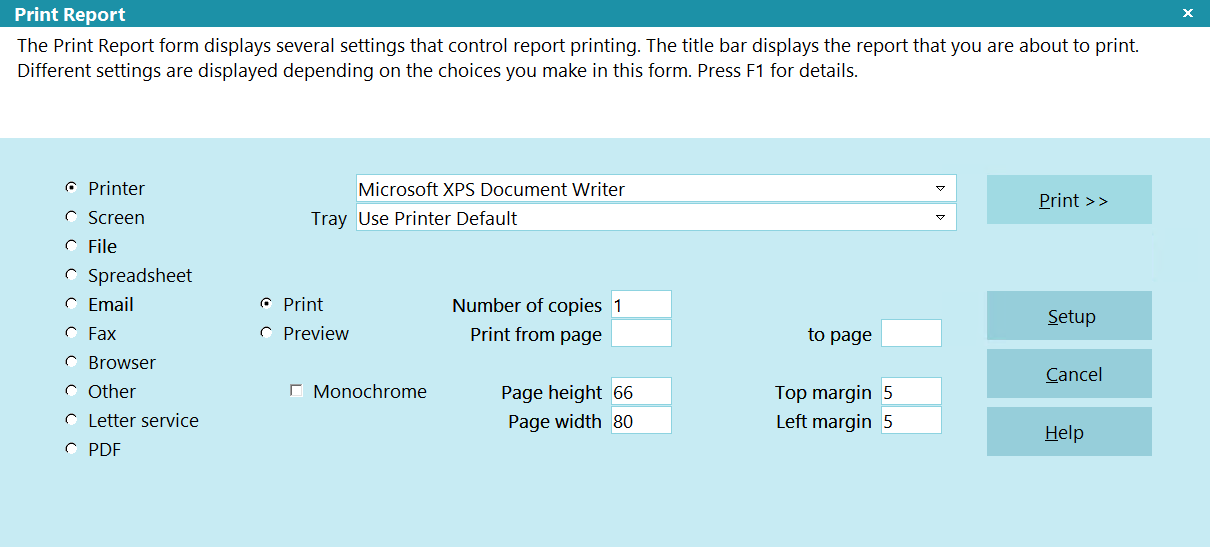
Print Report Screen
Clicking the Print>> button will execute your request as per your selections in this window.
Report Destinations
PRINTER
Typically you send reports to a printer. You can select from the list of printers installed on your PC.
Printer
This field displays the default printer. It may contain a pick list that you can select from.
Tray
If your printer supports printing to different trays, you can select a tray in this field. This is used with the @TRAY
command in the report writer.
Print
This selection prints directly to the printer.
Preview
This selection opens a Print Preview so that you can preview your letter or report before sending it to the printer.
SCREEN
You can send the report to the Screen. This allows you to quickly review the report. Control codes embedded in the
document will display in this view. Use Preview instead if you wish to see a representative example of what the output
will look like when you send it to the printer.
This option is useful when you are executing a process that requires a real-time run in order to complete contact events
but where you do not wish to generate actual paper output. Preview does not mimic an actual execution and thus will not
mark contacts done where such is the objective.
FILE
Outputs to a file in the format you specify, with the name you select and writes to the path destination of your choice.
File extensions should be .html, .txt or .csv. After clicking the radio button beside File, click the Browse button
to navigate to your file output destination and give the report a name and file extension type.
SPREADSHEET
Choose this option to output a csv file to a spreadsheet which you can open with your preferred program (i.e. Excel, Open Office,
UltraEdit, Notepad). Your file name and destination are selected in the same manner as with File above, by clicking Browse. Use
file name extension .csv so that you are able to open it in your program of choice.
EMAIL
Choose this option to print the report as an Email. The report will automatically be sent through your Email program to the
address in the Debtor's or Client's Email field.
Emailing through Collect! requires configuration prior to usage. See your Systems Administrator to find
out if your office has been set up for email usage.
FAX
Choose this option to print the report as a Fax. The report will automatically be sent through your Fax modem to the
phone number you choose in the Fax # field.
BROWSER
This selection will print the report to an html document which can be previewed and/or printed from your default web browser.
OTHER
Choose this option to print the report to an alternate word processor, such as WordPad or Word.
Other Print Options
Other print options allow you to specify page size and margins, and also which pages of the report you want to print.
Number of Copies
Enter the number of copies you want to print. It is pre-filled with the default 1 copy. No change is required if this is your
selection.
Print From Page
This setting specifies the starting page number of the report. If the report is 20 pages long and you want to start printing
on the 10th page, enter 10 in this field. This field is blank by default.
To Page
This specifies the ending page number of the report. If the report is 20 pages long and you only want to print the first 5 pages,
type 5 in this field. This field is blank by default.
Page Height
The page height lets you specify the number of lines that will be printed on each page before the form feed function advances
to the next page. It is defaulted to the correct number for a standard, portrait orientation page output.
Page Width
This will determine where printed lines wrap automatically. This is especially important for the Quick Print option. 66
is a standard width. It is defaulted to the correct number for a standard, portrait orientation page output.
Top Margin
This specifies the number of blank lines printed at the top of each page. It is blank by default. Most letters/reports contain
individual document format codes as part of the source they are written with. It is not necessary to place an entry in this
field.
Left Margin
This specifies the number of spaces left blank on the left side of each page. Most letters/reports contain individual document
format codes as part of the source they are written with. It is not necessary to place an entry in this field.
Canceling A Report
You can back out of the print process by selecting the Cancel button on the Print Report pop-up or by pressing any key if the
print job is in progress.
The program will pause and ask if the report should be cancelled.
YES - Stops printing the report.
NO - Continues printing the report.
MAILING LABELS
Mailing labels can be printed for debtors and clients. Before printing your daily reports, you will be asked to choose to print
either the letters or mailing labels. Please be sure you have the appropriate paper in the printer. If you have a separate
printer for labels, you will be able to select that printer before the printing begins.
Order of operations is to print Mailing Labels before batch letters so that your obtain your labels before the
process of the actual letters completes the letter contact event.
You can modify the label format by using the Print menu, Customize Printing, Edit Report Templates option. For Debtor labels,
the report is named Debtor Mailing Label. For the clients, the report is named
Client Mailing Label.
User's Guide - Working Accounts
This user's guide is an orientation to familiarize all Operator types with Collect! basics.
Starting Collect!
Once you have launched Collect!, you will see the splash screen below.
Collect! Splash Screen
Enter your login credentials in the ID and Password fields indicated.
IDs display as block capital letter entries irrespective of how you input the ID. Passwords are case sensitive. If you get an
'invalid' message, check your cap-locks and retry. Depending on your site's preferences, your password may be all lowercase,
uppercase or a mixture of cases. Your entry must match exactly.
When you have entered your login credentials, you will be advanced to the Welcome screen.
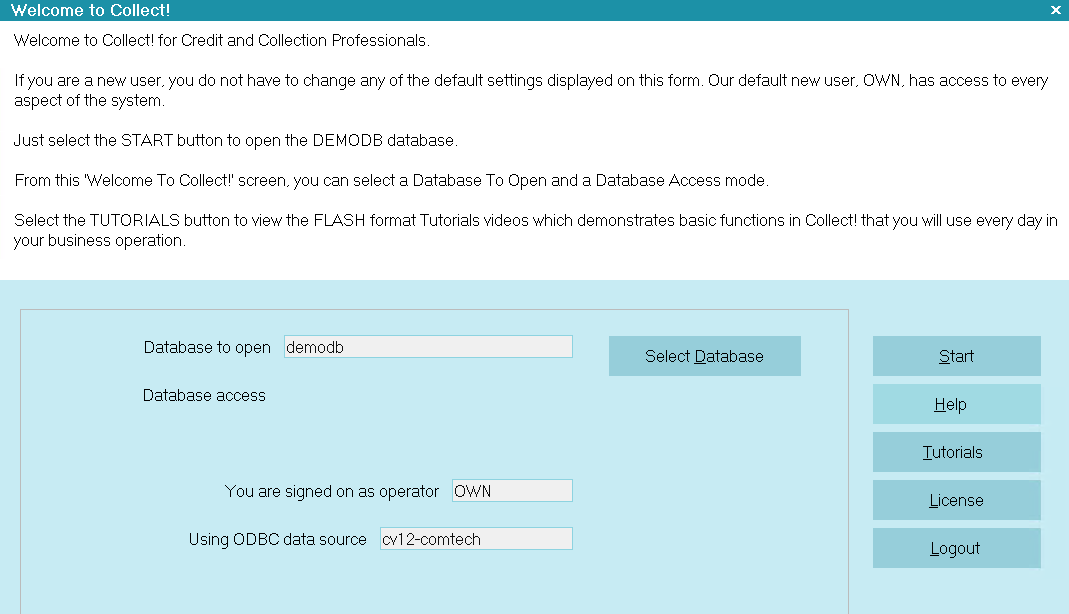
Welcome To Collect!
Click START to enter the program.
Your Operator Type and User Level will determine what screen you are presented with next. Administration/Data Entry/Management
see a Main Menu screen while collection personnel are navigated directed to their WIP windows.
Main Menu
The choices in the Main Menu are described in the User's Guide - Administration.
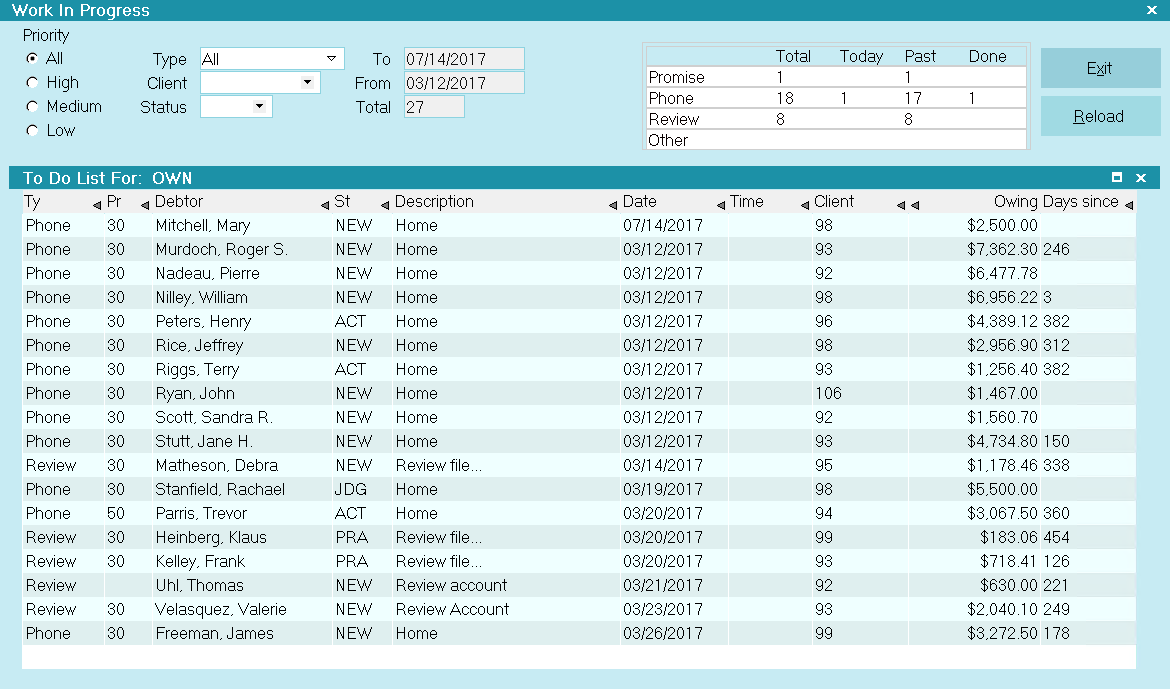
Work In Progress
For collection personnel, the WIP screen provides all-points access necessary to work their accounts.
Daily Collection Activities
As your WIP list is generating, it will be gathering all accounts which have a scheduled, In Progress contact associated with
your Operator ID which is dated for the current day PLUS anything which you had in Priors (dated prior to current but not
yet worked).
Work In Progress To Do List
Entering The To Do List
The list displays contacts scheduled to be worked today. It is called your " To Do List." What you see in your list depends on
how your office as configured your WIP settings. Typically, it is contact event types Review, Phone, Promise and Other which are
used to build a collector WIP list.
The following describes the significance of the screen features and options available to you.
TO DO LIST COLUMNS
Collect! ships with default list views, meaning the columns being shown and order they appear in are general. A highly
popular feature in the software is the ability to customize your list views to present you with the information that is most
relevant to you and restructure the column order to meet your own preferences.
By right-clicking your mouse on the column header row, you will be presented with the options of adding or removing
columns from your view. You can also click into the label of a column to expand or narrow the width to suit your view as well
as drag-and-drop the column to a different position in the column order.
The same capability to modify list views exists for most browse lists in the system.
Any columned list in Collect! which shows you it has a triangle on the right end of column label is an indicator that you may
sort that column in ascending or descending order by clicking your mouse on that triangle.
In the upper portion of the WIP screen, you will see a series of radio buttons and drop-down pick list menu options. These are
your Filtering options. By making selections within these pick lists, your WIP will regenerate, showing only those accounts
which meet the selected criteria.
For collections personnel, these sub-WIP tools allow for strategic working of accounts. For administration and management,
these tools provide easy access to desk counts and inventory breakdown data for operations monitoring and metrics.
Type is the kind of contact event that you have scheduled; Phone, Promise, Review, or Other.
Priority is a value from 1 to 99 that indicates how urgent you designated this contact event to be. It may be
used to further sub-WIP your accounts within the same Type. For example, a Priority 99 can be used to alert you to handle this
right away, while a 20 may indicate non-prime-time hour attention.
Debtor is the name of the debtor whose account the contact refers to.
Status is the Status on the debtor's account.
Description is what you have typed into this line when the contact event was created. Collectors can use this
as their 'next step' note to themselves to negate redundant note line review each time an account is scheduled to be worked.
Events scheduled by automated processes will have a generic description which is associated with the Contact Plan that was used
to insert the event. For example, your office may have " New Business - Work Account" in the description line of Review contacts
created when new listings are entered. Phone events do not permit free-form description entry; they require selection from a
pick list of which phone you plan to dial on your next contact.
Date is the scheduled work date.
Time may be used to time queue an account. Use this feature to meet a specific request for call-back, night
calls and when you are endeavoring to adhere to attempts at different times of day standards in your work plans. It is important
to NOT time queue every account on your desk. This may cause non-timed accounts to be left unworked due to the over-queuing of
timed calls.
Client is the Client Number for the debtor's account.
Owing is the Balance on the debtor's account.
Timezone tells you which of the timezones that debtor account is located in on the basis of area code on the
phone number(s). Use Sort in this column to assist you in making the most efficient use of legal calling hours. For example,
if you are located in a Pacific timezone, you can start Eastern night calls by sorting your timezone column for Eastern
accounts anytime after 3pm in your local timezone.
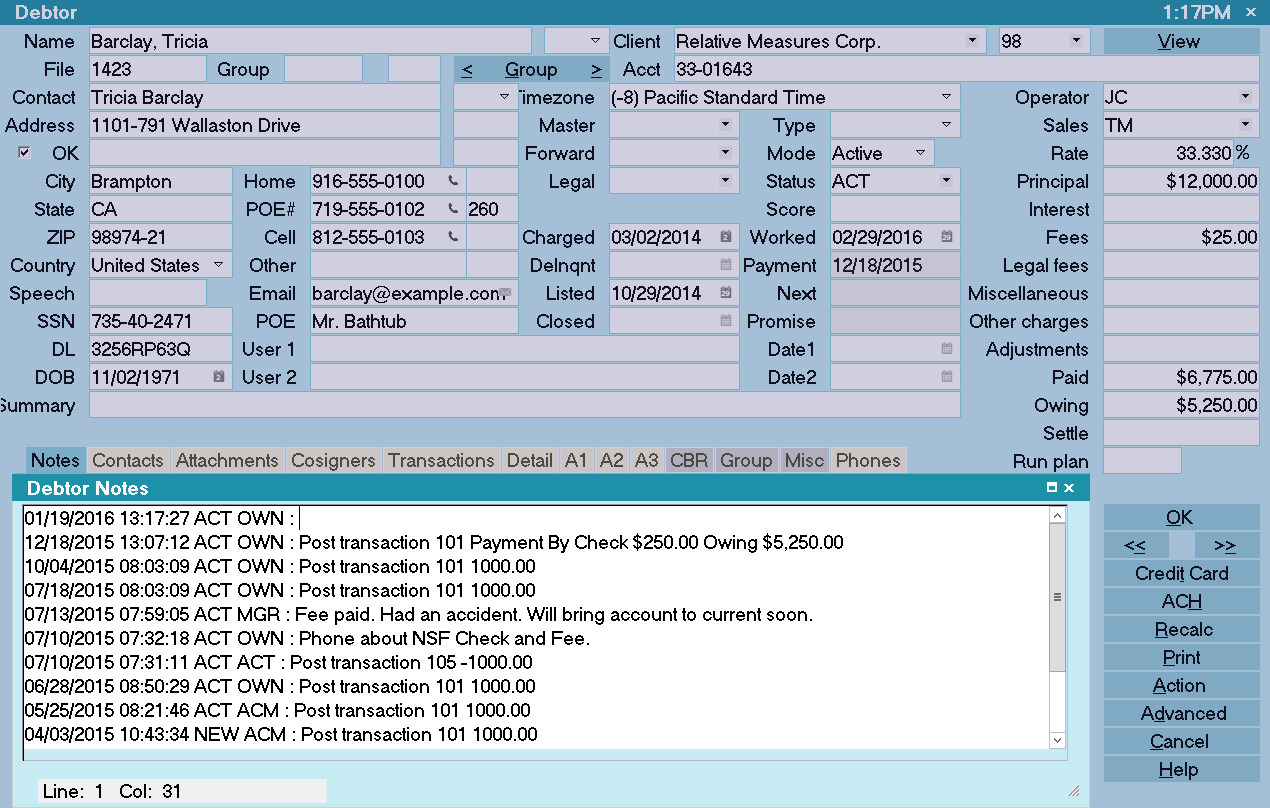
Debtor Screen Basics
Viewing Account Information
The Debtor screen contains all known information about the debtor since it was received by your office. The upper portion of
the screen contains the tombstone details and demographic contact information known about the account. The upper right corner
identifies which client this debtor owes. Below the client information and client account number, you will see the financial
summary information down the right side of the screen. This shows you to-date totals of what is owing in any of principal,
interest, costs and also a total of what has been paid to-date, if applicable.
The Tabs running horizontally in the lower part of the screen are separate sub-folders associated with the account. When a tab is
gray in color, there is nothing in it. When it is yellow, see this as the 'light is on' and something is in there to be viewed.
Any tab which opens with 2 small square buttons in the upper right corner of the tab display is a window which may be expanded to
full screen size by clicking on the square. The tab contents will return to regular size when you click the square a second
time. You may exit the tab view by clicking the "x" to close it or by pressing your Esc key.
In addition to the Tabs, there is further information on the account which may be viewed by clicking into fields of selecting
from the bank of buttons in the lower right corner of the screen, beneath the OK button.
Any screen you enter may be exited by clicking an associated "x" in the corner of the pop-up window or by pressing your Esc key.
In other views, you may be prompted to acknowledge a pop-up by clicking an OK button or clicking on a choice for Yes (or No).
Actions you can take on a debtor screen include review all existing information, add notes, add payment plan, post a payment,
establish your next work date by adding a new contact event, update address information (depending on your User permissions),
update status, send a letter, send an internal request to a coworker or manager via contact event, or run a contact plan to
invoke one or more events.
Navigation around the screen is via your mouse point/click or if you prefer keyboarding, you can use your Tab key to migrate
from field to field on the screen.
Viewing Debtor Notes
A complete set of notes on the debtor may be viewed by selecting the Notes tab on the Debtor screen. Click into the Notes area.
In addition to the tab window expansion, if you are presented with a scroll bar on the right of the tab display, then there is
additional information which you can't currently see because it doesn't fit in the regular/contracted tab display size. Use the
scroll bar to page down through additional information if you do not wish to expand the tab display to full screen.
Typing Debtor Notes
Unlimited notes may be entered either free-hand by clicking into the Note tab body area, you will be presented with a pre-filled
date/time/user ID stamp and a flashing cursor waiting for you entry. It is also possible to enter notes via action/result
contact plans which your office may set up to eliminate redundant note line entry. For example, a Contact Plan action/result
code could be defined to do all of auto-write a note line such as "Tel Res - NA" for you as well as update your account status
code from NEW to ACT once it has been worked.
Viewing Payment History
Select the Transactions tab to view a list of individual payments made as well as any charges levied on this account. Click into
the Transactions area and scroll down to view the entire list of line entries, or, expand the window to full screen by clicking
the square in the right corner.
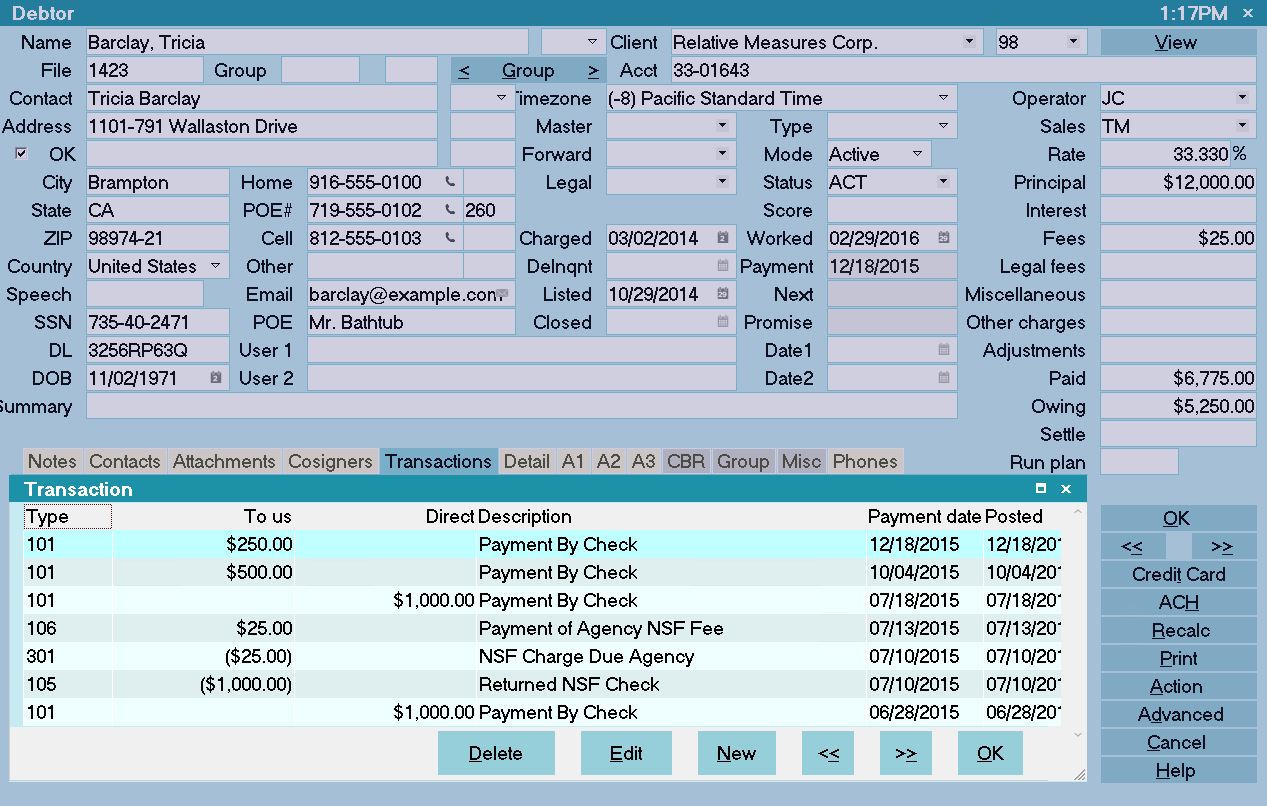
Debtor Payment History
Summary payment information may be displayed by clicking into the Owing field on the main debtor screen to obtain the Debtor
Financial Summary pop-up. This window shows you totals for original amount(s), paid amount(s), accrued amount(s) for interest/
other costs or charges, arriving at the balance owed and displaying this with a breakout into the balance component parts.
Viewing Additional Account Information
Additional information pertaining to the account is stored in the Detail, Attachments, Cosigners, Credit Bureau, and Group tabs.
Select the Detail tab to enter bank account information.
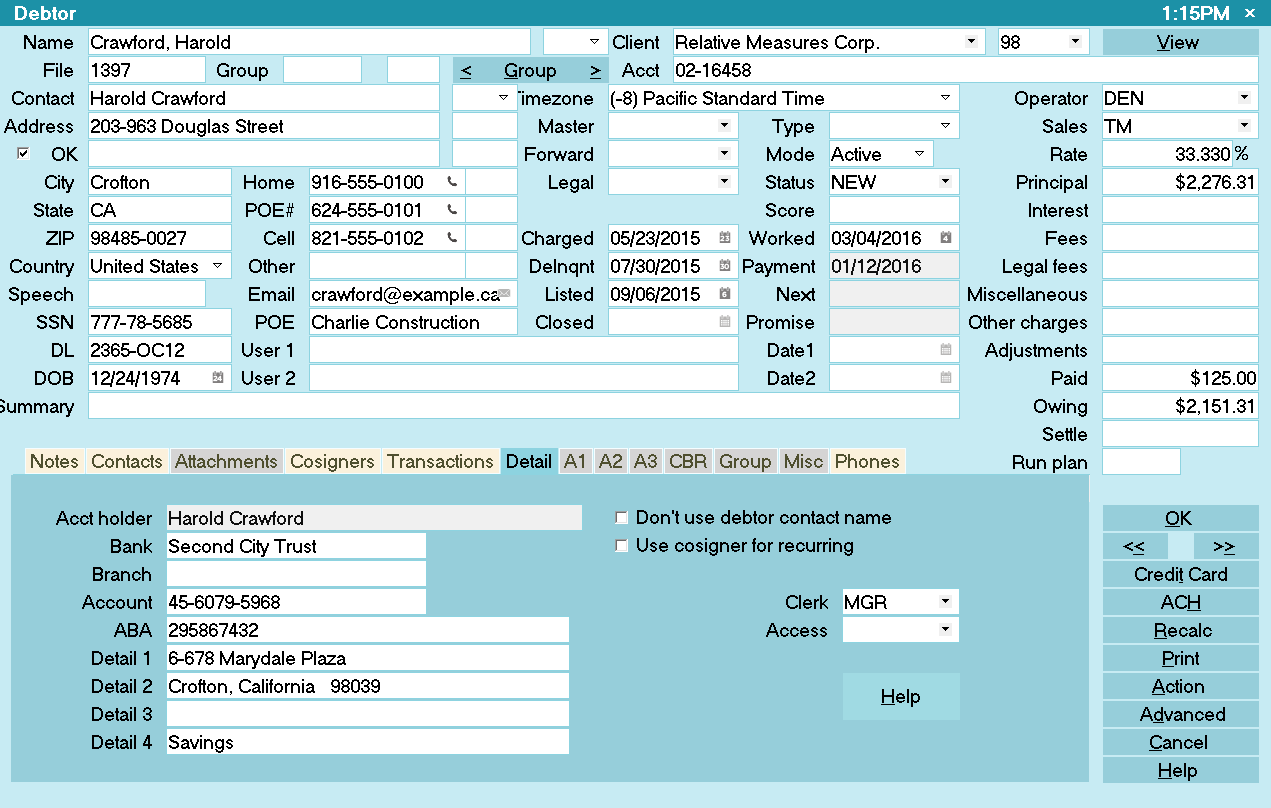
Debtor Detail
Select the Cosigner tab to enter either additional responsible parties on the debt AND use this feature to store associated
information such as employer, attorney, references, next of kin, spouse (not responsible), alternate or previous address
details, and alias names. Utilizing the window Class and Type descriptors allows you to set up as many windows as you need for
each account to store relevant data.
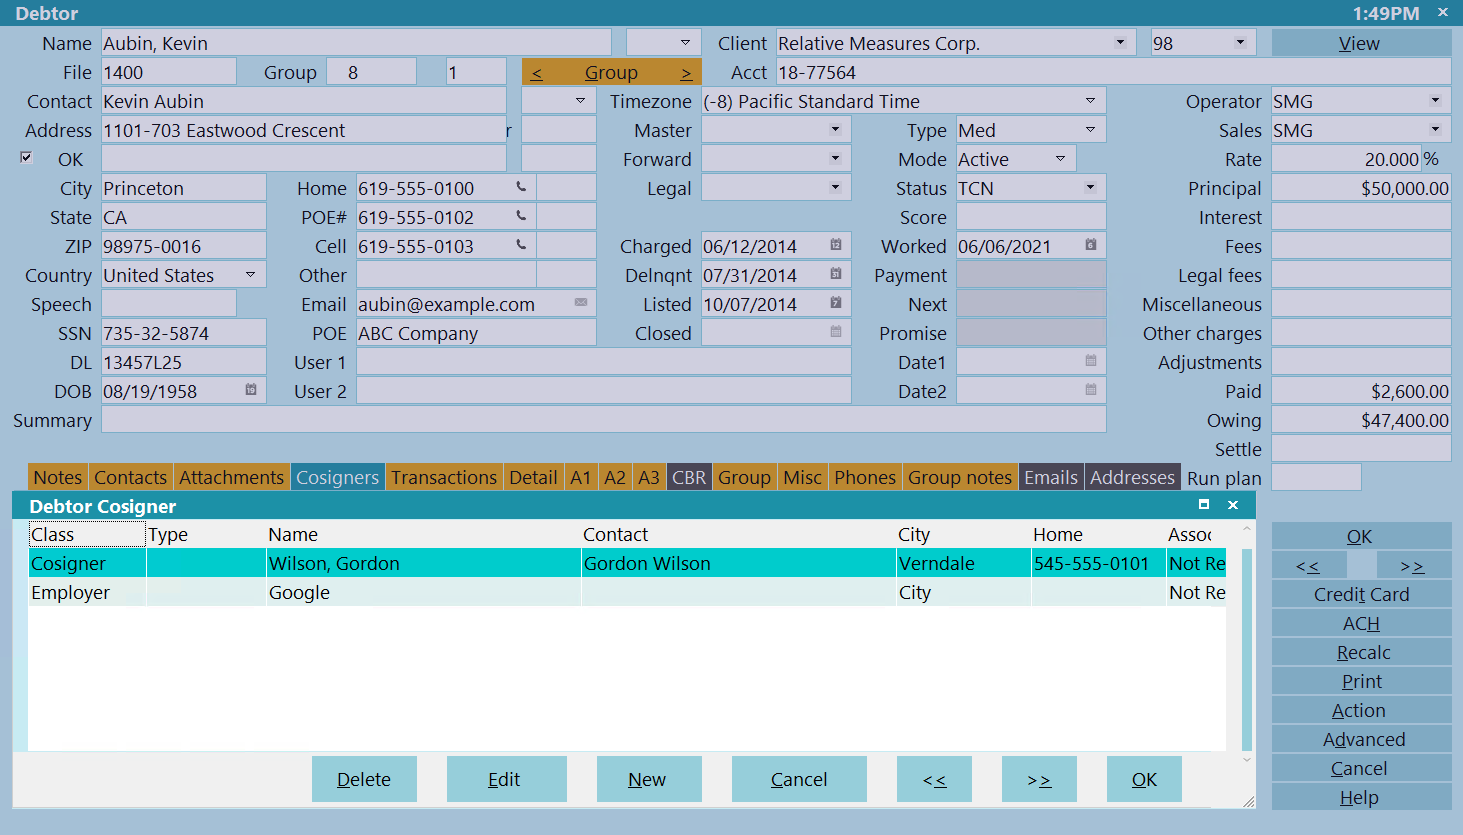
Debtor Cosigners
Viewing Contact History
Select the Contacts tab to view a list of all contacts for this debtor. Within this tab you will see the full complement of
events which have taken place on this account including letters sent, how many updates have been sent to the Credit Bureau
(if applicable) as well as all collector and manager events completed.
If you need to see the contents of any letter sent, highlight the letter event of interest and click on it to open. In the line
labeled "Attachment", you will see the word [METAFILE]. This means there is an image of the letter and what it contained exactly
as it was sent on the indicated date that the contact event was completed.
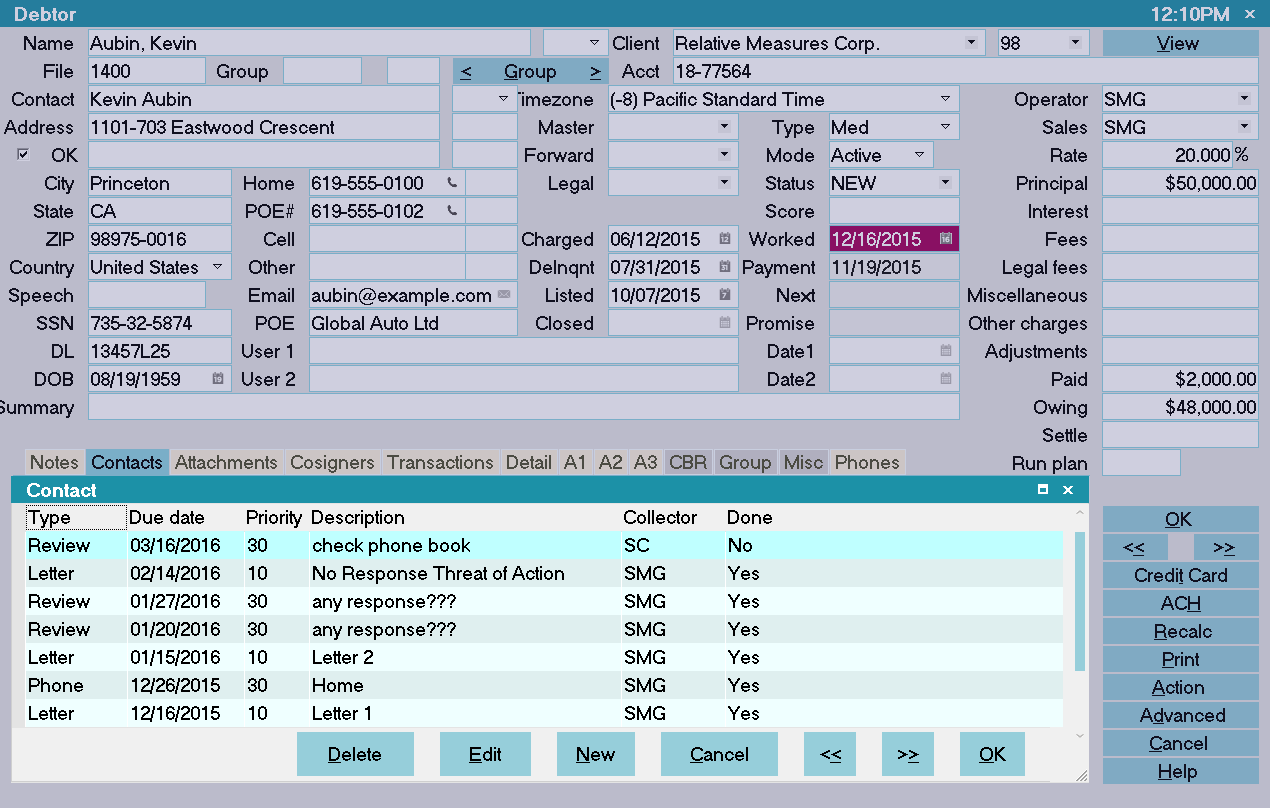
Contact Schedule
From a WIP list, you will select a contact event to work and click on it to open the file.
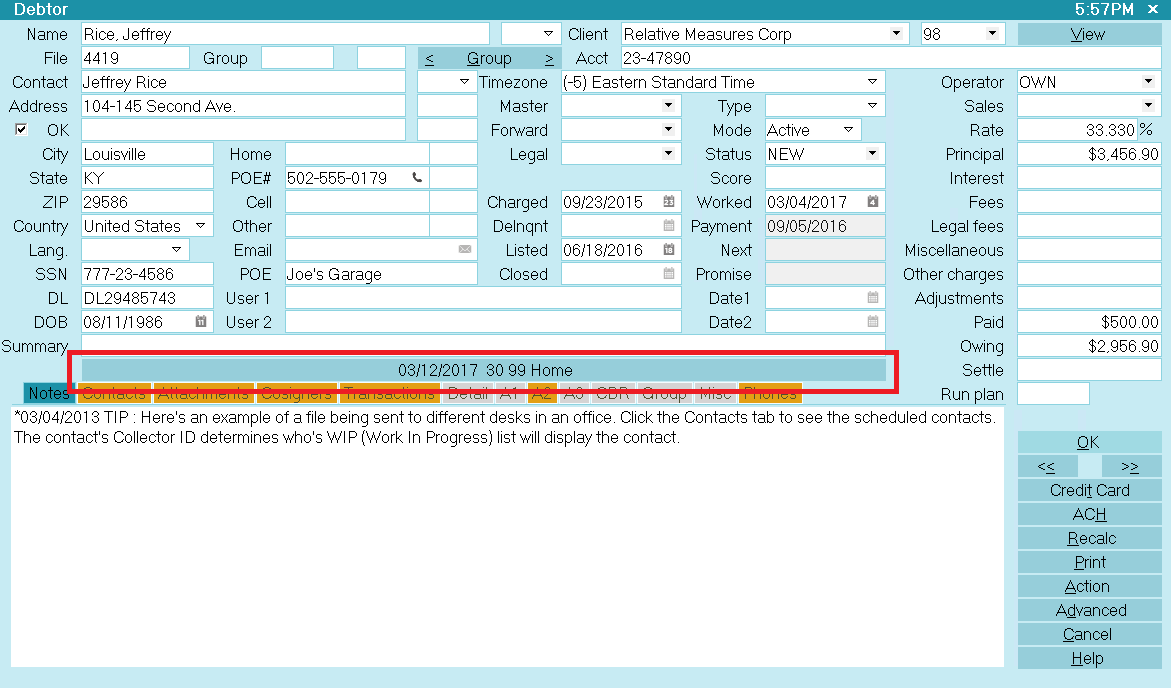
WIP Scheduled Debtor Account
The yellow bar beneath the "Summary" field displays information from the contact event you selected from your WIP list. The
reason for this is two-fold; (a) it saves keystrokes in that you do not need to stop to open your Contact tab and (b) it
identifies exactly which contact item you selected in the event that you have more than one scheduled contact with the same
work date on the same debtor account.
When you have completed all the work you wish to do on this account today and are ready to advance to the next account in your
queue, you need to do 2 things before advancing. Each site will make an individual decision as to how they want contact events
to be managed; voluntarily or by automatic prompt. Please see your management to find out which process you should follow:
If your office is using WIP Option "Always show next contact when" switch checked On:
1. After selecting and working your WIP account, click the right pointing arrow key (under the OK button) to advance to the
next account. You will receive 2 pop-ups. The first will ask you to choose between marking the current contact event done,
leaving it in your WIP or staying on the account. If you are done, proceed to step 2.
2. Click the Mark it Done button.
3. You will immediately be presented with the second pop-up which will be the item you need to setup your next work date
by assigning a new contact event with a new date to be worked.
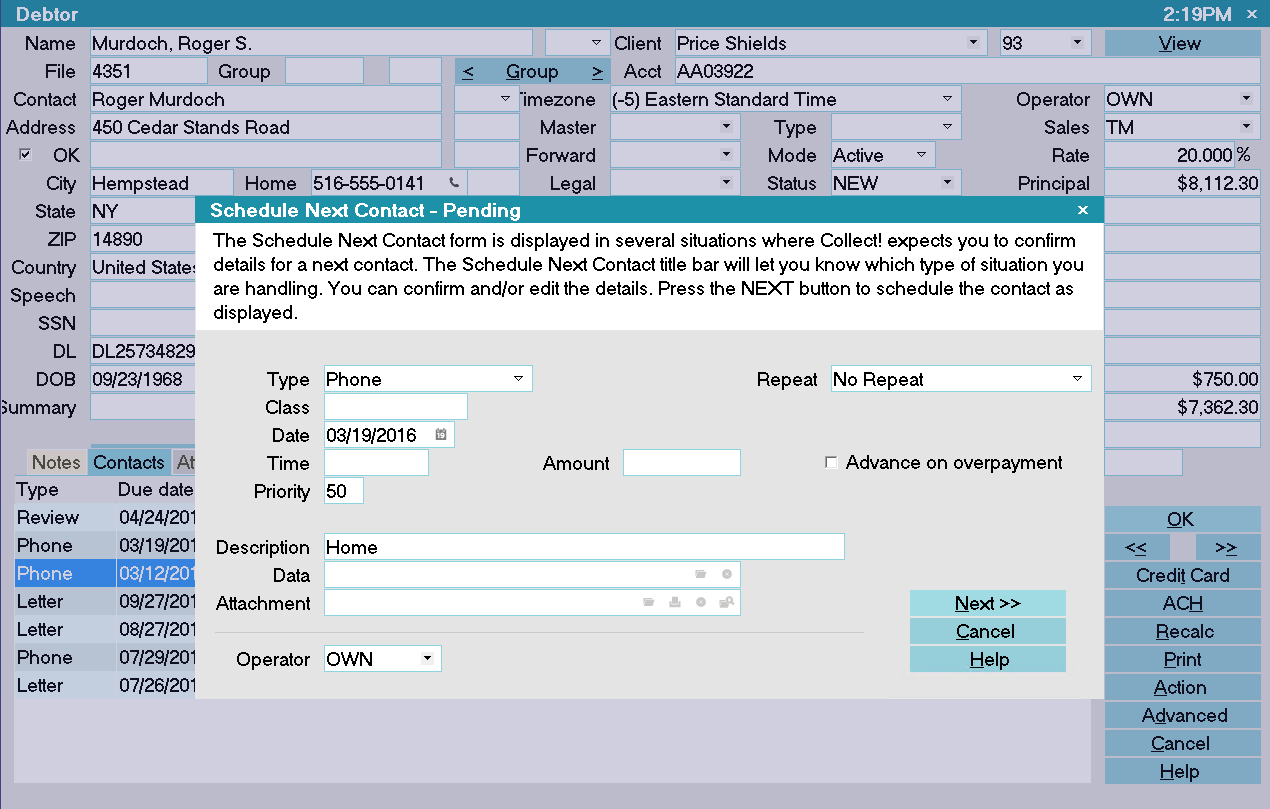
Schedule the Next Contact
If your office has not using the "Always show next contact when" feature:
1. Click into the Contacts Tab, and then click the New button or F3 to generate a fresh event window to set your next work date.
Choose the contact Type and Date for your next event and enter your 'next step' Description, if applicable.
2. Click the double arrow button pointing right under the OK button on the main debtor screen. You will receive another pop-up.
3. Choose whether to Mark it Done, Leave it in WIP list or Stay on Account. If you are ready to advance to the next file,
and you do not need to return to this account for any reason today, choose Mark it Done. If you need to return to it today,
click Leave it in WIP list. You will then be advanced to the next account or back to your WIP list itself.
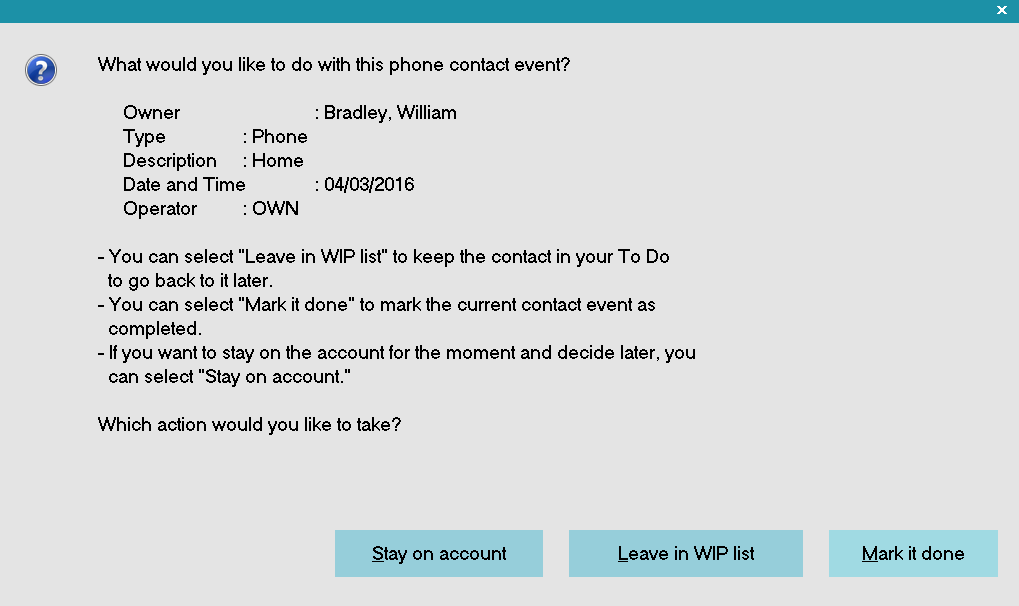
Prompt to Complete the Contact
4. Click the double arrow pointing right to advance to the next account in your WIP list.
Schedule the Next Contact
It is necessary to enter a next work date contact event. Accounts which do not have an In Progress contact scheduled
no longer appear in a WIP list and become an 'orphaned' account. Orphaned accounts can be located and sent back
to the current collector's WIP or an alternate operator's ID by running an internal inventory management report that
will insert a current dated Review event with a Description of Forgotten.
We recommend that each site run the Orphaned Account Search report weekly. It is located in the menu path
"Tools\Utilities".
Letters On Demand
While administration/clerical departments will be looking after scheduled letters to be printed, collectors may have
occasions where outputting a letter must be created/printed immediately.
Printing a single letter on a specific account right away is accomplished in these easy steps:
1. The account to receive the letter needs to be on your screen.
2. Depending on personal preference and user level, there are two ways to access the Print menu: (a) by clicking
the Print button in the lower right hand corner where the OK button is located, or (b) by clicking the drop-down
menu Print from the top of the screen and selecting the option Reports and Letters.
A list of available letters/reports is displayed.
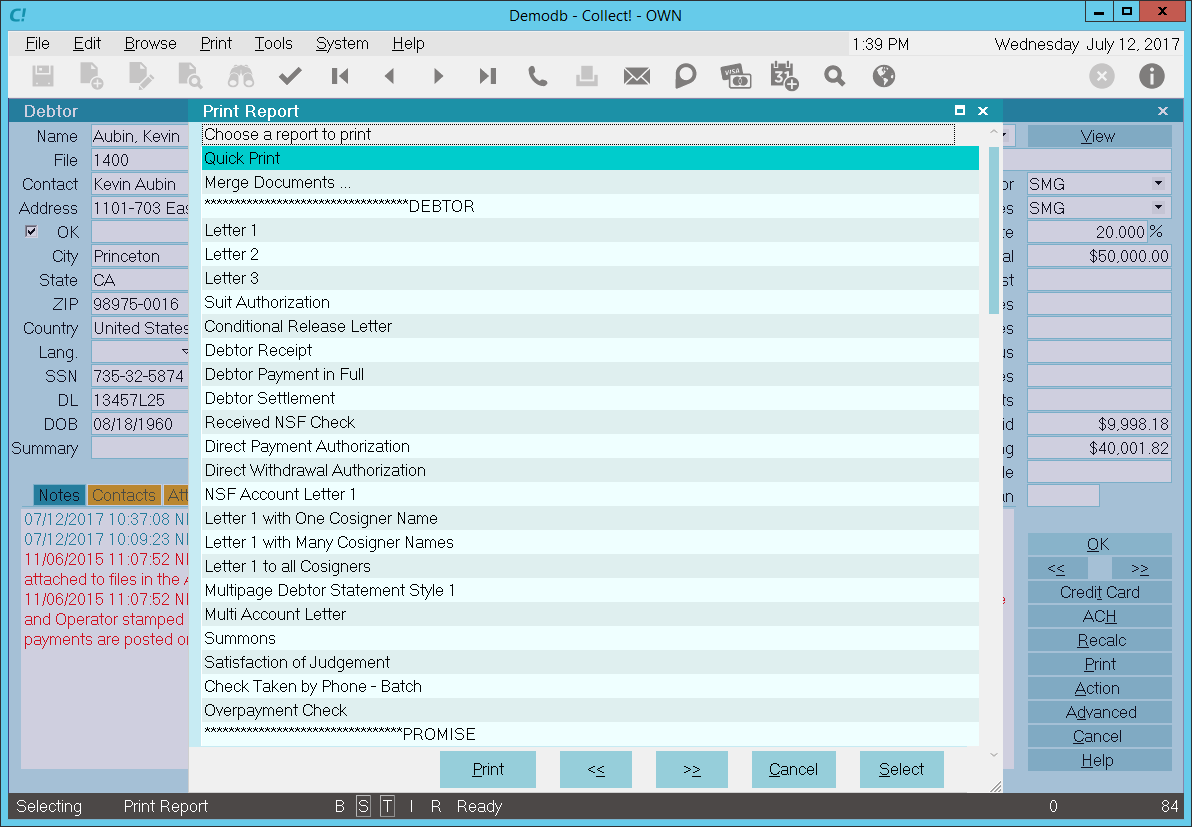
Printing a Letter Immediately
3. Select the letter you want to print and either click on it or press the Enter key. You will get a pop-up to launch the
print task as follows:
Print Window
The configured default printer name will appear as the device your letter is going to be sent to. To select
a different network printer, click the drop-down arrow at the end of the field displaying the printer name an
select which device you wish to have the print job sent to.
4. Click the button labeled Print>> and your letter will be sent to the chosen printer to be produced.
If you have opened the Print Menu and can't see any of the debtor letters you expect to see, then you are likely in
one of the associated account Tabs and not really on the main debtor file. The solution is to exit the Print Menu,
click into the background in the upper portion of the debtor account display to re-establish your location in the
system and retry clicking Print. This time you should see debtor related reports/letters in the menu listing.
All reports and letters have a designation of where in the system they may be initiated from. For example:
Anywhere - a report which may be run from any part of the system.
Debtor - must be run from a debtor list or an individual debtor file.
Client - must be run from a client list or an individual client.
| 
Was this page helpful? Do you have any comments on this document? Can we make it better? If so how may we improve this page.
Please click this link to send us your comments: helpinfo@collect.org