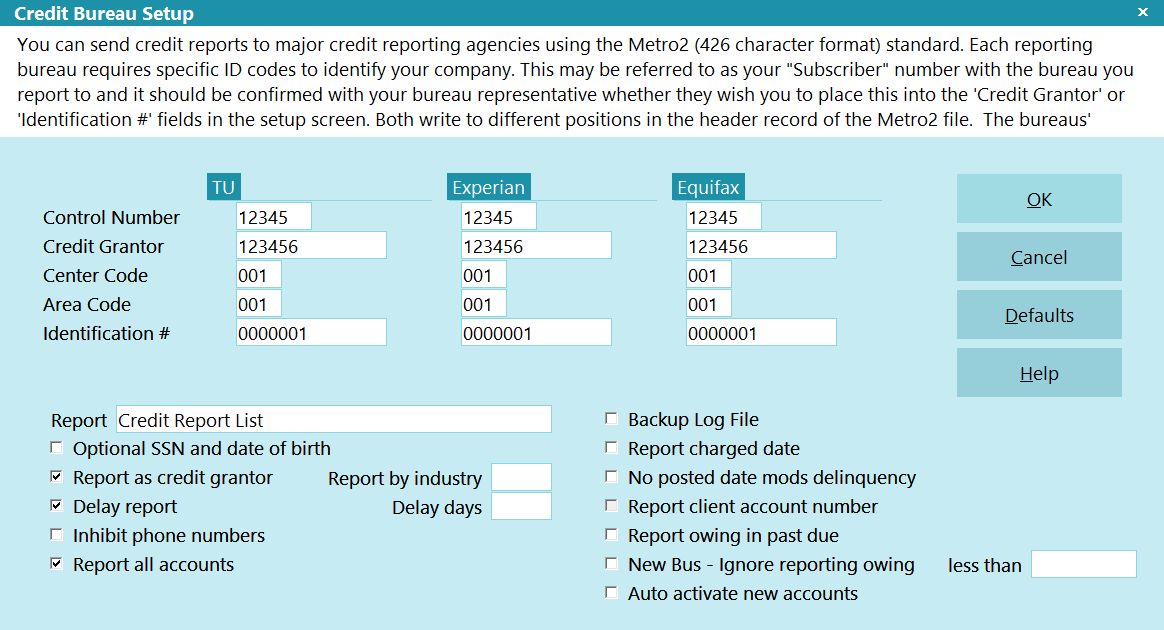
Credit Bureau Setup
You can send credit reports to major credit reporting agencies
using the Metro2 (426 character format) standard. Each reporting
bureau requires specific ID codes to identify your company. This
may be referred to as your "Subscriber" number with the bureau
you report to and it should be confirmed with your bureau
representative whether they wish you to place this into the
'Credit Grantor' or 'Identification #' fields in the setup screen.
Both write to different positions in the header record of the
Metro2 file. The bureaus' ability to correctly identify your
company will determine if your reporting files are accepted or
rejected. Please discuss the requirements with your
credit reporting agency.
Credit Bureau Setup
Once you start reporting to the credit bureaus, the Debtor's file
number must not change while the account is being reported on.
Click here for more
information.
 WARNING: Reporting credit is a legal matter. You are responsible
for ensuring that the information you are sending is accurate and
complete. Do not report credit without being ABSOLUTELY SURE
about your legal rights and the legal rights of the person or entity
you are reporting.
WARNING: Reporting credit is a legal matter. You are responsible
for ensuring that the information you are sending is accurate and
complete. Do not report credit without being ABSOLUTELY SURE
about your legal rights and the legal rights of the person or entity
you are reporting.
Credit Reporting Agencies
Collect! provides for reporting to the three major credit
reporting agencies:
Trans Union
Experian
Equifax

Reporting Credit With Collect!
There are 3 phases in Credit Reporting in Collect!:
1. Setups
* Global settings from the \Preferences\Credit Bureau Reporting,
generally done once and not updated again
* Advanced Client Settings, on a per client basis
2. Initialization of NEW accounts to report OR
modification of bureau 'condition' or 'status' on per
account and batch of accounts levels for accounts
already reporting
3. Creation of the Metro2 text file to send to your bureau(s).
Reporting companies are responsible for deleting accounts
which have exceeding the allowable reporting period. To
this end, we provide a report called the 7 Yr Age Out List,
with instructions for use that should be part of every
reporting company's Phase 3 process on a regular basis.
From the point that you have setup your credit bureau reporting
correctly, Collect! will take care of the accounts
automatically thereafter:
* If you have the Report all accounts switch ON, it will
report the account each time you run a CBR process to
output the Metro2 file, and continue to report until
such time as you officially send a Delete Metro (DA) on
the account, which will terminate further reporting.
* If you have the Report all accounts switch OFF, after
reporting the account the first time, it will only
report again if there has been a change to the account
details or balance. You are required to be compliant
with legislation and regulations in your region.
Effective 09/01/2016, it became required for USA
companies to report all accounts (full file) each time
they furnish a credit reporting file.
* Automatically updates the bureau status to PIF (AS62)
if the balance owing becomes $0.00
 If you are a credit reporting company, UNLESS an
adjustment to make the balance owing zero is intended
to reflect a PIF reporting to the bureau, you should
not adjust balances owing to zero prior to closing an
account in Collect!.
If you are a credit reporting company, UNLESS an
adjustment to make the balance owing zero is intended
to reflect a PIF reporting to the bureau, you should
not adjust balances owing to zero prior to closing an
account in Collect!.
Default Values
It is important to fill in all fields for the credit bureau(s) of your choice
in the Credit Bureau Setup form. USE THE DEFAULT VALUES listed
below, if you have not been supplied an actual value from your
credit bureau.
Control Number
The Program Identifier or Control Number contains a
unique identification number assigned to you by the
credit reporting agency.
Unless otherwise specified, fill this field with 00001.
(Alpha-numeric, length 5)
Uc
TRANS UNION PROGRAM IDENTIFIER
This is a unique number assigned to you by the credit
reporting agency.
Unless otherwise specified, fill this field with 00001.
(Alpha-numeric, length 5)
Wco
EXPERIAN PROGRAM IDENTIFIER
This is a unique number assigned to you by the credit
reporting agency.
Unless otherwise specified, fill this field with 00001.
(Alpha-numeric, length 5)
Xco
EQUIFAX PROGRAM IDENTIFIER
This is a unique number assigned to you by the credit
reporting agency.
Unless otherwise specified, fill this field with 00001.
(Alpha-numeric, length 5)
Credit Grantor
This is called the Subscriber Code in Trans Union terminology.
(Alpha numeric, length 10)
This is called the Subscriber Code in Experian terminology.
(Alpha numeric, length 10)
This is called the Membership Number in Equifax terminology.
For Equifax subscribers, enter the 10 character ID code
provided by Equifax here. (Alpha numeric, length 10)
Your unique subscriber codes will be placed at the top of the
file that Collect! creates for you to send to the credit bureau.
If reporting to Equifax and/or Trans Union, place the
Subscriber ID they give you into the Credit Grantor field.
Ug
TRANS UNION CREDIT GRANTOR
This is called the Subscriber Code in Trans Union terminology.
(Alpha numeric, length 10)
Wg
EXPERIAN CREDIT GRANTOR
This is called the Subscriber Code in Experian terminology.
(Alpha numeric, length 10)
Xg
EQUIFAX CREDIT GRANTOR
This is called the Membership Number in Equifax terminology.
For Equifax subscribers, enter the 10 character ID code
provided by Equifax here. (Alpha numeric, length 10)
Center Code
The Computer Center Code uniquely identifies which
data processing center generated the tape.
Unless otherwise specified fill with 001.
(Alpha numeric, length 3)
Uce
TRANS UNION COMPUTER CENTER CODE
The Computer Center Code uniquely identifies which
data processing center generated the tape.
Unless otherwise specified fill with 001.
(Alpha numeric, length 3)
Wce
EXPERIAN COMPUTER CENTER CODE
The Computer Center Code uniquely identifies which
data processing center generated the tape.
Unless otherwise specified fill with 001.
(Alpha numeric, length 3)
Xce
EQUIFAX COMPUTER CENTER CODE
The Computer Center Code uniquely identifies which
data processing center generated the tape.
Unless otherwise specified fill with 001.
(Alpha numeric, length 3)
Area Code
The Area Code is used only if the data processing center
produces files for more than one location. It contains an
identity code, which should be developed by the subscribe
for the location whose data is being reported.
Unless otherwise specified fill with 001.
(Alpha numeric, length 3)
Ua
TRANS UNION AREA CODE
The Area Code is used only if the data processing center
produces files for more than one location. It contains an
identity code, which should be developed by the subscribe
for the location whose data is being reported.
Unless otherwise specified fill with 001.
(Alpha numeric, length 3)
Wa
EXPERIAN AREA CODE
The Area Code is used only if the data processing center
produces files for more than one location. It contains an
identity code, which should be developed by the subscribe
for the location whose data is being reported.
Unless otherwise specified fill with 001.
(Alpha numeric, length 3)
Xa
EQUIFAX AREA CODE
The Area Code is used only if the data processing center
produces files for more than one location. It contains an
identity code, which should be developed by the subscribe
for the location whose data is being reported.
Unless otherwise specified fill with 001.
(Alpha numeric, length 3)
Identification #
The Identification Number is used to uniquely identify a
credit grantor. Report your internal code to identify each
branch, office and/or credit center where information is
verified. This number must be unique and at least five digits
long. Note that the entire field should never be zero, blank
or 9 filled. This field must be consistent on a month to
month basis. Notify your credit bureau representative before
changing this code.
Unless otherwise specified fill with 0000001.
(Alpha numeric, length 7)
UID
TRANS UNION IDENTIFICATION/VENDOR #
The Identification Number is used to uniquely identify a
credit grantor. Press F1 for details.
Unless otherwise specified fill with 0000001.
(Alpha numeric, length 10)
Wid
EXPERIAN IDENTIFICATION/VENDOR #
The Identification Number is used to uniquely identify a
credit grantor. Press F1 for details.
Unless otherwise specified fill with 0000001.
(Alpha numeric, length 10)
Xid
EQUIFAX IDENTIFICATION/VENDOR #
The Identification Number is used to uniquely identify a
credit grantor. Press F1 for details.
Unless otherwise specified fill with 0000001.
(Alpha numeric, length 10)
File Location
When the *.001 files are created, they will be placed
in the Collect\Log Files\cbr folder.
Report
This is the name of the summary report listing all Debtors
sent to the credit bureaus. The default report lists Debtor
name, principal, owing etc. You can edit the report to suit
your needs.
This is strictly for internal informational purposes and
is not necessary to generate. It is equally simple to
open the actual Metro2 output file in a pure text reader
such as Notepad and view your file contents if you wish
to see how many accounts you are reporting.
 TU.001, EFX.001, EXP.001 text files that you remit
to the bureaus should NOT be opened in any word
processing program (including Wordpad) as these will
change the pure text format, making the files
unreadable by the bureaus. Notepad / Notepad++, and
UltraEdit are 2 common pure text editors that are fine
for the purpose of opening/viewing credit reporting
files before you deliver them to the bureaus.
TU.001, EFX.001, EXP.001 text files that you remit
to the bureaus should NOT be opened in any word
processing program (including Wordpad) as these will
change the pure text format, making the files
unreadable by the bureaus. Notepad / Notepad++, and
UltraEdit are 2 common pure text editors that are fine
for the purpose of opening/viewing credit reporting
files before you deliver them to the bureaus.
Optional SSN And Date Of Birth
Switch ON 'Optional SSN and Date of Birth' to prevent
Collect! from checking the debtor for a valid SSN
or DOB when reporting to the bureau. When checked,
Collect! will NOT stop accounts that are missing an
SSN and also missing a DOB from being reported.
WARNING: As of 2017, US Credit Bureaus require
that any accounts being submitted must
have either an SSN or DOB. If you are
in the US, do not enable this option.
This option is for non-US customers
where the SSN and DOB are not a
requirement.
Report As Credit Grantor
This switch is connected to a field in the Company Details
window, labeled Credit grantor. Checking this switch
ON (or OFF) in either window will perform the same step
in both locations (checking or unchecking the box).
Whether this switch is ON/OFF in both places has an
effect on where information is sourced from on the Debtor
accounts when fields are being written into the Metro2
text file.
Only companies who are 1st party credit grantors should
check this switch. Collection Agencies and Attorney
Offices should not check this box ON from either
Company Details or Credit Bureau Setup screens.
When this switch is turned ON, the Delinquency Date
is used to report the Date of Occurrence for all bureau
status codes except 4, 10, 13 and 61 to 68. In those
cases, the date the Contact was scheduled is sent as the
date of Occurrence. See your Metro2 handbooks from your
credit bureaus for more information regarding bureau
status codes.
When the this switch OFF, the Date of Occurrence is
always taken from the Delinquency Date.
Report By Industry
The default setting is Collection Agency/Attorney. 1st
party credit grantors are the only companies that should
modify this setting, and in so doing, choose the Industry
type available that most closely reflects the nature of
their business. The pick list may NOT be modified with
any custom insertions as these values are hard-coded
'as is' by the Metro2 layout acceptable to the bureaus
Enter the Industry Code you wish to include in this
report. Only Debtors with this setting in the
Credit Report Details Reporting Industry field will be
processed for reporting.
This enables you to keep all your Collections accounts
together in one report and all your Mortgage Loan accounts
in a different report, for instance.
Please refer to How To Setup Credit Bureau Reporting
for more details.
Valid Industry Codes are:
0 - Check Credit
1 - Collection Agency
2 - Credit Card
3 - Credit Union
4 - Debt Counselor
5 - Educational
6 - Family Support
7 - Government Agency
8 - Installment Loan
9 - Loan Finance
A - Mortgage Loan
B - Retail
C - Sales Finance
D - Savings And Loans
E - Service And Professionals
Delay Report
Check this box ON to cause Metro Contact Event
Due Dates to be Delayed by a fixed number of days from
the current date. The field to enter the number of days
to be added to the current date (i.e. 30 days, 45 days)
will appear only when the switch to Delay report has been
checked.
Some of our USA collection agencies often utilize this
feature to encompass the FDCPA validation/dispute
period, only after which they will commence credit
reporting. Other Collect! users find that this feature
allows them to be compliant with specific client
directives, where they are bound by contractual agreement
with the creditor not to report the accounts for 'x'
days from listing.
This switch controls whether an account is eligible to
be reported effective the day it is initialized/turned
ON for reporting,
OR
should be put off for a prescribed number of days from
the date it is turned it ON. This is a global setting
that will apply to ALL accounts initialized UNLESS there
is a different number of Delay Days selected on a per
client basis: the Delay Days in Advanced Client Settings
overrides the global setting.
The Advanced Client Settings override is in place as
well to allow companies to be compliant with upcoming
credit reporting requirements for Medical accounts in
effect as of 09/15/2017.
To cause Metro Contact Event Due Dates to reflect the
current date when you turn ON Debtor accounts for
CBR reporting, do NOT the check Delay report switch.
Delay Days
This field is only displayed when you have checked
Delay report ON and is where you input the number of days
you want to wait before the account is eligible to be
reported.
For example, if today's date is 01/01/2018 and your
Delay days is set to 30, when you turn a debtor ON for
CBR reporting, the Due Date on the Metro Contact event
will be 01/31/2018.
If a client has a separate Delay days set to 60 when
the global setting is 30, then turning a debtor ON for
CBR reporting under that client on 01/01/2018 would
result in that account's Metro Contact having a
Due Date of 03/02/2018.
Inhibit Phone Numbers
Switch ON 'Inhibit phone numbers' to prevent Collect!
from sending phone numbers to the credit bureau.
The output file will contain all zeroes in the phone
number position. This ensures debtor privacy if
you have unlisted phone numbers in your database.
This is a global setting, it cannot be set on an
individual account basis.
Report All Accounts
When this is switched ON with a check mark, Collect! will
report all debtors in your database that have been setup
for credit bureau reporting. With this box unchecks,
Collect! will only report accounts that have been changed.
This box is on by default to comply with the
2016 USA reporting requirements change requiring
all accounts to be included in a credit report.
Backup Log File
When this is switched ON with a check mark, Collect! will
make a copy of the cbrlog.txt into the cbr\backup folder
after the CBR process is complete. The name of the file
will be formatted as yyyymmdd_cbrlog.txt.
When this switch is ON, you will not be prompted
to clear the log file after reviewing it.
Report Charged Date
This switch is intended for credit grantors ONLY who have
also turned ON the Credit grantor switch in
Company Details / Credit Bureau Reporting Setups.
Check this ON to report the account's Charged Date as the
debtor's Date Opened, instead of the Listed Date.
Even if checked ON, this switch will not function if the
company is a 3rd party collection agency / attorney's
office, which is not identified in setups as being a
credit grantor.
If you do not enter a Delinquency Date, Collect!
automatically uses the Charged Date for
credit bureau reporting. Also Collect!
automatically reports the Charged Date when
you are reporting NSF checks. You do not
need to switch on 'Report Charged Date'.
No Posted Date Mods Delinquency
When this is switched ON, Collect! uses the Payment Date
of the promise transaction as the Delinquency Date rather
than allowing the default 30 day delay in determining
delinquency.
This is used only in Credit Grantor mode.
Report Client Account Number
By default, Collect! uses the Debtor File Number as the
ID for credit bureau reporting. It is recommended that
you leave Report Client Account Number switched OFF
and let Collect! report using the Debtor File Number,
unless you are sure you need to do otherwise.
It is necessary to make a global decision for the company:
will you report accounts by your Client's Account Number
(Acct on the Debtor screen) or by your Office's
File Number on the Debtor screen. Once this decision is
made and you begin reporting, you cannot change this
setting again.
Check Report client account number ON if you will use
the client's account number,
OR
do NOT check this switch if you will report by the
debtors' file numbers as assigned by Collect! when
entered into your system. Reporting by File number is
the more popular selection as some creditors do not
provide an account number and the bureaus reject debts
reported without a reference number associated with
the debt.
WARNING: Reporting accounts by one setting, i.e.
client's account number followed by a change
(perhaps accidental) to report with your company's
file number will result in the same account
appearing twice on a debtor's credit report as though
they were different accounts completely; the bureaus
cannot differentiate when the debt is reported with
different 'account numbers' insofar as Metro2 layout
is concerned. This creates a serious situation between
your company and the bureaus that requires drastic
steps to resolve.
To avoid the possibility of the above occurrence, this
switch will become Read Only for all User Levels after
you have run your first report. Even where the switch is
being left unchecked in the OFF position, meaning you are
reporting by File number, it will still make the field
Read Only so a user doesn't inadvertently turn it ON at
some future point in time.
Report Owing In Past Due
Switch this ON with a check mark to report the Debtor's Owing
in the Past Due position of the CBR file. Normally, this field is
zero filled if you are not a credit grantor, but you can use
this switch to fill it with the Owing.
New Bus - Ignore Reporting Owing
If this field is checked, then debtors being reported for the
first time will not be enabled if their owing is less than the
value in the LESS THAN field.
Less Than
This field is used by the NEW BUS - IGNORE REPORTING OWING
field above. If the above field is checked, then debtors being
reported for the first time will not be enabled if their owing
is less than the value in this field.
Auto Activate New Accounts
Switch this ON with a check mark to automatically enable an
account for reporting to the credit bureaus. This feature
works on manually created accounts and imported accounts.
This feature only works if the Client is setup to report
to the bureaus in the Client Settings.
Help
Press this button for help on the Credit Bureau Setup
form and links to related topics.
Defaults
When reporting a Debtor to the Credit Bureaus, there are
certain settings that need to be reported to the bureaus.
Select this button to display the Credit Report Preferences
form where you can choose default credit reporting settings.
When you flag a Debtor to be reported to the Credit Bureau,
these default settings will automatically apply to the Debtor.
You can override these defaults on an individual Debtor level
through the Credit Report Details dialog. To access this
dialog, select the CBR tab on the Debtor form.
Cancel
Selecting this button will ignore any changes you have
made and return you to the previous form.
OK
Selecting this button will save any changes you may have
made and return you to the previous form.
| 
Was this page helpful? Do you have any comments on this document? Can we make it better? If so how may we improve this page.
Please click this link to send us your comments: helpinfo@collect.org