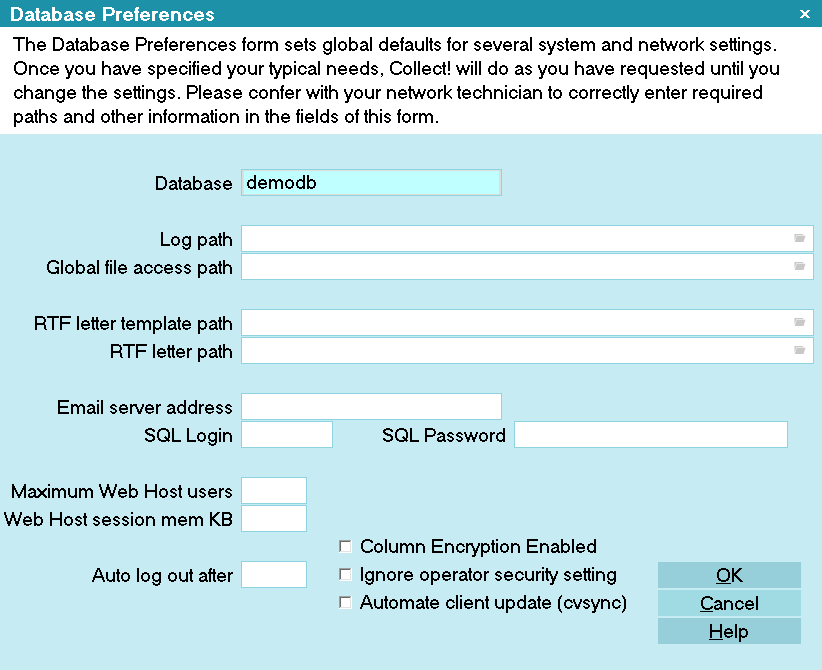
Database Preferences
The Database Preferences form sets global defaults for
several system and network settings. Once you have specified
your typical needs, Collect! will do as you have requested
until you change the settings. Please confer with your network
technician to correctly enter required paths and other information
in the fields of this form.
Some of the settings you can preselect are:
- Database to work with by default
- Path to Log file
- Path to Global file access
- Path to Letter templates
- Email Server address
- Maximum Web Host users allowed
- Maximum Web Host packet size
- Auto log out after
- Client Timeout
Database Preferences
When you change settings in this form and select the
OK button, Collect! saves the information in a file
named collect.cfg. This is located in
the Collect\bin folder. There are a number of system setup
forms which also write to this file to store system wide
options and settings.
Database
Enter the name of the database to open. This is the
name of the database folder. Typically, you would enter
MASTERDB, DEMODB or PROSDB here. The database
you enter in this field will be displayed as the Database
To Open in the Welcome To Collect! screen. The database
must exist and must be a registered device.
MASTERDB is your working database. This is where you
enter all of your live data. DEMODB is used to experiment
and try the system out. We highly recommend that you
use this function to familiarize yourself fully with Collect!.
This where you will find numerous examples and samples
of many of Collect!'s features. PROSDB is used to enter
information on clients you may be trying to obtain. This
information will be helpful storing the contacts and steps
you have taken to attract this new client.

Log Path
This is the location of the Log Files folder where Collect! stores
and writes to the Collect! Application Log. By default, Collect!
expects to find the Log Files folder in Collect\bin, but you can
specify a different path here. Select the FOLDER icon
to navigate to a folder of your choice.
Enter a fully qualified path name to the location of your "Log
Files" folder. If left blank, activity for all users will be logged to
the Collect\Log Files folder of your Server, UNLESS you
are using the Collect! Client installation.
 If your users signing into Collect! from a
Client, you will need to set the Log Path
here, and each Windows user needs write
permissions on the folder, too. If you do not set
a path, each user writes to their own local
CollectClient\bin folder.
If your users signing into Collect! from a
Client, you will need to set the Log Path
here, and each Windows user needs write
permissions on the folder, too. If you do not set
a path, each user writes to their own local
CollectClient\bin folder.
To configure your Client installs to log to your
Server's "Collect\Log Files" folder, enter "\\Server\Collect\bin"
using the Server Name and Share Name your Server is
using to share its Collect! folder. Or, you can direct Collect!
to log to any other network share, such
as "\\Server\MessageLogShare." If the share is
on a separate spindle, performance is improved.
Global File Access Path
This is the path collect uses to store and find external files
attached to contacts, transactions and attachments. Many
external files must be opened by third party applications and
therefore must be accessible by the client machine. The global
file access path provides a central location for these files to be
stored. When you select a file to attach, it will be copied to the
path specified in this field. Select the FOLDER icon to navigate
to a folder of your choice.
If no path is defined, Collect\bin\global is the default location.
If you define a path the location will be {path}\global.
If you are signing into Collect! from a
Client, you will need to set the Global File Access
Path, and each Windows user needs write
permissions on the folder, too. If you do not set
a path, each user writes to their local bin\global
folder.
Collect!! will also look for the styles folder in the path you
specify.
If no path is defined, Collect\bin is the default location for the
styles folder. If you define a path, the location of the styles
folder will be {path}\styles. Also, the "// external file"
command used with RTF reports will look here for the *.rtf
file. RTF reports use the "// external file" redirect to point to
an *.rtf document in the styles folder.
RTF Letter Template Path
Enter the location of your letter template files in this
field. This should allow the user to import, fetch, print
and edit RTF reports from any machine, as long as
they have access to the share. The user can also
apply file level security to the files, for example
making some templates read only. Select the
FOLDER icon to navigate to a folder of your choice.
RTF Letter Path
The path you enter here will be where your reports
will be saved when printed. You can also set up
Read and Create permissions on printing reports
to prevent users from printing a report and then editing
the saved copy. Select the FOLDER icon to navigate
to a folder of your choice.
Email Server Address
This is the actual IP address of your SMTP mail server.
Collect! talks to this address when you have enabled
SMTP for your operators. By default, Collect! uses
MAPI instead.
Authentication must be handled by your
Windows operating system, not by Collect!.
If you are authorized to send and receive
email, then you can send it through Collect!.
SQL Login
Enter an SQL administrator username when using SQL Login
instead of Windows Authentication to connect to the database.
Please refer to the help topic How to Network Collect! for
more information.
SQL Password
Enter an SQL administrator password when using SQL Login
instead of Windows Authentication to connect to the database.
Please refer to the help topic How to Network Collect! for
more information.
Maximum Web Host Users
Enter the maximum number of authenticated users
you want to be allowed to log into Web Host. This
is the default startup number. You can override this
number from the Web Host dialog.
If you leave this field blank, Collect! defaults to the
maximum users allowed by your Web Host
user licenses.The maximum number you can enter
may be found in the License Information screen.
Web Host Session Mem Kb
Web Host uses Heap Memory for input and output packets.
Enter a value in this field to set how much memory you want
these packets to use, ONLY IF you need to process large files
that Collect!'s defaults cannot handle. The default value 80 KB
will be used if this field is left blank and this should be
sufficient for all normal needs.
When Web Host is sent a packet that is too large for the
value specified in this field, Web Host will "beep" and write
to the Application Log. That might indicate an instance
where you would want to consider increasing the packet
size allowed.
Example:
"Web Host is not currently configured to handle more
than ### bytes of data.
Packet size ###.
Please configure in Database Preferences."
Auto Log Out After
Enter a number of minutes here if you want Collect! to
automatically log the user out of the system and close
Collect! on the user's machine after an extended period
of inactivity.
The setting you enter here has no effect on
an instance of Web Host or the Scheduler.
To shut either of them down at a precise time,
you must use the command line argument /T.
Auto Log Out After is a global setting. If you need different
values for individual workstations or for different Collect!
databases being used, you can use the
Command Line Startup Option, /x{mm}, in the Collect!
shortcuts for particular Collect! instances. That setting
will override the value set here in Database Preferences,
but only for the particular instance of Collect!.
Column Encryption Enabled
Switch this ON to indicate that Columns have been Encrypted
in the Database. Please refer to the help document
How to Encrypt a Database Column for more information.
Ignore Operator Security Setting
Switch this ON to disable account access control. This will
completely disable Operator settings for Security, Strict,
Locked out by default, and Client # in the Operator Security
form. It will be as if all these switches are turned OFF.
 WARNING: This is a MASTER SWITCH effectively
disabling security for everybody. Naturally this
should only be accessible by an administrator
for troubleshooting purposes.
WARNING: This is a MASTER SWITCH effectively
disabling security for everybody. Naturally this
should only be accessible by an administrator
for troubleshooting purposes.
AUTOMATE CLIENT UPDATE (CVSYNC)
Switch this ON to automatically update Collect! client installations
when they first sign on after a patch. The client installation will
automatically pull the files from the Server installation.
OK
Selecting this button will save any changes you have
made and return you to the previous form.
Cancel
Selecting this button will ignore any changes you have
made and return you to the previous form.
Help
Press this button for help on the Database Preferences
form and links to related topics.
| 
Was this page helpful? Do you have any comments on this document? Can we make it better? If so how may we improve this page.
Please click this link to send us your comments: helpinfo@collect.org