How To Install The Collect! Client
This document goes over install the Collect! client application. This is OPTIONAL. The Collect! client is used for environments
that need added security to prevent direct access to the database files. The client can also be used for users who are not at
the same physical location as the server, but have VPN access to the network. For the standard networking method of using a
desktop shortcut to your server, please refer to the Help topic How to Network Collect! for more information. A benefit of
installing the Client on the server and sharing it, as opposed to installing the Client on each workstation, is when it comes
time to apply an update, you only need to update the 2 installations on the server instead of having to apply a patch to each
workstation.
Collect! is a true Client/Server application. After you have installed the complete Server program to your Server,
you are able to install a very small Collect! Client program to access your Collect! database.
There are two ways to use the Collect! Client:
- You may install the Collect! Client on the Server, and make a shortcut to this on each workstation.
- Or, you may install the Collect! Client on each workstation.
This requires that you have already installed the Collect! Server application..
Your Collect! Client users will need access to a directory on your server that will allow for shared access to attached files
and printed letters. By default, this folder exists in your Collect!\bin\global folder.
Collect! Server Preparation
Before installing the Collect! Client to either your Server or your Workstations, please prepare as outlined below.
1. Have the Collect! Server running and configured on your Server.
2. Share the Collect! Server Installation's bin folder, with FULL CONTROL share permissions for all users who will be accessing
Collect!.
3. On your Server, start Collect!, sign in as a user with User Level 99.
4. Select System from the top menu bar and then select Preferences from the drop-down choices. This will display the
System Setup menu.
5. Select the DATABASE PREFERENCES button to view the Database Preferences form.
6. In the field labeled Log path, enter "\\FileServer\CollectShare\" where "FileServer" is the Windows
networking name of your file server and "CollectShare" is the name of the share that contains your
Collect! log folder.
7. In the field labeled Global file access path, enter "\\FileServer\Collect!Share\" where "FileServer" is the
Windows networking name of your file server and "Collect!Share" is the name of the share you defined above for your Collect! bin
folder.
8. Exit out of Collect!
9. Make note of the IP Address of your Server and the MS SQL Instance Name.

Installing The Client Over A Wan Or Non-Networked Computers
If you are installing the client to a location that is not part of the primary network, you may need to specify which IP address
that Collect! will have to use. This is done in the Collect\bin\fsrv.ini file. Open the file, fill in the correct IP address,
then place an upper carrot '^' in front of the word host.
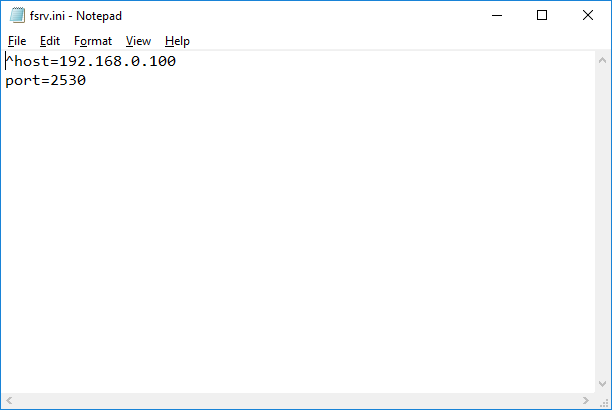
fsrv.ini File
You will also have to repeat this in the Collect\bin\sqlconfig.ini file. Also, in this file, you will need to add 'auth= login'
to the bottom and setup SQL Server with Password Authentication. Please refer to the help topic How to Network Collect! for more
information.
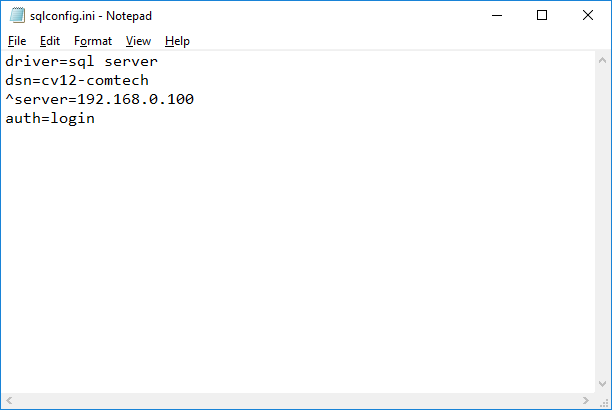
sqlconfig.ini File
Installing The Collect! Client To Your Server Or To A Workstation
The steps for installing the Collect! client on the server or workstation are identical. The difference is that if you install
the Client on the server, then you need to share the folder so users can access it.
1. If you downloaded the Collect! installation file, double-click the installation icon on your Desktop. This will begin
the installation wizard and in a moment the installation window will appear.
2. Installation begins. You will see the Welcome window. Select NEXT to continue. The License
Agreement asks you to read and be aware of the terms within the Collect! Terms of Use. Select "I accept
the terms of the license agreement" and then select NEXT to continue if you agree to the terms of use.
3. The Installation Type screen is displayed. Select CLIENT INSTALLATION, then select NEXT to proceed.
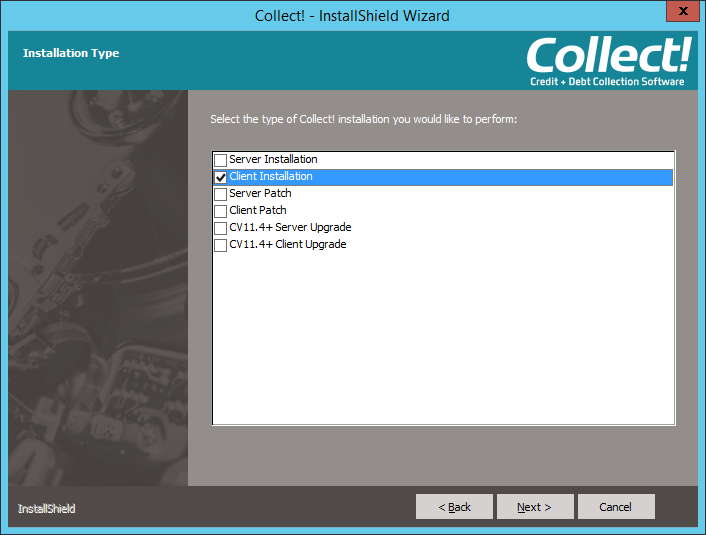
Installation Type
4. The Choose Destination Location screen is displayed. If you accept the default settings, the
Default folder installation will be installed to the default directory, C:\CV12Client. Select NEXT to procee
d.
 SELECT FOLDER TO INSTALL INTO: The Choose Destination Location dialog allows you to set the path
where you want to install the software. We recommend using the root of your hard drive.
(i.e. C:\CV12Client or D:\CollectClient) It will be easier for your technical
staff and
our technical support personnel if you install to a root drive. Please DO NOT install the software to the Program Files
SELECT FOLDER TO INSTALL INTO: The Choose Destination Location dialog allows you to set the path
where you want to install the software. We recommend using the root of your hard drive.
(i.e. C:\CV12Client or D:\CollectClient) It will be easier for your technical
staff and
our technical support personnel if you install to a root drive. Please DO NOT install the software to the Program Files
folder! It is important to know where you are installing Collect!. Select the CHANGE button to select a new path.
Select NEXT to continue.
5. The MSSQL Server Information screen requires that you fill in the information for your MS SQL Installation.
Enter your server's internal IP address, the port that you want the Collect! file service to run on (default is 2530), and the
MS SQL instance name. Select NEXT when finished.
6. The Start Copying Files screen lists the details of your selections. If you are satisfied, select NEXT
to begin the installation and copying of files.
7. Setup Status. The software is now being installed to your computer. This may take a few minutes. Sometimes
certain phases appear not to be moving, but be patient, things are happening. When the installation has completed copying files,
the Installation Wizard will inform you.
8. Installation Wizard Complete. Setup will tell you when it is finished installing Collect!.
Select option "Launch Collect! when installation finishes" and you will be taken right into Collect!
when you select the FINISH button.
Sharing The Client Installation On File Server
This section applies only to Client installed on your Server, not Client installed on a workstation.
1. After the Collect! Client installation has completed, on your Server, share the Collect! Client folder with FULL CONTROL
permissions for the Windows users who will be using Collect!. Please refer to How to Network Collect! for more information.
2. Create shortcuts on the Desktops of the client computers who will be using Collect! which point to
\\FileServer\CollectClient\bin\CV12.exe, where "FileServer" is the Windows networking name of your file server.
3. If you have customized headers and stylesheets, please copy the contents of your
Collect\bin\styles folder to your CollectClient\bin\styles folder.
 If you are making changes to the styles folder in one installation, you will need to copy the modified files to the
other installation.
If you are making changes to the styles folder in one installation, you will need to copy the modified files to the
other installation.
- Double-click the Collect! Client icon on your Workstation.
- Enter a valid ID and Password.
- You should be able to sign into Collect! if all the settings and shares are accurate.
| 
Was this page helpful? Do you have any comments on this document? Can we make it better? If so how may we improve this page.
Please click this link to send us your comments: helpinfo@collect.org