Billing Tree Credit Card Payments - Quick Tour
This page will provide an overview of:
For a detailed instructions of all the steps shown here, refer to
the Help topic, " Billing Tree Credit Card Payments - Step by Step".
Billing Tree Credit Card Setup
To be able to use Credit Card payments, there are two preliminary
steps to be completed:
You require licensing from Comtech Systems Inc. to license
the Billing Tree Module on your site. For pricing information
and licensing, please contact us at 250-391-0466 or email
sales@collect.org.
2. You require an active account with Billing Tree. They will
provide you with a url/web address and pin number to access the Credit
Card Gateway. Contact information for Billing Tree can be found at their
website www.mybillingtree.com.
Once you have the Collect! interface and an active account with Billing
Tree, you can enter the necessary information into the Credit Card Setup
screen and begin using the system-to-system interface.
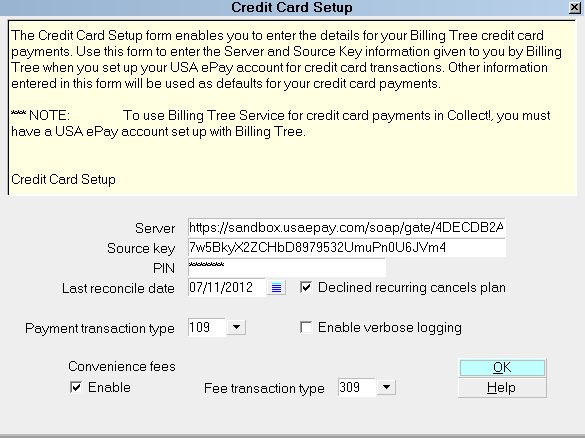
Credit Card Setup

Single Credit Card Transaction
To enter a single credit card transaction, click the
Credit Card button in the lower right corner of the main
debtor screen.

Select the Credit Card button
If you have not yet set up your Credit Card global login
credentials, your individual user will be prompted popup window
entitled " Billing Tree Credit Card Pin" and they will have to
enter the password they are to use.

Billing Tree Credit Card PIN
Individual logins are good for a single Collect! session and
the PIN will need to be re-entered on the next occasion this
user opens a Collect! session.
Alternatively, a global login can be created in the Credit Card
Setup window and will be used as default for all user levels. If
any of user levels 1, 10 or 99 required access to another viable
login profile to the Credit Card Gateway, they would be prompted
with a popup screen to enter the different credentials and thus
access with the different login if necessary. Otherwise, clicking
OK to proceed to the next screen is all that is needed when the
global login popup is presented to the highest ranking of user levels.
The CREDIT CARD TASKS menu pops up after selecting the 'Credit Card'
button on the Debtor screen.
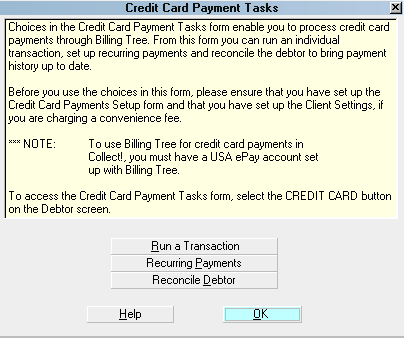
Credit Card Payment Tasks
Click RUN A TRANSACTION to open the Single Credit Card Transaction
screen.
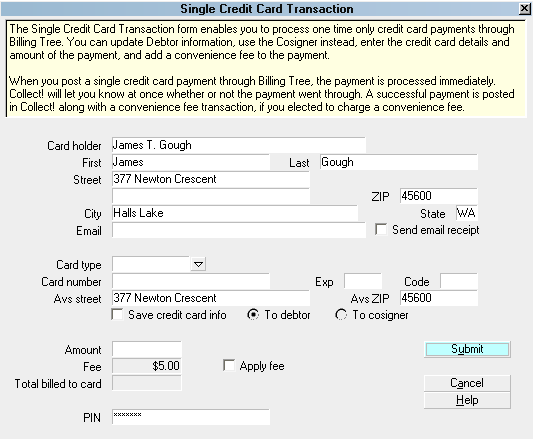
Single Credit Card Transaction
Some of the fields will be auto-filled for you as the window opens.
Credit card information that you enter will be stored in the Debtor
Detail tab.
 Be aware that this does overwrite any information
that is currently stored in the Detail 2
and Detail 3 fields.
Be aware that this does overwrite any information
that is currently stored in the Detail 2
and Detail 3 fields.
If you are permitted by regional law and your client to charge a convenience
fee, you can have the module include a fee automatically each time you
submit a credit card transaction. In addition to the Credit Card Setup
preferences, you also need to check the Credit Card Convenience Fee box
in the Advanced Client Settings window. Contact Technical Services if
you have a volume of clients to check this switch on and need a writeback
report to do these en masse from a tagged list of clients.
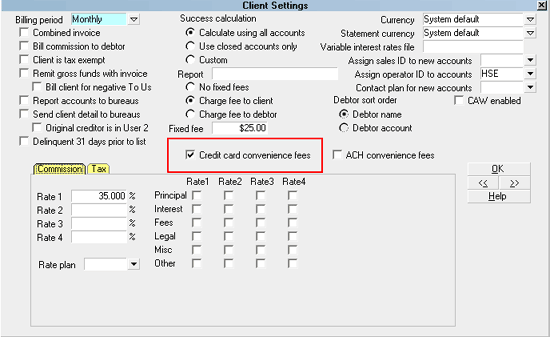
Client Settings screen
You can fill in other details as needed, save the credit card
and address information to the Debtor or Cosigner and
submit the payment.
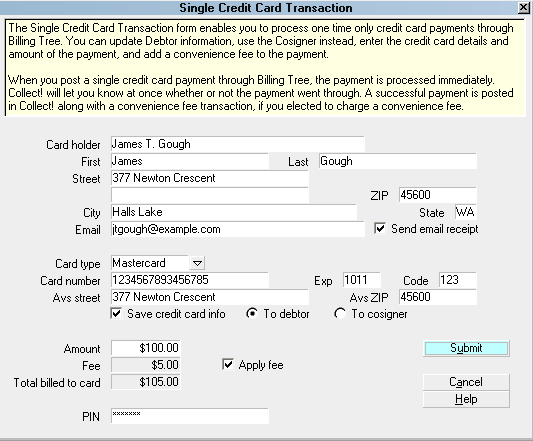
Ready to Submit Single Credit Card Transaction
Collect! sends the credit card information to Billing Tree
immediately. If the credit card is accepted, Billing Tree stores
the payment for processing by USA ePay at day's end.
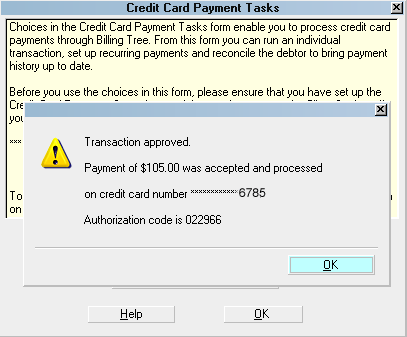
Credit Card Transaction Approved by Billing Tree
Approved single credit card payments are posted
in Collect! immediately, including convenience
fee transactions, if applicable, but they are
NOT sent to USA ePay by Billing Tree
until day's end. It is possible that a credit card
transaction will subsequently come back declined or
disapproved in future days' time.
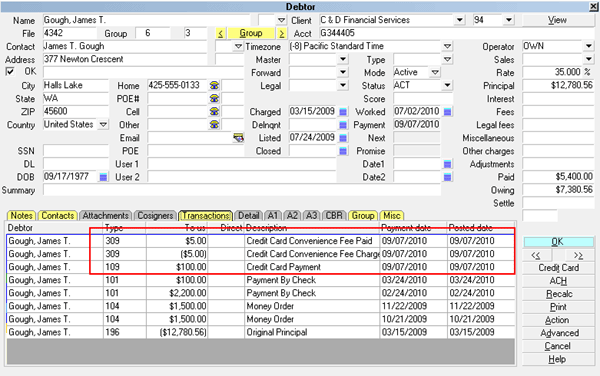
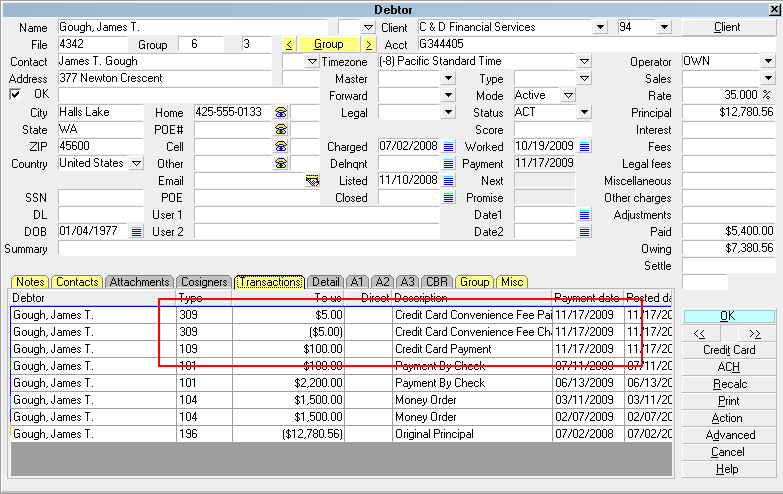
Credit Card Transactions Posted
Recurring Credit Card Payments
Click the 'Credit Card' button in the lower right of the
the Debtor Screen.
Select the Credit Card button
If this is the first time you are accessing this screen,
after signing into Collect!, you will be prompted to enter
your Credit Card login credentials.
Billing Tree Credit Card PIN
Once you enter your Source Key and PIN, they stay in
effect until you sign out of Collect! unless your site has
entered a global login. Only user levels 1, 10 & 99 see the
login prompt thereafter and simply click OK to accept the
defaults to proceed to the next screen.
You will then be presented with the Credit Card Payment Tasks
menu popup.
Credit Card Payment Tasks
Click the RECURRING PAYMENTS button to open this entry window.

Recurring Credit Card Payments
Some of the fields will be auto-filled for you as soon
as you open the window.
Credit Card Guidelines prohibit the charging
of convenience fees on all but the first
entry in any recurring schedule arrangement.
Our module is compliant with these regulations
and will not auto- post fees on any but the
first transaction in a recurring arrangement.
You can fill in other details as needed on the entry screen,
save the credit card and address information to the Debtor
or Cosigner and Submit the payment schedule to the Billing Tree
Gateway.
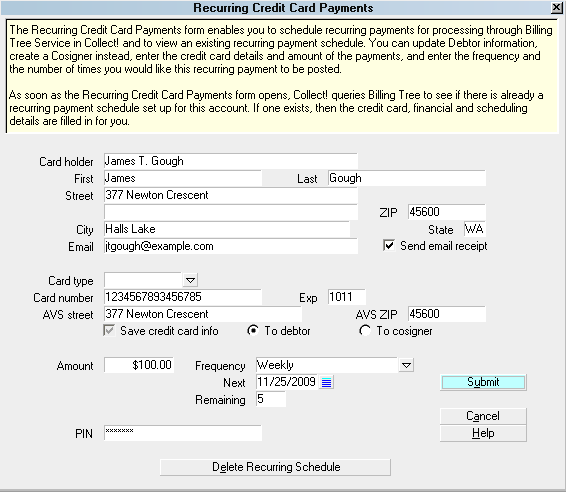
Ready to Submit Recurring Credit Card Payments Schedule
If the card is accepted, Billing Tree stores the card details for
the recurring credit card payments. This is a requirement for PCI
compliance. There will be a redacted version of the card number
retained only, with no expiry date or cvv numbers being retained in
system for PCI Compliance.
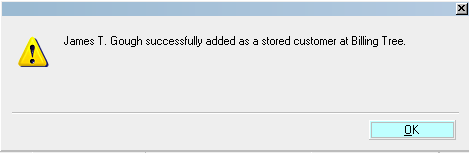
Credit Card Schedule Stored at Billing Tree
Recurring credit card payments are not posted
in Collect! until you run batch "Reconcile
Credit Card History" the day after the payment
comes due.
The module then creates a Promise contact to assist the collector with
keeping the track of the payment schedule.
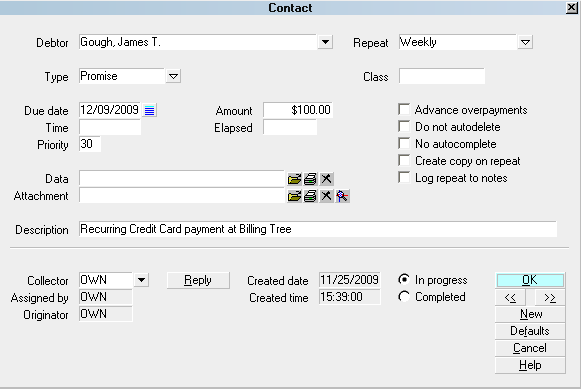
Promise Contact for Recurring Credit Card Payments
The module also inputs a post-dated Review Contact to make sure the
collector is reminded of the end of the payment schedule as well.
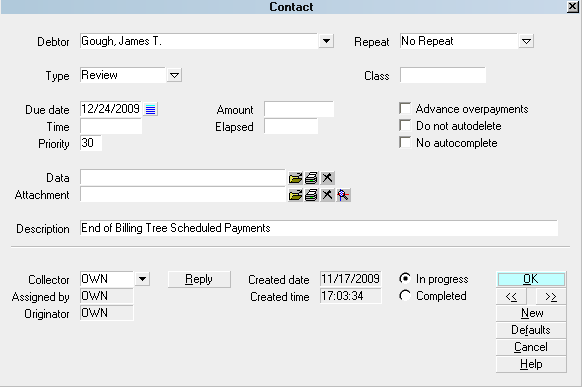
Review Contact for Recurring Credit Card Payments
The module includes an EFT Notice Setup which allows you to be able to
schedule all pre-payment reminder and/or authorization letters which
you may be legislatively required to send to your debtors making
Electronic Funds Transfer payments by reliably sending them out "X" days
ahead of the payment due dates.
EFT Notices and Reviews
EFT Notices
In compliance with EFT requirements, the module has the ability to
automatically schedule authorization letters and EFT notices for
recurring credit card and ACH payments.
You can access this setup window from the menu path
"System\Preferences\ Billing Tree Setup\ EFT Notices Setup".
It allows you to be able to select which letter you wish to
send from the letter library you have stored in your Print Menu
and set a predefined number of days ahead of any due date that
the letter should be sent.
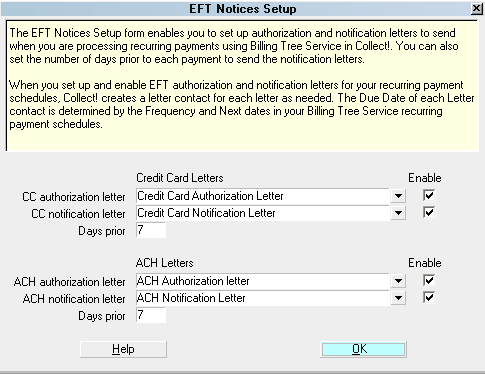
EFT Notices Setup
It is your responsibility to ensure that
any letters you send to debtors are
compliant in format and content with
legislation and regulations in your
region.
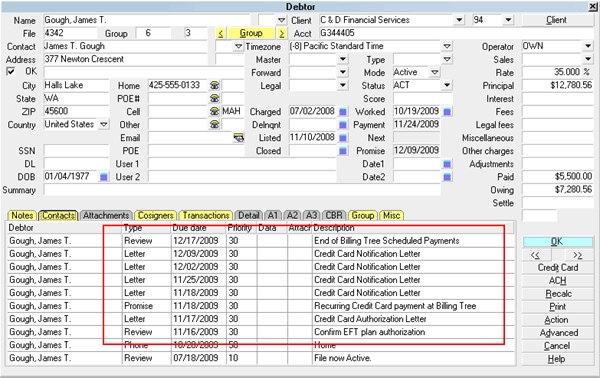
When you post a recurring credit card payments schedule,
the module will automatically schedule letters and reviews
according to your EFT Notices setup.
EFT Notices and Reviews
View EFT Notices
Reconcile Credit Card History
The Reconcile Credit Card History is a batch process that queries
Billing Tree for all credit card payments processed by them but have
not been posted in Collect! yet. This will include any payments
which any Debtors have made directly on the Billing Tree website,
provided they have used their Collect! file number as their unique
identifier on the Gateway website along with any recurring payments
which came due since your last Reconcile. You will also receive any
new declines / chargeback (reversals) when you run the Reconcile
process.
Reconcile Credit Card History

Credit Card Transactions Posted
Debtors may enter their own payments directly at
the Billing Tree Gateway provided they are
advised to use their Collect! file number as
their unique identifier/account number.
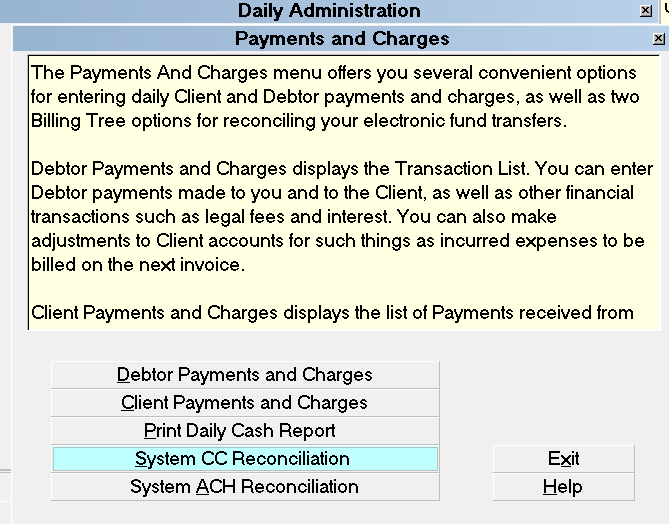
To download the latest batch of credit card transactions
not yet posted in Collect!, follow the menu path
" Daily Administration\ Payments and Charges\Reconcile Credit
Card History". Selecting this process will query Billing Tree
for all approved transactions, declines and/or reversals which
have taken place since your last reconciliation.
 WARNING: If you use different Billing Tree login IDs for staff
with different permissions, i.e. for max amount allowed
to submit, then it is necessary to run separate
reconciliations for EACH separate Billing Tree
login.
WARNING: If you use different Billing Tree login IDs for staff
with different permissions, i.e. for max amount allowed
to submit, then it is necessary to run separate
reconciliations for EACH separate Billing Tree
login.
Once the process is invoked, as information is exchanged
between Collect! and Billing Tree. You will see a summary
screen with batch download results. If payments
cannot be matched, for reasons such as invalid file number or
some kind of modification to a pre-existing transaction which
now no longer matches Billing Tree's records, then these items
will be written out to an exception report stored in your bin
folder; CV11\bin\BillingTree\CreditCard. The file naming
convention is "Unmatched", followed by the date in YYMMDD
format, and lastly the time stamp HHMMSS. Transactions in
this report require manual review and posting in Collect!.
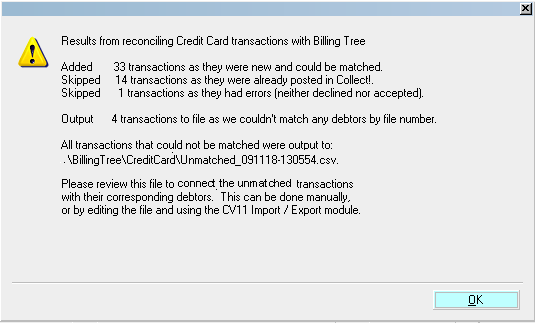
Reconcile Credit Card History Results
If a credit card is declined when an attempt is made by Billing
Tree to process a recurring payment, then Collect! processes
the payment as "Declined" and uses your settings from the
Credit Card Setup options.
Credit Card Setup
As of version CV11.6.2.9, if a file number match is made during
reconciliation but the transaction is skipped or errored out
for any reason, you will now see a Noteline logged to the specific
debtor account that the transaction belongs to, identifying
what was skipped or errored. The noteline will be prefixed
"Failed Transaction:" and indicate that an "Error" occurred,
as well as provide the Payment Date and amount. This is a
transaction that would need to be manually reviewed for what
caused the issue and corrective action would depend on what was
ascertained as root cause (i.e. was the transaction manually
modified between upload of transaction and download of process
confirmation).
It also writes a detailed log into the path
"CV11\bin\BillingTree\CreditCard\usaepay.txt".
 Users of CV11.6.2.7 and higher who are also licensed
for the Scheduler Module now have an enhanced automation
with the addition of the Reconcile process being added
to the Scheduler Task list of options. You may run this
process offline and unattended. Contact us at
sales@collect.org for module pricing.
Users of CV11.6.2.7 and higher who are also licensed
for the Scheduler Module now have an enhanced automation
with the addition of the Reconcile process being added
to the Scheduler Task list of options. You may run this
process offline and unattended. Contact us at
sales@collect.org for module pricing.
Reconcile Debtor
The Reconcile Debtor function enables you to query Billing Tree
for any credit card payments that may have been processed by
Billing Tree for a particular Debtor but not yet posted in Collect!.

Reconcile Debtor
When you run the Reconcile Debtor function, Collect! displays
a summary screen to let you know what, if any, action was
taken. If transactions are found for this debtor that are not in
Collect! then the payments will be posted as soon as the
Reconcile Debtor function runs.
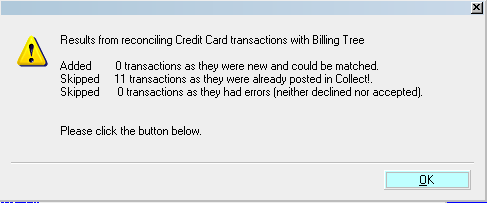
Reconcile Debtor Results
WARNING: If you use different Billing Tree login IDs for staff
with different permissions, i.e. for max amount allowed
to submit, then it is necessary to run separate
reconciliations for EACH separate Billing Tree
login.
Processing transaction confirmation will appear in the Transaction
record, where the Confirmation # is stored in the lower right of the
screen and additional information specific to the transaction is
retained in the Transaction Detail Tab.
See Also
- Billing Tree Topics
| 

Was this page helpful? Do you have any comments on this document? Can we make it better? If so how may we improve this page.
Please click this link to send us your comments: helpinfo@collect.org