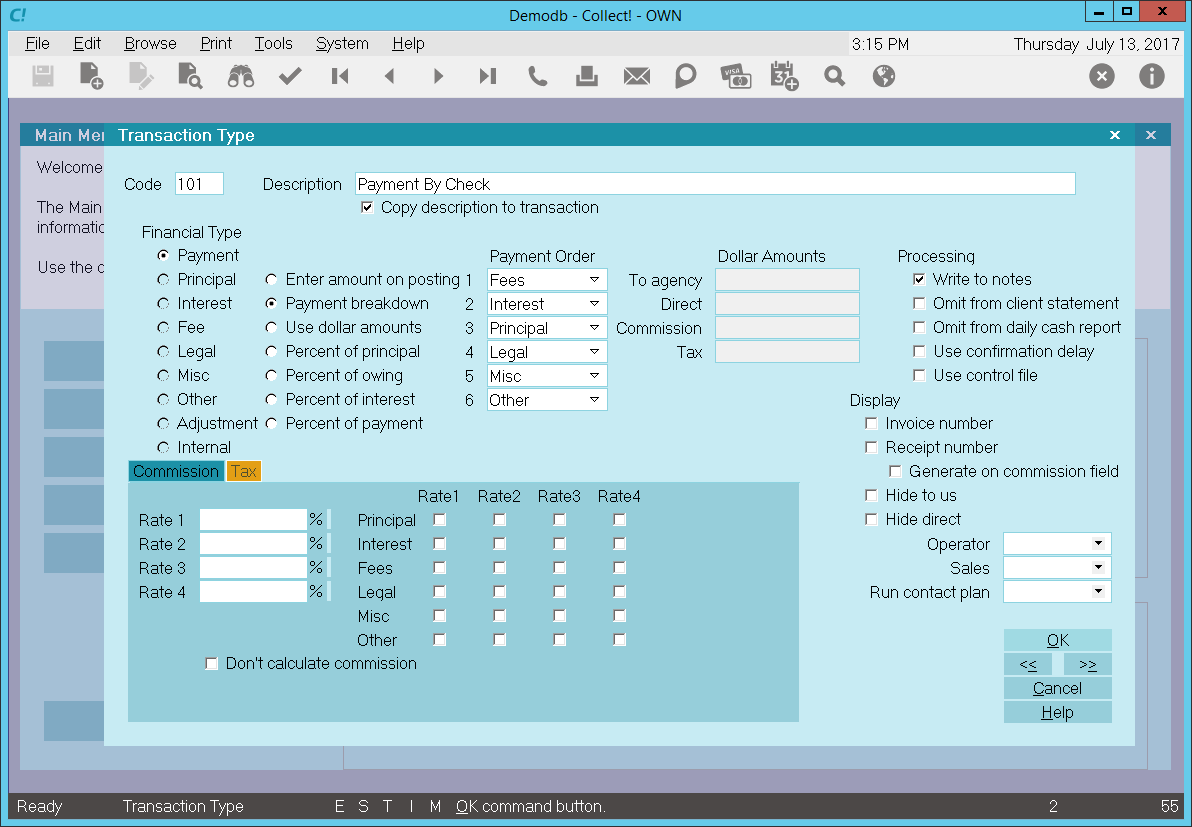
Transaction Type
Transaction types give you the ability to categorize transactions
for accounting and reporting. Through the Transaction Type form
you set options to control calculations, breakdown payments,
assign a specific operator and a sales person, designate a contact
plan to run, and set the commission rate. You may
view and modify existing transaction types in Collect! and
create your own new ones. By setting up transaction types
for the way you do business, you can automate many basic
aspects of posting and processing your transactions.
Transaction Type
The Transaction Type form displays many settings that
can be used to manage posting financial transactions
to your accounts.
Predefined Transaction Types
Collect! provides many pre-defined transaction types in the
Demonstration database for basic types of transactions you
may expect to handle. You can copy any of these to the
Masterdb database.
Transaction types are divided into groups of 100. The
actual "centenary" markers are used as a header for
the group. Although these markers have no settings,
you can reference the description when building reports.
This a handy way to provide a title for a group of
transactions on your reports.
The following list contains all the transaction types
provided for you by Collect!. Each one of these transaction
types has its own settings. These are set in the Transaction
Type for that specific Code, (e.g. 102, 303 etc.) You can
modify these if you need to or add your own, depending on
your business needs. You should seriously consider how
your business operates before making any changes to the
existing system.
Please refer to How To Setup Transaction Types for more
information.

Code
This field shows the Code for this Transaction Type.
The Code identifies the type of transaction you are
posting. Whenever you post transactions, you pick
the Code from the list of Transaction Types and
all the settings for that type are copied into the
Transaction form.
The default codes are organized in groups of 100 with
the "centenary codes", i.e. 100, 200, 300 etc.
used as titles for the group. The code field can
hold more characters, so you can use your own
codes.
Please note that some Codes are reserved for automations.
If you do not use those automations, then you can
re-purpose or remove those code. Please refer to the
Help Topic How To Setup Transaction Types for a
current list.
Description
This is a brief description of the Transaction Type.
For codes 100, 200, 300, 400, and 500, the Description
should be the title you want to see in your
Trust Account Report for the section that lists
transactions in each group.
Copy Description To Transaction
Switch this ON with a check mark so that whenever
you post a transaction of this Transaction Type, the
Description will automatically be copied to the
transaction's Description field.
Financial Type
The Financial Type setting determines the financial category
of each transaction. Financial types can be Payment,
Principal, Interest, Fee, Legal, Misc, Other, Adjustment, or
Internal. The dotted radio button in this column sets the
transaction's financial type. This is very important for processing
money amounts when a transaction is posted. The money
amount of the transaction will be allotted to the financial area
you choose here, that is, Payment, Principal, Interest, Fee,
Legal, Misc, Other, Adjustment or Internal.
Payment
Place a dot in this radio button to flag this Transaction
Type as a Payment. Transactions will be posted as
payments to the debtor's account and will be totaled in
the Paid field on the Debtor screen as well as being
calculated in financial statements and reports.
Principal
Place a dot in this radio button to flag this Transaction
Type as Principal. Transactions will be posted as principal
to the debtor's account and will be totaled in the Principal
field on the Debtor screen as well as being calculated
in financial statements and reports.
Interest
Place a dot in this radio button to flag this Transaction
Type as Interest. Transactions will be posted as interest to
the debtor's account and will be totaled in the Interest field
on the Debtor screen as well as being calculated in financial
statements and reports.
Debtor's total interest is Original Interest plus any
Accrued Interest minus any positive transactions posted
to the debtor's Interest account.
Fee
Place a dot in this radio button to flag this Transaction
Type as a Fee. Transactions will be posted as fees to
the debtor's account and will be totaled in the Fees field
on the Debtor screen as well as being calculated in
financial statements and reports.
Fees = all transactions posted to the debtor's
Fee account.
To charge a fee, post the amount as a debit to the
debtor's Fee account. To post a debtor payment to cover
a fee, post the amount as a credit to the debtor's Fee
account.
Legal
Place a dot in this radio button to flag this Transaction
Type as a Legal Fee. Transactions will be posted as
legal fees to the debtor's account and will be totaled in
the Legal Fees field on the Debtor screen as well as
being calculated in financial statements and reports.
Misc
Place a dot in this radio button to flag this Transaction
Type as Miscellaneous. Transactions will be posted
as miscellaneous transactions to the debtor's account
and will be totaled in the Miscellaneous field on the
Debtor screen as well as being calculated in financial
statements and reports.
Other
Place a dot in this radio button to flag this Transaction
Type as an Other type. Transactions will be posted in
the Other category on the debtor's account and will be
totaled in the Other Charges field on the Debtor screen
as well as being calculated in financial statements
and reports.
Adjustment
Place a dot in this radio button to flag this Transaction
Type as an Adjustment. Transactions will be posted
as adjustments to the debtor's account and will be
totaled in the Adjustments field on the Debtor screen
as well as being calculated in financial statements
and reports.
Adjustments = all transactions posted to the
debtor's Adjustment account.
Posting a credit to the account reduces the debtor's
Owing. A debit increases the debtor's Owing.
Internal
Place a dot in this radio button to flag this Transaction
Type as Internal. Transactions will be posted to the
debtor's account for tracking purposes. However, the
amount will not affect either the Debtor's totals or the
Client's Commission or Return.
 The Internal transaction type is used for
tracking internal agency expenses
connected with a particular account. These
expenses are borne entirely by the agency
and do not affect either the Debtor or Client
financials in any way.
The Internal transaction type is used for
tracking internal agency expenses
connected with a particular account. These
expenses are borne entirely by the agency
and do not affect either the Debtor or Client
financials in any way.
Enter Amount On Posting
If you place a dot in this radio button, when each
transaction is posted, the user must fill in the
amount of the transaction.
If this option is used for Payments, Collect! will use the
default internal breakdown order of: Other, Misc, Legal, Fees,
Interest, and finally Principal.
For user-defined breakdown, select the PAYMENT BREAKDOWN option.
Payment Breakdown
This function enables you to post payments broken
down into to Fees, Interest, Principal, Legal, Misc
and Other. Place a dot in this radio button to select
this option.
When you enable Payment Breakdown, additional fields
become visible where you can select the order that
you want to use for distributing the payment amount.
By default, Collect! posts to Fees, then Interest,
and finally to Principal. You can change this order and
optionally add additional breakdown order for Legal,
Misc and Other financial types. Please refer to the section
below on Payment Breakdown and Compound Interest for
further details.
 WARNING: This is the only type that can use the multi-rate
settings with commission. Enter Amount on Posting,
Use Dollar Amounts, and the Percentage Of types
will only use Rate 1 for the commission amount.
WARNING: This is the only type that can use the multi-rate
settings with commission. Enter Amount on Posting,
Use Dollar Amounts, and the Percentage Of types
will only use Rate 1 for the commission amount.
Use Dollar Amounts
When you place a dot in the radio button to select this
option, four additional fields appear, labeled To agency,
Direct, Commission and Tax. In the appropriate field,
enter the dollar amount of the transaction (as a number
from 1 to 100.). When the user posts a transaction of
this Transaction Type, the dollar amount will automatically
be copied to the correct field on the transaction.
Remember that a positive amount is a
credit to the account!
Percent Of Principal
When you place a dot in the radio button to select this
option, four additional fields appear, labeled To agency,
Direct, Commission and Tax. In the appropriate field,
enter the Percent of Principal of the transaction (as a
number from 1 to 100.) When the user posts a transaction
of this Transaction Type, Collect! will calculate the correct
percentage and the amount will automatically be copied
to the correct field on the transaction.
Remember that a positive percent is a
credit to the account!
Percent Of Owing
When you place a dot in the radio button to select this
option, four additional fields appear, labeled To agency,
Direct, Commission and Tax. In the appropriate field,
enter the Percent of Owing of the transaction (as a
number from 1 to 100.) When the user posts a transaction
of this Transaction Type, Collect! will calculate the correct
percentage and the amount will automatically be copied
to the correct field on the transaction.
Remember that a positive percent is a
credit to the account!
Percent Of Interest
When you place a dot in the radio button to select this
option, four additional fields appear, labeled To agency,
Direct, Commission and Tax. In the appropriate field,
enter the Percent of Interest of the transaction (as a
number from 1 to 100.) When the user posts a transaction
of this Transaction Type, Collect! will calculate the correct
percent of any Accrued Interest and the amount will
automatically be copied to the correct field on the
transaction.
Remember that a positive percent is a
credit to the account!
For example, we created a 499 Transaction Type
with Account Interest, 'Percent of interest' turned on,
and -100 in the To Us field. This takes any current
Accrued Interest on the account and posts it as a
transaction.
Combining this with the Edit Contact Event
to roll forward the 'Calculate interest from
date' in the Financial Detail form, you can
create interesting and very powerful
automation effects. For an example, please
refer to Help topic,
Accrued Interest - Tracking Month by Month.
Percent Of Payment
When you place a dot in the radio button to select this
option, four additional fields appear, labeled To agency,
Direct, Commission and Tax. In the appropriate field,
enter the Percent of Payment of the transaction (as a
number from 1 to 100.) When the user posts a transaction
of this Transaction Type, Collect! will calculate the correct
percentage based on the value in the Payment Amount
field in the Debtor's Financial Details and the amount will
automatically be copied to the correct field on the transaction.
Remember that a positive percent is a
credit to the account!
Payment Order
These fields are visible only when you have
selected "Payment breakdown." These fields allow
you to choose the order in which Collect! will apply
the payment amount to the debtor's account when a
transaction of this Transaction Type is posted. Select
the down arrow to view a pick list where you can
choose Fees, Interest, Principal, Legal, Misc or Other.
You can also select a blank [-] from the pick list to limit
your breakdown to fewer than the six financial
type categories.
1
Select the down arrow next to this field to choose
the first category to pay off when applying payments
of this Transaction Type to the debtor's account.
2
Select the down arrow next to this field to choose
the second category to pay off when applying payments
of this Transaction Type to the debtor's account.
Select a blank [-] to limit your breakdown to your
first choice.
3
Select the down arrow next to this field to choose
the third category to pay off when applying payments
of this Transaction Type to the debtor's account.
Select a blank [-] to limit your breakdown to your
first two choices.
4
Select the down arrow next to this field to choose
the fourth category to pay off when applying payments
of this Transaction Type to the debtor's account.
Select a blank [-] to limit your breakdown to your
first three choices.
5
Select the down arrow next to this field to choose
the fifth category to pay off when applying payments
of this Transaction Type to the debtor's account.
Select a blank [-] to limit your breakdown to your
first four choices.
6
Select the down arrow next to this field to choose
the sixth category to pay off when applying payments
of this Transaction Type to the debtor's account.
Select a blank [-] to limit your breakdown to your
first five choices.
Dollar Amounts
You can enter amounts in this area when you select "Use
dollar amounts." Enter the actual dollar amount in the
appropriate field. Collect! will use this amount whenever
you post a transaction of this type.
Remember that a positive dollar amount
is a credit to the debtor's account.
To Agency
You can enter amounts in this field when you have
chosen to enter an actual dollar amount or percent
for this Transaction Type. Enter an amount or percent
that will automatically be copied to the To Agency field
when creating a transaction of this Transaction Type.
Direct
You can enter amounts in this field when you have
chosen to enter an actual dollar amount or percent for
this Transaction Type. Enter an amount or percent that
will automatically be copied to the Direct field
when creating a transaction of this Transaction Type.
Commission
You can enter amounts in this field when you have
chosen to enter an actual dollar amount or percent for
this Transaction Type. Enter an amount or percent that
will automatically be copied to the Commission field
when creating a transaction of this Transaction Type.
 The Commission tab contains many fields for
setting commission rates if you want to set
them at the Transaction Type level. Please
see Commission and Tax Calculations
below.
The Commission tab contains many fields for
setting commission rates if you want to set
them at the Transaction Type level. Please
see Commission and Tax Calculations
below.
Tax
You can enter amounts in this field when you have
chosen to enter an actual dollar amount or percent for
this Transaction Type. Enter an amount or percent that
will automatically be copied to the Tax field when
creating a transaction of this Transaction Type.
The Tax tab contains many fields for setting
tax rates if you want to set them at the
Transaction Type level. Please
see Commission and Tax Calculations
below.
Processing
Several switches can be set to determine how you
will handle the reporting aspects when transactions
of this Transaction Type are posted.
Write To Notes
Switch this ON with a check mark if you want Collect!
to write a note to the debtor's Notes whenever a
transaction of this type is posted.
Omit From Client Statement
Switch this ON with a check mark if you want Collect!
to exclude transactions of this type when the client
statement is generated for each period. You can
override this when a particular transaction is being
posted, if needed.
Omit From Daily Cash Report
Switch this ON with a check mark if you want Collect!
to exclude transactions of this type when you print
your Daily Cash report. You can override this when
a particular transaction is being posted, if needed.
Use Confirmation Delay
Switch this ON to delay reporting transactions posted
with this Transaction Type. This is useful for allowing
time for a check to clear. The number of days delayed
is taken from the Payment Posting Options form.
Please refer to How to Use Confirmation Delay of Transactions
for details.
Use Control File
Switch this ON with a check mark to tell Collect! to run a
control file whenever a transaction is posted using this
Transaction Type. When this switch is enabled, a "control file"
field becomes visible where you can enter the name of the
control file you want to use.
Collect! expects the control file to be in the
{database}\control folder.
When enabled, Collect! will not perform any transaction breakdown
for payments. It is assumed that all financial calculations are
handled in the control file.
Control File
Enter the name of the control file you want Collect! to run
whenever a transaction is posted using this Transaction.
Collect! will add the ".ctf" extension.
The control file you enter here will be automatically entered
into the "Control file" field whenever you create a transaction
using this Transaction Type.
This field is only visible when the "Use control file" switch
is enabled.
Collect! expects the control file to be in the
{database}\control folder.
Display
Several switches can be set to determine what fields
you display when posting a transaction of this
Transaction Type and to automatically generate
invoice and receipt numbers.
Invoice Number
Switch this ON with a check mark if you want Collect!
to automatically assign an Invoice Number to
transactions of this type.
Invoice Numbers need these requirements:
- This switch must be turned ON with a check mark.
- The transaction must be posted as "Fees."
- The amount posted must be a negative amount (debit)
To Agency or Direct, or must be a positive (credit)
Commission amount.
If these conditions are not met, Collect does not assign
an Invoice Number even if the switch is ON.
The Invoice Number is determined by adding
one to the highest numbered invoice already
in Collect!. You can change an existing
Invoice Number so that Collect! will start at a
number of your choice.
Receipt Number
Switch this ON with a check mark if you want Collect!
to automatically assign a Receipt Number to transactions
of this type.
Receipt Numbers need these requirements:
- This switch must be turned ON with a check mark.
- The transaction must be posted to the Payment
account.
- The amount posted must be a positive payment
(credit) To Agency.
If these conditions are not met, Collect will not assign
a Receipt Number even if the switch is ON.
You can also generate receipt numbers for
payments to Commission if you switch
ON "Generate on Commission Field."
The Receipt Number is determined by adding
one to the highest numbered receipt already
in Collect!. You can change an existing
Receipt Number so that Collect! will start at a
number of your choice.
Generate On Commission Field
Switch this ON with a check mark if you want Collect!
to automatically assign a Receipt Number to transactions
of this type.
Receipt Numbers will be generated if:
- The "Receipt Number switch is also ON."
- The transaction must be posted to the Payment
account.
- The transaction must be posted as a positive amount
(credit) to Commission.
Hide To Us
Switch this ON with a check mark to hide the "To Us" field
whenever this Transaction Type is selected.
Use this switch if you want to organize your transaction
types according to Direct or To Us payments. This
function simplifies work for the user, as they don't have
to decide whether to post the transaction in the To Us
or Direct field.
Switch ON both the "Hide To Us" and "Hide
Direct" to force the User to post to
Commission. This is useful, at times, for
posting fees and prepayment amounts.
Hide Direct
Switch this ON with a check mark to hide the "Direct" field
whenever this Transaction Type is selected.
Use this switch if you want to organize your transaction
types according to Direct or To Us payments. This
function simplifies work for the user, as they don't have
to decide whether to post the transaction in the To Us
or Direct field.
Switch ON both the "Hide To Us" and "Hide
Direct" to force the User to post to
Commission. This is useful, at times, for
posting fees and prepayment amounts.
Commission And Tax Calculations
Several switches can be set to determine how you will
handle calculations relating to transactions of this
Transaction Type. You can set several rates and
also apply the rates to different financial types.
Please refer to Help topic, Commission and
Help topic, Tax for details.
Rates set in these areas are used when a
transaction of this Transaction Type is posted. These
rates override the debtor's Commission Rate or Rate
Plan which would ordinarily be used to calculate
commission for a payment.
Don't Calculate Commission
Switch this ON with a check mark to tell Collect!
NOT to calculate commission whenever a transaction
of this type is posted. You can override this when a
transaction is being posted, if needed.
Don't Calculate Tax
Switch this ON with a check mark to tell Collect!
NOT to calculate tax whenever a transaction of this
type is posted. You can override this when a
transaction is being posted, if needed.
Operator
Select the down arrow, or press F2, to view the list
of Operators. A choice in this field forces the
transaction to be posted to the Operator ID selected.
This is useful for transactions that you don't want
included in the standard Operator commission reports.
For example, payments to pre-collect accounts should
probably be assigned to either the system or to
management, to avoid inclusion in any particular
operator's Transaction Summary Reports.
Sales
Select the down arrow, or press F2, to view the list
of Operators. A choice in this field forces the
transaction to be posted to the Sales ID selected.
This is useful for transactions that you don't want
included in the standard Operator commission reports.
For example, payments to pre-collect accounts should
probably be assigned to either the system or to
management, to avoid inclusion in any particular
operator's Transaction Summary Reports.
Run Contact Plan
Select the down arrow, or press F2, to view the list
of Contact Plans. Select a contact plan to run when
a Transaction of this Type is posted. The contact
plan displayed is this field will run automatically as the
transaction is saved. This is useful for setting up custom
contact schedules that depend on the type of payment
or debit posted.
POST PAYMENT SEQUENCE
When you post payments with contact plans, the
sequence of events is as follows:
- A transaction record is created.
- Debtor totals are recalculated.
- The Transaction Type specific Contact Plan is
run.
- The default Payment Posting Contact Plan is run,
if there is one set up in Payment Posting Options.
This plan is run BEFORE any Contact Plan
you set up in the Payment Posting Options
form. This is due to the fact that the
transaction plan may do more processing
like posting a reversal to split the payment
across a group, which will alter the OWING
amount.
Delete
This button is visible only on the list of all Transaction
Types. Select this to delete the highlighted item from
the list.
Edit
This button is visible only on the list of all Transaction
Types. Select this to open and modify the highlighted
Transaction Type.
New
This button is visible only on the list of all
Transaction Types. Select this to open a new
blank Transaction Type form.
Help
Select this button for help on the Transaction Type
form and links to related topics.
Cancel
Select this button to ignore any changes you may
have made and return to the previous form.
OK
Select this button to save any changes you have
made and return to the previous form.
<<
Select this button to navigate to the
previous record in the database.
>>
Selecting this button to navigate to the
next record in the database.
Payment Breakdown And Compound Interest
When you use Compound Interest you MUST post the
Original Principal amount as a Transaction Type 196.
When posting payments, transaction types MUST have
the Payment Breakdown option set so that Collect! can,
by default deduct, fees first, then accrued interest,
and finally principal. You may adjust this payment
breakdown order when creating your Payment Breakdown
transaction types. Please be sure you know what you
are doing if you deviate from the default order, i.e.
Fees, then Interest, then Principal.
Results of the payment disbursement will be reflected in
several areas of the Financial Detail form accessed by
selecting the Principal or Interest field on the Debtor form.
Selecting the Owing field will display the
Debtor Financial Summary. Selecting the other
financial fields will display the
Debtor Transaction Summary.
Compound interest calculations produce a
running balance of principal, interest, fees and
adjustments. When using Compound Interest, you
MUST post transactions using Payment Breakdown.
Payment breakdown also works with Simple Interest
as well as Compound Interest.
| 
Was this page helpful? Do you have any comments on this document? Can we make it better? If so how may we improve this page.
Please click this link to send us your comments: helpinfo@collect.org