How To Create An Import Map
Collect!'s import module is a very powerful tool for importing data into Collect! from other
databases, instantly giving you all that valuable information at your fingertips within the
Collect! program. This process requires an import map. To get you started, this document steps
through the creation of a simple single record import map. It is necessary that you are familiar
with the use of Collect!'s Client and Debtor screens.
Collect! can import a variety of file formats, as long as they are saved in an ASCII text file.
The following formats are the most common:
Setup A Client
If your importing Debtor accounts, then you need to create a Client first, if one does not already
exist. If you are not importing accounts, then proceed to the next section.
Please refer to the Help topic How To Enter A Client for more information on adding a client.
If the Client already exists, and has accounts on it, we recommend creating a TEST Client that
mirrors the settings of the existing Client. You can do this in your production or test database.
Once testing is complete, you can delete the TEST Client.

Prepare The Data File
Before doing anything, make a copy of the data file. ASCII files can be opened in MS Excel, but
Excel will alter the data, so you want an untouched copy of the file first.
CSV files can be opened directly with MS Excel. Other delimters and Fixed Length Files need to be
imported. Please refer to Microsoft Excel documentation on how to import Text files.
Once you have the COPY of the file open in Excel, insert 2 rows at the top of the file. In row 1,
you are going to track the name of the record/form that the data will be stored in (EX: Debtor,
Cosigner, Debtor Detail, etc.). In row 2, you are going to track the name of the field that the data
will be stored in (EX: Name, Address, etc.).
Save the copy with your notes. Open the original file with a TEXT editor. We recommend Notepad++.
Make note of any columns with the following:
- Leading zeros
- Numbers longer than 15 characters
- Date formats
 Typically files from the same source will have the same format for all dates, but don't rely
on this. Check all date columns for consistency.
Typically files from the same source will have the same format for all dates, but don't rely
on this. Check all date columns for consistency.
- Phone number formats
- SSN number formats
Delimited File Format
Delimited Files are file types where each record of data is on its own row. Each field of data is
separated by a delimiter. The most common delimiter is comma (CSV), but Collect! supports other
delimiters like Pipe or Tab.
Example Delimited File
Name,Address,City,State,Zip,Balance
"Doe, John","123 Main Street",Los Angeles,CA,90210,"15,000.00"
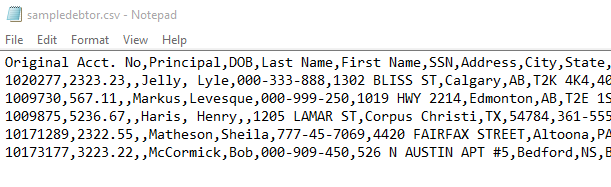
CSV Sample File Viewed In Notepad
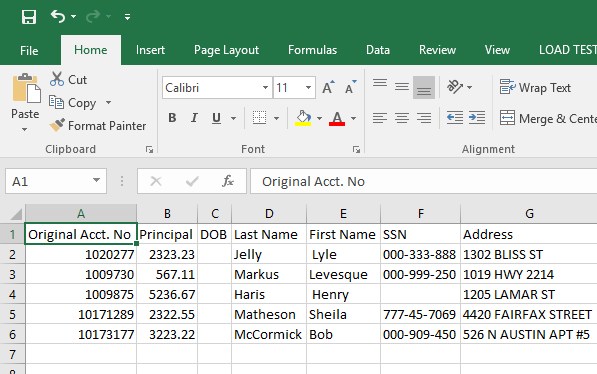
CSV Sample File Viewed In MS Excel
Dynamic Field Indexing
When importing a delimited file, you are simply creating Import Field Specifications without
referencing an Offsets or Lengths, as you would with Fixed Length.
Fields can be created with or without the use of Dynamic Field Indexing.
Without Dynamic Indexing: Each field is assumed to represent a column. The first field will be
column A, the second field will be column B, and so on. The issue with this design is if you are
skipping a column, you need to create blank field references. If you are importing multiple record
types (EX: Cosigners), you need to load the blank fields for any columns that don't belong on the
second record type (EX: all the Debtor fields). Another issue with this method is you cannot reference
the same column multiple times for the same record (EX: Transaction Payment Date and Posted Date both
needing to reference the date in column O).
With Dynamic Indexing: You can specify the column in the data file that you want to use. This method
is the preferred method as it doesn't require blank Field Specification records and you can reuse
columns for different fields.
Fixed Length Format
Fixed Length Files are file types that don't use delimiters to separate data. Each piece of information
is stored in the same location for each record. There are 2 types of Fixed Length Files:
- Each record is on its own line. Each field is stored in specific offsets and lengths.
- Each record is multiple lines with a record identifier. Each field is stored in specific
line numbers from the Record Identifier at specific offsets and lengths.
Example Fixed Length File - Single Line
Doe, John       123 Main Street    Los Angeles  CA  90210  15000.00
Smith, Jack     12 5th Avenue      Los Angeles  CA  90211   6000.00
Example Fixed Length File - Multiple Line
RECORD
Doe, John
123 Main Street, CA 90210
15000.00

RECORD
Smith, Jack
12 5th Avenue, CA 90211
6000.00
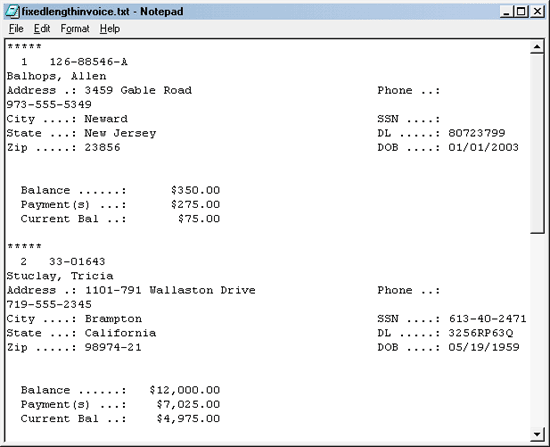
Fixed Length Invoice Text File
Below the identifier *****, there are several lines of information.
- Each piece of data is located at a specific character position on one of these lines. This
position is called an Offset and is a key in determining where the piece of data begins on the
specific line within the block of data.
- Each piece of data has a character length called Length which is the number of character spaces
allotted to the piece of data in the block of text.
- Each specific line of data has a value called Lines After Identifier which is the line number
where the piece of data is located.
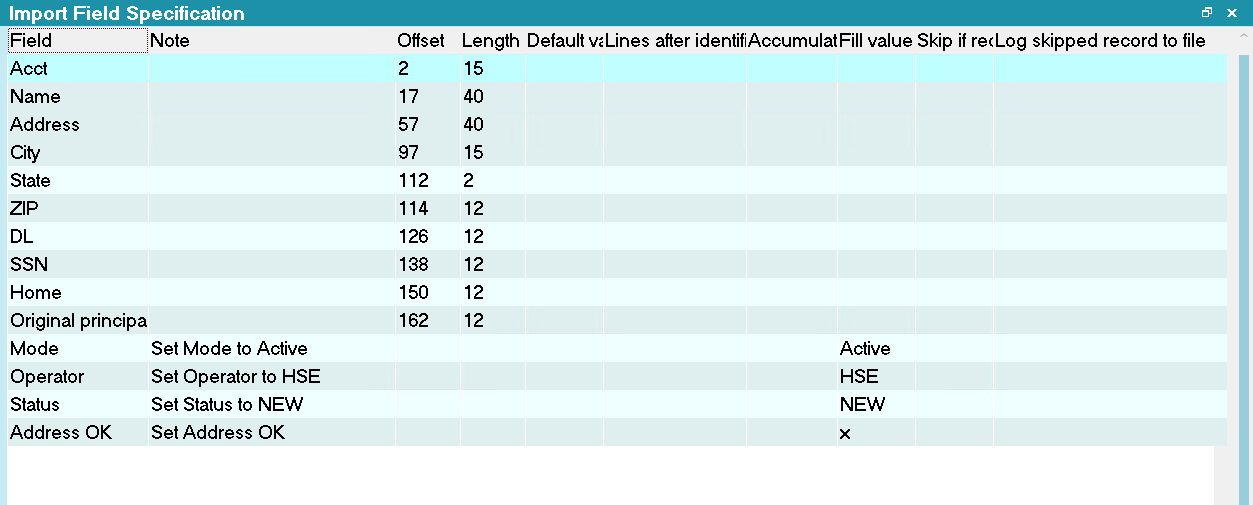
Field Specifications
The import map that we will create will state the line, length and position of each piece of data
that is going to be pulled into the database from the fixed length text file. There will be no blank
Import Field Specification records. As the data uses offsets and lengths, the same data can be used
multiple times.
Setting Date Formats
You must always make sure that the Date Options are set correctly when importing dates.
Date Formats must be set prior to importing, as these have a bearing on how the Date information is
formatted. As mentioned above, you want to set the global format for the Import Date Options, then,
if needed, set the Import Field Date Format.

Date Options Settings
Collect! supports:
- Month Day Year
- Year Month Day
- Day Month Year
- Year, then Number of Days into the Year (1-366)
- Number of Days into the Current Year (1-366)
- Day Month Year, where the Month is the 3 Letter abbreviation (EX: JAN)
Once selected, set whether the Day and Month have leading zeros. Then select whether the year us
2 or 4 digits. Finally, set the date separator.
Importing Notes
When importing notes, you must build a proper date/time stamp. The proper format is:
DATE TIME STATUS OPERATOR : TEXT (Example: 01/01/2029 15:30 NEW OWN : Review New Account )
For detailed instructions on how to import a note line, please refer to the TEXT CONCATENATION
WITH APPENDING section below.
The status is optional when importing Client notes.
You can build the date/time stamp by putting of the elements into the import map using the Text field
and 'append to existing data.' If the date/time is in the spreadsheet, then you can reference the
spreadsheet when building the map.
The notes field is considered a text field, so special steps are required to indicate that
you are importing a date into the notes. On the Import Field Specification form, click the
Date Options buttons to open the date options for this field. Set the date format to match
the format in the data file.
Importing Full Note Line
Alternatively, if the information is not available and you want to put in the current date, time,
status, and operator, then all you have to import is just the text. In the event that you only import
the note text, or if you don't build a proper date/time stamp, Collect! will not
automatically create the date/time stamp, so the test will be appended to the bottom of the note file.
Importing Partial Note Line
Multi-Line Notes
In order to import notes that have multiple lines, you can place @x0A (case sensitive) in the
following places:
- Default Value
- Fill Value
- Text File being Imported
Collect! will replace the @x0A string with proper carraige returns in the database.
This only works with in a single Import Record Definition for a note line. If you have
multiple import record definitions, they will be treated as separate entries in the
database (same behaviour as contacts, transactions, etc.).
Importing Financials
Usually money amounts already exist with their decimal placements, as you will see in our sample.
If they do not, you would set a value using the Multiple by field on the
Import Field Specification for the money field.
When importing money amounts, we have to be careful of where we are placing them in Collect!. Values
in certain fields may affect other data fields. For this sample, we are using Principal. You may
think that it is correct to choose Principal from the Field Type list to put this value in the
Principal field on the Debtor form. This is correct in a sense. However, Collect! actually gets the
Principal amount from the 196 transaction on the Transactions tab.
Method 1: Automatically Create Transactions
This should be used if you only have 1 Principal balance to load for an account. This method will
automatically create the applicable transactions after the Debtor is created. It is the same
behavior as creating an account manually.
- In the Debtor Import Record Definition, add Fields for importing the Original Principal,
Original Interest, Fees, etc.
- On the Import Options screen, check the boxes for Apply Client Settings and Include Transaction
Posting.
Method 2: Manually Create Transactions
This method is for importing individual transactions yourself. This gives you more control over the
process, but add steps.
- Click OK to go to the list of Import Record Definitions. Create a new record definition and
select Transaction from the list in the Record field.
- Create a new Field and leave the field blank. Put 'A - Account Number' into the note field.
 Reminder, with Dynamic Indexing, blank fields are not required.
- Create a new Field and select TO US from the field list.
As the values in the to us field on transactions are negative for transactions that should
increase the balance, you need to put a value of -1.0 in the multiply by field to convert
the principal into a negative number.
- If your *.csv file had the decimal stripped from the money amount, you would also fill in
0.01 in the field labeled Multiply By. However, this is not
needed in this exercise.
- Create and new field and leave the field blank and put '196' into either the Default Value or
Fill Value fields.
By selecting "use transaction type - after" in the import options, Collect! will automatically
fill in the rest of the transaction details like the description and financial type. There
is a time and place to use either the transaction type - before or transaction type - after.
Please press F1 on those fields for more information.
- You should now have a field in the map for each field/column in MS Excel, in the same
order.
To make sure you have all the fields, you can select the << or
>> button to go forward or back through fields, or select the
OK button to view the Import Field Specification list. Use your Up/Down arrow keys to scroll
through this list.
In addition to these fields, we will set a few default values in our import map.
Set Commission Rates And Tax During Import
Typically, you would use the Apply Client Settings box on the Import Options form to automatically
load the Commissions and Taxes, but in some cases, you may need to set specific values.
Several hidden fields on the Client, Debtor and Transaction forms enable you to access tax and
commission rate fields directly within the import field specifications. This enables you to easily
set commission and tax percentages and their breakdown settings during an import.
Commission Rate Field Names for Client
The field definitions for the fields on the Client's Commission Rates form are:
Commission Rate
Commission Rate 1
Commission Rate 2
Commission Rate 3
The field definition for the commission breakdown check boxes is:
Comm Rate Options
The Comm Rate Option value is actually a combination of bit values for all the check boxes on the
Commission Rates form. It is easy to figure out the value and then set it in the Default for the
field specification. How to find this value is described later in this document.
Commission Rate Field Names for Debtor
The field definitions for the fields on the Debtor's Commission Rates form are:
Commission Rate 1
Commission Rate 2
Commission Rate 3
Commission Rate 4
The field definition for the commission breakdown check boxes is:
Comm Rate Option
Commission Rate Field Names for Transaction
The field definitions for the fields on the Transaction's Commission Rates form are:
Commission Rate
Commission Rate 1
Commission Rate 2
Commission Rate 3
The field definition for the commission breakdown check boxes is:
Comm Rate Option
Tax Rate Field Names for Client
The field definitions for the fields on the Client's Tax form are:
Tax Rate
Tax Rate 1
Tax Rate 2
Tax Rate 3
The field definition for the tax breakdown check boxes is:
Tax Rate Options
The Tax Rate Options value is actually a combination of bit values for all the check boxes on the
Tax form. It is easy to figure out the value and then set it in the Default for the field
specification. How to find this value is described later in this document.
Tax Rate Field Names for Debtor
The field definitions for the fields on the Debtor's Tax form are:
Tax Rate 1
Tax Rate 2
Tax Rate 3
Tax Rate 4
The field definition for the tax breakdown check boxes is:
Tax Rate Option
Tax Rate Field Names for Transaction
The field definitions for the fields on the Transaction's Tax form are:
Tax Rate
Tax Rate 1
Tax Rate 2
Tax Rate 3
The field definition for the tax breakdown check boxes is:
Tax Rate Options
Accessing the Bit Values for Check Boxes
Before you can set the value for Commission or Tax Rate Options, you need to obtain the bit values
for the options. Once you know what the values are, you can just use this value as the Default in
the import field specification for the Comm Rate Option or the Tax Rate Option.
To determine the value that sets the switches you need, go to one debtor and set up the Commission
Rates and Tax exactly as you want them to be, switching ON check boxes with a check mark as needed.
Then, go off the Debtor form to commit the settings. Then print to screen @de.cro and @de.tro. This
will give you two numbers, for example. 3843 and 290 or 16386 and 258. The numbers won't seem to make
any logical sense, but actually they are a combination of switch values and Collect! knows exactly
what they mean. In your import field specifications, you can simply put these values in to the
Default field and Collect! will set the switches when the import runs.
You can do the same for the Client Comm Rate Options and Tax Rate Options, and the Transaction Comm
Rate and Tax Rate Options. If you are setting the same values at the Client or the Transaction level,
you can use the same values that you obtained above. They are the same behind the scenes. The same
number sets the same switches in each case.
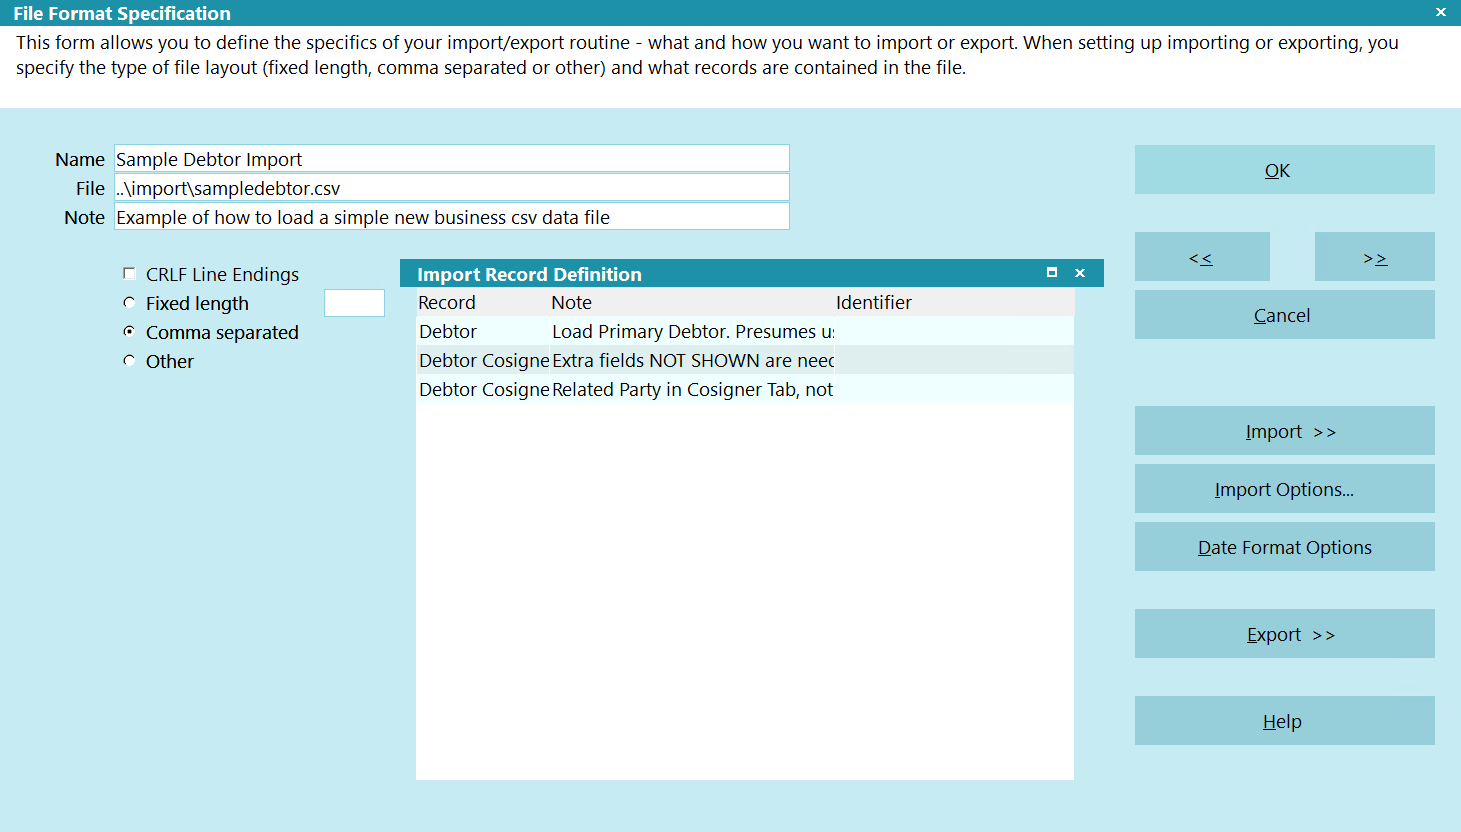
File Format Specification Form
An Import Map ( File Format Specification) has 3 levels:
- File Format Specification: Global Settings for the Map
- Import Record Definition: Record that is being imported (EX: Debtor, Cosigner, Attachment, etc.)
- Import Field Specification: Field data that is being imported (EX: Name, Address, etc.)
Here are the related help pages for more information on each form.
Click Here to View this Form.
Click Here to Close this Form.
This form allows you to define the specifics of your import/export
routine - what and how you want to import or export. When setting
up importing or exporting, you specify the type of file layout
(fixed length, comma separated or other) and what records are
contained in the file.
Click into the Import Record Definition list to add and modify the
records and fields you want to import or export.
To access the File Format Specification form, if you are
not already viewing it, select File from the top menu bar and then
select Import/Export, then choose Customize Import/Export,
Edit File Format. Or, choose Edit Format from the Import menu
or the Export menu.
File Format Specification
You can choose whether the file is fixed length or comma
separated (CSV) ASCII. You are also given additional options
for London Bridge EDI format, which is essentially a fixed length
file with a header record for verification purposes.
When importing, you can choose the records and fields to import
and set a number of options. These options include whether you
want the system to automatically schedule a letter and a review
contact, or calculate interest automatically.
When exporting, you can specify which fields you want to export.
Fixed length files are padded with spaces if you leave blank spaces
in a line of data.
Do not modify the file format samples until you are
thoroughly familiar with the concepts of files and file
transfers. Both sending and receiving import programs
must have identical format specifications to function
correctly.
Name
This is a name for the import specification. Be sure to use
a name that will jog your memory. You will notice that the
sample file formats have names describing their function.
File
This is the name and path of the file to be imported. You
cannot use wild-card characters. Import by default expects
the files to be located in the Collect! executable directory,
that is, Collect\bin. If you know that the name of the file will
always be the same, you can enter the exact filename.
Otherwise, leave this blank.
You can use today's date in the file extension.
If you enter "filename.@d", the system will
create a file extension using today's date
formed as filename MMDDYY.
Note
Enter a description for this import specification if there is
more than one file format you work with regularly. This is
a free form textual area for your use.
Crlf Line Endings
The import modules uses Line Feeds (LF) by default to determine
the end of a line. If you file has a mixture of Line Feeds and
Carriage Returns (CRLF), then you can select this option to
tell Collect! to use Carriage Returns as the line endings.
If Collect! encounters a Line Feed, it will replace
the line feed with a space.
Fixed Length
This specifies one of two basic file formats. In this case,
all information is formatted with either valid data or spaces.
See the section, FIXED LENGTH DEFINED, below.
When you select a fixed length file, you are implying a
number of things. For example, each field in a fixed length
file has an OFFSET and a LENGTH. Some of the options
in the record import definitions and field import definitions
directly control how information is written to fixed length files.
Line Width
You can optionally enter the actual width of each line.
Normally fixed length files have each line separated with
a carriage return (CR) or line feed (LF) character, but in
some odd cases there may be other separators. In this
case, the import may not work until you specifically tell
it the actual width of each line of the file being imported.
Line Width is used on both importing and exporting.
On exporting fixed length records, the line width is used
to pad partially filled lines.
On importing, the line width forces the read operation
to read the specified number of characters, rather than
freely reading up to the end of the next line.
If you import from a fixed length file and the import doesn't
seem to be working, you might need to define the actual
line width.
Fixed Length Defined
This is one of two major field format conventions. Fixed Length
fields are filled with spaces to a specified width. Each field has
an offset from the start of the line, and a length in number of
characters.
Imagine one line of the Fixed Length import file looks like this:
SMITH, FRED             10004A 10000.00 199 ESTELLINE RD.
123456789012345678901234567890123456789012345678901234567890
The start of the Name field is at position 1 and the length
is 24. The Number field starts at position 25 and its length
is 6.
Notice how the name starts at character position 1, and there
is room for a long name, although not all of the space is used
with this one. The length of the name field is 24 characters.
Then the account number starts at character position 25 in
the file, and is 6 characters wide.
When you import Fixed Length files, you will need to know the
starting position and width of every field you want to import.
This information is typically available from the person who
created the file.
Comma Separated
Comma separated files place quotes around text fields
and separate fields with commas. These files are simpler
to work with compared to fixed length files, as only the
field order needs to be known.
Comma Separated Defined
The data used in the fixed length file example above looks
like this in a CSV format.
"SMITH,FRED","10004A",10000.00,"199 ESTELLINE RD."
Notice that numeric fields don't have quotes. Import can accept
numerics with or without quotation marks.
Notice the commas separating the fields.
Notice the quotation marks around fields.
Text fields are surrounded by quotation marks, and fields are
separated with commas. Also notice that blank space is eliminated,
making this a more space-efficient way of transferring information.
Column Count In CSV Imports
The field/column count is not retained across records. In reality,
the count is restarted on each New record definition.
Other
In some cases, files do not conform to fixed length or
comma separated standards. For example, X12 EDI files
often use [~] and [^] as field and record delimiters. In
other words, some files are neither fixed length nor
comma separated, and the Collect! import/export functions
can still work correctly.
When you specify the OTHER file format, spaces are
displayed to enter field and record delimiters.
Field Delimiter
Enter a character that is placed between fields in the file
being processed.
For example, when we created an import/export specification
for an X12 EDI file we entered [ ~ ] as the field separator.
You can also enter hex codes in these locations to
allow you to work with any characters. Hex codes are
specified by entering xNN where the NN is a two digit
number. For example, when we entered x0Dx0A, the
system exported a carriage return and line feed.
Please refer to the sections below, TAB
DELIMITERS and PIPE DELIMITERS, for
more information.
Collect! can read multiple HEX and character codes in a
single pass. Please refer to Help topic,
Multi Character Field Delimiters for details.
Tab Delimiters
When TABS are used to separate fields in your file to be
imported, there is a special hex code to indicate this. It
is x09. This is entered into the Field
Delimiter Field so that Collect! can determine field
separations.
In your File Format Specification, choose OTHER and the
Record Delimiter and Field Delimiter fields will become visible.
Type in the following values.
Field delimiter: x09
Record delimiter: x0Dx0A
This would be a tab separating the fields and a carriage return
and line feed separating the records. x09 is
the code for the TAB character.
In your file, it might look like:
>>
A line of text in the file might look like:
120035>>3000>>56745>>etc.
This might indicate a Principal Amount of $1200.35 at 30%
commission with $567.45 still owing.
Pipe Delimiters
When PIPES are used to separate fields in your file to be
imported, there is a special hex code to indicate this. It
is x7C. This is entered into the Field
Delimiter Field so that Collect! can determine field
separations.
In your File Format Specification, choose OTHER and the
Record Delimiter and Field Delimiter fields will become visible.
Type in the following values.
Field delimiter x7C
Record delimiter x0Dx0A
This would be a pipe separating the fields and a carriage return
and line feed separating the records. x7C is
the code for the PIPE character.
In your file, it might look like:
|
A line of text in the file might look like:
120035|3000|56745|etc.
This might indicate a Principal Amount of $1200.35 at 30%
commission with $567.45 still owing.
Record Delimiter
Enter a character that is placed after each record in the file
being processed.
For example, when we created an import/export specification
for an X12 EDI file, we entered [ ^ ] as the record separator.
You can also enter hex codes in these locations to allow
you to work with any characters. Hex codes are specified
by entering xNN where the NN is a two digit number. For
example, when we entered x0Dx0A, the system exported a
carriage return and line feed.
Please refer to sections above, TAB DELIMITERS
and PIPE DELIMITERS for more information.
Collect! can read multiple HEX and character codes in a
single pass. Please refer to Help topic,
Multi Character Field Delimiters for details.
Multi Character Field Delimiters
You can specify multiple field delimiters in Collect!'s
Import/Export for both Field Delimiter and Record
Delimiter fields. You can specify multiple HEX codes and/or
multiple ASCII codes simultaneously. This lets Collect!
parse more complex data files where different
delimiters are used to separate various data items.
When importing data, every Delimiter in the field will be
interpreted as a Record or Field Delimiter in the incoming
data, unless the first two delimiters are x0Dx0A,
in which case the first two will be used together as a whole.
When exporting data, only the first delimiter specified in
the Delimiter field will be used, unless the first two
delimiters are x0Dx0A, in which case
the first two will be used together as a whole.
Hex Code Table
For your convenience, the following table will help you
when specifying the delimiters for your import maps.
| Hex Code |
Character |
Hex Code |
Character |
Hex Code |
Character |
| x09 |
TAB |
x2A |
* |
x4A |
@ |
| x0A |
LF |
x2B |
+ |
x5B |
[ |
| x0D |
CR |
x2C |
, |
x5C |
\ |
| x21 |
! |
x2D |
- |
x5D |
] |
| x22 |
" |
x2E |
. |
x5E |
^ |
| x23 |
# |
x2F |
/ |
x5F |
_ |
| x24 |
$ |
x3A |
: |
x60 |
` |
| x25 |
% |
x3B |
; |
x7B |
{ |
| x26 |
& |
x3C |
< |
x7C |
| |
| x27 |
' |
x3D |
= |
x7D |
} |
| x28 |
( |
x3E |
> |
x7E |
~ |
| x29 |
) |
x3F |
? |
|
|
Import Options
Clicking this button displays the control
and preference switches you may choose from
to govern how your import map will function.
Specifically, default settings and pre-filled
options. Press F1 on any field to obtain
greater detail on each individual field.
Date Format Options
The dates in the imported files can be represented in a
number of ways. Selecting this control opens the
Import Date Options form where you can choose from a
selection of date formats. Dates are converted into the
Collect! internal date format when importing.
Import
Selecting this takes you to the Import menu form.
Export
Selecting this takes you to the Export menu form.
Delete
Select this to delete the highlighted item from
the database.
This button is visible only on the list of all
File Format Specifications.
Edit
Select this to open and modify the highlighted item.
This button is visible only on the list of all
File Format Specifications.
New
Select this to open a new blank form where
you can create a new File Format Specification.
This button is visible only on the list of all
File Format Specifications.
Help
Press this button for help on the File Format Specification
form and links to related topics.
Cancel
Select this button to ignore any changes you may
have made and then return to the previous form.
OK
Selecting this button will save any data you have
entered and return you to the previous form.
<<
Selecting this button will take you back
to another record.
>>
Selecting this button will take you forward
to another record.
Records
The list of Import Record Definitions defines which
record types are to be imported. The Collect! Inter Office
file formats work with multiple record types in one file,
but files from other sources will have only one record type.
When you transfer more than one record type, each record
type requires a unique identifier. This allows the import to
know which record a particular line in the file refers to.
Order Of Record Types
The order of the record types is also important. Account
record types should always come before the Contact,
Transaction and Note record types. This is because Import
scans each line of the file, compares the record type
identifier, and creates the record after reading the fields
and checking for duplicates. Since, for example,
Transactions belong to an Account record, you need to
save the Account record before you attempt to save
Transactions belonging to that Account.
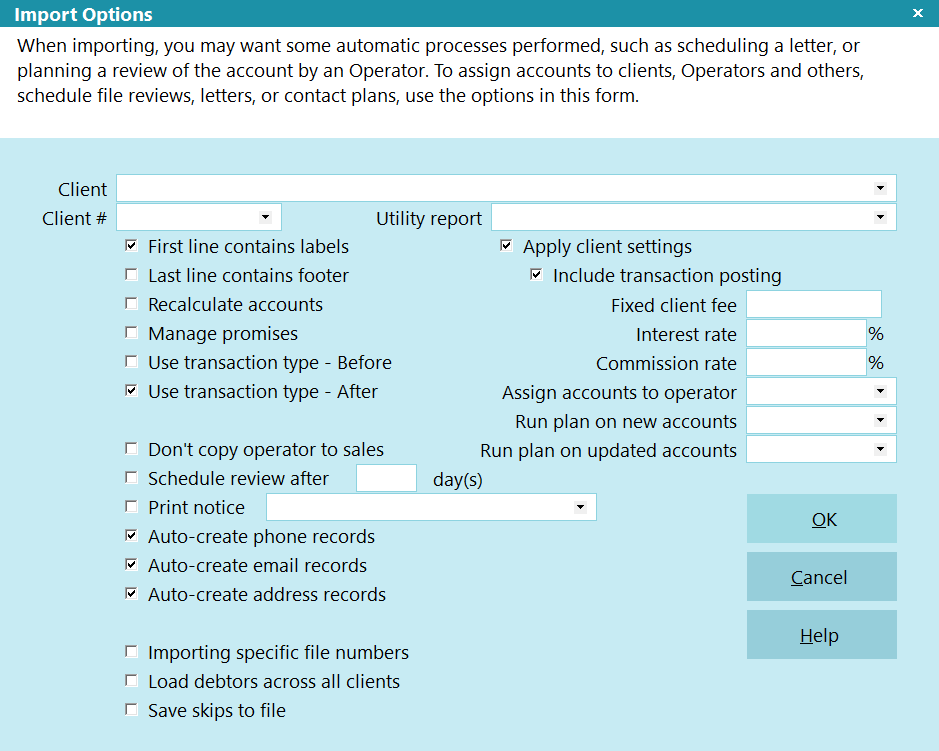
Import Options Form
Click Here to View this Form.
Click Here to Close this Form.
When importing, you may want some automatic processes performed,
such as scheduling a letter, or planning a review of the account
by an Operator. To assign accounts to clients, Operators and others,
schedule file reviews, letters, or contact plans, use the options
in this form.
Import Options
Client
This is the name of the Client for whom you
usually import this type of file. If you
import the Client number or name, the imported
value overrides any Client specified here. You
can change the Client in the Import menu just
before you import. If Import can't find the Client,
it will create it for you.
This field is auto-filled when you select a
Client Number first.
Client #
This is the number of the Client for whom
you usually import this type of file. If you
import the Client Number or Client name,
the imported value overrides any Client
Number specified here. You can change the
Client Number in the Import menu just before you
import. If Import can't find the client, it
will create one for you.
This field is auto-filled when you select a
Client Name first.
First Line Contains Labels
When this switch is ON, Collect! ignores the
first line of the file and starts importing
on line 2. This is useful for files created by
Excel, and other similar systems, that put
field labels on the first line of the file.
Last Line Contains Footer
When this switch is ON, Collect! ignores the
last line of the file and stops importing
on the second to last line. This is useful for
files created by Excel, and other similar systems,
that put a footer or totals on the last line of
the file.
Recalculate Accounts
If this switch is checked, the import will
automatically recalculate all imported
accounts when it is completed. If the switch is
unchecked, you will be prompted as to whether you
would like to recalculate the accounts.
Manage Promises
Switch this on to manage promised payments when the
import is run. With this switch enabled, Collect! will
consider any active promises set on an account and
take the appropriate action before importing the next
transaction. This will allow for the Promise contacts to
be revolved ahead or back, or completed, as if you were
posting manually on a debtor.
Use Transaction Type - Before
This switch enables you to apply transaction
type settings BEFORE you bring in your data.
When you put a check mark in this field and you
import a transaction, Collect! does the following.
- Recalculates the debtor up to the Payment Date
on the transaction, EXCLUDING the new transaction.
- Loads transaction details from the Transaction
Type imported and performs a breakdown as needed
of the transaction.
This step brings in the Commission Rate
from the Debtor and writes the amount
to the new transaction, unless you have
a value in the Commission Rate field.
- Recalculates the debtor up to the Payment Date,
including the new transaction, and updates the Debtor
record in the database.
When there is no data coming in to determine
a transaction type for the 'Use transaction
type' settings, Collect! will attempt to use
the 'Default value' in the Type Field
Specification for a match.
Use Transaction Type - After
This switch enables you to apply transaction type
settings AFTER you bring in your data. When you put
a check mark in this field and you import a transaction,
Collect! does the following.
- Recalculates the debtor up to the Payment Date
on the transaction, INCLUDING the new transaction.
- Loads transaction details from the Transaction
Type imported and performs a breakdown as needed
of the transaction.
This step brings in the Commission Rate
from the Debtor and writes the amount
to the new transaction, unless you have
a value set in the Commission Rate field.
- Recalculates the debtor up to the Payment Date again,
including the new transaction, and updates the Debtor
record in the database.
When there is no data coming in to determine
a transaction type for the 'Use transaction
type' settings, Collect! will attempt to use
the 'Default value' in the Type Field
Specification for a match.
Don't Copy Operator To Sales
When you turn this switch On, the Sales field
in the transaction record being imported is not
automatically filled in. Instead, it
must be filled in by the import program
specifically.
In the past, the Sales field was filled with the
same ID as the Operator field in the transaction
record.
In order to leave the Sales field blank in the
transaction records being imported, turn this
switch On.
If this switch is Off, the Sales field will be
filled with an appropriate Operator ID, if at
all possible. If you have existing imports that
work properly, do not turn this switch On in the
existing import specifications, or you may lose
desired Operator commissions assigned after
importing transactions.
Schedule Review After
The import will automatically schedule an
Operator to Review imported files if you put
a check in this field. The number of days
to delay from the current date for the Review
Contact Due Date to appear in the collector's
WIP list will be entered in the adjacent
Day(s) field.
Print Notice
Import will automatically schedule a
letter if you put a check in this field.
Select which letter from your Print Menu
by clicking the drop-down arrow to the
right of the adjacent field.
Notice
To choose the letter you want printed,
click the drop-down arrow to the right
of the field adjacent to Print Notice,
or press F2. Use the arrows to select
from the list.
The letter contact will be scheduled in
the current day's Due Date print batch.
To schedule more complex letter series
and Review schedules, create a Contact
Plan for this purpose that contains all
the requisite events.
Auto-Create Phone Records
Switch this ON to have the import modules automatically create
Phone records after the Primary record has been created. This
option works on Clients, Associates, Debtors, and Cosigners.
Auto-Create Email Records
Switch this ON to have the import modules automatically create
Email records after the Primary record has been created. This
option works on Clients, Associates, Debtors, and Cosigners.
Auto-Create Address Records
Switch this ON to have the import modules automatically create
Address records after the Primary record has been created. This
option works on Clients, Associates, Debtors, and Cosigners.
Importing Specific File Numbers
By default, newly imported accounts will be
assigned the next available file number. Checking
this switch overrides this default behavior and
allows you to specify file numbers in your
import file.
Load Debtors Across All Clients
Switch this ON with a check mark if you
want Collect! to consider all clients
when matching records during the import.
If this is switched OFF, only the client
displayed in the Client or Client # field
will be processed.
Switch this OFF if you have multiple
accounts in your database with the
same "Use as key" value and you want
to ensure that Collect! only considers
records belonging to the Client or
Client # you have specified.
 WARNING: If this switch is OFF and the Client
and Client # fields are BLANK,
then the incoming data will be
associated to the FIRST CLIENT
in your list!
WARNING: If this switch is OFF and the Client
and Client # fields are BLANK,
then the incoming data will be
associated to the FIRST CLIENT
in your list!
Save Skips To File
By default, when the "Log Skipped Record to File" is checked
on the Import Field Specification record, the logged data is
written to the Collect! Application Log.
Check this box to save the data to a file instead of the
Application Log. The "impskip" file is uniquely named with
a date and time stamp {impskip-YYMMDD-hhmmss.txt}
and stored in your Collect\import\impskip\ directory.
For example, Collect\import\impskip-091201-123027.txt
If the exact {impskip-YYMMDD-hhmmss.txt}
filename already exists, then Collect! will use
the {impskip-YYMMDD-hhmmss-#.txt} format
and increment the # until it can create a
unique filename.
For example, Collect\import\impskip-091201-123027-2.txt
If the Collect\import\imskip folder cannot be
created, then Collect! will store the "impskip"
files in the Collect\bin folder.
Utility Report
When an import finishes, you can specify a report to run for
post-import processes. The report must be start on anywhere
and not rely on a tagged list.
You can use this option to run a complex account
distribution routine on your accounts.
Apply Client Settings
When switched ON with a check mark, the
client settings will be applied to newly imported
debtors just as they are when the debtors are
created manually. For example, Client Sales ID,
Operator ID, Currency, Commission Rate, as well
as other settings, are applied to new debtors as
they are imported.
Include Transaction Posting
This option is used on conjunction with Apply Client Settings.
Switch this ON to invoke the automated transaction posting for
Client Fees, Debtor Fees, Principal Creation (which means you
don't have to create a Transaction record in the import map to
import the 196 Transaction), Add Commission to Owing (Bill
Commission to Debtor), and Judgment Transactions if you are
importing Judgments as new debtors.
WARNING: For the assignment fields, please ensure that you
have selected the fields from the Financial Summary Totals
form that are prefixed with "Original." Judgement fields
should come from the Principal Detail form.
Fixed Client Fee
This is a fixed charge that is loaded into the account's Fixed
Fee field in the Client Settings form. Collect! does not currently
use this for financial calculations.
To post a charge that will be used in financials,
you should create a transaction type with
'Use Dollar Amounts' on, and enter the amount
of the fee. Then, create a contact plan that
contains a contact of type Transaction, and
reference the transaction that posts the fee.
Interest Rate
The interest rate is used to automatically calculate interest on
the account if the Debtor's 'Charged' date (also called the
Incurred or Write-off date) is also imported.
Interest is calculated, assuming the interest rate is annual,
based on the number of days since the Interest Date. If
you tell Import to import the Interest Rate field, the value
you set here will only be used if the Interest Rate field imported
is blank. Otherwise, the imported Interest Rate value will be used.
Commission Rate
Commission Rate is used to calculate commission for payments
from accounts. You can enter a value here if you want to apply
it to all the records that you are importing.
To recalculate imported transactions automatically
and post the commission amount, switch ON 'Use
transaction type - Before' or 'Use transaction
type - After'.
If your import map brings in a Commission Rate from the incoming
data or has a default set in the Field Specification for Commission
Rate, then that will be used instead of this value.
Assign Accounts To Operator
This is the ID code of the collector to whom these accounts
should be assigned. Press F2 to pick from the Operator list.
If you tell Import to import the Collector field, the value you set
here will be used only if the Collector field imported is blank.
Otherwise, the imported Collector value will be used.
Run Plan On New Accounts
The contact plan will be run on each Debtor imported. You
will be prompted after the import runs and before the
contact plan is run.
To pick from your list of contact plans, press F2.
To create a new contact plan, press F2 and then F3
to add a new contact plan in the list.
Run Plan On Updated Accounts
This Contact Plan will be run after Collect! imports all data
to existing accounts.
Since contact plans can contain conditional
processing (based on field values in the database)
you can embed quite a bit of intelligence into the
processing of incoming accounts. This eliminates
human error and increases efficiency.
OK
Selecting this button will save any data you have
entered and return you to the previous form.
Cancel
Select this button to ignore any changes you may
have made and then return to the previous form.
Help
Press this button for help on the Import Options
dialog and links to related topics.
Import Date Options Form
Click Here to View this Form.
Click Here to Close this Form.
This form defines the format of date fields. Choose from the
available formats. You do not need to fill this in if you are
using the default format of MM/DD/YY. This setting applies
to all dates imported from the incoming file.
If you import or export a file with multiple date formats,
you will need to press the Date Options button on the
Import Field Specification form for individual fields. This will
bring up the Import Field Date Format dialog where you can
set the format for a particular date field.
Please bear in mind that what you see in a spreadsheet may not
be the actual layout of your dates. To see the actual layout,
open your file in a text editor, such as Notepad.
When you have determined the actual layout of the dates
that you are importing, select the option below that matches
your file's date format.
Dates will be converted into the Collect! internal date format
as they are imported. Then they will be displayed correctly
in accounts, contacts, transactions etc. However, they must be
read correctly from the file as the import is being run, so your choices
below must accurately reflect the format of the date as it appears
in the file you are importing.
Import Date Options
By default, dates are MM/DD/YY.
MDY - Month/Day/Year
Radio button: MDY - Month/Day/Year
This is MonthDayYear
If you determine that the actual layout of the dates give n
in the imported file is in the format MDY,
For example:
Date: April 9, 2001
Formatted as 04/09/2001 04/09/01 04092001
Then select the MDY - Month/Day/Year radio button.
YMD - Year/Month/Day
Radio button: YMD - Year/Month/Day
This is YearMonthDay
If you determine that the actual layout of the dates given
in the imported file is in the format YMD,
For example:
Date: April 9, 2001
Formatted as 2001/04/09 01/04/09 20010409
Then select the YMD - Year/Month/Day radio button.
DMY - Day/Month/Year
Radio button: DMY - Day/Month/Year
This is DayMonthYear
If you determine that the actual layout of the dates given
in the imported file is in the format DMY,
For example:
Date: April 9, 2001
Formatted as 09/04/2001 09/04/01 09042001
Then select the DMY - Day/Month/Year radio button.
YYYYDDD - Year/Day
Radio button: YYYYddd - Year/Day
This is YearDayofYear
If you determine that the actual layout of the dates given
in the imported file is in the format YYYYddd,
For example:
Date: April 9, 2001
Formatted as 2001/99 200199
Then select the YYYYddd - Year/Day radio button.
Please note that ddd or DayofYear indicates the actual
numeric value of the day in the whole year. In the example,
April 9th is actually the 99th day of the whole calendar
year of 365 days.
Ddd - Day Of Year
Radio button: ddd - Day of Year
This is DayofYear
If you determine that the actual layout of the dates given
in the imported file is in the format ddd,
For example:
Date: April 9, 2001
Formatted as 99
Ddmmmyy
Radio button: DDMMMYY
This is Day-TextMonth-Year.
If you determine that the actual layout of the dates given
in the imported file is in the format DDMMMYY,
For example:
Date: April 9, 2001
Formatted as 09APR01
Then select the DDMMMYY radio button.
Please note that date separators can be used and years can be
4 digits.
WARNING: The text values for the months must be the same as the
regional settings in your Windows Control Panel setup.
For example, English US would be: JAN, FEB, MAR, APR,
MAY, JUN, JUL, AUG, SEP, OCT, NOV, DEC.
Then select the ddd - Day of Year radio button.
Please note that ddd or DayofYear indicates the actual
numeric value of the day in the whole year. In the example,
April 9th is actually the 99th day of the whole calendar
year of 365 days.
Custom Date Separator
You must inform Collect! that the date format includes
a date separator. The default value is /.
Sometimes different systems use different formats.
For example:
Date: April 9, 2001
Formatted as 04/09/2001 or 04.09.2001 or 04-09-2001
Enter the date separator in this field as /
or . or - as per examples above.
Day Leading Zero
(05 VS. 5)
Check this check box if the date segment in the import file
has pre-appended a 0 if the day is a single figure. Do not
trust the display in a spreadsheet as this often removes
leading zeroes. To determine the actual layout, it is necessary
to view your file in a text editor, such as Notepad.
For example:
Date: April 9, 2001
Formatted as 04/09/2001
Leave this check box blank if the date segment in the import file
has NO pre-appended 0 to the day with a single digit.
For example:
Date: April 9, 2001
Formatted as 4/9/2001
Month Leading Zero
(03 VS. 3)
Check this check box if the date segment in the import file
has pre-appended a 0 if the month is a single figure. Do not
trust the display in a spreadsheet as this often removes
leading zeroes. To determine the actual layout, it is necessary
to view your file in a text editor, such as Notepad.
For example:
Date: April 9, 2001
Formatted as 04/09/2001
Leave this check box blank if the date segment in the import file
has NO pre-appended 0 to the month with a single digit.
For example:
Date: April 9, 2001
Formatted as 4/9/2001
Century
(1995 VS. 95)
Check this check box if the date segment in the import file
has the century in a long format. Do not trust the display in a
spreadsheet as this often reformats dates as it displays them.
To determine the actual layout, it is necessary to view your file
in a text editor, such as Notepad.
For example:
Date: April 9, 2001
Formatted as 04/09/2001
Leave this check box blank if the date segment in the import file
has the century in a short 2 digit format.
For example:
Date: April 9, 2001
Formatted as 04/09/01
No Separator
Check this check box if there is NO SEPARATOR at all in
the date segment in the import file. Do not trust the display in a
spreadsheet as this often reformats dates as it displays them.
To determine the actual layout, it is necessary to view your file
in a text editor, such as Notepad.
For example:
Date: April 9, 2001
Formatted as 04092001 040901
This will inform Collect! not to look for a separator
in the date segment.
Help
Press this button for help on the Import Date Options
dialog and links to related topics.
Cancel
Select this button to ignore any changes you may
have made and then return to the previous form.
OK
Selecting this button will save any data you have
entered and return you to the previous form.
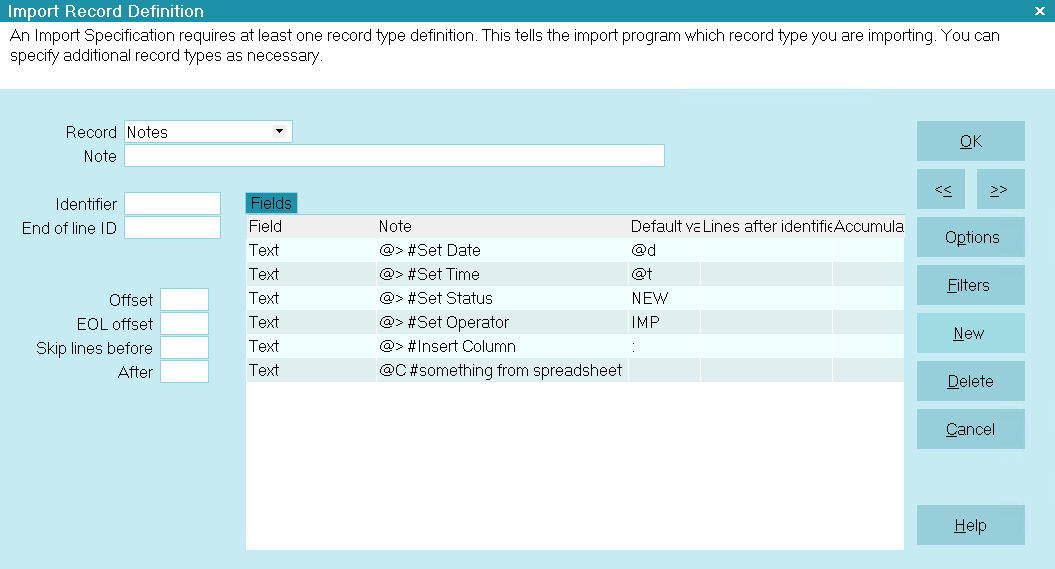
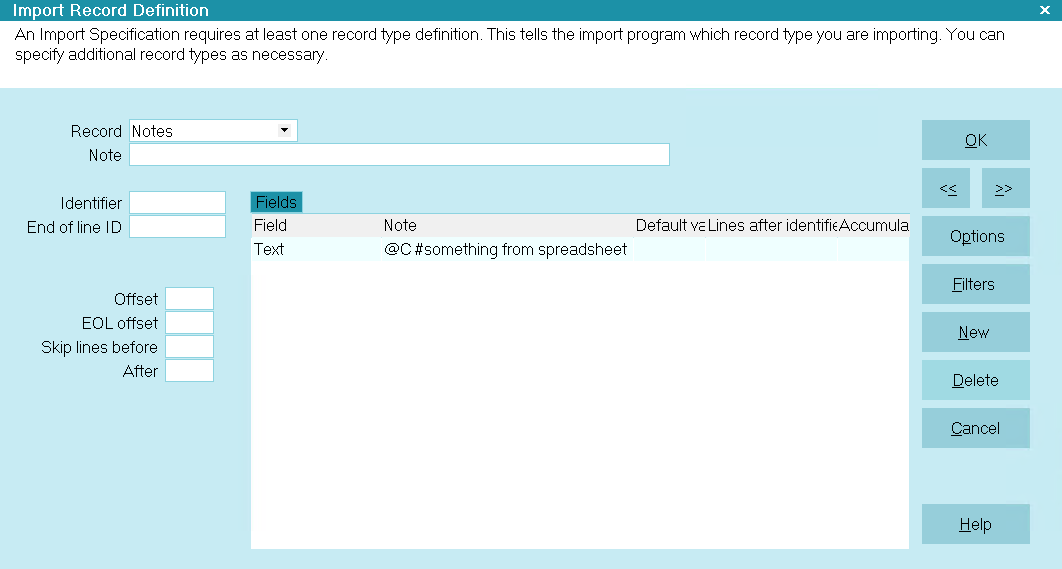
Import Record Definition Form
Click Here to View this Form.
Click Here to Close this Form.
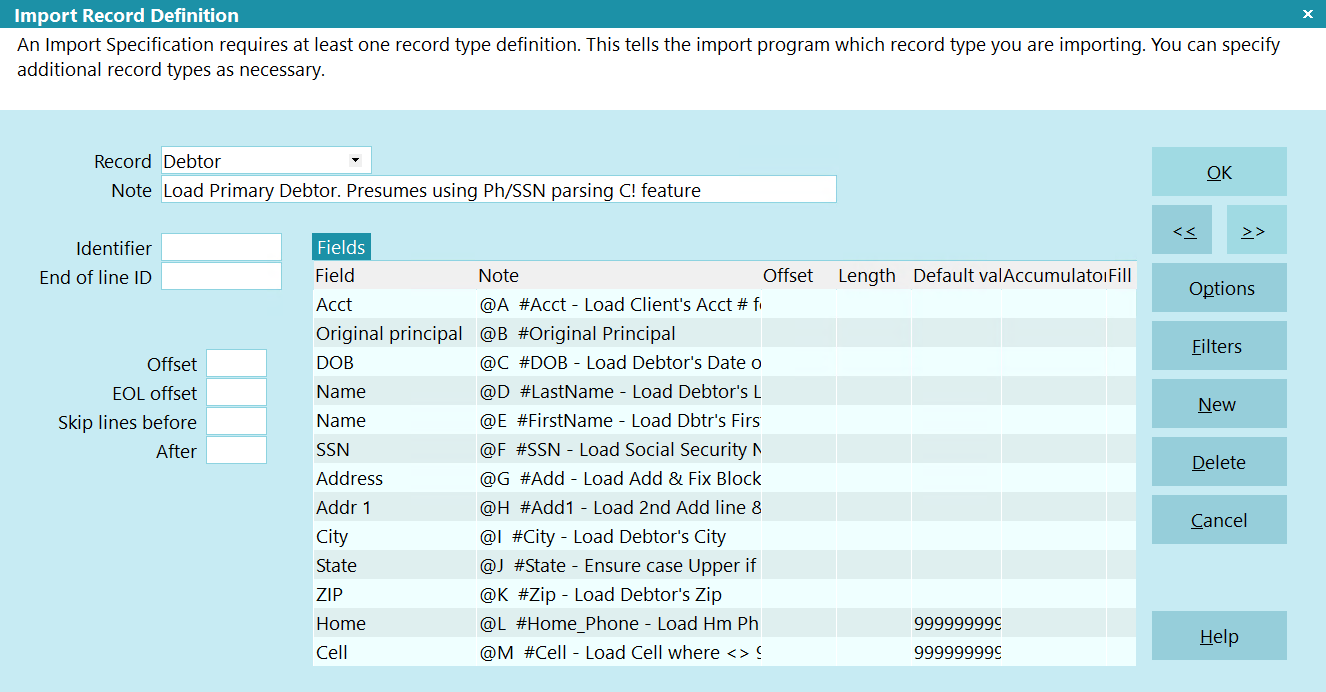
An Import Specification requires at least one record type definition.
This tells the import program which record type you are importing.
You can specify additional record types as necessary.
Multiple record types are often used when working with Collect!
interoffice files, and in some more complex imports from large
institutions.
Within each record definition, you specify the fields to be loaded
into the record. Each field can have various attributes on importing,
and you can set conditionals, default values, multiplication factors
and other useful details.
Import Record Definition
Record
Press F2 to pick from the list of available record types.
Typically, you will import only one record type at a time.
Most likely, this will be the Debtor record, but you can also
import transactions, contacts and notes.
The records will be attached to the correct Debtor, provided
that you have included a key identifier (such as the Debtor's
name) with the contact, transaction or note record being
imported.
WARNING: Do not change record types after you
have defined fields. This will cause the import
to fail if you try to run it.
Note
This is for your use.
Identifier
This is used in conjunction with the Import Field Specification
form field, Lines After Identifier.
Use this to trigger importing the current record type. The record
will only be imported if this identifier is found in the file you import.
This is usually used in fixed length files. You specify the offset
from the left margin, and the size of the identifier. In comma
delimited files, the first field is assumed to be the record identifier.
When you specify an identifier, Import will skip any lines that don't
have that identifier at that location in the line read from the import
data file. When the identifier is found on a line, Import starts loading
the fields specified in the import record definition.
Each field can be on the same line as the identifier, or it could
be one or more lines below the identifier. This feature lets you
import from a wide variety of files, including files that were
originally designed as printed reports. Use the Lines After Identifier
field on the Import Field Specification form.
If you are importing multiple record types, there should be a record
identifier on each line to tell the system which record type the
line pertains to. However, in some cases (some note files, for
instance) it is not necessary.
In the Collect! Inter Office file format, record types are identified
on the first field of each line.
End Of Line ID
This is the identifier used to mark the end of a specific record type
started by the Identifier field.
Offset
This indicates that the record Identifier begins on the nth
character of the line. This is used only for Fixed Length
format files. Note that the first character on the line is offset 0.
EOL Offset
This indicates that the End Of Line identifier begins on the nth
character of the line. This is used only for Fixed Length
format files. Note that the first character on the line is offset 0.
Length
This indicates the length in characters of the record identifier. It
is used only on Fixed Length format files.
Skip Lines Before
This tells the import that the identifier is located n lines above the
actual data being imported. This will typically be used when
defining formats for reports generated by external accounting
programs.
After
This tells Import to skip n lines after the record has been imported
before it attempts to import another record. Typically, it is used as
above.
Options
Selecting this displays the Import Record Options form where
you can set additional key values for fixed length file importing and
exporting. Press F1 when the form is displayed for more details.
Filters
Selecting this OPENS the EXPORT FILTER FORM for the
highlighted line in the list of export filters. You can
review what you had previously set up and make any
modifications if desired.
Fields
The list of Import Field Specifications list contains the fields being
imported on this line. Press F5 to display the Import Field Specification
form for the currently selected item in the list.
To fill a field with a fixed value when you Import, check
the Default Value field in the Import Field Specification.
Order Of Field Types
The order of the field types may be important, depending on the
type of file you are importing. For instance, a *.csv file has a very
particular ordering of fields, whereas a comma-delimited text file
can be scanned in any order necessary.
Help
Press this button for help on the Import Record Definition
form and links to related topics.
Delete
Select this to delete the record definition that
is displayed. You will be prompted to confirm
the delete process.
New
Select this to display a blank form where you can
enter another record definition for this import.
Cancel
Select this button to ignore any changes you may
have made and then return to the previous form.
OK
Selecting this button will save any data you have
entered and return you to the previous form.
<<
Selecting this button will take you back
to another record.
>>
Selecting this button will take you forward
to another record.
Import Field Specification Form
Click Here to View this Form.
Click Here to Close this Form.
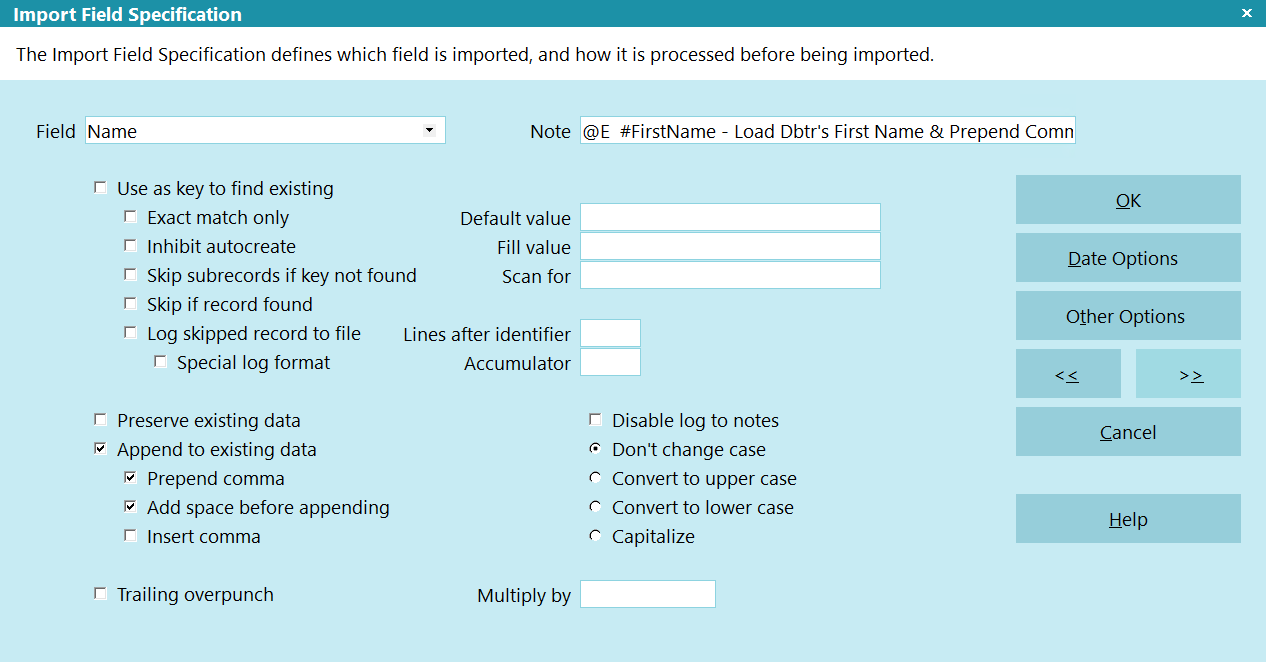
The Import Field Specification defines which field is
imported, and how it is processed before being imported.
For example, you can use a field as a key, to check for
existing records and avoid duplication.
You could specify that a field is required, so that no new
record is created unless the field contains some data. You
can also append incoming data into a single field in the database.
Numerous options are available that provide significant flexibility
for importing.
For each record type, you must specify the fields imported. When
you pick a Record in the Import Record definition form, you will
have to tell Import which fields from that Record Type are on the
line being read in, and where they are.
Import Field Specification
Field
Pick from the list of fields belonging to
the Record Type you are importing.
To skip a field in CSV files, leave the field
blank. The field imported will be skipped.
If you enter a default value when exporting,
you don't need to specify a field. The default
value will be sent to the export file.
Exercise care to choose the correct field
name in the list. In some record type
field lists, there may be multiple fields
with the same name. Example: in the Debtor
Record there is a Driver's License field
intended to hold the entire DL # for the debtor
which appears first in the fields to choose
from. Further down in the list of fields,
a second "DL" is referenced and this one is
a 1 character field belonging to the
Group Member fields to indicate by a check
box being ON or OFF for cascade field
sharing.
Use AS Key To Find Existing
This switch allows Import to test whether a record already exists.
If the record already exists in the database, imported data will
update existing data unless the "Preserve Existing Data" is
set for a field.
If the record does not already exist, it will be created, and field
values will be filled in from the imported data or default values.
If Inhibit Auto-create is switched on, the record will not be created.
The "Use as key to find existing" switch can be set for any
number of the fields being imported. This allows us to perform
complex comparisons.
WARNING: For numeric fields like File Number or UID, this box will
likely perform an exact match as the database indexes are
sorted numerically. If you use the 'Use key to find existing'
on a text field like Acct or SSN, then Collect! will likely
do a partial match search. For example, if the lookup value
in the data file is 'ABC123' and Collect! encounters 'ABC123456'
in the database, it will consider it a match. In order to key
on an exact match, select the 'Exact match only' box.
For example, we may be importing transactions and want to
ensure that we don't create duplicate transactions. We would
then set the "Use as key to find existing" and/or "Exact match only"
switch on the transaction date, type and amount fields. This would cause
Import to first check if a transaction record exists which contains
identical date AND type AND amounts. If it finds one with those
matching fields, it will not add the transaction in the import file
to the database.
If, however, no transaction record with those specific fields is
found, a new transaction will be created in the database, which
contains the information in the imported record. If Inhibit
Auto-create is switched on, the record will not be created.
Fields from related records do not need to have
this switch set. It searches for matching owner
records automatically.
Exact Match Only
This switch allows Import to test whether a record already exists.
If the record already exists in the database, imported data will
update existing data unless the "Preserve Existing Data" is
set for a field.
If the record does not already exist, it will be created, and field
values will be filled in from the imported data or default values.
If Inhibit Auto-create is switched on, the record will not be created.
The "Exact match only" switch can be set for any
number of the fields being imported. This allows us to perform
complex comparisons.
This box will do an exact match search in the database where
the "Use as key to find existing" option will only do a partial
match for text fields like Acct or SSN.
Selecting this box will inherently enable the "Use as key to
find existing" box, whether you select that box or not. This
means that all functionality associated with that box will be
inherited by this box. The difference is the exact matching
on the database search.
For example, we may be importing transactions and want to
ensure that we don't create duplicate transactions. We would
then set the "Use as key to find existing" and/or "Exact match only"
switch on the transaction date, type and amount fields. This would cause
Import to first check if a transaction record exists which contains
identical date AND type AND amounts. If it finds one with those
matching fields, it will not add the transaction in the import file
to the database.
If, however, no transaction record with those specific fields is
found, a new transaction will be created in the database, which
contains the information in the imported record. If Inhibit
Auto-create is switched on, the record will not be created.
Fields from related records do not need to have
this switch set. It searches for matching owner
records automatically.
Inhibit Autocreate
If the record does not already exist, it will NOT be created
when the Inhibit Auto-create is switched ON. If you want
a record to be created, and field values filled in from the
imported data or default values, leave this switched OFF.
Skip Subrecords If Key Not Found
Switch this ON to skip sub-records when the debtor doesn't
exist. Then, subsequent record types in the import are
skipped and the import moves on to import the next valid
record. This must be switched ON in the same field
specification that you are using to key on, that is, where you
have also switched ON 'Use as key to find existing' and/or
'Exact match only'.
Skip If Record Found
Switch this ON to skip matching records. Ensure there is
also a check mark in the field labeled 'Use as key to
find existing' and/or 'Exact match only'. Then, if a
matching record is found, it will be skipped.
Log Skipped Record To File
When you put a check mark in this field, if a line of
data in the incoming file is skipped for any reason,
then the line read from the incoming data stream will
be appended to an an entry that is written to the
Collect! Application Log.
To save it to a text file, select the Save Skips
to File box on the Import Options.
Special Log Format
A check mark in this field will cause the impskip.txt
log file format to output debtor information as File
Number, Client Account Number, Owing, Debtor Name.
File Number, Account Number and Name are read from
the Debtor record, and Owing is read from the input file.
If this switch is not ON, the line of data is written to the
log just as it exists in the import file.
Preserve Existing Data
This switch controls whether existing data will be overwritten
by new data read during the import.
If the record already exists in the database, (based on the
Key fields defined for this record), two things can occur. If
the field is not blank in the existing record, the values read
on importing will not overwrite the existing field data. If the
existing field is blank, the imported field data will be loaded
into the record.
Append To Existing Data
This function causes data being read to be appended to an
already loaded field. Data is simply added to the end of
existing data.
This switch is useful for importing into the address fields.
Some systems have City, State and Zip codes in separate
fields. You could append these together into the Address 2
field.
If you also include a Default Value for the
field, the default value will be prepended to
any data imported in this field. Existing data
in the field is overwritten by any default value.
This is needed when importing notes if you are building
the noteline (EX: 01/01/2020 13:00:00 IMP IMP : Text).
New notelines are automatically created and sorted by date.
If a noteline is not imported with a date/time stamp, Collect!
will put the note at the bottom. See Date Options below for
more information on note dates.
Prepend Comma
If the append switch is set, this switch can modify the way data
is appended into fields. This switch causes a comma and then a
space to be added in front of the data being appended. In the
case above, with the address, you would specify the City to be
read directly into the Address 2 field. Then, you would set the
Append To Existing Data and Append Comma switch on both
the State and Zip fields, which also load their data into the
Address 2 field.
Add Space Before Appending
Put a space between fields being appended. If a comma is also
added, put the space after the comma.
Insert Comma
Add a Comma before the first existing space. If the data in the
field does not have a space, then this does not do anything.
You can use the Add Space Before Appending box with EITHER
Prepend Comma or Insert Comma, depending on the data layout
and what you are appending into the field. The Insert Comma
option is typically used in situations where you have data
in a column, that you want to insert a comma in to. For
example "Doe John" in column A.
Note
This is for your own use, or for specifying a column from a CSV file.
For Collect Version 11.3.9 and later the note line may contain a CSV
column reference preceded by the "@" symbol.
For example @A represents Column A from the CSV file.
Alternatively, @1 represents the first column from the CSV file.
Offset
This indicates that the Field begins on the nth character
of the line. This is used only for Fixed Length format files.
Note that the first character on the line is offset 0.
Length
This indicates the length in characters of the Field. It is
only used on Fixed Length format files.
If you are exporting, the number you enter here
is evaluated when you have "Right justify
zero fill" switched ON in the Import Options.
Default Value
Enter a value here to fill the field with the text that
you entered.
If you specify a default value for a field that exists in the
file being imported, the default value will override the
imported value, including when you have 'Use
transaction type' settings switched ON in the
Import Options.
If the field does not exist in the file being imported, you
must ensure that you add the field you want filled with
a default value to the end of the list of fields being
imported.
To empty the field during importing, set the default value
to @.
If you turn ON the 'Append To Existing Data'
switch when you have a default value, this
causes the default value to be prepended to
any imported data.
If the text in the default value starts with an "x"
you will have to use the ASCII HEX codes for
your default value.
For Example: Xray should be put in as: x58x72x61x79
For Example: xray should be put in as: x78x72x61x79
For Example: x201 should be put in as: x78x32x30x31
When exporting, the default value is exported to the file.
Comparing Data
You can put a value into the Default Value field and use
that to 'compare' with the incoming data stream. This
comparison works with numeric, text and database field
codes. For example, you might want a value equal to 100
or equal to @de.pr. A text value is compared simply as
an ASCII value. 'z' is greater than 'a', for instance.
Select the OTHER OPTIONS button to set the
comparison in the Import Field Options form.
You may want to set other switches to tell Collect!
what to do during the 'compare' process. For
example, "Use as key to find existing" and/or
"Exact match only", and "Skip sub-records if
key not found" should be switched ON if you
want Collect! to skip the record when the
'compare' fails.
Fill Value
Enter a value into the Fill Value field. This is done when you
want to set a conditional compare with the Default value, and
based on the result of that compare, load some data into a field.
Normally, any value entered into the Default Value field is loaded
into the field either on importing or is transmitted when exporting.
However, this model breaks down when you want to test on a
condition and import or export some piece of data that is not the
same as the compare value.
For example, you might want to export the character 'O' for
accounts with an Owing amount greater than $1.00, and
character 'P' for Paid In Full accounts. You would do this by
creating two export fields, each with $1.00 in the Default Value
field and the appropriate conditional settings set in the
Import Field Options for each case. Then you would enter
an 'O, and a 'P' in the Fill Value field for each of the field
specifications.
You can use printable field specifiers (used to
pull database information into reports) in the
Fill Value field to export data from records
related to the current record. For example,
imagine that you want to export the
Client Name when the current record being
exported is a Transaction record. You
could enter @cl.na into the
Fill Value field, and immediately the Client
Name is exported.
You must make sure the appropriate record
is current.
Scan For
The Scan For field offers the full capabilities of the C language
scanf function to parse imported and exported text.
You can use this function to perform pattern matching, sub-string
extraction, and other functions.
Refer to How to Use Scanf for more information.
Scan For only supports 1 return result. If you try to load
more than one result into a field, Collect! will provide the
below message indicating the Record Definition and
Field that need to be corrected.
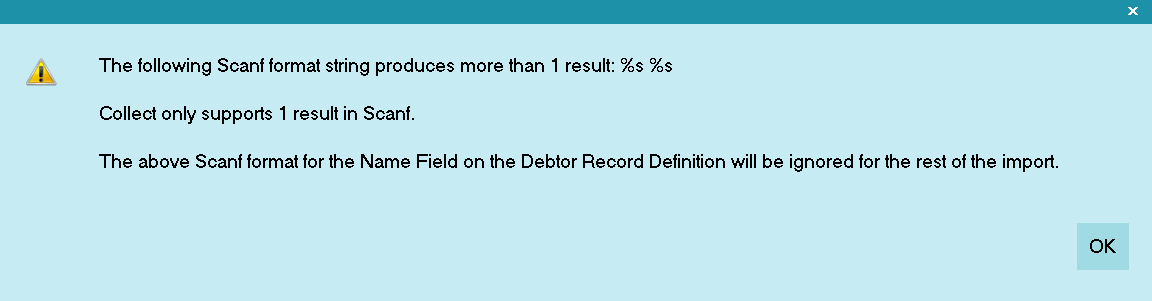
ScanF Message
Lines After Identifier
This is used in conjunction with the Identifier field in the
Import Record Definition form. You may have a record whose
data is spread over several lines in the file being imported.
Here, you specify the line number (after the identifier) on which
the field data appears.
Fields should be listed on a line by line basis.
In other words, list data fields on the same line as the Identifier
(if any) first. Their "Lines After Identifier" field would be blank,
representing 0 lines after the ID. Then, list those one line below
(Lines after = 1), then those fields two lines below, and so on.
Accumulator
The accumulator field specifies where to total the count and
value (if it is numeric) of the field being imported or exported.
Enter a number from 1 to 20 to have the information about
this field totaled in the Accumulator record. The number you
enter is the number of the line item in the accumulator record
where the information will be stored.
This must be defined by you in the
Accumulator form before you reference it.
When importing, you can use this to verify total counts, dollar
amounts and other checks. When exporting, you can total the
counts and values of information exported, then place the totals
at the top or bottom of the file exported.
Disable Log To Notes
Switch this ON to disable the logging of field changes to notes.
The option only applies to fields that support and have the
Log to Notes option enabled in the Access Rights.
Case Conversions
Import can automatically convert field text into upper or lower case,
and even capitalize words. Leaving all of these switches blank by
default ignores any potential case conversions.
Don't Change Case
Choose this option to import or export data AS IS with no
case conversion.
Convert To Upper Case
Choose this option to convert all data to upper case as it
is imported or exported.
Convert To Lower Case
Choose this option to convert all data to lower case as it
is imported or exported.
Capitalize
Choose this option to capitalize the first letter after every
space as data is imported or exported.
This option will also capitalize the first letter after a
hyphen (-) or apostrophe (').
Trailing Overpunch
This is a data format used by older mainframes to save
space. By using an alpha or curly brace, it is possible to
indicate either positive or negative value for a numeric
and also to give the last digit in the numeric - using only
one character instead of two.
{ = +0
A = +1
B = +2
C = +3
D = +4
E = +5
F = +6
G = +7
H = +8
I = +9
Examples:
00155003E = +15500.35
003467{ = +346.70
} = -0
J = -1
K = -2
L = -3
M = -4
N = -5
O = -6
P = -7
Q = -8
R = -9
Examples:
005173K = -517.32
003467} = -346.70
In an actual file these would be in a single string.
For example: 00155003E003467{005173K003467}
This might indicate a Principal Amount of $15500.35
with a Payment of $346.70, Fees totaling $517.32 and
an NSF amount of $346.70.
Multiply By
This value is used to multiply incoming numeric values. A typical
use for this is importing from systems which specify percentages as
fractional numbers. For example, 18% would come into Import
as '0.18'. Collect!, however, requires '18.0'. We would, therefore, use
Multiply By 100 in this case, and the '0.18' would be stored as '18'.
Date Options
Selecting this opens the Import Field Date Format form
where you can choose how you want dates represented
for this field. You can choose a format and Collect! will
convert dates to the format you chose.
The format applies only to this specific
field and overrides the date options set
in the Import Date Options form which
sets a format for dates at the record level.
Field level date options are useful when importing or
exporting a file that has different formats for dates in
various fields.
The notes field is considered a text field, so
special steps are required to indicate that you
are importing a date into the notes. Click this
button to open the date options for this field.
Set the date format to match the format in the
data file.
Other Options
Selecting this opens the Import Field Options form where
you can control fields, verify and check values, set a value
to use for comparison and ensure that certain conditions
are met when importing and exporting records.
Ignoring Fields In CSV Files
To ignore a field when importing from a CSV file, simply
create an import field definition record (Field Type). Then,
instead of assigning a database field in the Field box,
simply leave the Field assignment blank. Leaving the
Field box blank causes the Collect! Import to ignore
the field.
Help
Press this button for help on the Import Field Specification
dialog and links to related topics.
Cancel
Select this button to ignore any changes you may
have made and then return to the previous form.
OK
Selecting this button will save any data you have
entered and return you to the previous form.
<<
Selecting this button will take you back
to another record.
>>
Selecting this button will take you forward
to another record.
Import Field Options Form
Click Here to View this Form.
Click Here to Close this Form.
These options control fields on importing and exporting. You can
control, or even cancel, importing a record or field if the correct
values are not read from the file. You can also control exporting
to ensure that only data that matches specific criteria are sent.
If you are wondering which optional switches you should set for a
field, do not set any to start with. Only add additional criteria after
you have a functioning framework. Start small with the first record
and only expand after that is working correctly. It is best practice to
prove each step as you build it. This will eliminate frustration when
applying these switches in complex reports.
For instance, "Must be filled" and "Fail cancels field," you should
accept the defaults unless you really must choose these settings.
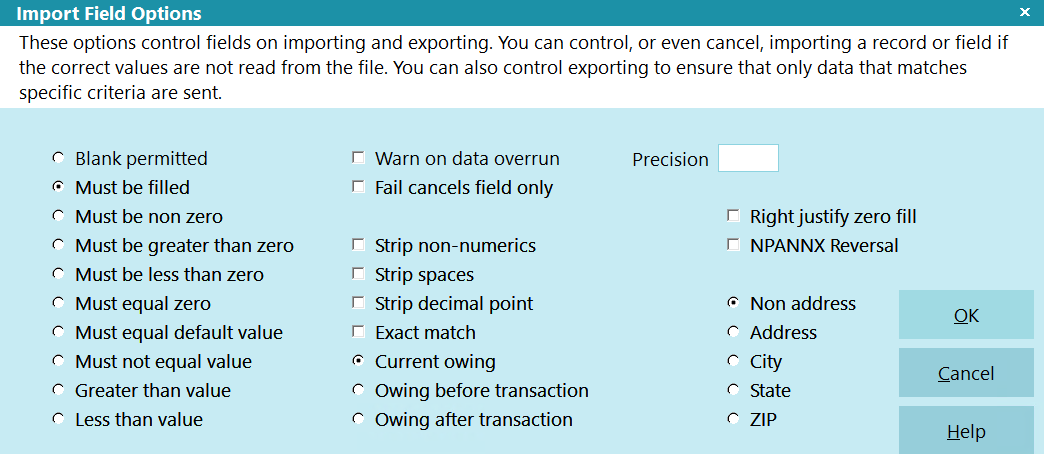
Import Field Options
Matching Field Values
The blank permitted, must be filled and other options control
import and export operations at both the record and field level.
The record will not be imported if the incoming field data does
not match the requirement. The only exception to this is turning
ON the "Fail Cancels Field Only" switch. In this case, the record
will continue loading, but the specific failed field data is not
imported into the record.
Similarly, the export routine examines the data in the record
being exported. If it fails the test, the record is not exported. Or,
if you have set the "Fail Cancels Field Only" switch, the field is
not exported.
Blank Permitted
The record or field will be exported or imported even if
the data is blank.
The "Fail Cancels Field" switch determines if it is the record
or just the particular field that has been canceled.
Must Be Filled
The record or field must have data in it, for it to be imported or
exported. It cannot be blank.
The "Fail Cancels Field" switch determines if it is the record or just
the particular field that has been canceled.
If you select 'Must Equal Default Value' and leave the
Default Value blank, Collect! will treat
that as the same as 'Must be Blank.' Essentially,
the opposite of 'Must be Filled.'
Must Be Non Zero
Numeric fields must have a value for this field or record to be
imported or exported.
The "Fail Cancels Field" switch determines if it is the record or
just the particular field that has been canceled.
Must Be Greater Than Zero
Numeric fields must be a positive value greater than zero
for this field or record to be imported or exported.
The "Fail Cancels Field" switch determines if it is the record or
just the particular field that has been canceled.
Must Be Less Than Zero
Numeric fields must be a negative value greater than zero
for this field or record to be imported or exported.
The "Fail Cancels Field" switch determines if it is the record or
just the particular field that has been canceled.
Must Equal Zero
Numeric fields must equal zero for this field or record to be
imported or exported.
The "Fail Cancels Field" switch determines if it is the record or
just the particular field that has been canceled.
Must Equal Default Value
Data in the field being imported or exported must
be equal to the value you entered into the
import field specification "Default Value" field.
This comparison works with numeric, text and
database field codes. For example, you might
want a value equal to 100 or equal to @de.pr.
A text value is compared simply as an ASCII
value. 'z' is greater than 'a', for instance.
The "Fail Cancels Field" switch determines if it is
the record or just the particular field that has
been canceled.
If you select this option and leave the
Default Value blank, Collect! will treat
that as the same as 'Must be Blank.' Essentially,
the opposite of 'Must be Filled.'
Must Not Equal Value
Data in the field being imported or exported must
not be equal to the value you entered into the
import field specification "Default Value" field.
This comparison works with numeric, text and
database field codes. For example, you might
want a value not equal to 100 or not equal
to @de.pr. A text value is compared simply as
an ASCII value. 'z' is greater than 'a', for instance.
The "Fail Cancels Field" switch determines if it is
the record or just the particular field that has
been canceled.
Greater Than Value
Data in the field being imported or exported must
be greater than the value you entered into the
import field specification "Default Value" field.
This comparison works with numeric, text and
database field codes. For example, you might
want a value greater than 100 or greater
than @de.pr. A text value is compared simply
as an ASCII value. 'z' is greater than 'a', for instance.
The "Fail Cancels Field" switch determines if it is
the record or just the particular field that has
been canceled.
Less Than Value
Data in the field being imported or exported must
be less than the value you entered into the
import field specification "Default Value" field.
This comparison works with numeric, text and
database field codes. For example, you might
want a value less than 100 or less than @de.pr.
A text value is compared simply as an ASCII
value. 'z' is greater than 'a', for instance.
The "Fail Cancels Field" switch determines if it is
the record or just the particular field that has
been canceled.
Warn On Data Overrun
Switch this ON to prompt when data being imported
or exported is wider than the field.
Fail Cancels Field Only
Normally, when a required field is missing, the whole
record will not be imported. However, when you set this
switch, only the field data will not be imported or
exported. The record will continue to be loaded with
field data.
This switch is useful for filling a single field from one of
a range of places in an import file, depending on which
of the places has actual data.
For example, you can set the operator of an account based on
the principal being loaded. If the principal is less than
$1,000, set the operator to JC, else set the operator to OWN.
Skip Remaining Field References
This works in conjunction with FAIL CANCELS FIELD ONLY.
Fail cancels field only only fails when that field instance
comes up in the import. It does not fail if the same field
is referenced multiple times.
Switch this ON to skip all remaining references to the
referenced field upon the first FAILURE of a condition check
to the Default Value.
For example, let's say that you are trying to exclude importing
a phone number if it is in a certain format ((000) 000-0000 or
000-000-000). You can setup 2 field conditions to skip if the value
is (000 000-0000) or 000-000-0000. As soon as the first matching
condition is NOT found, Collect! will not check the remaining conditions
if this switch is ON.
This option is only available if FAIL CANCELS FIELD ONLY
is selected.
Precision
This field sets the number of digits after the decimal point.
It is used only for floating point numbers.
Strip Non-Numerics
This removes non-numerics from the incoming data for
this field.
If you have switched ON an "Only numerics"
option in the Screen and Messages form,
non-numerics will be stripped from Phone
and/or SSN fields, even when this "Strip
Non-numerics" switch is OFF.
Strip Spaces
This removes spaces from the incoming data for this
field.
Strip Decimal Point
This removes the decimal point and left justifies the field.
It is used only for floating point numbers.
Exact Match
The default behavior for Must Equal Default Value is
Partial Matching, for instance a Default Value of "Test"
would be considered a match to a value of "Tested" in
the data file.
Check this box to force the system to use an exact match
when doing the comparison.
Right Justify Zero Fill
This right justifies the field and fills empty spaces
with zeroes. This only works when EXPORTING data.
Specify a value in the Length field and Collect! will
use this to right justify the data and zero fill to the
length you have specified.
NPANNX Reversal
This option relates to phone numbers. When the system
being imported switches the exchange and area code
portions of the phone number, this option can handle
the reversal.
Current Owing
This switch applies only when you are exporting the
transaction records and are including the Debtor's
Owing or Paid amounts with the transaction.
The Current Owing switch (default) will export the Debtor's
Owing or Paid. This will occur at the time the export is run,
when you are exporting the Owing or Paid fields from the
transaction record.
Owing Before Transaction
This switch applies only when you are exporting the
transaction records and are including the Debtor's Owing
or Paid amounts with the transaction.
The owing before transaction switch will export the
Debtor's Owing or Paid. This will occur before the
transaction is applied to the Debtor. Collect! calculates
this while you export by reviewing historical transactions.
This switch applies only if the field you are exporting
is the Owing or Paid fields in the Transaction record.
Owing After Transaction
This switch applies only when you are exporting the
transaction records and are including the Debtor's
Owing or Paid amounts with the transaction.
The owing after transaction switch will export the
Debtor's Owing or Paid. This will occur after the
transaction is applied to the Debtor. Collect!
calculates this while you export by reviewing
historical transactions.
This switch applies only if the field you are exporting
is the Owing field or Paid field in the Transaction record.
Non Address
This command tells Collect! to ignore address formatting.
Address
This function tells Collect! that you are intentially
importing a Full Address into the Address 1 field
and to not process the City/State/Zip split into the
respective fields.
City
This function exports the City portion of the address.
Please refer to the address formats specified for
credit bureau reporting.
This applies only when you specify the field you are
exporting as one of the address fields.
State
This function exports the State portion of the address.
Please refer to the address formats specified for
credit bureau reporting.
This applies only when you specify the field you are
exporting as one of the address fields.
ZIP
This function exports the Zip or Postal portion of
the address.
Please refer to the address formats specified for
credit bureau reporting.
This applies only when you specify the field you are
exporting as one of the address fields.
Help
Press this button for help on the Import Field Options
dialog and links to related topics.
Cancel
Select this button to ignore any changes you may
have made and then return to the previous form.
OK
Selecting this button will save any data you have
entered and return you to the previous form.
Creating The Import Map - File Format Specification
- Sign into Collect! and stop at the Main Menu. Select File from the top menu bar and a drop-down
list of choices will display. Select Import/Export from the list. A sub-menu of choices will
be displayed.
- From the Import/Export sub-menu, select Customize Import/Export and then select Edit File
Format. This will display a list of import map examples that are already in your database.
- Press F3 or select the NEW button to open a new File Format Specification form to use for our
import map.
- Fill in the Name field.
- The File field is optional. If the file will always be in the same location with the same
filename, you can fill in the path and name here; otherwise, leave blank.
- The Note field is optional and for you reference only.
- Select the Fixed Length, Comma Separated, or Other radio, depending on your data file.
Collect! supports any plain text ASCII file, so if you need to import a file with another
delimiter (; | {TAB}), select the 'Other' radio button and fill in the HEX codes for the
field delimiter. You will also have to fill in the record delimiter (line feed, carriage
return, etc.).
- If your file has multi-lines notes that use use Line Feeds, not
Carriage Returns, then check the CRLF Line Endings box; otherwise,
leave unchecked.
- Select the Import Options button to display the screen control panel where you may make
selections for preferences on how you want the import to pre-treat or post-treat the incoming
data. Key items to select for standard Debtor Imports:
- Client/Number: if this map is for a specific Client
- Apply Client Settings: if you would like the commission and tax information copied to
the Debtors
- Include Transaction Posting: if you are not importing the Transactions as separate
Import Record Definitions and would like the applicable Transactions created automatically
- First Line Contains Labels: if there is a header row in the data file
- Last Line Contains Footer: if there is a footer row in the data file
- Recalculate Accounts: if you are importing interest bearing accounts
- Manage Promises: if you are importing payments
- Use Transaction Type - After: if you are importing Transactions and want the default
information from the Transaction Type record to be populated on the Transaction
- Auto-Create Phone, Email, and Address Records: if you want to automatically create
the sub-records for these record types
Import Options Dialog
- Select the OK button to close the form and return to the File Format Specification form.
File Format Specification Form
- Click the Date Format Options button. Select the default date format and separator. Please
refer to the SETTING DATE FORMATS section above. Click OK.
- Click your mouse in the Import Record Definition sub-form to activate it.
- Click NEW to create a new record.
Creating The Import Map - Import Record Definition
Record Hierarchy
In a Collect! database, records have "owners." This is very important to consider when you are
creating an import routine. Owners are imported before the records that they own. For instance,
Debtors are owned by Clients, so you must create or import a client first. Transactions and Cosigners
are owned by Debtors, so the Debtors must be imported first.
Fill in the Record
- Select the Down arrow next to the field labeled Record. You will see the list
of all types of records that you can import using the import module.
- Choose the first record that you need to import. In most cases this will be
Debtor.
Record Definition Form
- Fixed Length Files:
- Identifier: Enter the Record Identifier (EX: RECORD or ***** in the examples above)
- Offset: If the Identifier is not on the left margin of the file, enter the number
of characters from the left margin where the Identifier starts. Blank means 0.
- The remaining fields and the Options button are too complex for this tutorial.
Please contact Support for more information.
- Click your mouse in the Import Field Specification sub-form to activate it.
- Click NEW to create a new record.
Creating The Import Map - Import Field Specification
We are going to import information into fields in the applicable form. We will need a Field Specification
for each field.
- Select the Down arrow next to the field labeled Field. This will display a list of all the
fields on the record's form that you could include in your import map. Scroll
through the Field Type list and select the field for column A (or the first segment if fixed
length).
WARNING: The list of fields will display all fields on the record AND related
records. For example, the Debtor record will also display fields for Debtor Detail,
Misc, Principal Detail, Financial Summary Totals, and more. Pay special attention to
the value in the Form Name column. Some fields are in the list multiple
times like Name, which appears on the Debtor form and the Group Member Setup form twice.
If you are unsure on which one you should select, go into Collect!, click in to the field
that you want to load the data in to, select the System menu, go to Layout and Languages,
and click Form Properties. This will tell you the Form Name. You should also select
Field Properties under Layout and Languages. This will tell you the actual Field Name without
any Aliases.
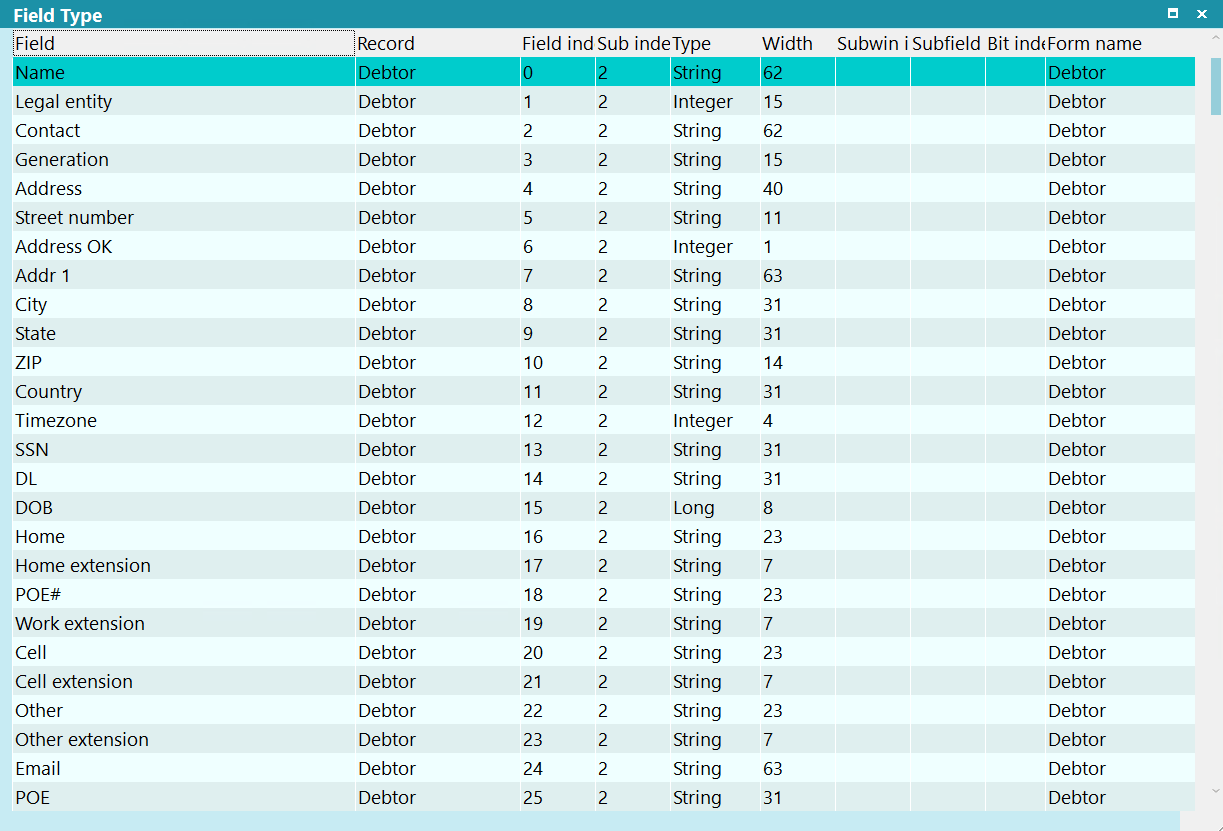
Field Specifications List
- Note:
- Delimited Format without Dynamic Indexing: What you enter here does not get imported. It
is for your reference only. We typically recommend putting in the column letter to make it
easier to read.
- Delimited Format with Dynamic Indexing: Enter the @ symbol followed by the
column letter or number. After that, you can add a # symbol with a comment following it. This
helps to make the file readable.
For Delimited files, Dynamic Indexing is the preferred method (EX: @A #Account Number). Collect!
also support the numeric value (EX: @0 #Account Number).
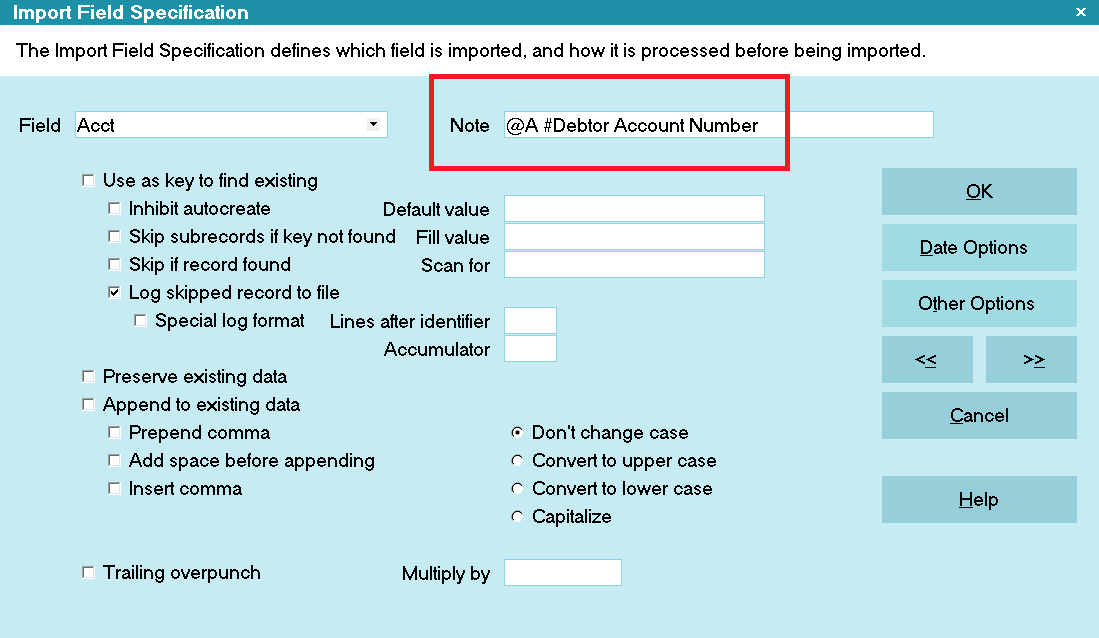
Dynamic CSV Import Indexing
@[space] does not result in any output but allows the user to enter static
data prior to the data being imported.
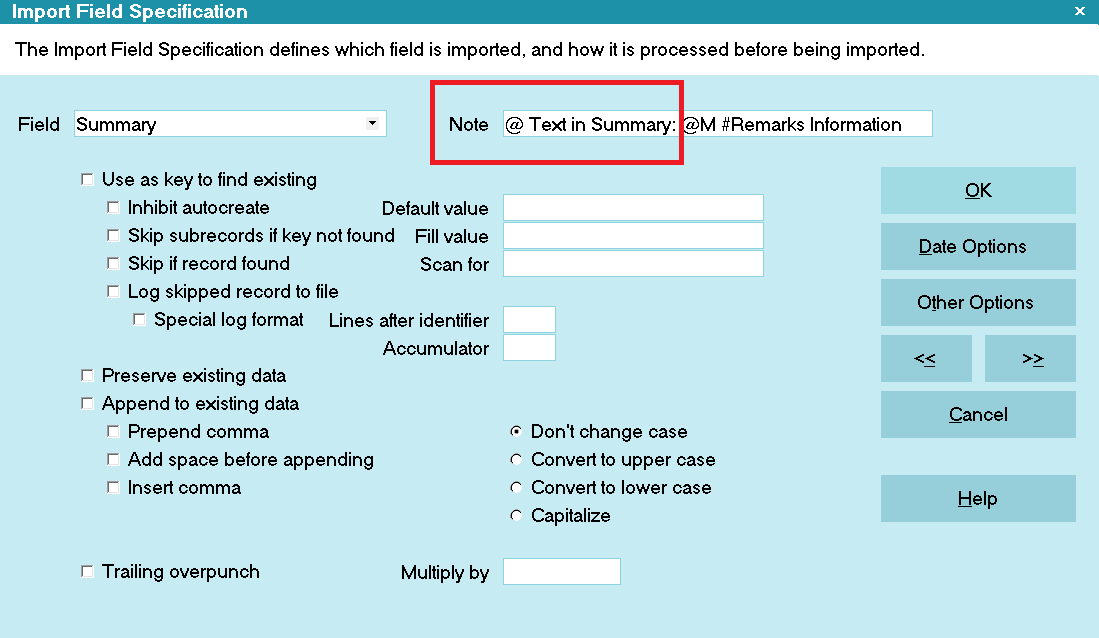
Inserting Static Data Prior to Column Data
The @[>] symbol instructs the CSV parser to advance to the next CSV column
after processing this Dynamic CSV field. You would need to use this if you are placing static
text in the middle of an import, such as Debtor Mode or Address OK.

Forcing Collect! to Read the Next CSV Column
- Fixed Length: What you enter here does not get imported. It is for your reference only.
- Offset: This only applies to Fixed Length files. Enter the number of characters from the left
margin of the file where the data starts. For example, 0 (or blank) means that the data segment
starts on the left side of the file. 7 means that there are 7 characters to the left of the
segment.
- Length: This only applies to Fixed Length files. Enter the number of characters that the segment
is in length. Form example, 40 means that there can be up to 40 characters in the data segment.
Collect! will not import any white-space after the end of the last text character.
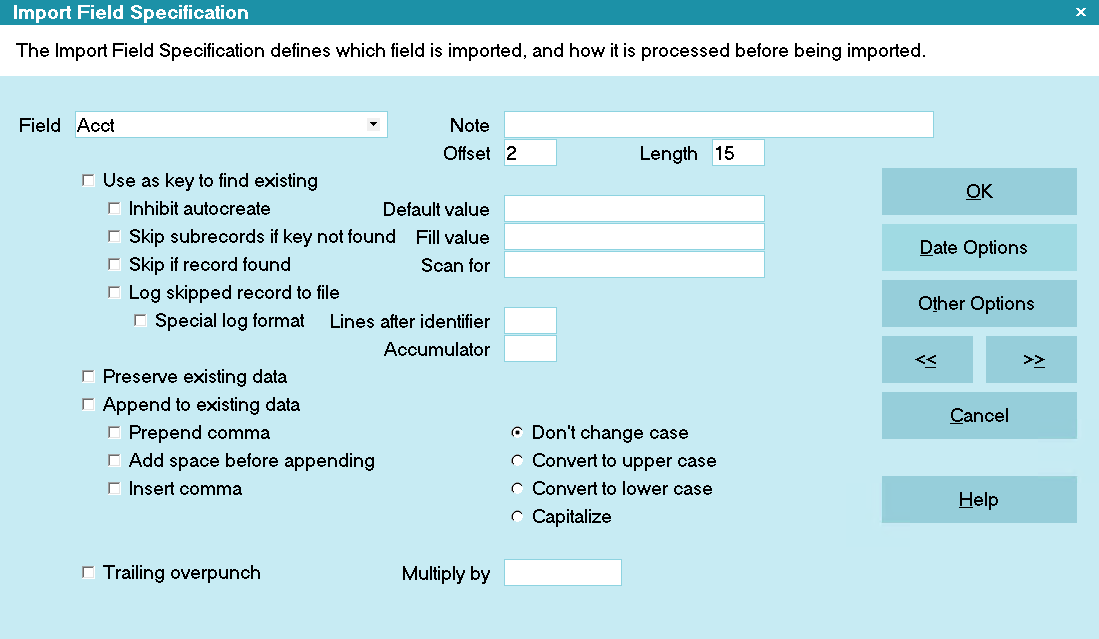
Debtor Acct Field Specification
- Lines After Identifier: This only applies to multi-line Fixed Length files.
Enter the number of lines after the Identifier specified on the Import Record Definition form.
- For the remaining fields, please refer to the Import Field Specification form section above.
Some key fields to be aware of:
- Use Key to Find Existing: This section of fields can be used if you are expecting accounts
to already be in your database. For example, skip trace return files, payment imports, or
dialer results.
- Preserve Existing Data: Don't overwrite data in the field, if it is already populated.
- Disable Log to Notes: If you are overwriting existing data in the field, you can disable
the Log to Notes functionality.
- Append to Existing Data: This section of fields can be used to concatenate multiple columns.
For example, Last Name in column B, then a comma, then a space, then First Name in column C.
- Change Case: This radio selection allows you to indicate the case for text.
- Multiply By: If you are importing Financials and you need to do math on the data, you can
enter a multiplication value here. For example, Principal and other charges need to be entered
in Transactions as negative value, so you can enter -1.000. If your data file has an interest
rate as a decimal (EX: 0.1255), you can enter 100 to convert it into a rate that Collect!
will recognize (EX: 12.55). Please refer to the IMPORTING FINANCIALS section above.
- Default Value and Fill Value: Without any conditional checks, Collect! will populate the data
directly into the field as it is typed. These 2 fields can also be used to do comparisons.
For example, you can put a value in the Default Value field, check the "Must Equal Default
Value" radio on the Import Field Options form, then if the data in the file matched the
value in the Default Value field, then the value in the Fill Value will be written to the
field on the record.
- Scan For: You can use the ScanF functionality to parse data. Please refer to the Help topic
How To Use Scanf for more information.
- Click the Other Options button:
- Conditional Criteria: As already mentioned with the Default Value field, you can use the
bottom 4 radio options to compare against the Default Value field. If true, the value in
the Fill Value will be written to the record. The compare against zero only works for
numeric data. Blank permitted and Must Be filled apply to all data types, but keep in mind
that a value of 0.00 in the data field is still technically filled. Select the applicable
value. Typically, this is left as Blank Permitted. If a condition is set and it fails, the
entire record is skipped, UNLESS you have the Fail Cancels Field Only box checked.
You should set the Must Be Filled on one field in each record that should always be populated.
For example, the Name or Last Name field for Debtor and Cosigners. Or you can set the To Us
field for Transactions to be Must be Non Zero. This will prevent blank records from being
created.
- Fail Cancels Field Only: Check this if you have a condition that you only want to fail
on this field, rather than the whole record.
- Strip Non-Numerics, Spaces, Decimal Point: If you want to remove un-needed characters.
We recommend using the Strip Non-Numerics in conjunction with the Only Numerics in Phone
and SSN fields on the Screen and Messages form. This will allow you to only store the
numeric data in the database, but apply a field mask on the display.
- Refer to the form section above for the remaining fields.
- Click OK to close the form.
- If this field has a different date format than what was specified as the global date format
for the import map, click the Date Options button and set the applicable date format.
- Click OK to return to the Field list.
Instead of clicking OK, you can use Ctrl + N or F3 to save the Import Field Specification and
display a blank form for the next field.
- Repeat the above process for all remaining fields for this record type.
Not all data is in the data file. You can use records with @> in the note field to load
default data like Operator/Sales (if not set in the Client Settings), Status Code,
Address OK, or Interest Details. For fields that are check boxes, use the letter X in
the Default or Fill value field. You can use Printable Information codes. These should
be placed into the Default Value field.
- Once you have finished the remaining fields for this record type, repeat the above process
for any other Import Record Definitions and their Import Field Specifications.
When you have completed the Import Map's Record Definitions, you should have something that looks
like the following.
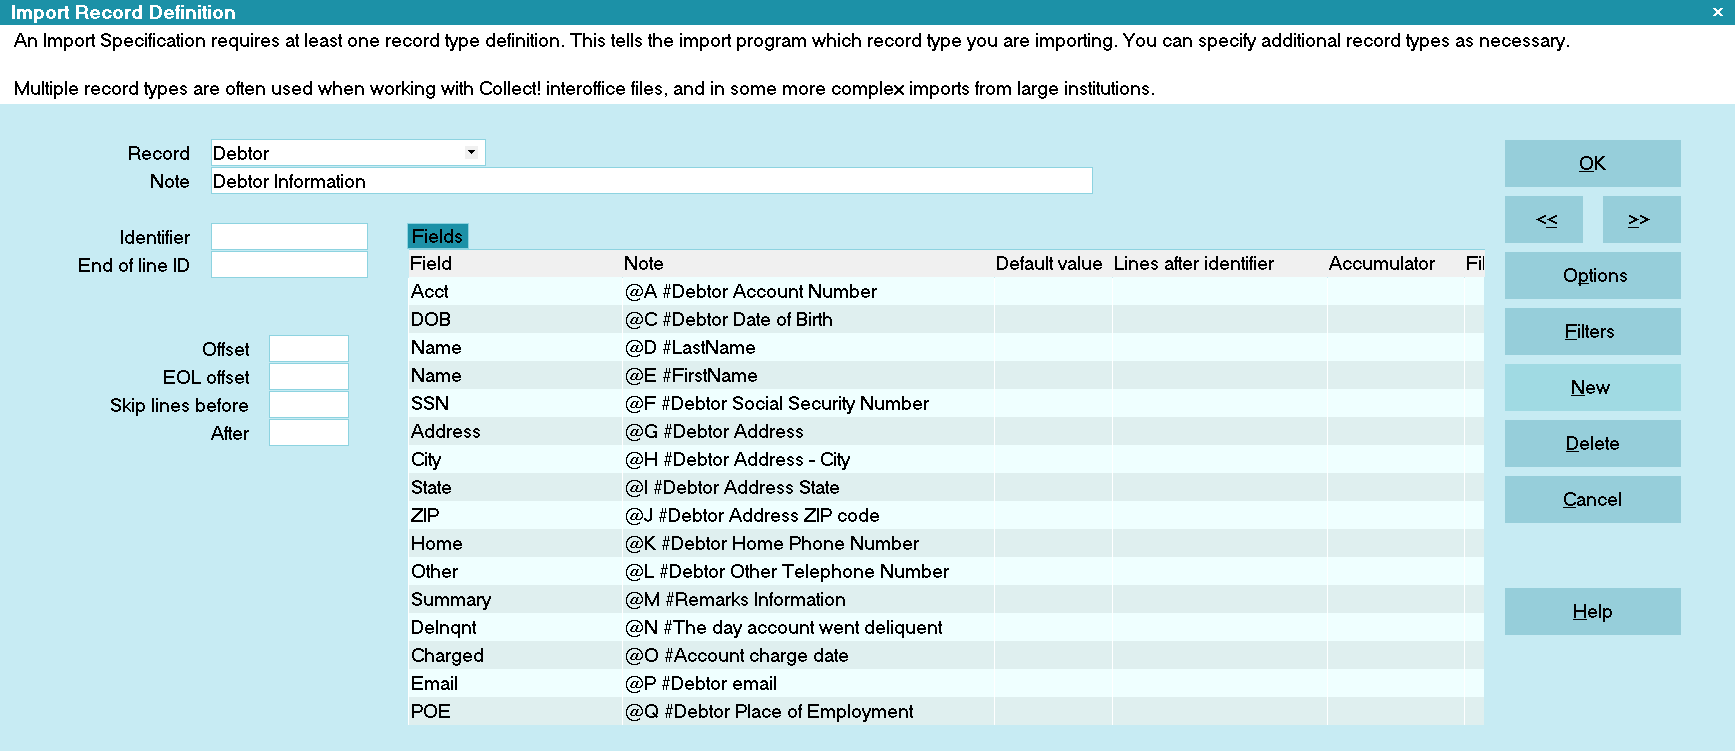
Completed Record
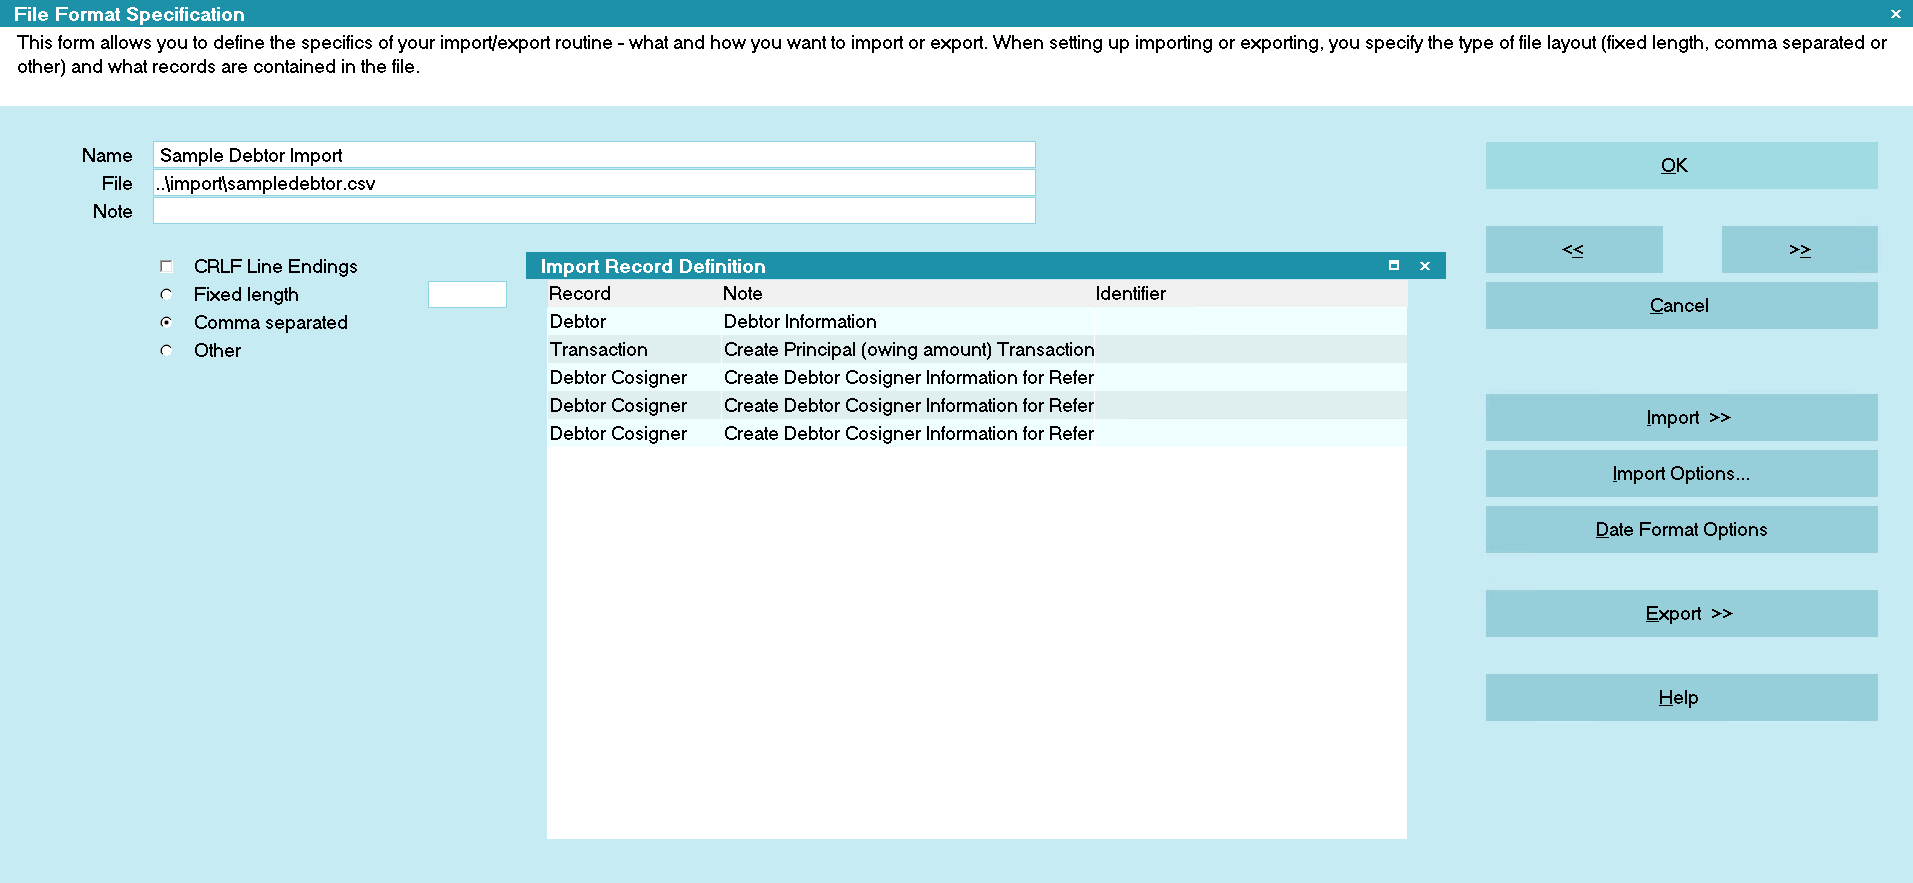
Completed Import Map
Using Keys To Find Existing Records
The Import module has lookup capabilities based on values in the data file or Default Value field.
- In a field that you want to use for data lookup, check the Use as Key to Find Existing box.
If the data is referencing the data file, it will use that value to look up a record; otherwise,
it will use the value in the Default Value field.
You should use a field that is unique like file number, or a combination of field like
Acct and Client Number. Please note that if you select a Client on the Import Options
or Import Menu, it will automatically be used as a key.
- Exact Match Only should only be checked if you want to do an exact match on a Text field.
Numeric fields will always do an exact match. For text fields, if this is not checked,
then Collect! will return the first partial match.
- Inhibit Autocreate should be checked if you are not loading new records, like a payment import,
that way blank records won't be created if the key is not found.
- Skip Subrecords if Key Not Found should be checked in most cases to prevent sub-records, like
Transactions, from being created on random records.
- Skip if Record Found should only be checked if you want to skip an existing record. For example,
you are importing a payment file and you are key on the Transaction ID and want to prevent
duplicate payments from posting.
Check both the Skip Subrecords if Key Not Found and Skip if Record Found to emulate "Skip
Subrecords if Key Found" where you don't want to import sub-records. For example, you don't
want to import Cosigners if the Debtor already existed.
- Log Skipped Record to File can be checked if you want the skipped records to be written to the
Collect! Application Log.
- Repeat for any other fields that you want to use as keys.
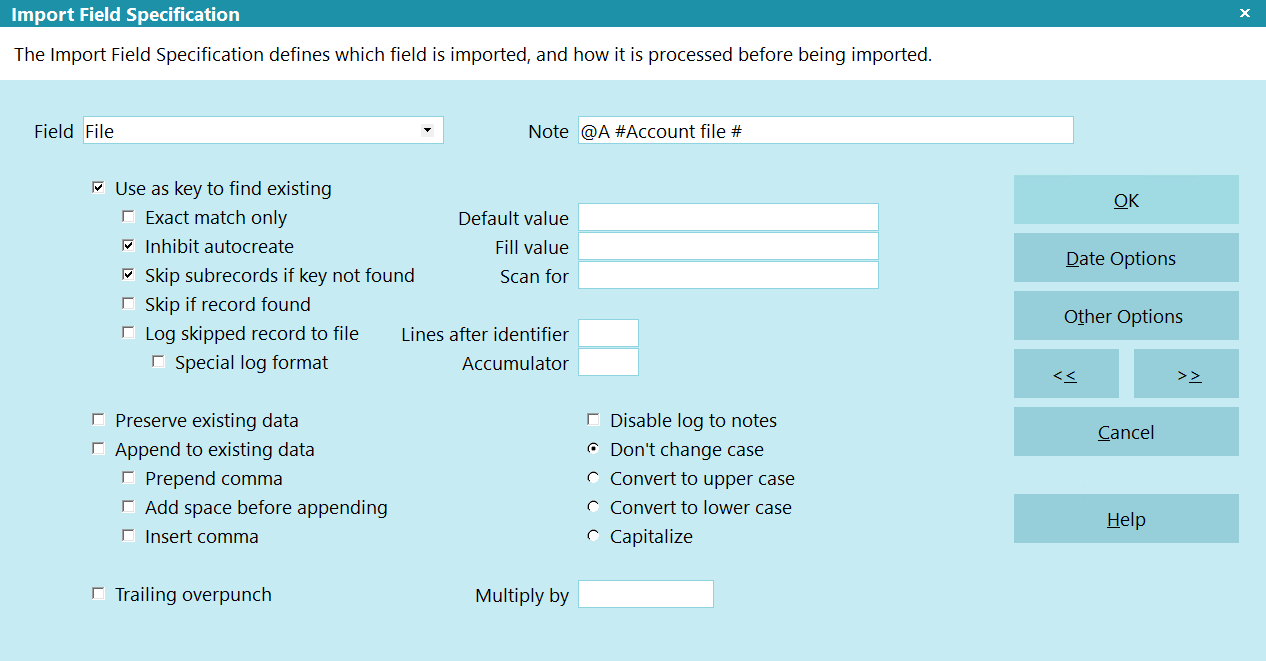
Use Keys to Find Existing
Text Concatenation With Appending
In some cases, like Debtor Name or Notes, you may want concatenate strings from multiple sources into
a single field. You can use the Append to Existing Data section to accomplish this.
Debtor Name Example
- Set the first Import Field Specification record as you normally would to reference the last
name in the data file (EX: column A) and save to the Name field.
- On the second record, which references the first name (EX: column B), check the Append to
Existing Data, Prepend Comma, and Add Space before Appending fields.
The logical process that the import is programmed to do is to store the last name from
column A in the name field. Once saved, the next Import Field Specification is set to append
data. First, a comma is prepended to the data from column B (after the data already in the
field). Then, a space is added before appending (after the comma, before the data from
column B). Finally, the data is imported from column B.
When populating the Name field, Collect! will automatically populate the Contact field, and
vice versa.
Loading First Name
Note Line Example
All notes are imported into the TEXT field. The other fields in the import modules for notes can be
ignored. Each step in the list below represents an Import Field Specification.
- If a date exists in the file, then reference it; otherwise, put @d in the Default Value field,
and put @> in the Note field, if this is a delimited file.
- If a timestamp exists in the file, then reference it; otherwise, put @t in the Default Value
field, and put @> in the Note field, if this is a delimited file. Then check the Append to
Existing Data and Add Space before Appending boxes.
- If a status exists in the file, then reference it; otherwise, put a Status in the Default
Value field, and put @> in the Note field, if this is a delimited file. Then check the
Append to Existing Data and Add Space before Appending boxes.
- If an Operator code exists in the file, then reference it; otherwise, put an Operator code
in the Default Value field, and put @> in the Note field, if this is a delimited file. Then
check the Append to Existing Data and Add Space before Appending boxes.
- Put a : in the Default Value field, and put @> in the Note field, if this is a delimited
file. Then check the Append to Existing Data and Add Space before Appending boxes.
- Reference the applicable data text from the data file. Then check the Append to Existing Data
and Add Space before Appending boxes.
Importing Note Line
Comparing Data With Default Value
There may be cases where you want to read a value from the data file and fill with something else.
Some example include:
- Payment Files that use an identifier like P for purchase, R for return, V for Visa, M for
Mastercard, etc.
- Converting full text states to the abbreviation.
- Status or Operator code conversion from another system to Collect!.
- On the Import Field Specification, enter a value into the Default Value field that you want to
compare to a value in the data file.
- Click the Other Options button.
- Click the Must Equal Default Value radio button.
You can check the Must not Equal Value, Greater than Value, or Less than Value radio options
for those applicable comparisons.
- Check the Fail Cancels Field Only box, IF this comparison is for this field only and should
not stop the entire record.
You would not check the Fail Cancels Field Only box if you are writing a payment import and
used different Import Record Specifications for each Transactions Type.
- If you are doing multiple comparisons, like States, and want to stop when a match is made,
check the Skip Remaining Field References box.
Skip Remaining Field References is primarily used with the Must not Equal value option.
- Click OK.
- Enter a value into the Fill Value field. This will be written to the selected field if the
condition is met.
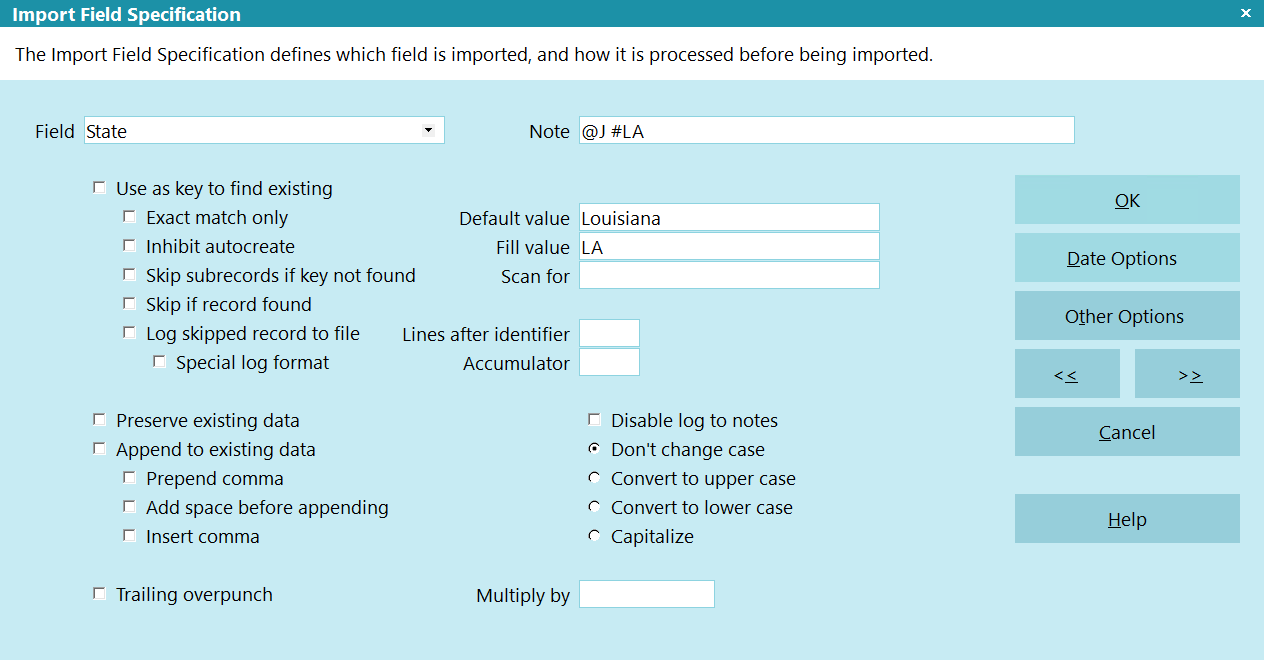
Default Value to Compare Data
Testing The Import Map
If you are running complex imports, you may want to backup your database before running the
import.
Whenever you build an import routine, it is a good idea to test it at various stages. Depending on
the complexity, you can test either when the map is finished or when you have finished an
Import Record Definition.
At various stages below, you will be asked to correct errors, if they exist. After you go back and
correct the errors, repeat the steps below up to where you left off.
Initiate the Import
- Navigate back to the File Format Specification screen.
- Click the Import button (above the Import Options button) to display the Import Menu screen.
- Select the Down arrow next to the field labeled File Format. The File Format Specification
list is displayed.
- Select Import Map that you are working on.
- Review any fields that were auto-populated. If there are any errors, click the CLOSE button
to go back to the map and correct the issues. Possible errors:
- Wrong data in the fields
- Fields were populated that should have been blank (ignore the Starting File Number field)
- Fields were empty that should have been populated
- File Name: If you specified a file name in the Import Map, this will be populated. If you didn't
specify a file name, click the Browse button.
- On the Open Import File dialog box, navigate to the location of the file that you are
importing, then select the file, and click the Open button. Now the file and its location
will be displayed in the field labeled File Name.
- Client/Number: If you specified a Client in the Import Map, this will be populated. If you didn't
specify a client, or the specified client has accounts already, open either Client pick list and
select the Client that you want to run the test import on.
Do not import test accounts in to a live Client. If this is a new client, without accounts,
that is fine, but if it's a client with existing accounts, then we highly recommend using a
TEST Client with the same settings as the live Client.
Not all Imports Maps require you select a Client. For example, if you are importing payment
files, skip trace results, or dialer results, the Import Map should already be setup to
key on a unique identifier like File Number. If your key is on Client Account Number, then
you would select a Client to create a combined key for the lookup.
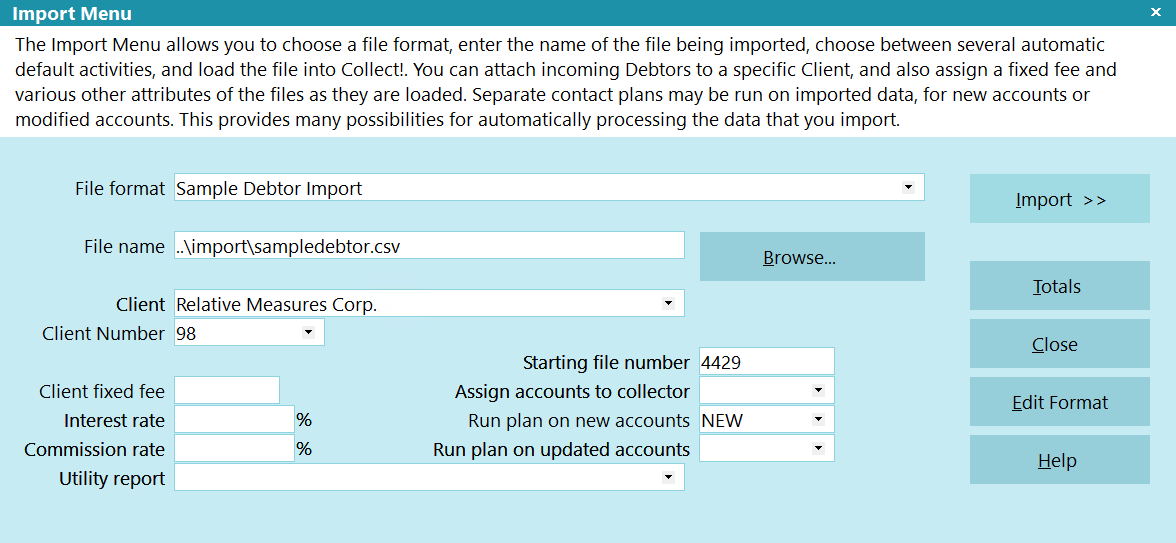
Import Menu Settings
- Select the Import button. You will see the first record that is being imported.
When you run an import, you will get the following prompt asking if you want to disable
record tagging. Select NO if you plan to run batch processing or recalc after the accounts
are imported.
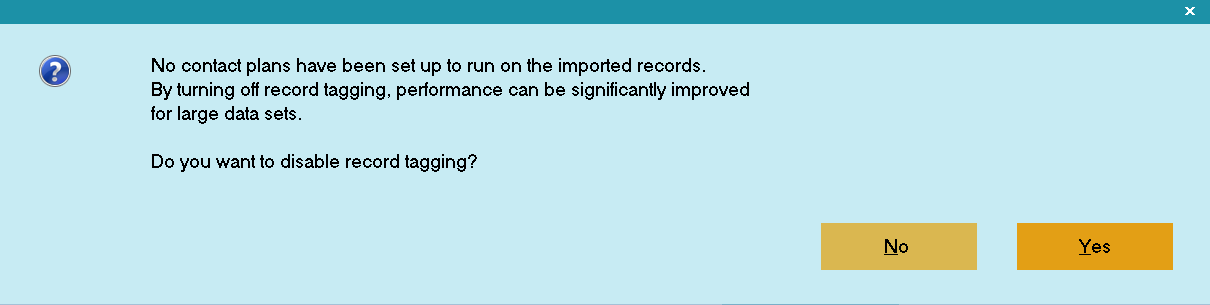
Disable Record Tagging
Examining Records as They are Imported
When you import records, it is very important to examine the results that you are getting. For this
reason, the import routine pauses as each record is imported. This gives you an opportunity to refuse
the record, cancel the import, or proceed.
Notice at the bottom of the Collect! screen, in the status bar, that you are being prompted for a
response. In white letters, you will see Update Debtor? (Yes/No/All/Cancel) Do not
choose anything yet!
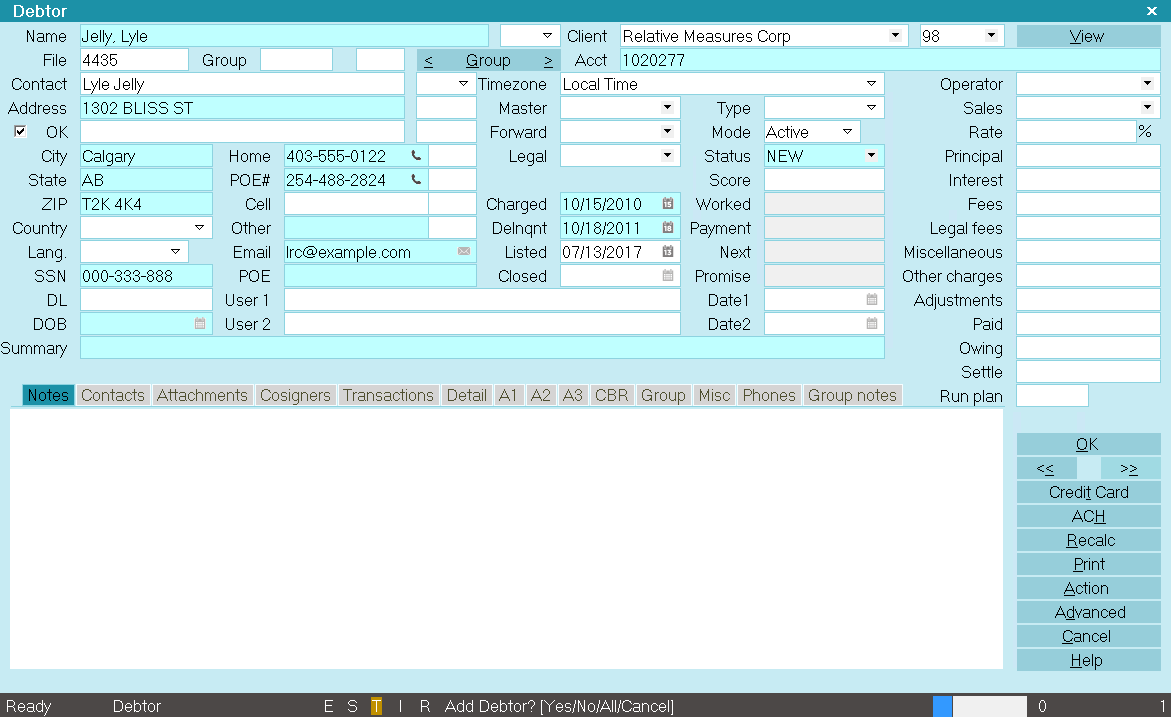
Debtor Record Being Imported
You may have to auto hide your Windows taskbar if it is hiding the status bar in Collect!.
You have four choices:
- Yes [y] accepts the record, imports it and displays the next record ready to import.
- No [n] refuses the record, skips it and displays the next record ready to import.
- All [a] runs the whole import with no more prompts.
- Cancel [c] aborts the importing routine. Whatever you accepted up to this point is imported.
Once an import begins, these are your only choices. We will always choose one of these
letters. Clicking on the screen with your mouse may cause import issues. This is not an
active form, but rather a snapshot for you to verify.
- If everything looks correct, press the y key on your keyboard to accept the
record. If there are errors, press the c key on your keyboard to cancel the
import and go back to correct the errors.
- The next record will now appear. Check for errors and proceed accordingly.
- Repeat this process until you have reviewed a large enough sample that is error free.
- When you are comfortable that the import is working, press the y key on your
keyboard to import all remaining data.
- After the data has been imported, a summary window will appear. Review it and click OK.
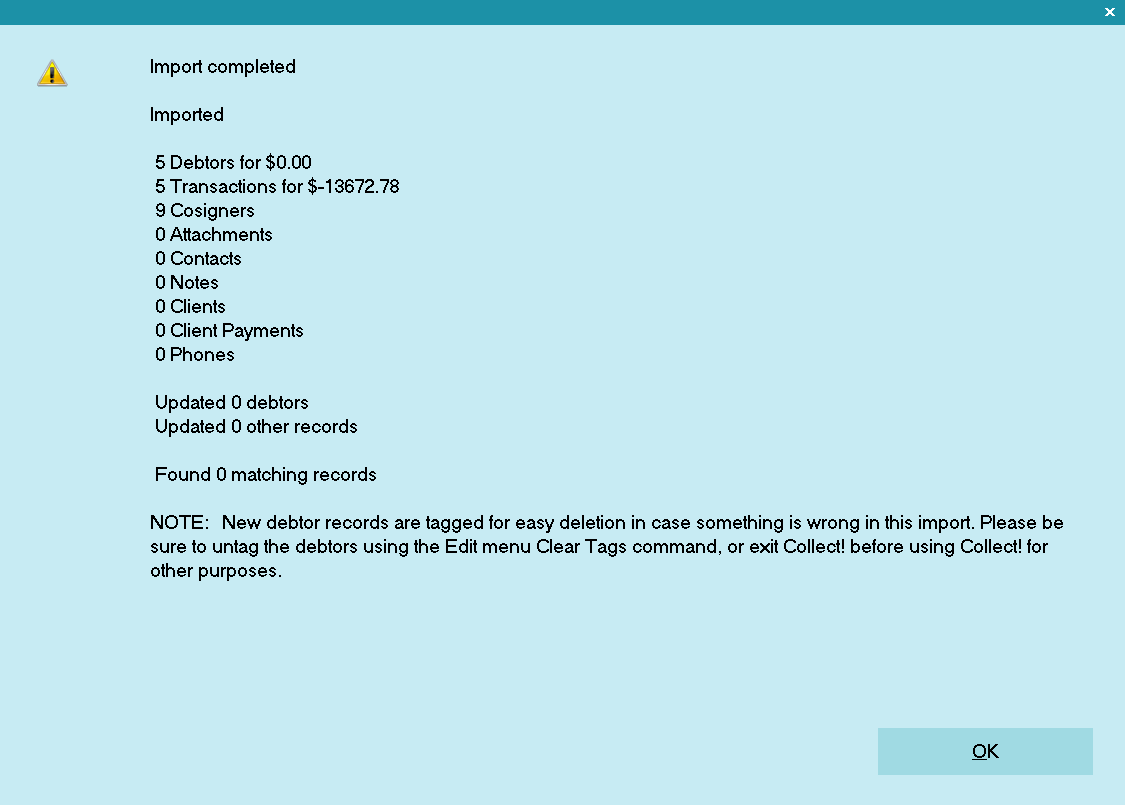
Import Summary
- If you selected the Recalculate Accounts box on the Import Options, you will be prompted to
recalculate the debtors. If you imported dollar amounts, select the Yes button.
If you do not recalculate, you can always do it after the import. Select Tools from the top
menu bar and select Recalculate from the drop-down choices.
- After the import, close the window and check out the new debtors to make sure the data is
correct.
After an import, newly imported records remain tagged. Select Browse from the top menu and
select All Debtors from the drop-down choices. Then Select Edit from the top menu bar and
select View Tags from the drop-down choices. You will be viewing a list of all your newly
imported records.
Clean Up The Test And Do Live Import
Once you have reviewed the accounts and validated the data (data in correct fields, financials are
accurate, etc.), then you need to clean up the data and do the live import.
- Navigate to the Main Menu.
- Click on the Edit menu and select Clear Tags. If you are unsure, you can close and reopen
Collect!.
- Navigate to the Client that you imported the accounts to.
- Delete the imported Debtor Accounts:
- If this was a new Client, open the Client, click in to the Debtors tab, use Ctrl + A (or
Edit -> Select All) to tag all records, then delete them.
- If this was a TEST Client created specifically for this test import, then delete the Client.
- Navigate to the Main Menu.
- Run the LIVE import as per the Help document: How to Import Records
Troubleshooting
If you find that the import overwrites data, check your import map. Overwriting will occur if you
have the 'Use as key to find existing' and/or 'Exact match only' turned ON for a field. This switch
will cause overwriting if a match is found. Consider turning OFF all 'Use as key' fields.
| 
Was this page helpful? Do you have any comments on this document? Can we make it better? If so how may we improve this page.
Please click this link to send us your comments: helpinfo@collect.org