How To Create A Single Record Import Map
Collect!'s import module is a very powerful tool for importing
data into Collect! from other databases, instantly giving you
all that valuable information at your fingertips within the Collect!
program. This process requires an import map. To get you started,
this document steps through the creation of a simple single
record import map. It is necessary that you are familiar with
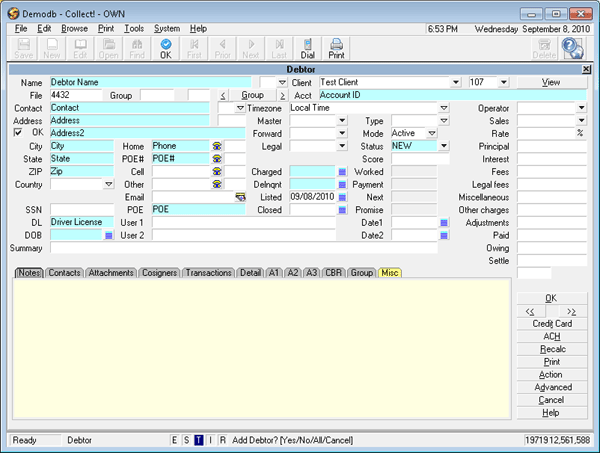
the use of Collect!'s Client and Debtor screens.
For this example, we will import data into Collect!
using a *.csv file. If you are not familiar
with *.csv files, we would recommend someone who is
knowledgeable is the area. (i.e. technician or co-worker)
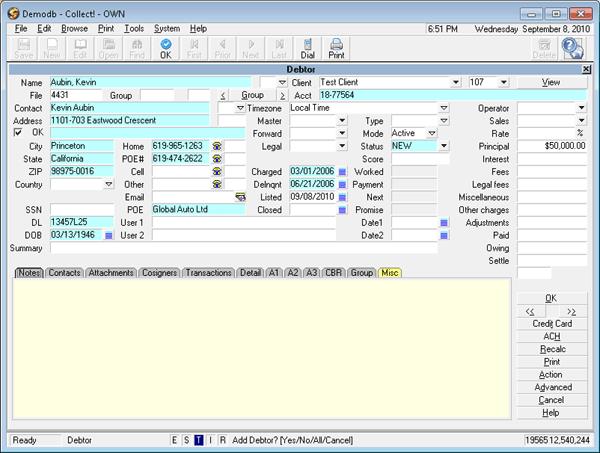
Before proceeding, please create a test Client
in the DEMODB database so that we can import debtors to it.
The file containing the data to import must be in a format
that the importing function can read. A consistent, accurate
file is necessary. In our example, the *.csv file is used. This is
a straightforward, comma-separated file. This means that each
piece of data (field) is separated from the next by a comma.
This makes it easy for the parsing mechanism to determine
where a field ends and the next field begins. Each row in the
file is a separate record. We will use the debtorcsv.csv
file for this example. You can find this file in the Import
folder of your Collect! application, (e.g. C:\CV11\Import)
If you do not have this file in your Import folder, please
download the sample imports from our Member Center before
proceeding.
Download Import Samples
Please open the sample debtorcsv.csv file in MS Excel
and take a look at it. The first row contains the names of sixteen
fields in Collect! in the Debtor form. We will use these names later
on when we build the import map.
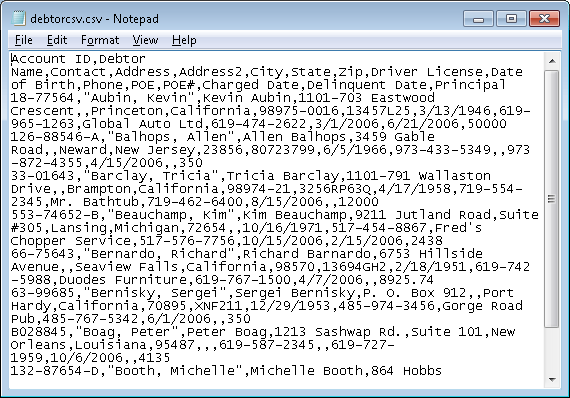
CSV Sample File Viewed In Notepad
The sample debtorcsv.csv file is simply a text file. However, when
you open it in MS Excel, each field becomes its own column. This
is because the comma is read as a flag to alert MS Excel that this
is a new field. This same thing occurs internally in Collect! when
the import function reads this file. It knows where a field begins
by looking for the next comma. (If there is a comma in the
field data, the whole field is enclosed in quotes, for
example, "Aubin, Kevin", the Debtor's Name field.)
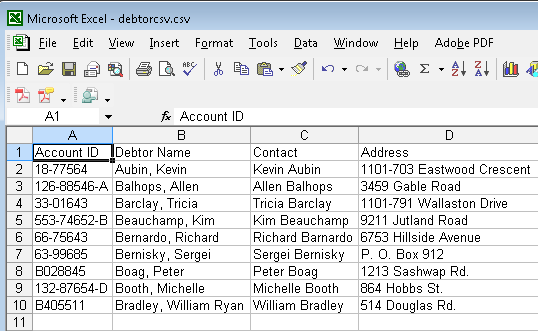
CSV Sample File Viewed In MS Excel
 If your file is not a *.csv file, you may be able to open it
in MS Excel and save it as a *.csv file. Sometimes, this is
necessary to clean up the data before the import routine is
started.
If your file is not a *.csv file, you may be able to open it
in MS Excel and save it as a *.csv file. Sometimes, this is
necessary to clean up the data before the import routine is
started.
Import Map Exercise
Please perform this exercise in your DEMODB Database.
In a Collect! database, records have "owners." This is very
important to consider when you are creating an import
routine. Owners are imported before the records that they
own. For instance, Debtors are owned by Clients. For our
example, please create a Client record in your DEMODB
database. We will import debtors and attach them to this
client.
Let's begin our exercise by building an import map to
bring the new debtors listed in the debtorcsv.csv file into
your database.
1. Sign into Collect! and stop at the Main Menu.
Select File from the top menu bar and a drop-down list of
choices will display. Select Import/Export from the list. A
submenu of choices will be displayed.
2. From the Import/Export submenu, select
Customize Import/Export and then select Edit File Format.
This will display a list of import map examples that are
already in your database.
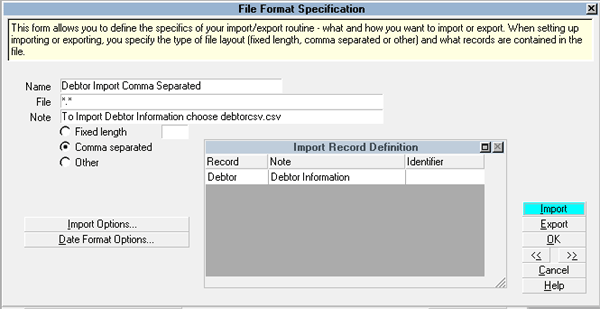
3. Press F3 or select the New button to open a new
File Format Specification form to use for our import map.
4. Type Debtor Import Sample in the
field labeled Name.
5. Type *.* in the field
labeled File.
6. Type Import debtor information in
the field labeled Note.
7. Make sure the radio button labeled Comma
separated has a dot in it. (You can select
this with your mouse or press your spacebar.)
Press F1 for information about the other choices on this
form. We won't be using any other fields for this exercise.
8. Select the Import Options button to display the screen
control panel where you may make selections for preferences
on how you want the import to pre-treat or post-treat the
incoming data.
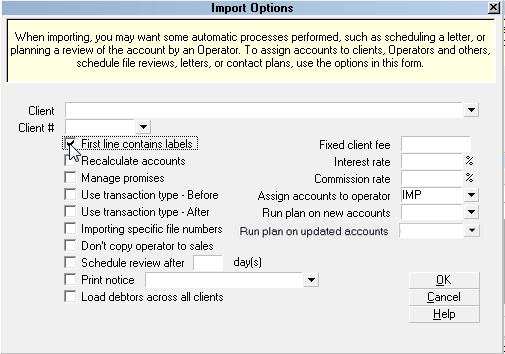
Import Options Dialog
9. While we are here, it is a good idea to always assign an
operator to the accounts you are importing. You might even
create a special IMP operator solely for this purpose. When
we discuss "Default Values" later on, we will explain the
reasons for this a bit more detail.
Select the OK button to close the form and return to the
File Format Specification form.
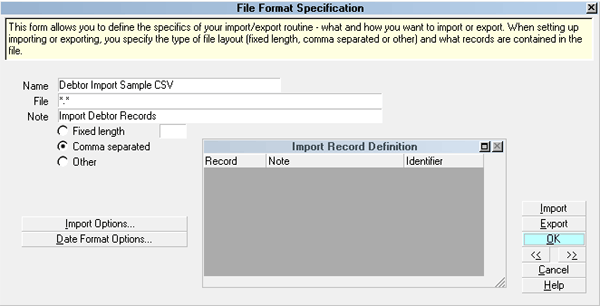
File Format Specification Form
10. Click your mouse in the Import Record Definition subform
to activate it, or press F5. You will be prompted to create a
record definition.
11. Select Yes to create our first
Record Definition.

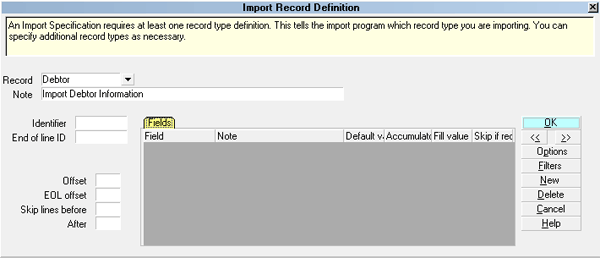
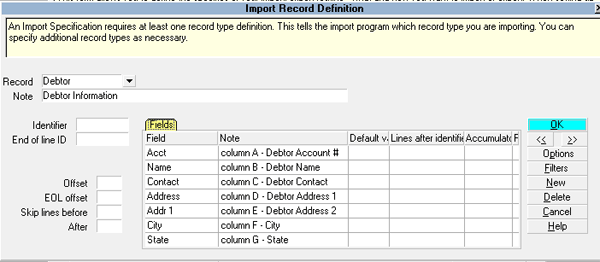
Record Definition For Debtor Record
You should now be looking at a new Import Record Definition
form. We are going to create a Record Definition for the Debtor
record because we are importing Debtors.
1. Select the Down arrow next to the field
labeled Record. You will see the list of
all types of records that you can import using the import
module.
2. Choose Debtor from the Record Type list.
You will be prompted to include all the fields from the Debtor
form. Select No to refrain from entering all
the fields from the Debtor form into your import map.
Record Definition Form
3. Click your mouse in the Import Field Specification subform
to activate it, or press F5. You will be prompted to create
your first field specification. Select Yes
to create the specifications for the fields we want to include.
Field Specifications For Debtor Fields
We are going to import information into fields in the Debtor
form. We will need a Field Specification for each field. Each
field specification will match a field name on the Debtor form.
If you are unsure which fields we are choosing, please look
at the Debtor form.
In the sample *.csv file, as explained above, the
data for each field is separated by a comma.
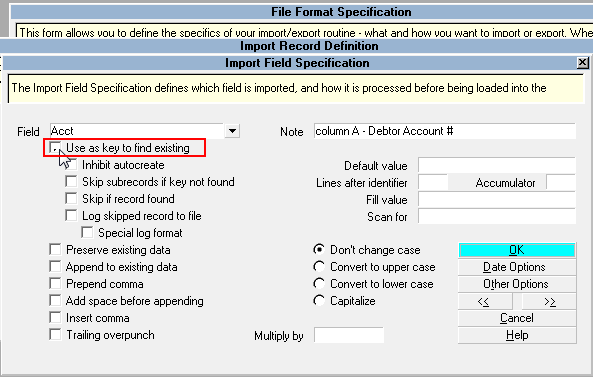
1. Select the Down arrow next to the field
labeled Field. This will display a list of all
the fields in the Debtor form that you could include in your
import map. Scroll through the Field Type list and
select Acct. You will be returned to the
File Specification form and Acct
will be displayed in the field labeled Field.
2. In the field labeled Note,
type Debtor Account Number.
This is the name of the field you are importing. What you
enter here does not get imported. It is for your reference
only.
When you view the sample debtorcsv.csv file in MS Excel,
you will notice that each column header is an
Alpha character. You could use these alpha characters
in your Note fields when building your field
specifications. For instance, the Note field for
the Acct field specification could
read A - Debtor Account Number. This
would make it easy to find the exact field when you are
looking at your sample in MS Excel.
Field Specifications for Debtor Account Number
 If we were going to update existing debtors, we would
make sure to select the check box labeled Use as key to
find existing. Then the import routine would only create
a new debtor if the account number did not already exist in the
database. Please leave this without a check mark
for our exercise.
If we were going to update existing debtors, we would
make sure to select the check box labeled Use as key to
find existing. Then the import routine would only create
a new debtor if the account number did not already exist in the
database. Please leave this without a check mark
for our exercise.
3. Press F3 to display a blank Import Field Specification form for
the next field.
If you need to go back or forward to another import field,
select the << or >>
button or select the OK button and then select the
field in the Import Field Specification subform.
4. Select the Down arrow next to the field labeled Field.
You will see a list of all the fields you can choose from.
5. Select Name from the Field Type list.
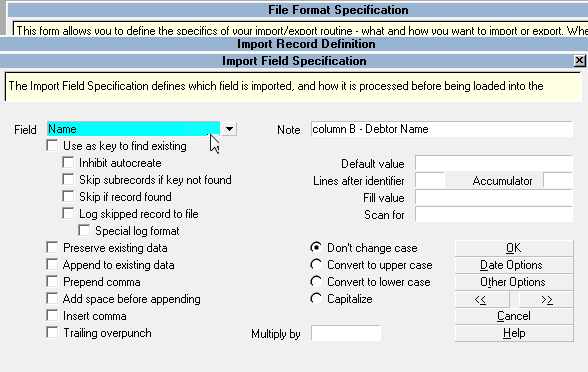
Field Specifications for Debtor Name
For advanced ways of importing into the field
labeled Name on the Debtor screen,
please look at the Name Examples in the list
of File Format Specifications.
6. In the field labeled Note, type Debtor
Name or B - Debtor Name. This is the
name of the field you are importing.
7. Press F3 to display a blank Import Field Specification
form for the next field.
8. Select the Down arrow next to the field
labeled Field.
9. Select Contact from the Field Type list.
10. In the field labeled Note,
type Debtor Contact or C - Debtor
Contact. This is the name of the field you are
importing.
This is the process for creating the field specification for each
field. Look at the sample file in MS Excel so that you can see
the remaining fields. For each field, repeat the process below,
until you get to the column named Date of Birth.
- Press F3 to display a blank Import Field Specification form
- Select the Down arrow next to the field labeled Field
- Select the field name from the Field Type list
- In the field labeled Note, type the name of the
field you are importing. For easy reference, include the column letter
from MS Excel.
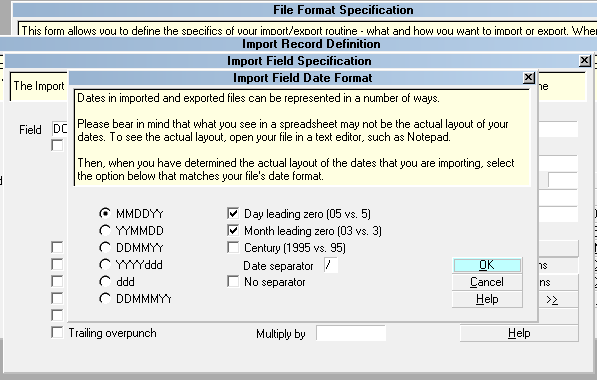
Date Formats
Always make sure that the Date Options are
set correctly when importing dates.
Date formats must be set prior to importing, as these have a
bearing on how the Date information is formatted. So when
you create a field specification for a Date field, (i.e. DOB,
Charged Date, or Delinquent Date), the Import Field Date
Format must be correctly filled out to match the way the dates
are formatted in the raw data file. For instance, in our
sample *.csv file, the date format
is mmddyyyy (6/12/2000). We have
to specify this in the specification for this field.
View the debtorcsv.csv file in Notepad or Ultra Edit to
see the format of the dates and currency fields. MS Excel
may be set to automatically format these types of data for
you, and you may not be seeing the true format of the raw
data.
When you get to Date of Birth in your field specifications,
1. Press F3 to display a blank Import Field
Specification form.
2. Select the Down arrow next to the field labeled Field.
This will display a list of all the fields you can choose.
2. Select DOB from the Field Type list.
3. Type Date of Birth or J -
Date of Birth in the field labeled Note.
4. Select the Date Options button to open the Import Field
Date Format form.
5. Make sure the radio button labeled MMDDYY
is selected with a dot.
6. Make sure the check box labeled Day Leading
Zero (05 vs 5) is selected with a check mark.
7. Make sure the check box labeledMonth Leading
Zero (03 vs 3) is selected with a check mark.
8. Make sure the check box labeled Century(1995 vs 95)
is selected with a check mark.
9. Type a forward slash [ / ] in
the box labeledDate Separator.
10 Select the OK button to save the information.
Date Formatting Settings
11. Continue to add the other fields from the debtorcsv.csv file
to your specifications following the same basic steps.
- Press F3 to display a blank Import Field Specification form
- Select the Down arrow next to the field labeled Field
- Select the field name from the Field Type list
- In the field labeled Note, type the name of the
field you are importing. For easy reference, include the column letter
from MS Excel.
Make sure you set the Date Options when you get to
the other Date fields, i.e., Charged Date and Delinquent Date.
Stop when you get to the column
named Principal. Do not enter
it yet. We will enter it in the Currency
Formats section below.
Currency Formats
Usually money amounts already exist with their decimal
placements, as you will see in our sample. If they do not,
you would set a value using the Multiple by
field on the Import Field Specification for the money field.
When importing money amounts, we have to be careful of
where we are placing them in Collect!. Values in certain
fields may affect other data fields. For this sample, we are
using Principal. You may think that it is correct to choose
Principal from the Field Type list to put this value in
the Principal field on the Debtor form. This is correct in a sense.
However, Collect! actually gets the Principal amount from the
Original Principal field in the Financial Detail form and then
displays this in the Principal field on the Debtor form.
1. We should be on a blank form. If not, press F3.
Choose Original Principal from the field list.
2. If your *.csv file had the decimal stripped from the
money amount, you would also fill in 0.01
in the field labeled Multiply By. However,
this is not needed in this exercise.
3. You should now have a field in the map for each
field/column in MS Excel, in the same order.
To make sure you have all the fields, you can
select the <<
or >> button to go
forward or back through fields, or select the OK button to
view the Import Field Specification list. Use your
Up/Down arrow keys to scroll through this list.
In addition to these fields, we will set a few default values
in our import map.
Default Values
Up to now, to keep this exercise simple, we have only
referenced fields in the debtorcsv.csv and related them
to fields in Collect!. Sometimes, you will want to set
default values for other fields as you import records.
Previously we mentioned assigning an operator in the
Import Options so that accounts will have an operator
as soon as they are imported.
Import Options with Operator IMP Assigned
This is useful for quickly identifying newly imported
accounts and for running contact plans or operator
assignment batches on the new accounts.
As of version CV11.6.2.9, a new switch was added to "Apply
client settings". Check this switch if you want your preset
values from the Client Setup and Advanced Client Settings
screen to be passed along to the debtor files as part of the
import process. Example, Commission Rates, Tax Rates, and
Sales ID.
Also, when importing debtors, you may want to
set the Debtor Address OK switch to ON, set the
Debtor Mode to Active, and set the
Debtor Status to New. Setting these
defaults is a very good idea whenever you import debtors.
We will set them now.
You should have a blank Import Field Specification form
in front of you. If not, press F3.
1. Select the Down arrow next to the field
labeled Field and select Mode
from the Field Type list.
2. Type Set Mode = Active in the field
labeled Note.
3. Type Active in the field
labeled Fill Value.
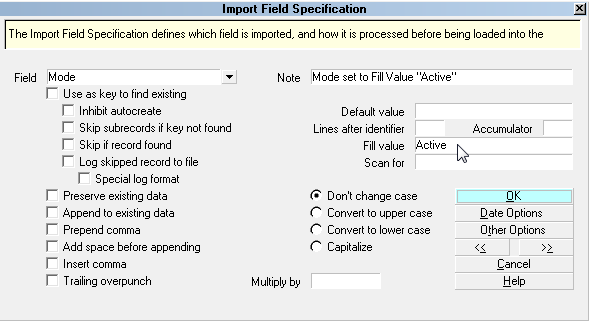
Setting Default Value for Debtor Mode
4. Press F3 to display a blank Import Field Specification
form for the next field.
5. Select the Down arrow next to the field
labeled Field and
select Status from the Field Type list.
6. Type Set Status to New in the
field labeled Note.
7. Type New in the field
labeled Fill Value.
Default Values For Switches
Here's how to turn ON a switch, such as
the Address OK setting, when
you run an import.
1. Press F3 to display a blank Import Field
Specification form for the next field.
2. Select the Down arrow next to the field
labeled Field and
select Address OK from the Field
Type list.
3. Type Set Address OK in the
field labeled Note.
4. Type X in the field
labeled Fill Value. This indicates
that the switch is switched ON.
This method can be used whenever you want to
set the value of a switch in your import. A
switch means any place in Collect! where you
mark your choice with a check mark.
Skipping Fields In The Data File
Sometimes you will want to import all the data,
except for a field or two. In this case, you can
skip over the fields in your raw file by creating
an empty Import Field Specification form as a
space holder.
- Leave the field labeled Field empty
- Fill in the field labeled Note so that
you know which field you are skipping
- If you need to skip more than one field, make
a blank form at each location where you are skipping
a field
Finishing Up
Select the OK button, or press F8, to save your settings
and exit the Import Field Specification form. You will now
notice a list of all your field specifications in the Import Field
Specification list.
List of Field Specifications
Select the OK button, or press F8, to save your settings and
exit the Import Record Definition form. You should be
looking at the File Format Specification form.
List of Record Definitions
Try Out The Import Map
When you are building an import routine, it is a good idea to
test it at various stages. Let's try out what we have designed
so far. This will confirm that it is behaving as you expect
and you can build the next part confidently.
1. You should be looking at the
File Format Specification form. Select the Import
button. The Import Menu is displayed.
2. Select the Down arrow next to the field
labeled File Format. The
File Format Specification list is displayed.
Our Debtor Sample is a new item in this list.
3. Select Debtor Import Sample. Now this
is displayed in the field labeled File Format.
4. Select the Browse button next to the field
labeled File Name and
navigate to the location of the debtorcsv.csv.
It should be in the Import folder of your Collect!
application. (e.g. C:\CV11\Import)
5. Select debtorcsv.csv and select the Open button.
Now the file and its location will be displayed in
the field labeled File Name.
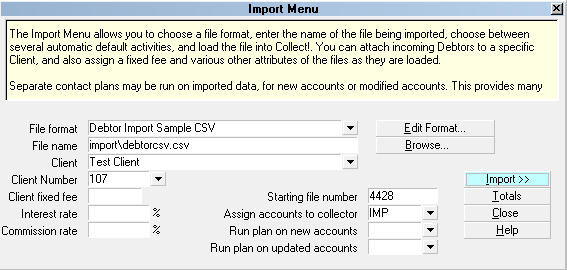
Import Menu Dialog
6. Select the Down arrow next to the field
labeled Client. This will display
the list of all your clients. Select the client that
that you set up for this test. Now this client is
displayed in the field labeled Client.
7. Select the Import button. You will see the first
record that is being imported.
Examining Records As They Are Imported
When you import records, it is very important to examine
the results that you are getting. For this reason, the import
routine pauses as each record is imported. This gives you
an opportunity to refuse the record, cancel the import or
proceed.
1. You are now looking at the first record being imported.
As you can see, it is the second line in your *.csv file. Each
separate line is treated as a complete record. It is the second
line because we skipped the first line, the column labels. This
is a result of selecting the check box labeled First
line contains labels in the Import Options.
2. Notice at the bottom of the Collect! screen, in the status bar,
that you are being prompted for a response. In white letters, you
will see Update Debtor? (Yes/No/All/Cancel)
Do not choose anything yet.
Prompts in the Status Bar When Importing A Debtor
You may have to auto hide your Windows taskbar if it
is hiding the status bar in Collect!.
You have four choices:
Yes [y] accepts the record, imports it
and displays the next record ready to import.
No [n] refuses the record, skips it
and displays the next record ready to import.
All [a] runs the whole import with no
more prompts.
Cancel [c] aborts the importing routine.
Whatever you accepted up to this point is imported.
Once an import begins, these are your
only choices. We will always choose one of
these letters. Clicking on the screen with
your mouse may cause import issues. This is
not an active form, but rather a snapshot for
you to verify.
3. Press the Y key on your keyboard
to accept the record.
If we had not switched ON First line
contains labels when we set our import
options, the label record would appear first.
Here is what the label record would have looked
like.
Label Record
Thus, we would have pressed the n key
for NO, to refuse this record and move on to the next.
4. The third record will now appear, actually, our second
debtor. Press the y key to accept
this debtor as well.
5. The fourth record now appears. We are comfortable
with this data, so we will press the a
key to accept all.
6. After the data has been imported, a summary window
will appear.
If this were a real import routine, you would
probably want to examine a few more records in this
fashion before pressing the a
key to allow the import to carry on automatically
without your assistance.
7. Select the OK button on the Summary Report.
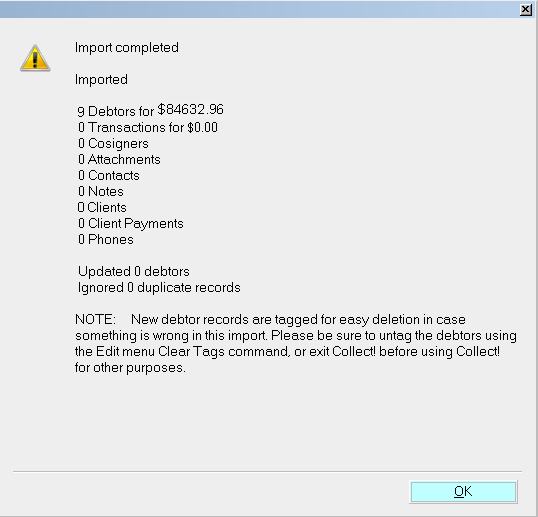
Summary Report
8. You will be prompted to Recalculate the Debtors.
If you imported dollar amounts (which we did),
select the Yes button.
If you do not recalculate, you can always do it after
the import. Select Tools from the top menu bar
and a list of choices is displayed. Select
Recalculate from the list.
9. After recalcing, Collect! will prompt to
Sort the Debtors. This is up to you, but most
clients do.
10. If you selected Yes,
Collect! will prompt you to choose your
sort order. The choices are by Name
or by Account.
11. After the import, close the window and check
out the new debtors to make sure the data is correct.
If you find that the import overwrites data, check your
import map. Overwriting may occur if you have the
field labeled Use as key switched
ON with a check mark in a field specification.
This switch will cause overwriting if a match is found.
Consider turning OFF all 'Use as key' fields
If for any reason, you decide to re-import, make
sure you delete the debtors you just imported to
avoid duplicate entries.
Summary
You have just completed your first import! Although
we imported a simplified file, you have successfully
completed all the major steps to an actual import routine.
As you can see, taking this step by step in the correct
order, you can quickly and accurately bring volumes of
data into your database.
- Remember to start simple and test your results
along the way
- Always test your import map on a Demo database
or a copy of your Masterdb database
- Never run your import on your live database until
you are SURE it is performing correctly in every area
- Backup your database before importing records into it
See Also
- Import/Export Topics
|
Was this page helpful? Do you have any comments on this document? Can we make it better? If so how may we improve this page.
Please click this link to send us your comments: helpinfo@collect.org