Date Format
You can control how dates are displayed and printed in Collect!
by setting the options on the Date Format screen. Dates can
also be checked when entered to make sure they are valid.
Date Format Settings
To access the Date Format dialog:
1. Select System from the top menu bar and then select
Preferences from the drop-down choices. This will display
the System Setup menu and you will have several choices.
2. Choose Options, Sounds and Colors from the System Setup menu.
This will show you the Screen and Messages dialog. There are many
settings here. Press F1 for an explanation of the various fields and
buttons that you see. To set the date format, please press the
Date Format button.
3. Now you will be looking at the Date Format screen.
The standard date format setting in North America is MM/DD/YY,
while other areas use DD/MM/YY or YY/MM/DD.
The separator character is by default '/' (forward slash). This
can also be changed in this form.

Entering Dates Into Fields And Searches
Year 2000 dates can be entered in date fields and when you
search using the F6 key.
When entering dates into the date field, you can type 1 1 2010 for
January 1, 2010 for example. Since there is only limited space
in date fields, to enter December 31, 2010 you would type 12312010 in
a date field.
You can also search over date ranges using the F6 key. When you
use a date in a search there is more room, and you could type 12 31 2010.
Press Escape when the calendar pops up, and the system will correctly
interpret the month, day and year.
 When Date format is modified, ALL existing DATE formats
used in DEBTOR NOTES will be modified to reflect the new format.
When Date format is modified, ALL existing DATE formats
used in DEBTOR NOTES will be modified to reflect the new format.
Validate Date Entry
Switch this ON with a check mark to check validity as
dates are entered into Date fields. Collect! will alert the
user if it cannot validate any date between 1970
and 3000. After the user is prompted, Collect! will blank
out the field rather than leaving the bad date. The user
will be responsible for re-entering a date in the field.
The prompt to "try again" only appears when the "Validate
date entry" check box is ON.
Date Formats
MONTH DAY YEAR (MMDDYYYY)
To display dates as MM.DD.YYYY (Example: 01.31.2010 for January 31, 2010)
1. Click on the Month Day Year setting.
2. Type a '.' in the Date Separator field.
To display dates as MM-DD-YYYY (Example: 01-31-2010 for January 31, 2010)
1. Click on the Month Day Year setting.
2. Type a '-' in the Date Separator field.
To display dates as MM/DD/YYYY (Example: 01/31/2010 for January 31, 2010)
1. Click on the Month Day Year setting.
2. Type a "/" in the Date Separator field.
DAY MONTH YEAR (DDMMYYYY)
To display dates as DD.MM.YYYY (Example: 31.01.2010 for January 31, 2010)
1. Click on the Day Month Year setting.
2. Type a '.' in the Date Separator field.
To display dates as DD-MM-YYYY (Example: 31-01-2010 for January 31, 2010)
1. Click on the Day Month Year setting.
2. Type a '-' in the Date Separator field.
To display dates as DD/MM/YYYY (Example: 31/01/2010 for January 31, 2010)
1. Click on the Day Month Year setting.
2. Type a "/" in the Date Separator field.
YEAR MONTH DAY (YYYYMMDD)
To display dates as YYYY.MM.DD (Example: 2010.01.31 for January 31, 2010)
1. Click on the Year Month Day setting.
2. Type a '.' in the Date Separator field.
To display dates as YYYY-MM-DD (Example: 2010-01-31 for January 31, 2010)
1. Click on the Year Month Day setting.
2. Type a '-' in the Date Separator field.
To display dates as YYYY/MM/DD (Example: 2010/01/31 for January 31, 2010)
1. Click on the Year Month Day setting.
2. Type a "/" in the Date Separator field.
Date Separator
The separator character is by default '/' (forward slash).
This can also be changed to '.' or '-' as shown in the
previous examples. Press F1 for details.
Year 2000
Year 2000 dates can be entered in date fields
and when you search using the F6 key.
When entering dates into the date field you
can type 1 1 2010 for January 1, 2010, for
example. Since there is limited space in date
fields to enter December 31, 2010, you would
type 12312010 in a date field.
You can also search over date ranges using
the F6 key. When you use a date in a search
there is more room, and you could type 12 31 2010.
Press Escape when the calendar pops up and the
system will correctly interpret the month, day and year.
Invalid Dates
If you have switched ON "Validate Date Entry," Collect!
will not let you enter an invalid date. You will be prompted
with a message.
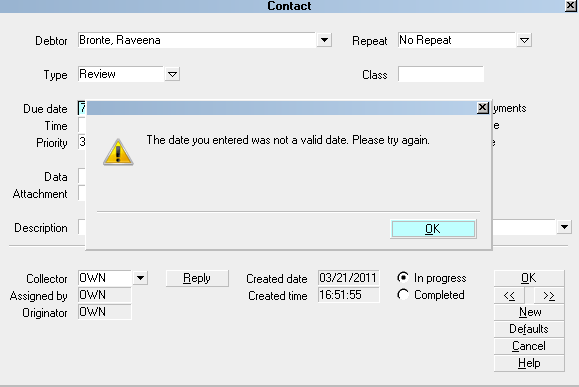
Invalid Date Message
When you select the OK button, Collect! erases
the invalid date so that you can try again.
Collect! uses your date format settings
for checking the dates. So it can recognize the
difference between what is valid for Day/Month/Year
or Month/Day/Year and so on.
 If you change your date format, you may need
to sign out of Collect! for the new format to take effect.
If you change your date format, you may need
to sign out of Collect! for the new format to take effect.
Help
Press this button for help on the Date Format
screen and links to related topics.
Cancel
Selecting this button will ignore any changes you
have made and return you to the previous form.
OK
Selecting this button will save the format you
have chosen and return you to the previous form.
See Also
- Date Editing
- How To Use Date And Time Codes
- How To Format Date Fields And Date Variables
|
Was this page helpful? Do you have any comments on this document? Can we make it better? If so how may we improve this page.
Please click this link to send us your comments: helpinfo@collect.org