How To Use Promises
What is a Promise? A Promise is an agreement with a debtor to pay a specific sum of money on a
definite date. A promise may be a single payment, multiple payments or a repeating payment at
regular intervals. How do we record these promises in Collect!? Keep track of when the promise is
due? Know when it is met or broken?
A Promise may easily be managed in Collect! using a Promise contact. Promise contacts are very
useful for scheduling single promise payments, multiple promise payments, or a series of payments
promised at a repeating interval. Promise contacts provide a loosely structured " payment plan" with
far more leeway that an actual payment plan. If payments are irregular, incomplete or missed, Promise
contacts keep track of this and calculate correctly with no extra work on your part.
When you create a Promise contact, the due date of the Promise will be displayed on the Debtor form
in the Promise field. The Promise will show up in the Operator's WIP List on that day.
Processing promised payments is controlled by the "Automatically Manage Promises" switch in the
Payment Posting Options form. If this switch in ON, Collect! will automatically keep track of
whether or not the promise is met, forwarding the date to the next Repeat period when appropriate,
or marking the Promise contact as Done, if needed.
When there is a Repeat value, Collect! forwards the contact when a full payment is received for the
dollar amount of the Promise contact. The contact's Due Date is advanced to the next Repeat period's
date. Normally, the Promise Due Date is advanced one Repeat period when a full payment is received.
If you switch ON 'Advance overpayments', the Due Date will advance as far ahead as necessary if a
payment is made that fulfills the promise for several Repeat periods.
An unfulfilled promise or partial payment does not advance and stays in the WIP List as delinquent.
The Promise field on the Debtor form turns RED when the Due Date passes.
Promises may be automated with contact plans. For instance, you may want to send a letter when you
set up a promise on an account, write a line to the debtor's Notes, and maybe print a coupon book.
Also, several actions may be taken automatically when a promised payment is received. These are
controlled by Promise Contact Actions in the Payment Posting Options form. Payment in Full,
Overpayment, Underpayment, NSF Payment and Broken Promises each trigger a contact plan. These may
be modified to suit your needs, or you may choose not to run any of them.
Step By Step Process For Taking Promised Payments
We will cover:
- Single Promise
- Creating a Promise Contact
- Viewing the Debtor form
- Loading the WIP List
- Posting Promised Payments
- What Collect! does when you post a payment for a promise
- When an NSF Check is returned
- Multiple Single Promises
- Creating multiple single promises
- Repeating Promises
- What is a repeating promise?
- Creating a repeating promise
- Viewing the Interest Detail form
- Special Settings

Contact Form
Click Here to View this Form.
Click Here to Close this Form.
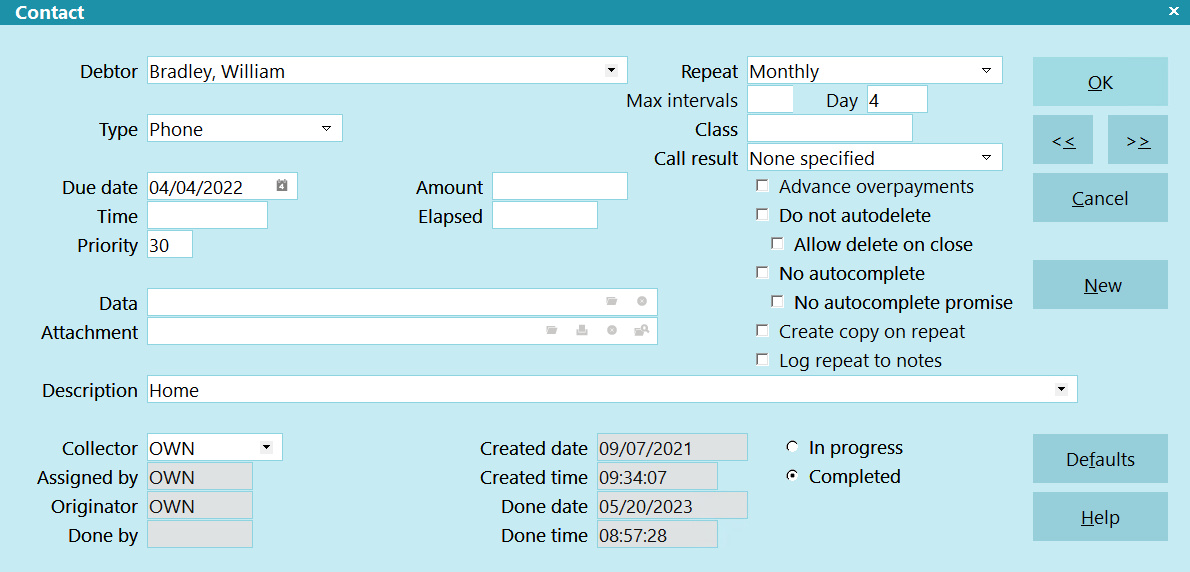
The Contact form is used to define contacts and other actions
scheduled to occur on specific dates. Several different types
of contacts may be scheduled. The Contact form displays fields
and pick lists for all the possible settings that you can choose.
Contact
Schedule letters, phone calls, emails, and file reviews. Change
debtor status, execute a revolving promise payment, post transactions,
write notes to the Debtor record, or make one or more changes to a
Debtor record. Activate or close an account, assign accounts to an
operator, set a commission rate or plan. Schedule a contact plan to
be run on some future date.
Contacts may be scheduled to occur on a chosen date. Set the
number of days delay before a contact appears in an operator's
Work In Progress (WIP) List. Schedule contacts for other operators
and they will appear in the operators'' WIP lists on the date and time
you specify in the contact.
When you are working your WIP List, the current contact you are
working on is displayed on the Debtor form. When you select the
Debtor's Contacts tab, the list of contacts will highlight the one
you are working on.
Contacts have Type, Description, Due Date and Time, Priority,
a Debtor, an Operator or collector, and several other settings. The
date and time the contact is completed are recorded. A file can be
attached to a contact to include extra details. Contacts appear in
a collector's WIP List on the contact's Due Date, the day it is
scheduled to be done. For example, you may schedule a phone call
for two days hence. Then, when you load your WIP List for today, the
contact won't appear. In two days, it will be in your list. Settings for the
WIP List determine how many days' worth of contacts are displayed
when you load the list.
 Often, people mistakenly use the term Contact Plan
when referring to a single Contact. The term Contact
refers to a single scheduled event, while a Contact
Plan is a way to automate your contact management with a
sequence of contact Events. It is a very useful and
versatile feature of Collect!.
Often, people mistakenly use the term Contact Plan
when referring to a single Contact. The term Contact
refers to a single scheduled event, while a Contact
Plan is a way to automate your contact management with a
sequence of contact Events. It is a very useful and
versatile feature of Collect!.
Type
The Type field sets the type of contact that you
are scheduling. Press F2 or select the down arrow
to view the list of contact types that you can
choose.
The Type of contact determines a general action. For
instance, Letter means print a letter, while Operator
means assign an operator to the account. Other
settings on the Contact form define the details, such
as which letter to print, or which operator to assign to
the account. Depending on the Type you choose,
certain fields on the Contact form are visible or hidden.
Also, the use of the Description field changes
depending on the Type you select in the Type field.
Please refer to each Type of contact for details.
Types Of Contacts
When you choose a Contact Type, other fields on the Contact form
change according to the Type you select.
The following is a list of predefined Contact Types with details of
how your choice of Type affects the Contact form and the way
Collect! handles the contact.
Activate
The Activate Contact automatically activates a Debtor when
processed. This means the Mode field on
the Debtor's account is set to ACTIVE and
the Closed Date field is hidden.
This will process all accounts regardless of the current
setting of the Mode when you want to set it to ACTIVE by
processing
The activation takes place when you process your
automatic contacts previously scheduled through
Tools, Batch Processing.
Close
The Close Contact automatically closes a Debtor when processed.
This means the Mode field on the Debtor's
account is set to CLOSED and any pending and incomplete
contacts are deleted, removing this Debtor from all To Do lists.
Any contacts with the switch "Do not autodelete" are NOT deleted.
In progress Promises and Transactions are marked 'Completed'.
The Closed Date field appears displaying the current date.
The closing of the account takes place when you process
your automatic contacts previously scheduled through
Tools, Batch Processing.
Commission
The Commission Contact sets a commission rate on the debtor's
account. In the Description field, enter the percentage as a number.
For example, 33 means 33% and 12.5 means 12.5%.
The assignment takes place when you process your
automatic contacts previously scheduled through
Tools, Batch Processing.
Edit
The Edit Contact allows you to modify any field related to the
Debtor form. In the Description field, you need to type in the field
name and its new value, i.e. field name=some value.
For example, the Description would contain Summary=Test note
if you wanted Test note to appear in the Debtor
Summary line. Or, you could use POE=Fred's Cleaners to
put Fred's Cleaners in the debtor's POE field.
The field name is the name that appears on the Debtor
form. This works for aliased fields as well. Or, you can use the
printable field code for the field. For example, @de.su=Test note
Any field of a related debtor record can be modified. For example,
on an interest-bearing account, you can change the date in
the Calculate interest from field in the Interest Detail
section of the Financial Detail form using the
format @id.cifd={date}, for
example, @id.cifd=12/12/2003. This can be
combined with a transaction that allows you to post the accrued
interest on an account. Please see Transaction Type for details.
The field editing takes place when you process your
automatic contacts previously scheduled through
Tools, Batch Processing.
Email
The Email Contact lets you post an email to this Debtor. Use the
Description field to type in the Subject of the email. This
description will also be displayed in the Operator's WIP List. By
default, email is addressed to the Email Address stored in the
Debtor form in the Email field.
When the Send Mail form is opened by selecting the Email field
on the Debtor form, the email can be loaded, completed and
sent through Collect! using your email program. See Send Mail
for information about how the Email feature works.
The Email is sent when you run your daily letter batch.
Email In
This is a Contact Type that can be used to track incoming emails.
There is no system functionality linked to this type.
When emails are received from Debtors, you can create a
Email In Contact and attach a copy of the email
to the Contact.
Tracking incoming emails is useful to avoid over counting
Emails with the Contact Control rules, which only look
at Email Type Contacts.
Export
The Export Contact schedules the exporting of the records the
plan is run on. This can be used in conjunction with the Import/Export
module to automate scheduling of export activities.
Letter
The Letter Contact schedules a letter to be queued for printing in
your daily batch. Press F2 on the Description field to view the list
of all letters and reports in your system. Select the letter to
be printed.
When your daily letter batch runs, Collect! uses the Description
field of each Letter contact to locate the letter to
print. Please be aware that changing the name of
a letter may result in Collect! not being able to process
a Letter contact when the batch is run.
Letter In
This is a Contact Type that can be used to track incoming letters.
There is no system functionality linked to this type.
When letters are received from Debtors, you can create a
Letter In Contact and attach a copy of the scanned letter
to the Contact.
Tracking incoming letters is useful to avoid over counting
Letters with the Contact Control rules, which only look
at Letter Type Contacts.
Metro
The Metro contact is scheduled when you choose to report a
debtor to the credit bureaus.
The Description field contains various codes representing the
choices you made describing the debt type, association code and
associated details for a Debtor. Collect! updates the Description
automatically whenever a reportable change is made to
the account. For more information, please refer to
How to Read the Metro Contact Description.
When you send a credit report, Collect! scans the list of Metro
contacts and reports all Debtors with pending Metro contacts.
You must then set the contacts to Done, when the reporting
process has created its file for the bureau. For more information,
please refer to How to Setup Credit Bureau Reporting.
Note
The Note Contact writes one line of notes into the Debtor notes.
In the Description field, enter the text you want written into the
Debtor's notes. Open a new attachment file if you want to include
more text.
The note line is written when you process your automatic contacts
previously scheduled through Tools, Batch Processing.
 If an asterisk [*] is the first character in the Description,
an asterisk will be placed at the beginning of the note line
causing it to be at the top of the Notes.
If an asterisk [*] is the first character in the Description,
an asterisk will be placed at the beginning of the note line
causing it to be at the top of the Notes.
ODBC
The ODBC Contact is a special type of contact used in the
ODBC Sync extension module. This is a licensed add-on module.
Please refer to Help topic, How to Use ODBC Sync for details.
Operator
The Operator Contact sets the operator assigned to the debtor.
Any pending contacts on the account that were assigned to the
previous operator will be assigned to the new operator. The Collector
field holds the Collector ID to be assigned to the Debtor.
The assignment takes place when you process your
automatic contacts previously scheduled through Tools,
Batch Processing.
Operator Viewed
On the Operator Security form, if you have Log Viewed Accounts
and Create Contact enabled, Collect! will create an Operator Viewed
Contact when you leave the Debtor.
The Contact will contain the date, time, and operator that viewed
the account along with how long the operator was on the account.
Other
For general use, write a note in the Description field.
Phone
Use the Phone Contact to schedule a phone call to the debtor. A drop-down
list arrow appears in the Description field allowing you to choose from
available phone locations for this Debtor. When you choose
Dial A Number from the Tools Menu, Collect! reads the Phone contact's
Description field and the phone number is displayed automatically.
This number will be dialed automatically when you enter this Contact
when working your WIP (if you have the Auto Dialer option).
You can also manually type in a phone number if you
want, or you can even type in text if you want.
Phone In
This is a Contact Type that can be used to track incoming calls.
There is no system functionality linked to this type.
When calls are received from Debtors, you can create a
Phone In Contact and attach a copy of the call recording
to the Contact.
Tracking incoming calls is useful to avoid over counting
Phone Calls with the Contact Control rules, which only look
at Phone Type Contacts.
Plan
The Plan Contact runs a contact plan. This is useful for scheduling
a contact plan to run at some future date. Press F2 on the Description
field to select a Contact Plan to run.
The Plan is run when you process your automatic
contacts previously scheduled through Tools,
Batch Processing.
Promise
The Promise Contact schedules a promised payment due on a
specific date. In the Amount field, enter the dollar amount of the
promise. Use the Description field for other details.
When a payment to the Debtor is posted, the transaction will
automatically display the amount of the promise. When the
promise date passes without a payment, this promise continues
to appear in the WIP List as a delinquent promise.
The 'Repeat' field enables you to schedule revolving promise
contacts. When a full payment of the dollar amount of the
promise is received within the selected Repeat period,
Collect! automatically forwards the contact. Additional options
are available for tracking the Promise history.
The 'Create copy on repeat' creates a completed contact every
time a Promise is forwarded.
The 'Log repeat to notes' writes a line to the debtor's Notes
every time a Promise is forwarded.
The 'Advance overpayments' check box enables you to manage
overpayments. Switch it ON to consider overpayments as
fulfillment of future promises. Leave it switched OFF to forward
the Promise Due Date only one Repeat period, no matter how
much is overpaid.
When an account is CLOSED, In Progress Promise
contacts are marked 'Completed'.
Rate Plan
The Rate Plan Contact sets a Commission Rate Plan on the debtor's
account. Press F2 in the Description field to choose a commission
rate plan ID.
The assignment takes place when you process your
automatic contacts previously scheduled through
Tools, Batch Processing.
Review
The Review Contact schedules a review of the file. Enter a Description
which will appear with this contact in the Operator's WIP List. Open a
new attachment to add more information.
Sales
The Sales Contact changes the Sales Team ID assigned to the debtor.
Press F2 in the Collector field to select the Sales ID. This is very
powerful, providing for flexible commission rates.
The assignment takes place when you process your
automatic contacts previously scheduled through
Tools, Batch Processing.
Sms/Text
Use the SMS Contact to schedule an SMS message to the debtor. Results
of the message can be imported back into Collect! and stored on this record.
Sms/Text In
This is a Contact Type that can be used to track incoming texts.
There is no system functionality linked to this type.
When texts are received from Debtors, you can create a
SMS/Text In Contact and attach a copy of the text
to the Contact.
Tracking incoming texts is useful to avoid over counting
texts with the Contact Control rules, which only look
at SMS/Text Type Contacts.
Status
The Status Contact changes the debtor's Status Code. Press F2 in the
Description field to pick the Status Code to assign.
The assignment takes place when you process your
automatic contacts previously scheduled through
Tools, Batch Processing.
Transaction
The Transaction Contact posts a Transaction to an account. Press F2
in the Description field to select the ID of the Transaction Type. Set
the amount of the transaction in the Transaction Type settings, or in
the Amount field on the Contact form.
The Transaction is posted to the account when you
process your automatic contacts previously scheduled through
Tools, Batch Processing.
When an account is CLOSED, In Progress Transaction
contacts are marked 'Completed'.
Custom
If you wish to create your own custom contact types, you may do so.
In the applicable pick lists, create a new type with the value of
50 or higher. These will be treated as your own. On the
WIP Reload Filters form, you can check the 'Custom types'
box to display them in the To Do list.
 WARNING: Modifying System Pick Lists will result in new
values not being added as we release them.
To prevent conflict, we do not modify your
custom pick lists. If you do add your own
custom values, please review the below list
of the current default values to see if you
are missing any.
WARNING: Modifying System Pick Lists will result in new
values not being added as we release them.
To prevent conflict, we do not modify your
custom pick lists. If you do add your own
custom values, please review the below list
of the current default values to see if you
are missing any.
"12", "Activate       "
"8 ", "Close          "
"18", "Export         "
"11", "Edit           "
"0 ", "Letter         "
"26", "Letter In      "
"10", "Metro          "
"7 ", "Note           "
"6 ", "Other          "
"13", "Operator       "
"23", "Operator Viewed"
"1 ", "Phone          "
"25", "Phone In       "
"4 ", "Plan           "
"3 ", "Promise        "
"16", "Commission     "
"17", "Rate Plan      "
"5 ", "Review         "
"14", "Sales          "
"22", "Text/SMS       "
"24", "Text/SMS In    "
"2 ", "Status         "
"15", "Transaction    "
"19", "Email          "
"27", "Email In       "
"20", "Client         "
"21", "ODBC           "
Debtor
This is the Debtor whose account is being worked. You
may want to send a letter to this debtor, make a phone
call, post a promise payment or several other actions.
A contact is generally attached to a specific debtor.
Due Date
This is the Date the contact is due, the scheduled
date for the contact activity. The Due Date determines
when this contact shows up in an operator's WIP List.
For batch processing, the Due Date is the date that
the contact will be processed.
Time
This is the scheduled Time for the contact activity
in 24 hour format. In other words, if you type 4
it's 4 AM. Type 16 for 4 PM, 18 for 6 PM and so on.
You can set the time to the minute. For example, you could
type 16:25 and the call will pop up at 4:25 PM.
It is not compulsory to enter a time. Timed
contacts are important when you must deal
with a Debtor at a specific time. (Perhaps
he is only home at 7 PM to answer calls.)
Then you would enter 19:00 in the time field
of the contact and a prompt will pop up on your
screen at that time to go to the contact.
This only works when you are working accounts
from your WIP List.
If you do not need a time prompt for this account, it
is recommended that you leave the time field blank.
Priority
The Priority field allows you to enter a priority
for this Contact. Priority may be used to
organize your WIP List, or to alert an operator
to the importance of a particular contact. In
the WIP List you can easily display contacts
in order of priority.
Priority levels in the WIP List are as follows.
66 to 99 High
34 to 65 Medium
1 to 33 Low
Amount
The Amount field is used to store a dollar amount.
You can use it for any purpose. However, for certain
types of contacts, it has a special purpose.
For a Promise Contact, as described above,
the Amount field holds the dollar amount of the promise.
This amount is displayed automatically whenever a
payment transaction is posted to the account. Any
calculations of underpayment or overpayment of the
promise use this value.
If a payment is under, the Amount field will display
the remaining amount to fulfill the promise. If the
payment is over, the promise contact will forward to
the next due date, if a repeat has been setup, and the
Amount field will display the remaining amount to fulfill
the next promise.
To prevent this field from changing, you can set
'over/under' values on the Payment Values form located
off of the Payment Posting Options form.
For a Transaction Contact, the Amount field holds the
dollar value of the transaction to be posted.
Promised
The Promised field is used to store the original dollar
amount of a promise. This field is only visible when
type 'Promise' is selected.
For a Promise Contact, as described above,
the Amount field holds the dollar amount of the promise.
With Automatically Manage Promises enabled on the
Payment Posting Options form, whenever a payment transaction
is posted to the account, any calculations of underpayment
or overpayment of the promise use this value to determine
if the promise has been fulfilled. Once fulfilled, the
promise contact will forward to the next due date if the
promise contact has a repeat setup.
Elapsed
This is the amount of time that you have spent on the
contact. You can enter an amount in hh:mm:ss time
format (for example, 00:01:53 is 1 minute and 53
seconds.) Or, Collect! can enter a value automatically.
To automatically keep track of time spent on
an account, switch ON 'Enable elapsed time
counter' in the WIP Options form. If an
operator stays on an account longer than 15
seconds or modifies the Debtor record, time
will be calculated when they exit from
the account.
Time tracking is recorded only when contacts are
worked from the WIP List. Intervals of less that 15
seconds are not recorded.
Please bear in mind that the time displayed is cumulative
and shows total time spent when this particular contact
took the operator to the account. Repeated visits via the
same contact will be added on to the Elapsed time.
Repeat
The Repeat field allows you to automatically forward the
date of a contact. This can be used, for example, to
repeat printing a letter or posting a promised payment.
One use of this is posting a revolving promised payment.
When the Contact occurs, Collect! reads the Repeat
value. If a full payment of the Promise dollar amount
has been received within the Repeat period, the
Contact is forwarded automatically to the next period.
Click the drop-down arrow beside the Repeat field to
select a repeat interval. When a repeat period is
selected, other fields become visible.
When this field is set to Custom, the Number of Days
field becomes visible.
Max Intervals
This field is visible when you select a REPEAT
value. Collect! uses it to determine how many
times this Contact is repeated.
Number Of Days
The Number of Days field holds the custom number
of days the Contact is forwarded when it is processed.
This field is only displayed when the Repeat field is
set to "Custom."
Class
The Class field is for your own use. You can use it to
further categorize a particular type of contact. Then a
report can be made to retrieve data or write back to
the account based on the Class field.
Call Result
Select a value from the attached pick list to note the
result of the last attempt made to phone this number.
You can add a pick list of result codes to use with
your call campaigns and reports. This information
is displayed when you view the Phone list from the
Debtor.
The default pick list mirrors the Last Result pick list
on the Phone record.
When changing the value in this field, and the
value is set to one of the types designated as
RPC in the applicable Contact Control record,
Collect! will attempt to find the associcated
Phone record and update the Last Result value
to match. The system will also check the RPC
box and fill in the Last RPC date with today's
date on that Phone record.
Advance Overpayments
This setting causes Collect! to consider overpayments
of promises as prepayments against future promises.
For instance, if a Debtor promises to pay $100 per
month, and actually makes a payment of $200, the
contact's Promise Date will move ahead two payment
periods when the transaction for $200 is posted.
If 'Advance overpayments' is switched OFF,
the Promise Date moves ahead only one period
whenever an overpayment is posted.
To switch this ON, select the check box next to
this field to place a check mark in it.
Do Not Autodelete
Switch this ON to prevent auto-deletion of this contact.
This is useful for overriding events in contact plans that
delete pending contacts. There may be cases where
you do not want pending contacts to be deleted when
a contact plan is run.
To switch this ON, select the check box next to this field
to place a check mark in it.
This also affects behavior when an account is
closed manually. Contacts with "Do not
autodelete" switched ON are not deleted.
However, Promises and Transactions will
be marked done when accounts are closed,
regardless of this switch setting.
Allow Delete On Close
Switch this option ON to override the Do Not Autodelete when
the mode is being set to Closed.
No Autocomplete
In WIP Options, the setting 'Automatically mark
contacts done' can be set so that Collect! marks
contacts as Done when they are worked from the
WIP List. To override this global setting for this
particular contact, switch ON 'No Autocomplete'.
To switch this ON, select the check box next to
this field to place a check mark in it.
No Autocomplete Promise
When an account reaches zero, Collect! with
automatically mark a promise as complete, even if
the No Autocomplete box above is checked. To override
this functionality for this particular contact,
switch ON 'No Autocomplete Promise'.
To switch this ON, select the check box next to
this field to place a check mark in it.
This box is useful if you are using Collect!
for recurring subscriptions where the account
balance reaches zero each period, but you want
the promise to remain active and move to the
next period.
Data
The Data field is typically used for information related
only to this particular contact. This information is stored
in a metafile within the contact record. This field will display
the file number by default, when you create a new entry.
You can change the filename displayed in the field to
anything you want, it is only a description. This field will
be empty if there is no additional information for this contact.
The Data field provides a convenient and flexible way
of passing messages around your office, or tracking
details of specific activity occurring on an account.
Adding information here keeps the related information
together. Perhaps you don't want to put it in the
Debtor's notes because it is not globally useful.
To the right of this field, there are three buttons. Use
these buttons to open, print or delete the information
contained in the metafile.
When you print letters through Collect!, the
Letter contact will save a copy of the letter
you printed and store it in this field. You
will see [METAFILE] displayed in the field.
You can view the letter by selecting the OPEN
button.
If your letter is printed to Email, then you will
see "Email: {File Number} in this field.
Attachment
The Attachment field may be used to store an actual
file with this particular contact. The field contains the
full path to an already existing file on your system. You
cannot use this field to create a file. This field will display
the attachment filename if there is a file attached to
this contact. It will remain empty if there is no attachment
for this contact.
The contact Attachment may be used for attaching a
scanned document or any other correspondence that
you want to store with the account. This information
may be quickly retrieved and viewed by selecting one
of the buttons next to the field. The file opens in whatever
program your system has associated with the type of
file you have attached.
To the right of this field, there are four buttons. Use
these buttons to perform the following actions.
- OPEN or create an attachment
- PRINT an existing attachment's contents
- DELETE an existing attachment
- SELECT an existing file to attach to this contact
To attach an existing file to this contact, select
the Magnifying Glass button. This feature lets you
attach any kind of file to your accounts in Collect!.
As long as Windows is set up to handle that file
type, you can instantly display or print any type of
original information about any account.
You can print Contact attachments in
reports and letters using the @File
command in your report templates.
However, the attachment file can ONLY
be a text file.
If you put a URL in this field, Collect! will
use your web browser to go to the web
site when you select the OPEN button.
By default, if there is no file path, just a file
name, Collect! will look for the file in the
Global folder for the Debtor. There are 3
exceptions to this: Letter, Email, and Phone.
Letter and Email contacts will look in the Global
Letters folder. Phone Contacts, if TCN is configured,
will look in the defined TCN folder for your call
recordings.
Letter and Emails contacts that use @PDF, @TXT, or
are RTF letters will automatically fill this field
with the file name of the first file produced.
The exception to this is if the Contact is a repeating
Contact without Create Copy on Repeat enabled.
Description
The Description field defines the details of the Contact.
The functionality of the Description field changes
depending on the Type of Contact that is scheduled.
For example, if you schedule a Letter, the
Description field becomes a pick list where you can
choose the letter you want printed from the list of
all reports in the system. Press F2 from the
Description field to display the list. For a Note Contact,
you type the actual text that you want written to the
debtor's Notes into the Description field.
Please refer to each Contact Type for details about
what to enter in the Description field for that type
of Contact.
Create Copy On Repeat
This field is visible only when there is a value in
the Repeat field.
Switch this ON with a check mark to create a completed
copy of the Contact every time it is forwarded. This
allows you to track a past history of the Contact.
If the Contact is a Letter, Collect! will attach a Metafile
to the completed Contact if you have Metafiles enabled.
This switch is referenced when Promises are forwarded,
when previously scheduled transactions are batched,
when letters are batch printed, or when contacts are
worked through the WIP List.
This switch will also be referenced whenever you
process automatic contacts previously scheduled.
All automated types of contacts are handled. This
includes Activate, Commission, Rate Plan, Transaction,
Plan, Status, Operator, Sales, Edit, Note and Close.
Log Repeat To Notes
This field is visible only when there is a value in
the Repeat field.
Switch this ON with a check mark to write a line to the
debtor's Notes every time the Contact is forwarded.
The note is in the following format:
[Type] type contact [Description], due [Date] processed
by [Op ID]
This switch is referenced when Promises are forwarded,
when previously scheduled transactions are batched,
when letters are batch printed, or when contacts are
worked through the WIP List.
Collector
This is the Operator ID assigned to this Contact. The
contact will show up in this operator's WIP List on the
contact's Date Due. Usually this is the Operator assigned
to the Debtor, but could include supervisory personnel to
review files, or other members of your team.
Reply
You can construct a reply to a contact and select
the Reply button to send it back to the operator in
the Assigned By field.
Assigned By
This is the operator who sent you the contact. This would
ordinarily be the same as the Originator. However, when
the contact has been forwarded, this could be a different
operator.
Originator
This is the operator who created the contact.
Done By
This is the operator who completed the contact. This is
a useful field to note if you need to track account
activity. It tells you who worked the contact and marked
it done. This field is visible only when a contact is
marked "Completed."
Created Date
This is the date the contact was created.
Created Time
This is the time the contact was created.
Done Date
This is the date the contact was done. This field is only
visible when a contact is marked "Completed."
Done Time
This is the time the contact was done. This field is only
visible when a contact is marked "Completed."
In Progress
A mark in the radio button beside this field
means that the contact has not been done.
The contact will be loaded into your WIP List
until the contact is marked completed.
For example, if it's a Phone Contact, the call
hasn't been made yet, and the contact will show
up in the operator's WIP List. If it's a Review, the
file hasn't been reviewed. If a Promise, there is
still a balance owing on the account.
Select this field, or press Spacebar on it, to turn
this switch ON.
Completed
A mark in the radio button beside this field
means that the contact has been completed.
The contact will no longer show up in any
WIP List or be processed in any other way.
When the Completed field is selected, several
other fields appear on the Contact form, to
date and time stamp when the contact was done.
Also, the Done By field appears, displaying
the ID of the operator who completed the contact.
Copy
This field is only visible if the Contact was created
as a result of the "Create copy on repeat" switch.
It is a Read Only field with a check mark indicating
that it was created when the repeating Contact
was forwarded to the next Due Date. It can be used
as a criterion in searches or just to keep track of
the account's history.
OK
Select this button to save any changes you have
made to this contact and return to the previous form.
<<
Select the BACKWARD navigation button to
view the previous Contact in the list.
>>
Select the FORWARD navigation button to view
the next Contact in the list.
New
Select this button to save any changes you may
have made to this contact and then create a new
blank contact for you to fill out.
Defaults
Select the 'Defaults' button to open the WIP Options
form where you can change the settings for the default
behavior of your Work In Progress.
Cancel
Select this button to ignore any changes you may
have made to this contact and return to the
previous form.
Help
Select this button for help on the Contact form
and links to related topics.
Delete
This button is visible only on the list of all contacts.
Select it to delete the highlighted contact from
the database.
Edit
This button is visible only on the list of all contacts.
Select it to open and edit the highlighted contact.
Examples Of Contact Scheduling
The following are a few examples of the contact
scheduling process.
Schedule A Future Contact
To schedule a Contact for the future:
- Press F3 to create a new Contact record.
A blank form is displayed.
- Press F2 to change or assign a Debtor for
this Contact.
- Press Tab to move to the Type field.
- Press F2 to pick the type of Contact you
want to create.
- Select Review, for example, and press Enter.
- Pick a date to review the file.
- Enter your own ID as the Operator assigned to
this Contact.
- Select the OK button to save the Contact.
Schedule A Contact For Another Operator
To schedule a Contact for another Operator:
Do the same as the example above, just use that
Operator's ID rather than your own.
Metro Contact Description Codes
Please refer to the Help topic How To Read The Metro Contact Description
for more information.
Single Promise
When you receive a promise from a debtor to pay a certain dollar amount on a specific date, you can
create a Promise contact to keep track of the agreement. When a payment is received, Collect! will
mark the contact as Done.
Creating a Promise Contact
To enter a Promise Contact for an account, we must first open the Contact form while on the debtor's
account.
- Once the Debtor form is displayed, select the field labeled Owing. This will
display the Debtor Financial Summary.
- Select the PROMISE SCHEDULE button on the Debtor Financial Summary. You will be prompted to
create a Promise.
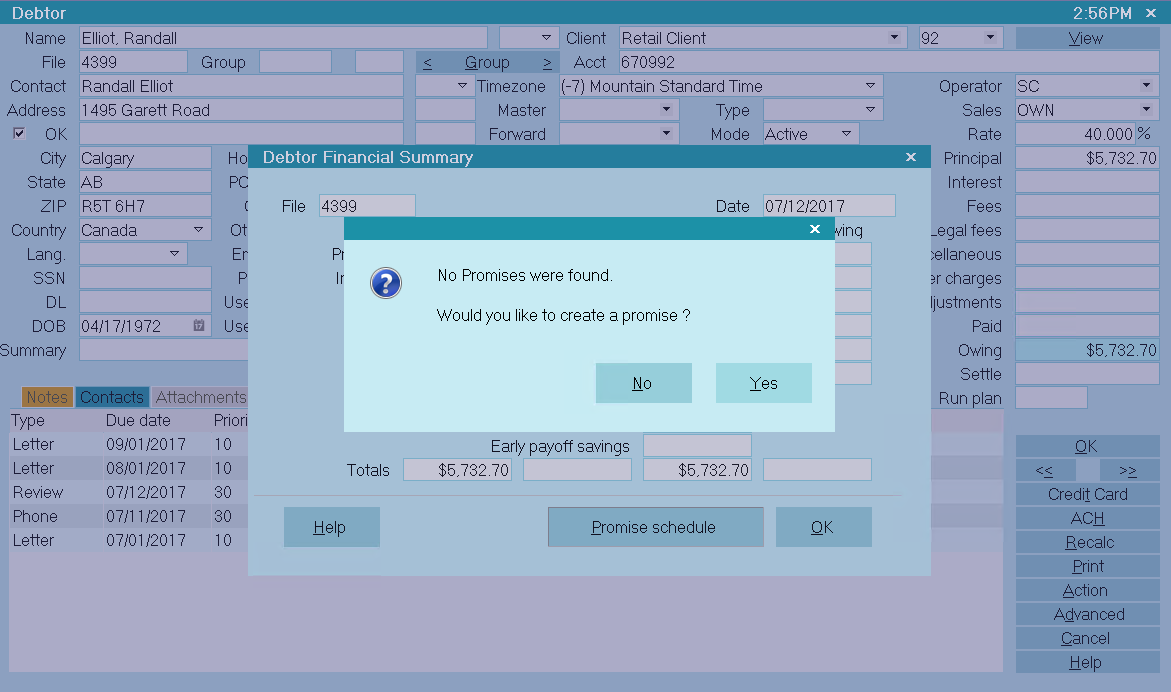
Prompt to Create a Promise
- Select YES to display a new Contact form.
The Contact form will display, filled with any defaults, such as Priority and Delays Days,
that have been set in the WIP Options.
You will notice that the Debtor's Name and Due Date are entered automatically. The Due Date may be
in the future if you have "Delay Days" set in the WIP Options form. As well, the default contact
Type field should already display "Promise."
- If needed, you can select the field labeled Type to view the list of Contact
types. Use the PageUp or PageDown key to see the whole list. Select PROMISE from the list, if
it is not already displayed in the Type field.
- The Contact's Due Date determines when the promised payment is due. The default is today, but
the Due Date may be in the future, if you have "Delay Days" set in the WIP Options. Select the
Calendar icon to the right of the Due Date field and choose the date the payment must be
made.
- Locate the field labeled Repeat. This field is used to schedule repeating
promise payments. Ensure that "No Repeat" is selected for now, as we are scheduling a single
Promise.
- Locate the field labeled Advance overpayments. This field is used to manage
repeating promise payments. Ensure that it is unchecked as we are scheduling a single
promise.
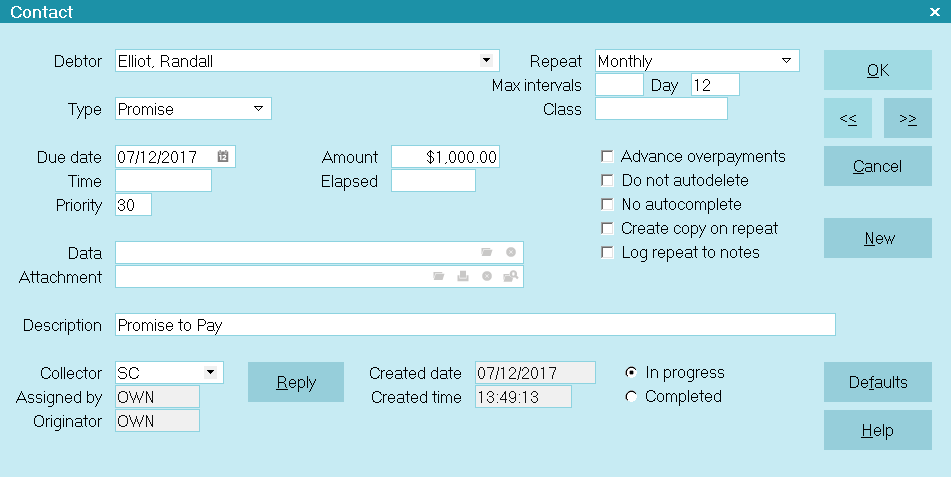
- Enter the amount of the promised payment in the field labeled Amount.
- In the Description field, enter a description or a short note for the operator, such as,
"Promise to pay."
- If you want to assign this promise to another Operator's WIP List, select the down arrow next
to the field labeled Collector to view the list of operators and make your
selection.
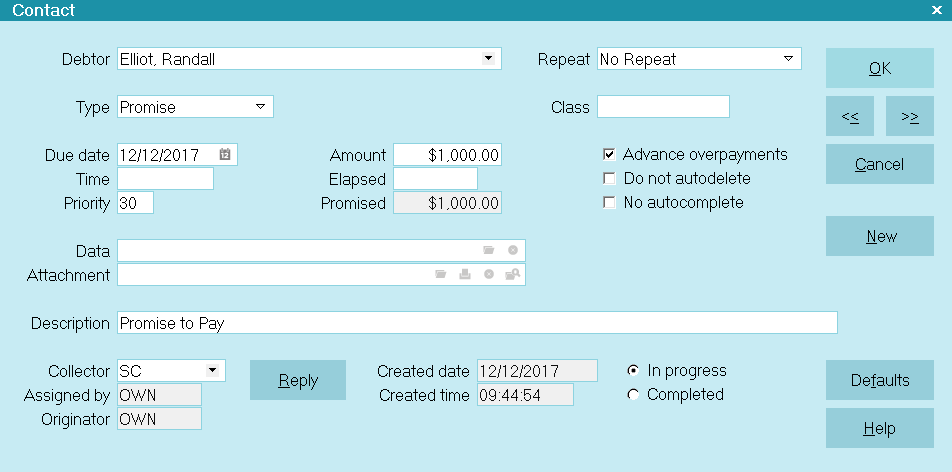
Contact for Single Promise
- Press F8 to save this Contact.
If you see a prompt to "automatically manage promises," please refer to that section below.
- The Promise Listing Summary will be displayed with the newly created promise details
displayed.
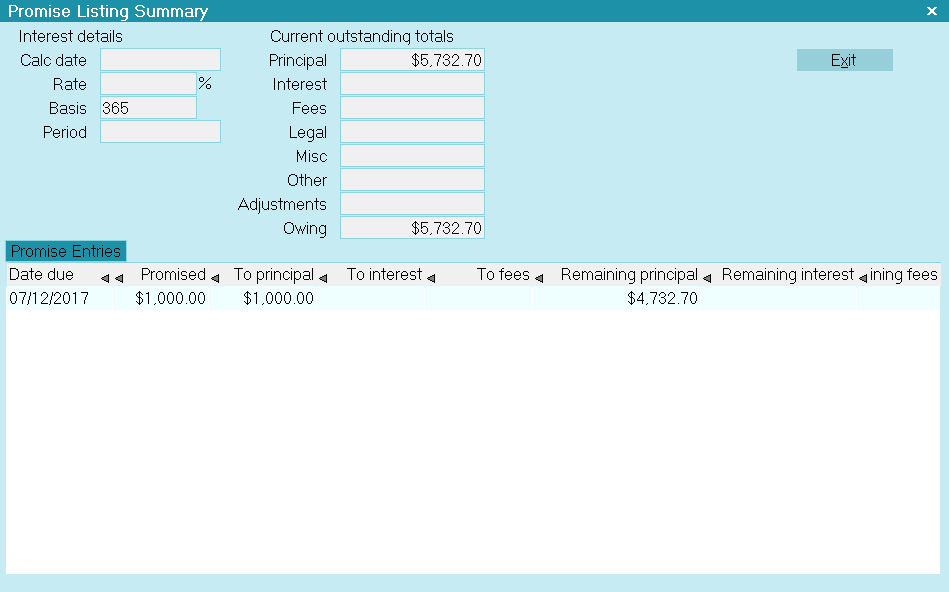
Promise Listing Summary with Promise Displayed
- Select EXIT to close the Promise Listing Summary. Then select OK to close the
Debtor Financial Summary.
Viewing the Debtor Form
When you are back at the Debtor form, select the RECALC button to refresh the account information.
The Due Date of the Promise will be displayed in a field labeled Promise on the
Debtor form, to the left of the OK button.
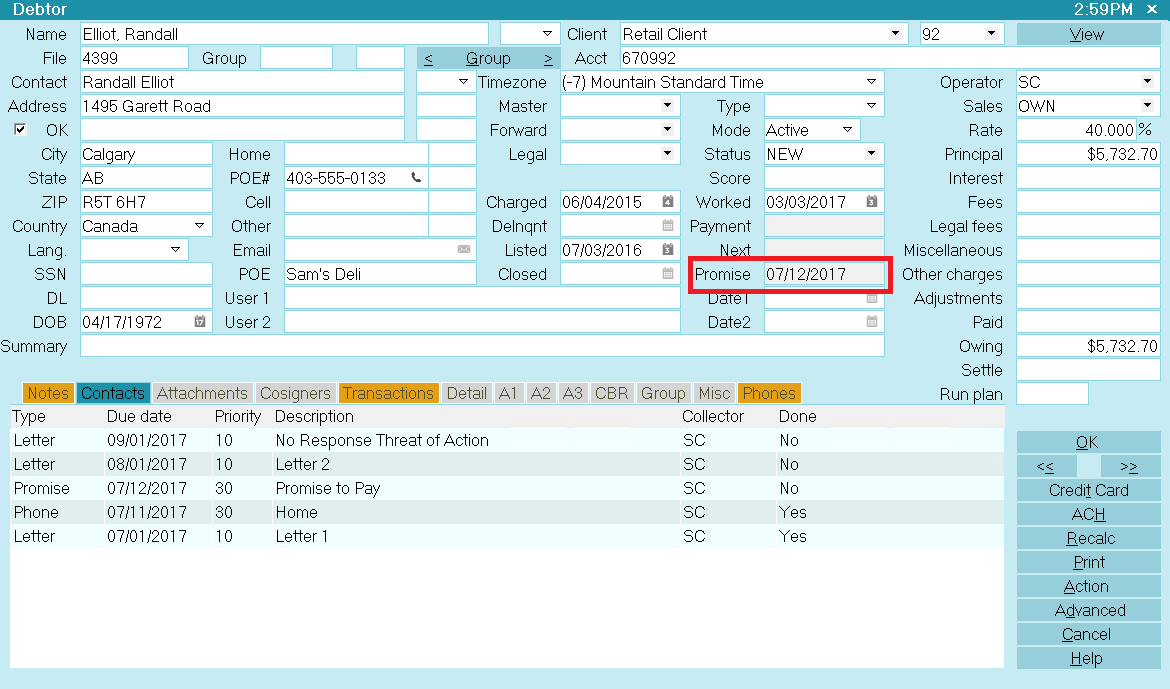
Debtor Screen with Promise Date
If the promised payment is not received by this date, the Promise field will turn RED.
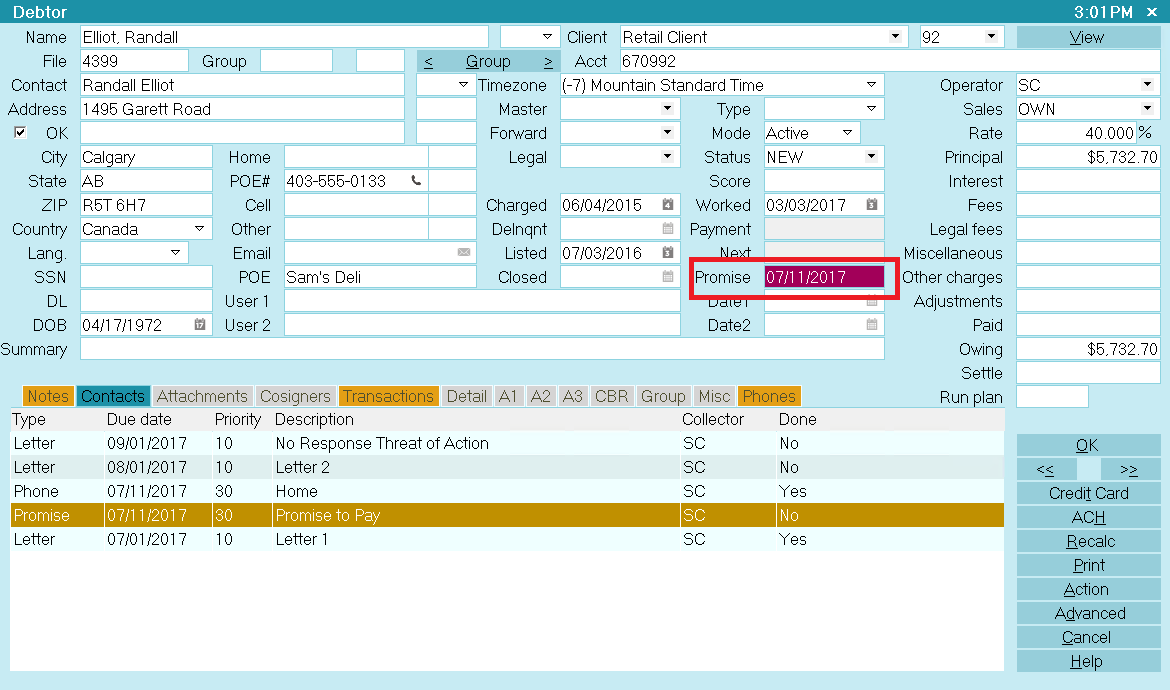
Debtor Screen with Promise Date Delinquent
To automatically refresh the financials on the Debtor form, switch ON 'Automatic recalc' for
the Operator. This switch is set in the Operator form.
Loading the WIP List
The day that this promise comes due, the Promise Contact will show up in the operator's WIP list.
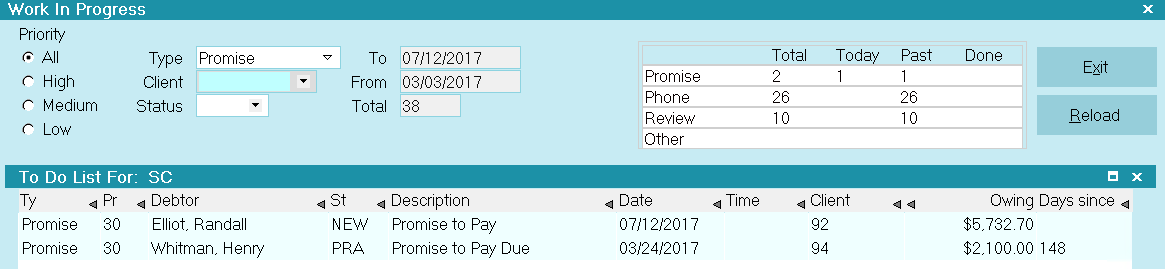
WIP List With Promise Contact Loaded
If the promised payment is not received, the Promise will stay in the operator's WIP list as
delinquent.
Posting A Promise Payment
Now you can use the Promise contact to record and process Debtor payments.
Ensure that Automatically Manage Promises is switched ON in the Payment Posting Options form.
When a payment is received, post a Payment transaction. The To Us field in the Transaction form will
show the Promise Amount.
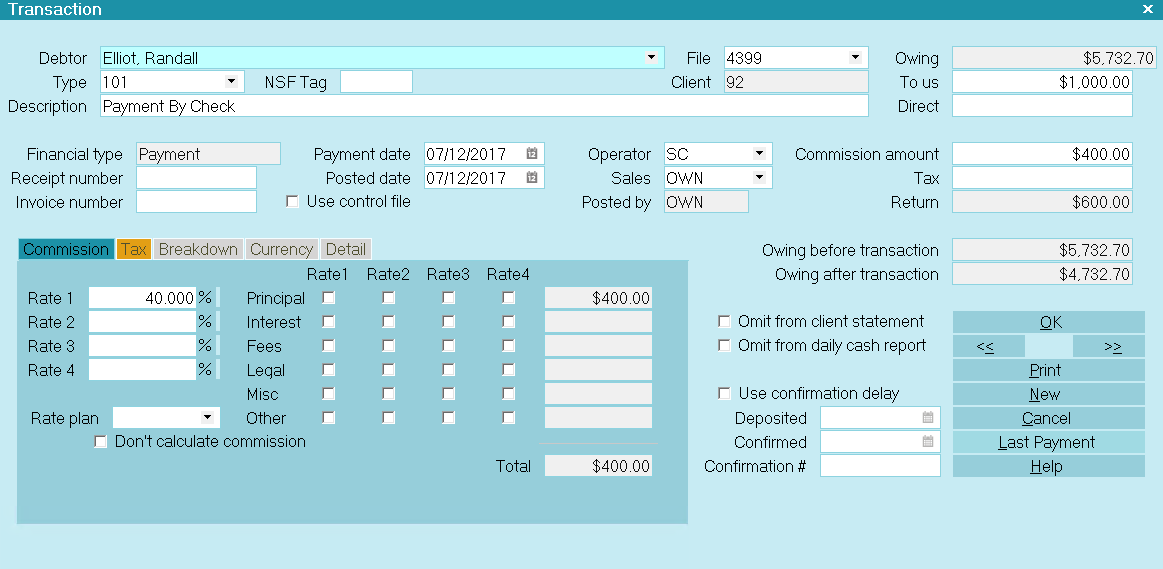
Payment Transactions with Promise Amount
After the transaction is posted, Collect! will locate the Promise contact, evaluate the payment and
mark the contact as done if the promise has been met. When the promise is met and there are no other
outstanding promises, the debtor's Promise field is empty. A partial or incomplete payment does not
satisfy the Promise and it remains In Progress after the payment is posted.
If there is interest to be calculated, this is calculated and added to the Owing before the
promise amount is displayed.
When an NSF Check is Returned
When an NSF check is returned, enter the amount as a negative and Collect! will back date the promise
to its outstanding date and amount.
Multiple Single Promises
Following the same steps as outlined above, you may enter more than one promise payment. The screen
shot below shows three promises scheduled for different dates and amounts.

Multiple Single Promises
The Promise field on the Debtor form will display the date of the earliest unmet promise in the
contact list.
When a payment is posted, the amount of the earliest unmet promise will be automatically filled
in. This contact will be marked done when the payment is posted.

One Promise Met with Two Outstanding
Ensure that 'Automatically Manage Promises' is switched ON in the Payment Posting Options form.
Repeating Promises
What is a repeating Promise? A repeating Promise is a Promise contact with a Repeat value and an
Amount filled in. Collect! will manage this contact, evaluating it whenever a payment is posting and
forwarding the Promise Due Date as necessary according to the Promise contact settings.
The "Automatically manage promises" switch must be switched ON in Payment Posting Options
for this method to work.
- As described above, create a Promise contact for the debtor through the Debtor Financial Summary
form.
- When the new Contact form is displayed, select Promise from the Type pick list.
- In the Due Date field, select the calendar icon to display the Calendar, and select a date
for the first promised payment.
- Enter a value in the Repeat field, such as Monthly. This creates a revolving contact.
- In the Amount field, enter the dollar amount that the Debtor has promised to pay each month.
- Locate the field labeled Advance overpayments. Switch this ON if you wish to
consider overpayments as fulfillment for future promises.
- Enter a description in the Description field. Assign the contact to a specific operator if
desired.
Contact for Monthly Promise To Pay
- Press F8 to save this Contact. The Promise Listing Summary will be displayed with the newly
created promise details displayed.
If you see a prompt to "automatically manage promises," please refer to that section below.
Select EXIT to close the Promise Listing Summary. Then select OK to close the Debtor Financial Summary.
Collect! automatically stores the Payment Amount dollar value in the Interest Detail for the account.
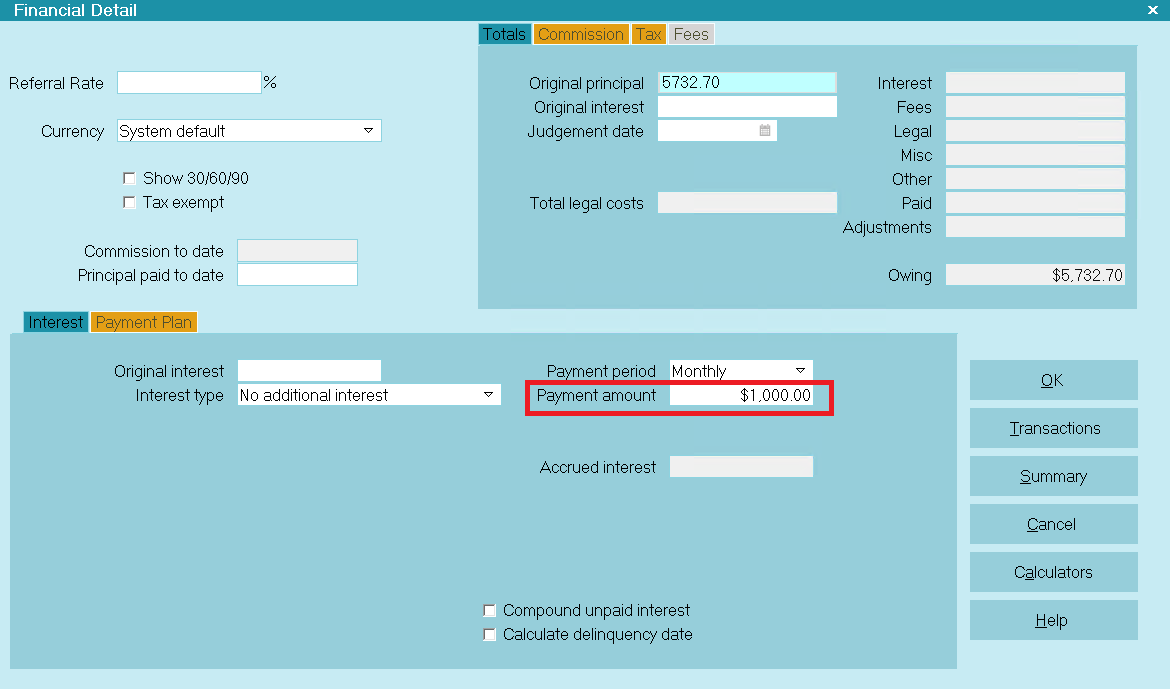
Promise Amount Stored in Interest Detail
Collect! uses this each month to see whether or not the Promise is met. If the Promise is met, the
Promise Contact Due Date will roll forward to next month, same day. If the Promise is not met, the
Promise Contact Due Date does not roll forward. When the debt is completely settled, Collect! marks
the Promise Contact as Done.
When a payment is partial, Collect! does not forward the promise. Instead, the remaining amount is
still due on the current promise date.
When the payment is nearing completion, Collect! automatically adjusts the final payment to reflect
the actual amount outstanding. The last payment turns off the promise contact cycle automatically
when the Owing reaches zero.
Ensure that 'Automatically Manage Promises' is switched ON in the Payment Posting Options form.
Special Settings On The Contact Form
Several settings in Collect! influence how promises are handled. These are described below.
Advance Overpayments
The 'Advance Overpayments' switch on the Contact form is used to manage overpayments when a promise
payment is received.

Advance Overpayments Enabled
With this switch enabled, Collect! will roll the Promise Due Date forward according to how many
periods are satisfied by the payment. For example, if the debtor pays $300 at once, and that
satisfies 2 monthly payments of $150, the Date Due will roll forward 2 months when this switch is
enabled. If it is not enabled, the Date Due will roll forward only one month, no matter how much
is overpaid.
Max Intervals
Optionally, you can set a number of repeats for a Promise. Collect! will only repeat the Promise
the number of times you set, even if this does not fully pay off the debt.
When a repeating Promise rolls forward and there is a value in the Max Intervals field, the value
will be decremented. When it reaches 0, the Contact will be completed regardless of the Debtor's
Owing. This enables you to accept a series of Promise payments even if this agreement does not
fully pay off the debt. Without a value in the Max Intervals field, a Promise repeats until the
debt reaches zero.
Max Intervals will also work with the Copy on Repeat switch, the Advance Overpayments switch, and
contact plans that schedule repeating Promise contacts.
WIP Reload Filters Form
Click Here to View this Form.
Click Here to Close this Form.
The WIP Reload Filters form allows you to select the types
of contacts to load into your To Do List. Collect! loads all
Promise, Phone, Review and Other contacts by default.
Choosing specific Contact types can make your list shorter
and easier to manage. Fastest load performance is obtained
when you load a single Contact Type.
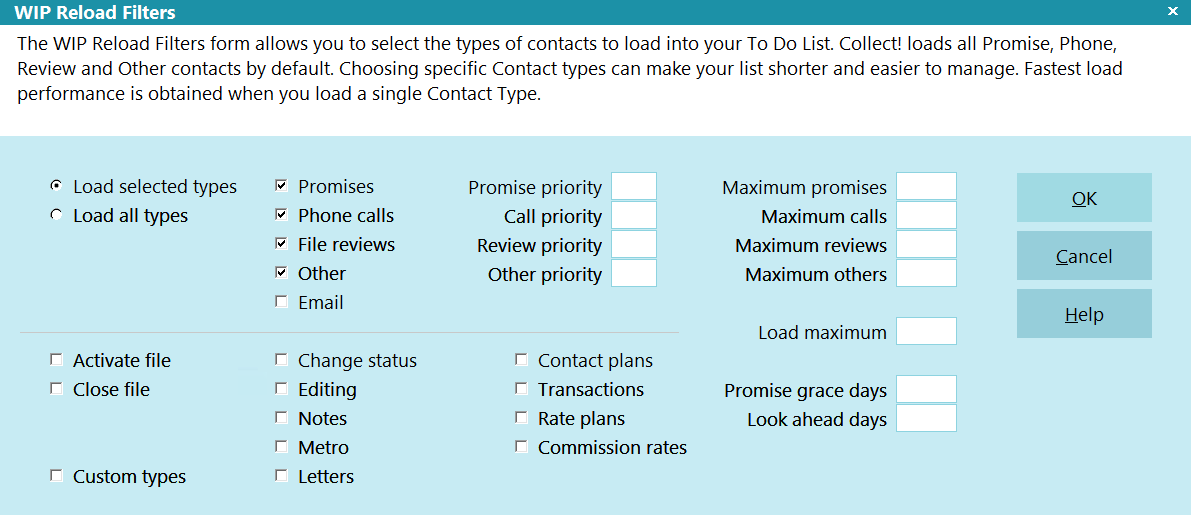
WIP Reload Filters
The WIP Reload Filters form lets you select all contacts
or specific Contact types. When you press the Reload
button on the Work In Progress form, the Reload Work
In Progress List form displays. Press the Select Types
button to access the WIP Reload Filters form.
Making A Selection
Some fields in the WIP Reload Filters form are "switches."
A check in the box switches it ON and unchecking
switches it OFF. Use the TAB key to move from one of
these fields to another. Use the spacebar to check or
uncheck the box. Or click in the box to check or
uncheck it.
Load Selected Types
Switch this ON with a check mark to choose the types to
load into your WIP List. With this option you can be very
flexible regarding the contacts you choose to appear in
your WIP List. Click the choice to mark or unmark it or
use the spacebar.
Selected types will also be used as defaults
when Collect! searches for pending contacts
when you have enabled Schedule Next Contact
functionality. Please refer to that Help topic
for details.
Load All Types
This setting should be used cautiously. It is meant for
administrative purposes and not for normal working of
a collector's WIP List!
Switch this ON with a check mark to force all contacts to
be displayed in your WIP List. All other options are grayed
out when this field is switched ON. Click the choice
to mark or unmark it or use the spacebar.
When you turn this switch ON, Maximum
values you enter in other areas of the form
are disregarded. Also, Collect! changes what
it considers a future Contact. Normally only
Phone calls, Reviews, Promises and Other
Contact types qualify as a future Contact.
When this switch is turned on, ALL Contact
types qualify as future Contacts.
When Load All types is selected, ALL contact types are
set to display and users can not modify which events to
display.
Schedule Next Contact - Pending is also disabled when
this setting is switched ON.
Promises
Switch this option ON to include Promise
contacts in your WIP lists. Click the choice
to mark or unmark it or use the spacebar.
Phone Calls
Switch this option ON to include Phone Call
contacts in your WIP List. Click the choice
to mark or unmark it or use the spacebar.
File Reviews
Switch this option ON to include Review
contacts in your WIP List. Click the choice
to mark or unmark it or use the spacebar.
Other
Switch this option ON to include Other
contacts in your WIP List. Click the choice
to mark or unmark it or use the spacebar.
Email
Switch this ON to show email contacts in your
To Do List. Click the choice to mark or unmark
it or use the spacebar.
Promise Priority
When you limit the number of Promise contacts
loaded you may want to load certain types
before others. Set a priority from 1 to 4 here
with 1 being the highest priority and 4 being
the lowest.
Call Priority
When you limit the number of Phone contacts
loaded you may want to load certain types
before others. Set a priority from 1 to 4 here
with 1 being the highest priority and 4 being
the lowest.
Review Priority
When you limit the number of Review contacts
loaded you may want to load certain types
before others. Set a priority from 1 to 4 here
with 1 being the highest priority and 4 being
the lowest.
Other Priority
When you limit the number of Other contacts
loaded you may want to load certain types
before others. Set a priority from 1 to 4 here
with 1 being the highest priority and 4 being
the lowest.
Maximum Promises
Enter a number to limit the maximum number
of Promise contacts that may be loaded into
your WIP at any one time. If you have a very
large WIP List you can speed up loading
contacts by entering a number here.
Maximum Calls
Enter a number to limit the maximum number
of Phone contacts that may be loaded into
your WIP at any one time. If you have a very
large WIP List you can speed up loading
contacts by entering a number here.
Maximum Reviews
Enter a number to limit the maximum number
of Review contacts that may be loaded into
your WIP at any one time. If you have a very
large WIP List you can speed up loading
contacts by entering a number here.
Maximum Others
Enter a number to limit the maximum number of
Other contacts that may be loaded into your
WIP at any one time. If you have a very large
WIP List you can speed up loading contacts by
entering a number here.
Daily Batch
When marking choices in the WIP Reload
Filters form, you should only flag the types
of contacts that need Operator intervention.
Other types are done in the daily batch.
Activate File
Switch this option ON to include Activate File
contacts in your WIP List. Click the choice
to mark or unmark it or use the spacebar.
Close File
Switch this option ON to include Close File
contacts in your WIP List. Click the choice
to mark or unmark it or use the spacebar.
Custom Types
Switch this option ON to include the user-defined
types with a value of 50 or higher. Click the choice
to mark or unmark it or use the spacebar.
Change Status
Switch this option ON to include Change Status
contacts in your WIP List. Click the choice
to mark or unmark it or use the spacebar.
Editing
Switch this option ON to include Editing
contacts in your WIP List. Click the choice
to mark or unmark it or use the spacebar.
Notes
Switch this option ON to include Notes
contacts in your WIP List. Click the choice
to mark or unmark it or use the spacebar.
Metro
Switch this option ON to include Metro contacts
in your WIP List. Click the choice to mark or
unmark it or use the spacebar.
Letters
Switch this option ON to include Letter
contacts in your WIP List. Click the choice
to mark or unmark it or use the spacebar.
Contact Plans
Switch this option ON to include Contact Plan
contacts in your WIP List. Click the choice
to mark or unmark it or use the spacebar.
Transactions
Switch this option ON to include Transaction
contacts in your WIP List. Click the choice
to mark or unmark it or use the spacebar.
Rate Plans
Switch this option ON to include Rate Plan
contacts in your WIP List. Click the choice
to mark or unmark it or use the spacebar.
Commission Rates
Switch this option ON to include Commission Rate
contacts in your WIP List. Click the choice
to mark or unmark it or use the spacebar.
Load Maximum
Enter the Maximum number of contacts to load at
any one time. This is useful if you have a very large
WIP List that takes some time to load.
This value works in conjunction with the maximum
values for the different types of contacts, such that
contacts of each type will be loaded in order of Priority
up to the Load Maximum limit.
Promise Grace Days
Enter a value here for the number of days to wait
before considering a promise overdue. This means
a promise will only display in the WIP List when
the due date of the promise plus the grace days
exceeds today. This overrides the global WIP settings
for showing "future" or "today and past" contacts.
Look Ahead Days
When Search all dates is switched ON in the
Reload Work In Progress List form, you can limit the
number of days in the future Collect! will load
Contacts for.
- Enter 7 to Look Ahead one week.
- Enter 30 to Look Ahead one month.
- Enter 365 to Look Ahead one year.
- Leave blank to Look Ahead all dates in the future.
OK
Select this button to save any selections you have
made and reload your WIP List showing only the
Contact types you have marked.
Cancel
Select this button to ignore any selections you have
made and return you to your WIP List.
Help
Press this button for help on the WIP Reload Filters
form and links to related topics.
Grace Days
If you wish to wait a few days grace before considering the Promise as overdue, open the WIP Reload
Filters and enter a number of days in the 'Promise Grace Days' field.
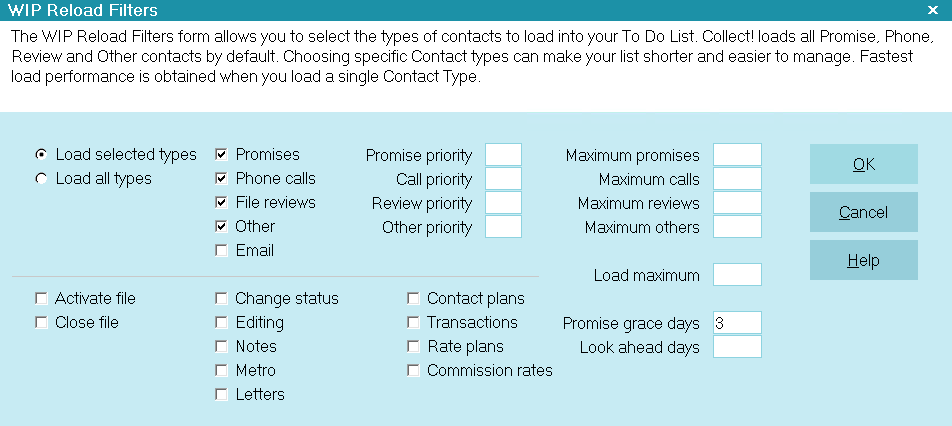
WIP Reload Filters with Promise Grace Days
The Promise will only display in the WIP List when the grace period has expired. This means the Due
Date of the promise plus the Promise Grace Days exceeds today. For instance, on April 12th, a Promise
for April 8th with a 3 grace days is now overdue. On April 12th, the Promise will show up in the
operator's WIP List.
Automatic Promise Actions Set In The Payment Posting Options
Click Here to View this Form.
Click Here to Close this Form.
The Payment Posting Options form is used for setting actions
performed when a payment is posted to an account. Each action
is a contact plan that runs automatically when the payment
posting condition is true.
You can manage promises and payment plans and determine
what to do when accounts are paid in full.
You may have a policy to close all accounts below a certain
balance, or run a certain contact plan when a payment is
received. With Collect! you can automate the logical
procedures for managing promised payments, administering
payment plans and posting normal payments received in the
course of daily operation.

Payment Posting Options
Payment Posting
When you post a payment the following sequence occurs:
- The Default contact plan specified is run (if there is one).
Please be careful here. If you run a contact
plan that closes a debtor, the debtor will no longer appear
in your WIP List and may be effectively "lost" to your
system.
- The plan associated with the transaction type is
run (if there is one).
A contact plan set in the transaction type
you are posting is executed before any further action
is taken using the Payment Posting Options you have
set. So it is important that no conflicting plans are set
up by accident in your transaction types.
- The appropriate payment posting plan is run (if there is
one).
Write Date To Debtor Record
Switch ON 'Write date to debtor record' to automatically
write the current date to the debtor's Payment date
whenever a Payment transaction is posted to the
account.
To flag this field, select it with your mouse
or, while you are in this field, press your space
bar to toggle the switch off or on.
Use NSF Date
This option works with the Write Date to Debtor Record
option above.
When checked, Collect! will use the Payment Date of the
last payment transaction, regardless of positive or negative
value, for the Last Payment Date on the Debtor Form.
Example: With the below dates, Collect! will use 02/02/2022
for the Last Payment date on the debtor.
01/01/2022: Payment
02/01/2022: Payment
02/02/2022: Reversal
When unchecked, Collect! will use the Payment Date of the
last successful payment transaction. In other words, if
you post a reversal payment, and Collect! can match that
reversal to an existing payment, then both the reversal
and payment are ignored and the Payment Date of the
payment transaction before that payment is used.
Example: With the below dates, if the reversal is properly
entered, then Collect! will use 01/01/2022 for the
Last Payment date on the debtor.
01/01/2022: Payment
02/01/2022: Payment
02/02/2022: Reversal
Automatically Manage Promises
Switch ON 'Automatically manage promises' to
have Collect! manage promised payments. Collect!
will advance the debtor's Promise date when the
promise is met. Specified contact plans for full
payment, underpayment, overpayment, NSF
payment and broken payment conditions are called
when necessary.
When this switch is ON and a payment is posted,
Collect! automatically fills in Promise details
based on the Promise contact's promised Amount
and the setting for Transaction Type in the
Payment Values form.
SWITCHED ON
When this switch is ON and you save the posted
transaction, Collect! checks the payment amount
against the amount promised. If the promise amount
is met, the debtor's Promise date is advanced.
Collect! calls the contact plan associated with full,
under or over payment, NSF or broken payment,
as needed.
If you are a large office where the person posting
payments has little or no knowledge of the accounts
they are posting to, switch this ON to control what
happens for over and under payment. This enables
you to send the file to an account manager for review
in exceptional cases.
When a payment is posted, Collect! examines contact
and transactions, checking for promised payments. If
a promise is found, Collect! fills in the transaction
details as soon as you open a new Transaction form.
You may then edit the payment being posted if needed.
SWITCHED OFF
When this switch is OFF and you save the posted
transaction, Collect! does not advance the debtor's
Promise date, and does not call any contact plan.
You are manually in control of whatever happens next.
If you are a small office where the person posting
payments has some knowledge of the accounts
being posted to, you can leave this switch OFF and
manage your promises manually.
When this switch is OFF and you post a new
transaction, Collect! will not fill in the details
automatically. If you select a Payment transaction
Type, then, if a promise is found, Collect! fills in the
transaction details. You may then edit the payment
being posted if needed.
To access the Payment Values form, select
the ADVANCED button on the
Payment Posting Options form.
Use Today For Payment Date
By default, when a Promise exists on an account
and the Due Date is in the future, Collect! will use the date
of the next Promise for the Payment Date in any new
transactions. When this switch is set, Collect! will always
use the current date for the Payment Date by default
when a new Transaction is posted.
This is only in effect when the Promise Due
Date is greater than today, "Automatically
manage promises when posting" is
switched ON and the transaction is a
PAYMENT type transaction.
Use Today For Posted Date
By default, when a Promise exists on an account and the
Due Date is in the future, Collect! will use the date of the
next Promise for the Posted Date in any new transactions.
When this switch is set, Collect! will always use the current
date for the Posted Date by default when a new Transaction
is posted.
This is only in effect when the Promise Due
Date is greater than today, "Automatically
manage promises when posting" is switched
ON and the transaction is a PAYMENT
type transaction.
Truncate 33 Percent Commission
Switch ON 'Truncate 33 percent commission' to
truncate 33% commission rates. When this switch
is OFF, a 33.3% commission is calculated as 1/3.
Automatically Run Default Plan
Switch ON 'Automatically run default plan when
posting' to run a contact plan every time you
post or edit a payment. The plan you run can perform
conditional event scheduling based on amount
owing, debtor status, or other criteria you choose.
If you want to run the default plan only when the
debtor's Owing falls below a threshold level,
enter the amount in the 'Run only when balance
below' field.
If you want to process and close accounts
manually, leave this switch OFF.
To flag this field, select it with your mouse
or, while you are in this field, press your space
bar to toggle the switch off or on.
Don't Automatically Create 196
By default, Collect! will create an Original Principal
transaction of Type 196, as needed, whenever you
create or modify financial details on an account.
The 196 transaction keeps track of the Principal
amount of the debtor. This is necessary for correctly
calculating interest, applying a judgment or adding
more principal at a later date.
Switch this OFF to prevent Collect! from automatically
creating the 196 transaction.
Please be aware that you may have to
manually create a Principal transaction
if you switch this OFF.
Early Payments Skip Promises
Switch ON 'Early payments skip promises' to disable managing
promises on an account if a payment is posted before the
due date. This feature works in conjunction with the DAYS
field below. Payments posted before X or more days will not
manage the promise. The payment will be treated as an extra
payment.
This feature only works if the USE TODAY FOR XXX DATE
switches are set above.
Days
This field applies to the EARLY PAYMENTS SKIP PROMISES box above.
Enter a value here to represent the number of days an early payment
will not invoke manage promises. For example, if you enter a value
of 7, any payments posted more than a week before the promise's
due date will be treated as an extra payment, but any payment
posted in the last week will be considered as the current payment
and update the promise.
Run Only When Balance Below
Enter a dollar value in the 'Run only when balance
below' field. The default automatic contact plan
will run only when the debtor's Owing falls below
the amount entered. For example, if you enter 50,
the contact plan will be invoked automatically only
when an account Owing drops below $50.00.
Leave this field blank to always run the
contact plan regardless of the Owing amount.
Default Contact Plan
In the 'Default contact plan' field, enter the ID Code
of the default contact plan to run automatically
when posting a payment. Press F2 to view the list of
contact plans in the system.
This plan is run AFTER any Contact Plan
you set up in the Payment Posting Options
form. This is due to the fact that the
transaction plan may do more processing
like posting a reversal to split the payment
across a group, which will alter the OWING
amount.
Be careful here. Running a contact plan that closes
a debtor removes this debtor from your WIP List.
The debtor may appear "lost" to the system.
Confirmation Delay
Enter a number of days to delay reporting transactions
posted with 'Use confirmation delay' switched ON. You
can enter a number from 0 to 999 in this field. Collect!
uses this number when generating statements. Please
refer to Transaction Confirmation Delay for details.
Promise Contact Actions
The payment conditions listed here apply when there
is a Promise contact set up on an account. Full, under
and over payments, NSF and broken promise payments
may each cause a plan to run. This requires that you
have switched ON 'Automatically manage promises'.
Collect! does four things with Promise contacts:
- When a debtor has a Promise Contact, the debtor
Promise field displays the date the payment is
due. If this date passes by without a payment
posted, the promise becomes delinquent and the
field is displayed in red when the debtor totals
are recalculated.
- When a payment is posted, Collect! checks for
Promise contacts and fills in the transaction
details for your confirmation.
- If the contact contains a Repeat Value, the contact
is forwarded to the future date when the promised
payment is posted.
- When a promised payment is posted, Collect! runs
the appropriate contact plan for full payment, under
payment, or over payment, NSF or broken promise.
Press F2 or select the down arrow at the right of
each field below to pick from the list of contact plans
in the system.
Promise Full Payment
Select the ID Code of a contact plan to run for 'Promise
full payment'. When the full amount of a Promise contact
payment is posted, Collect! will run this plan.
Promise Underpayment
Select the ID Code of a contact plan to run for 'Promise
under payment'. When less than the full amount of a
Promise contact payment is posted, Collect! will run this
plan.
Promise Overpayment
Select the ID Code of a contact plan to run for 'Promise
over payment'. When more than the full amount of a
Promise contact payment is posted, Collect! will run
this plan.
Promise NSF Payment
Select the ID Code of a contact plan to run for 'Promise
NSF payment'. When you post a transaction for a negative
amount due to an NSF payment returned because of
insufficient funds, Collect! will run this plan.
Promise Broken Payment
Select the ID Code of a contact plan to run for 'Promise
broken payment'. When you run your daily batch process
for broken promises, Collect! will run this plan for any
delinquent promise that is found. This works when you
switch ON 'Broken promises' in the Select Contacts To Process
form.
A promise is considered delinquent when no
payment has been posted during the past
payment period, (i.e., week, month or
whatever Repeat period is displayed in
the Promise Contact.)
Promise Schedule Payment Order
This section has no impact on how payments are posted.
To control the order that payments are applied to,
please refer to Transaction Type settings.
This section allows you to set the payment order for
the Promise Schedule. There are 3 options for the
order: First, Second, and Third.
The screenshot above demonstrates paying Fees first,
then Principal, and finally Interest.
Principal
Set the position to apply the predicted promise payment.
Interest
Set the position to apply the predicted promise payment.
Fees Legal Other Misc
Set the position to apply the predicted promise payment.
WARNING: The above payment order will only be used if
all 3 fields are filled in. If any of them
are left as Unspecified, Collect! will use the
default order of Fees, then Interest, then Principal.
Payment Plan Actions
Using the Payment Plan feature, the payment conditions
listed here apply when there is a Payment Plan set up
on an account. Full, under and over payments may each
cause a plan to run. This requires that you have switched
ON 'Automatically manage promises'.
Collect! does three things with Payment Plans:
- When a debtor has a promised transaction, the debtor
Promise field displays the date the payment is due.
If this date passes by without a payment posted, the
promise becomes delinquent and the field is displayed
in red when the debtor totals are recalculated.
- When a payment is posted, Collect! checks to see if
there are any promise payment transactions and fills
in the transaction details for your confirmation.
- When a promised payment is posted, Collect! runs the
appropriate contact plan for full payment, under
payment, or over payment.
Press F2 or select the down arrow at the right of
each field below to pick from the list of contact plans
in the system.
Plan Full Payment
Select the ID Code of a contact plan to run for 'Plan
full payment'. When the full amount of a payment plan
payment is posted, Collect! will run this plan.
Plan Underpayment
Select the ID Code of a contact plan to run for 'Plan
under payment'. When less than the full amount of a
payment plan payment is posted, Collect! will run this
plan.
Plan Overpayment
Select the ID Code of a contact plan to run for 'Plan
over payment'. When more than the full amount of a
payment plan payment is posted, Collect! will run this
plan.
OK
Select this button to save any changes you may
have made and return to the previous form.
Advanced
Select the Advanced button to open the
Payment Values form where you can set minimum
and maximum values for Collect! to accept as
fulfilled payment when a payment transaction is
posted. These values determine when to evoke the
different contact plans that you assign in the
Payment Posting Options form.
You can also set a Transaction Type to use by
default whenever a Payment is posted on an
account with an In Progress Promise. By default,
Collect! uses Transaction Type 101 but you can
use any Payment type.
Cancel
Select this button to ignore any changes you may
have made and return to the previous form.
Help
Select this button for help on the Payment Posting Options
form and links to related topics.
Promise Contact Actions are contact plans that enable you to perform custom actions as Collect!
automatically manages promises on your accounts. You can schedule whatever events you need for full
payment, underpayment, overpayment, NSF payment and broken promises. Any payment posted to an account
with a Promise will trigger one of the promise contact plans. Broken promises are managed through
Batch Processing.
Remember that whenever you use contact plans, you have to be careful that you know every step the
plans will take on your accounts.
Other promise contact plans shipped with the Demonstration database are Promise Activate (PRA) to
start a Promise on an account and Promise Review (PRR) to review an account that has a Promise set
up.
Promise Contact Actions are set in the Payment Posting Options form and are enabled when you switch
ON 'Automatically manage promises' in the same form.
Promise Contact Actions set in Payment Posting Options
The contact plans used for promises must be set up beforehand or must exist already in your
system. They are shipped with Collect! and may be copied from the Demonstration database.
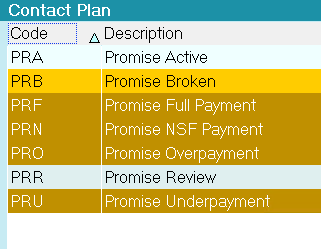
Contact Plan list with Promise Contact Plans
Collect! ships with plans and settings in place to manage promises automatically. We will explain
how each plan performs.
We will cover:
- Automatically Manage Promises
- Promise Full Payment
- Promise Underpayment
- Promise Overpayment
- Promise NSF Payment
- Promise Broken Payment
- Payment Values
Automatically Manage Promises
'Automatically Manage Promises' must be switched ON in the Payment Posting Options form so that
Collect! can perform automatic functions regarding promises, such as marking the Promise contact as
Done, or rolling the Due Date forward, or running contact plans when a promised payment is received.
When you create your Promise, you may be alerted by Collect! if the setting 'Automatically manage
promises' is not switched ON.
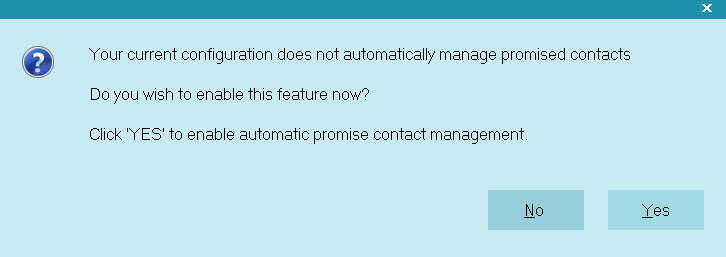
Prompt to Manage Promises Automatically
Please select YES when prompted so that Collect! can set this switch for you. It is necessary
for managing promise payments and broken promises.
Promise Settings Updated
Select the OK button to proceed.
You can also set this switch by selecting System from the top menu bar. Then select
Preferences, Plans and Reference Tables, Payment Posting Options and put a check mark in the
check box labeled Automatically Manage Promises.
- Collect! will advance the promise Due Date on a repeating promise when a full payment is posted
to the account. When the account is paid in full, the Promise Contact will be marked Completed.
- Collect! will not advance the promise Due Date when an underpayment is posted to the account,
but will keep track of how much more is needed to satisfy the Promise.
- Collect! will advance the promise Due Date on a repeating promise when an overpayment is posted
to the account.
- Collect! will roll back the Due Date and reactivate the Promise, when an NSF check is posted
to the account.
If there are contact plan codes in the Promise Contact Actions section, then additional steps will
be taken whenever an account has an active Promise. Each of these steps is described below.
Promise Full Payment
The Promise Full Payment (PRF) plan will run when a payment is posted that matches the Amount set
in the Promise contact for the account.
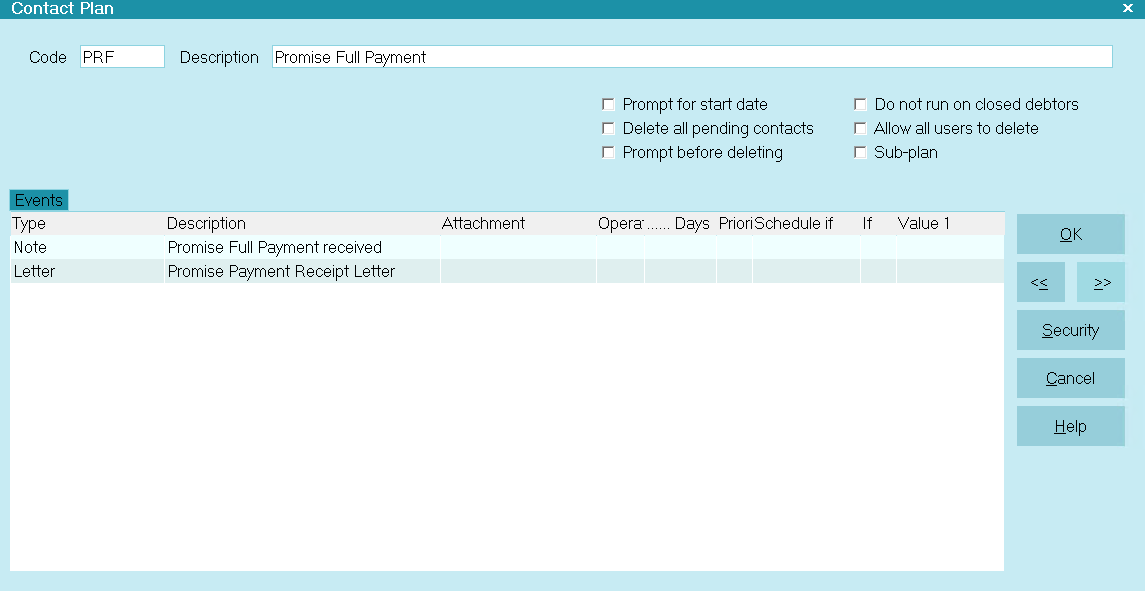
Promise Full Payment Actions
This plan writes a line to the debtor's Notes and queues a letter confirming receipt of payment.
Even without a plan in this section, Collect! will advance a repeating promise Due Date
when a full payment is posted to the account.
Promise Underpayment
The Promise Underpayment (PRU) plan will run when a payment is posted that is LESS than the Amount
set in the Promise contact for the account.

Promise Underpayment Actions
This plan writes a line to the debtor's Notes and queues a letter informing the debtor that the
amount received did not satisfy the Promise.
Even without a plan in this section, Collect! will not advance the promise Due Date when an
underpayment is posted to the account, but will keep track of how much more is needed to
satisfy the Promise.
Promise Overpayment
The Promise Overpayment (PRO) plan will run when a payment is posted that is MORE than the Amount
set in the Promise contact for the account.

Promise Overpayment Actions
This plan writes a line to the debtor's Notes and queues a letter confirming receipt of payment and
informing the debtor that the amount received more than satisfies the Promise.
Even without a plan in this section, Collect! will advance a repeating promise Due Date when
an overpayment is posted to the account. You can set the 'Advance overpayments' switch in
the Promise contact if you wish to consider overpayments as fulfilling future promises. By
default, the Promise Due Date always rolls forward only one Repeat interval, regardless of
the amount overpaid.
Promise NSF Payment
The Promise NSF Payment (PRN) plan will run when you post a returned NSF payment on an account that
has a Promise.
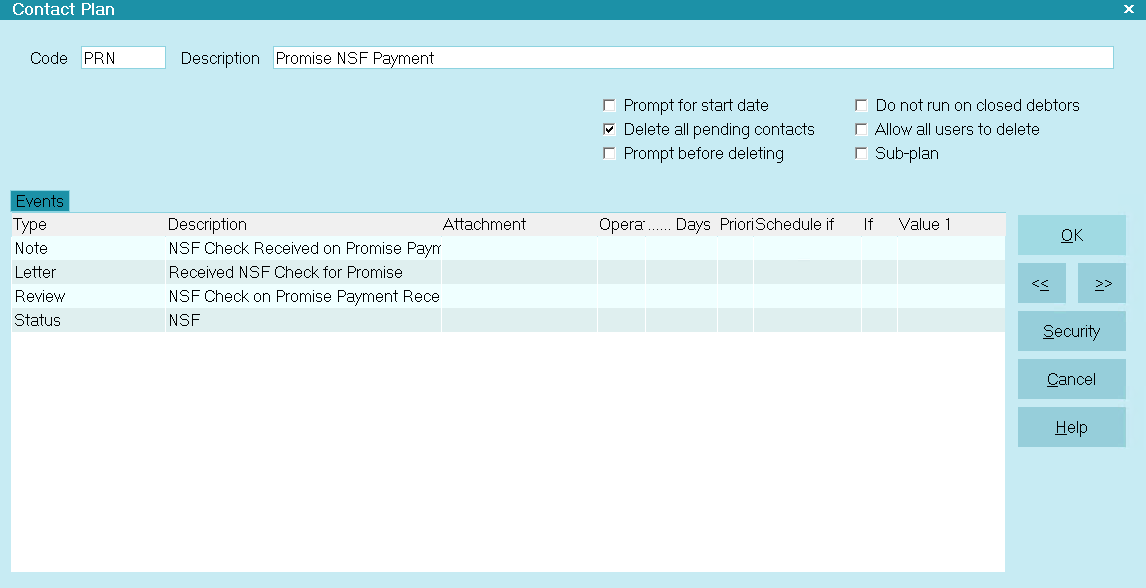
Promise NSF Payment
This plan writes a line to the debtor's Notes, queues a letter informing the debtor that the promise
payment has gone NSF, schedules a Review of the account and changes the account's Status to
NSF.
The Promise NSF Payment action also deletes pending contacts on the account. This deletes
the Promise contact, effectively ending the Promise agreement. You are prompted before the
plan deletes the contacts, so you may cancel that action.
If you do not want Collect! to delete the Promise contact, you can switch ON "Do not autodelete"
when you first set up the Promise contact. The PRA - Promise Active plan has this switch set to
prevent auto-deleting promises.
Even without a plan in this section, Collect! will roll back the Due Date and reactivate
the Promise, when an NSF check is posted to the account.
Promise Broken
The Promise Broken (PRB) plan will run when you process your broken promises using Batch Processing.
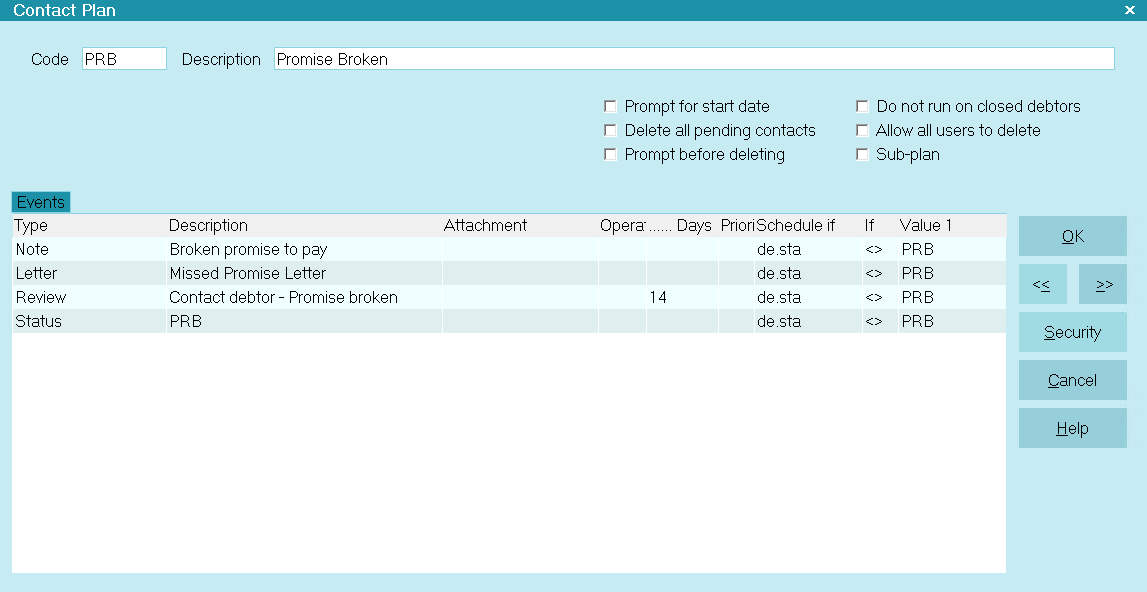
Promise Broken
This plan writes a line to the debtor's Notes, queues a letter informing the debtor that they
missed their promised payment, schedules a Review of the account with a Delay of 14 days and changes
the account's Status to PRB.
To use this Promise Contact Action to manage your broken promises, you must use Batch
Processing. Unlike the other plans, It does not run automatically.
To Run Promise Broken
- Select Tools and then select Batch Processing from the drop-down choices.
- Ensure that ' Process automatic contacts previously scheduled' is enabled with a dot in the
radio button. Select NEXT.
- Enable 'Selected contacts only' and switch ON 'Broken promises' with a check mark. Select
NEXT. Then select START when you are ready to proceed.
- Collect! will process your broken promises and display results.
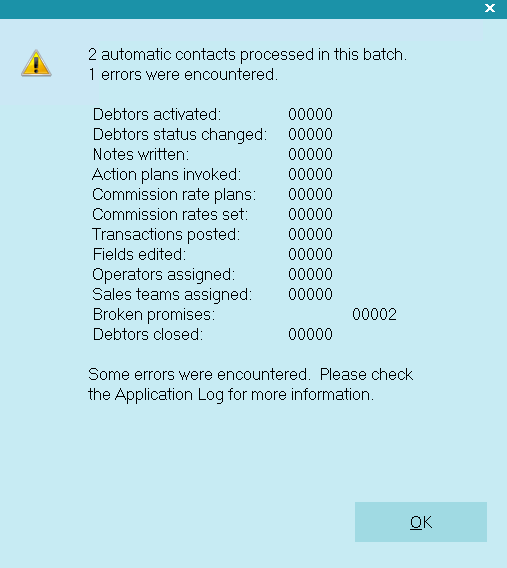
Results of Processing Broken Promises
- If you go to an account with a broken promise, you will see the changes that the plan made to
the account. The Status is changed and a line is written to Notes.
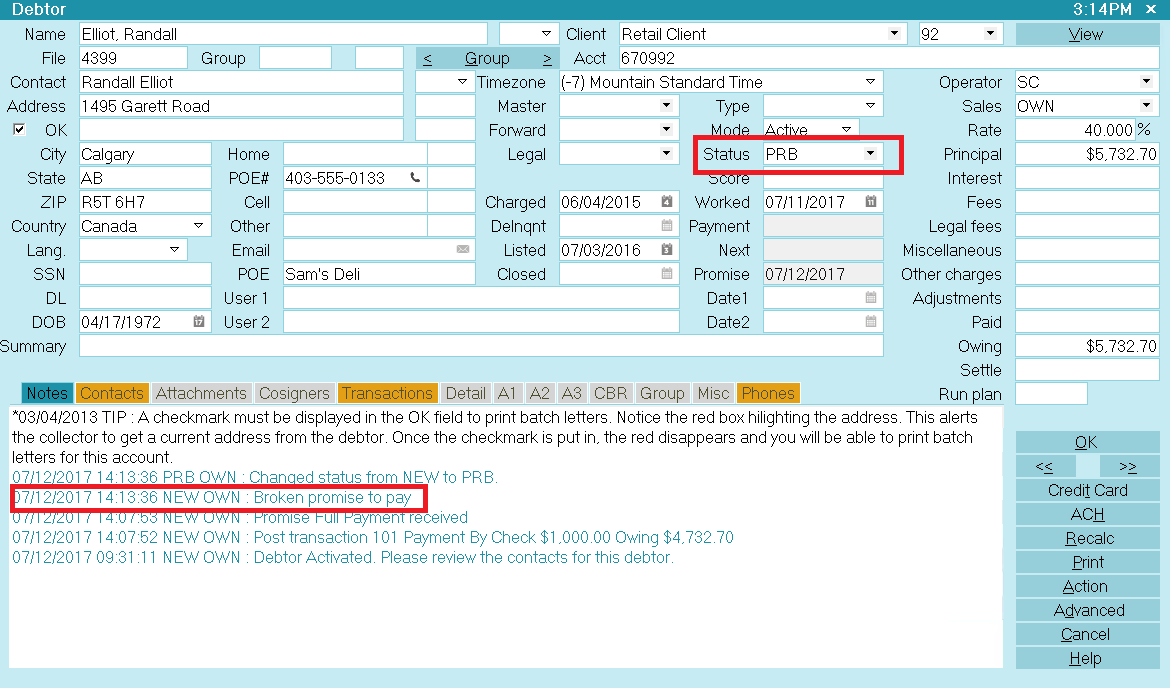
Debtor with Broken Promise
Viewing the Contact list for the account, we can see that a letter and a review have also been
scheduled. The review is delayed 14 days to give the debtor time to respond to the letter.

Contacts Scheduled for Broken Promise
You may want to handle broken promises differently. This is easily managed by modifying the actions
in the Promise Broken plan to suit your needs.
Payment Values
When you are viewing the Payment Posting Options form, there is an ADVANCED button that takes you
to the Payment Values form. There you can enter defaults to consider when posting promised payments.
You can select a Transaction Type to use for promised payments. Values may be entered for evaluating
a payment as an underpayment or an overpayment, if the amount paid is not exactly the same as the
promised Amount.
Managing Promises For Grouped Accounts
Collect! allows you to manage promises for for an entire group by only having a single promise on
any group member and posting the payment to any group member. When the payment is posted, Collect!
will search all the group members to find an in progress promise contact and manage it accordingly.
This feature requires that "Automatically manage promises when posting", located in the
Payment Posting Options form, is turned ON.
This feature also requires the following check boxes to be checked:
- A check box in Account Matching Setup called "Manage Group Promises"
- A check box in Group Member Setup also called "Manage Group Promises" for each of the group
members of a group
In addition to retroactively setting up existing debtors in groups, you will need to add a step to
your new business processing to check this Member Setup box ON for newly grouped debtors going
forward.
For pre-existing accounts in groups for small to medium sized databases, this may be done with a
Report Writer write back that edits gms.mgp=x.
You may also contact Tech Support for assistance in retroactively fitting your grouped accounts for
this feature and recommendation as to the best way your site can maintain new accounts being added
to groups going forward.
Notes regarding function
- When a payment is posted to the group, irrespective of whether it is the group member whose
Contact tab has the In Progress Promise, the Promise event that is affected will be the most
current In Progress Promise as assessed from all the group members. This is in case there are
multiple Promises within the group.
It is not recommended to have multiple Repeating Promises inside the same account or spread
across the same group.
- The Promise contact that gets Completed, rolled forward as a function of being completed, had
a Copy created on Repeat or Due Date rolled backwards due to a reversal no longer relies on
the account where the transaction was posted; the Promise being affected can be positioned
anywhere in the grouped accounts.
- The promise contact "Amount" field is linked to the debtor that contains the Promise. If a
single payment is being split among group members, the Amount field will continue to subtract
amounts being posted until $0.00 is reached, indicating a full Promise has been kept. It is
then that the Promise Due Date will roll forward, and invoke any other actions as applicable
for the account as per Payment Posting Options.
- If the total amount paid is split among group members (or posted to a single account within
the group) is less than the In Progress Promise amount, the Due Date will NOT roll forward
and the Amount field will show the shortfall that hasn't been paid yet to fulfill this period's
Promise. Example: Debtor was to pay $150.00. $100.00 was received and posted $10 each to 10
accounts. The Amount field in the Promise will show $50.00. The Due Date will not roll forward.
The Promised field will still be displaying the original amount of $150.00. If the site has
grace days, this will be a broken promise the day after the grace days expire.
If you have a contact plan setup to run in the event of an Underpayment, Collect! will run
that plan for each payment until the promise is fulfilled.
- If the total amount paid is split among group members (or posted to a single account within
the group) is more than the In Progress Promise, then the Promise Due Date will roll forward
one cycle (if it is a Repeating Promise) UNLESS you have also checked "Advance overpayments".
In this case, it will roll forward as per existing Collect! functionality. Please refer to
Advance Overpayments above.
- It is recommended to use "Advance overpayments" so that the software has proper rollback
capability in the event of a payment reversal insofar as resetting the correct Due Date. The
Advance overpayments field to edit with Report Writer is cc.ao=x, or contact Tech Support for
assistance.
- Group Promises will function as expected if a Repeating Promise has "Copy on Repeat" checked
ON.
- Promise related Contact Plans in Payment Posting Options will execute on the debtor containing
the Promise. This would mean that Reminder Letters or Broken Promise Letters should be queued
on the account that contains the Promise event for best self-maintaining results.
- If the account with the Promise Contact reaches 0.00, then the Contact will be marked done,
and a copy of the Contact will be placed on the account with the highest balance.
Payment Processing Module For Promised Payments
The Payment Processing Module enables you to process credit card and ACH payments electronically
through Collect!'s Payment Processing connection. This is a full-featured solution for managing
single and recurring payments made by credit card or by bank draft. External payments posted at
the Payment Provider web site are also reconciled and posted within Collect!. Recurring scheduled
payments are fully managed within Collect!'s promised payment system.
Coupon Books With Promises
A Coupon Book is a printed schedule of payments that may be given to a debtor when a repeating Promise
contact is set up on an account. A coupon is printed for each scheduled payment. The Due Date and
Payment Amount are printed to make it easier for the debtor to keep track of when payments are due.
A sample Promise Coupon Book report is shipped with Collect! in the Demonstration database.
This report expects a Due Date between the 1st and 28th of the month.
The sample coupon book has borders and a place for your company logo. You may modify it to suit
your needs.
To print a coupon book when you start a Promise, You may add a letter event to a plan that
you run to schedule the Promise on an account.
| 
Was this page helpful? Do you have any comments on this document? Can we make it better? If so how may we improve this page.
Please click this link to send us your comments: helpinfo@collect.org