How To Setup The WIP List
The Work In Progress (WIP) List is the scheduling engine for all of your operators in different
job functions to organize and attend to their workloads where the same pertains to requiring
particular debtor accounts (or client files - see TIP below) on a multi-categorized and diarized
basis.
WIP settings and preferences can be input for operators individually or set as a global profile
for all WIP Operators. Being flexible, the software also allows you to maintain your own company's
preferred default settings for WIP users AND override these settings only for individual
Operator IDs. This latter is accomplished by saving a different parameter profile for specific
Operator IDs after the system-wide defaults are determined.
These parameters and preferences are governed by a series of Option and Filter settings. At any time,
you have the ability to modify these settings as your needs change or circumstances require.
 If you have Administration / Clerical / Inside Sales staff who would benefit from being able
to have a WIP list of Clients, please contact our office at 250-391-0466, option 3 for
Administration to inquire about licensing our Client Management Module. The module is
available at no cost, but may not be enabled on users who upgraded from an older version
of Collect!.
If you have Administration / Clerical / Inside Sales staff who would benefit from being able
to have a WIP list of Clients, please contact our office at 250-391-0466, option 3 for
Administration to inquire about licensing our Client Management Module. The module is
available at no cost, but may not be enabled on users who upgraded from an older version
of Collect!.
Each Operator's WIP list is an aggregate of the Contact Events that have been designated to that
Operator's user ID. Which event Types, work scheduled Due Dates, urgency Priority ascribed etc.
that are presented in the list are determined by which settings queried the Contact sub-file of
the system AND what filter and sub-sorting the user requested ad hoc on the Work In Progress window.
The flexibility of the software allows you to bring an EVENT into a user's work to be done without
the actual account having to be transferred to a different queue. This by itself saves tremendous
amounts of time as accounts are not being misplaced and forgotten about on managerial / administrative
desks, being the foremost reasons percentages of inventory can go unworked or payments credited
to incorrect user IDs.
Examples of circumstances where the assigned collector may not be the Collector ID on a Contact Event
are tasks specific items such as: Manager Review, collector request for Manager call,
Preset Audit Review, Clerical Request (special mailing/document/request to client/close file),
Legal Action Initialize, Paralegal to take next step, etc.
Work In Progress
If you are an operator with a Type of Collector, you will be navigated directly to the WIP List upon
login. Operators with a Type of System will have the Main Menu landing screen upon login.
To access the WIP list, click the Work In Progress button on the left side of the
screen.
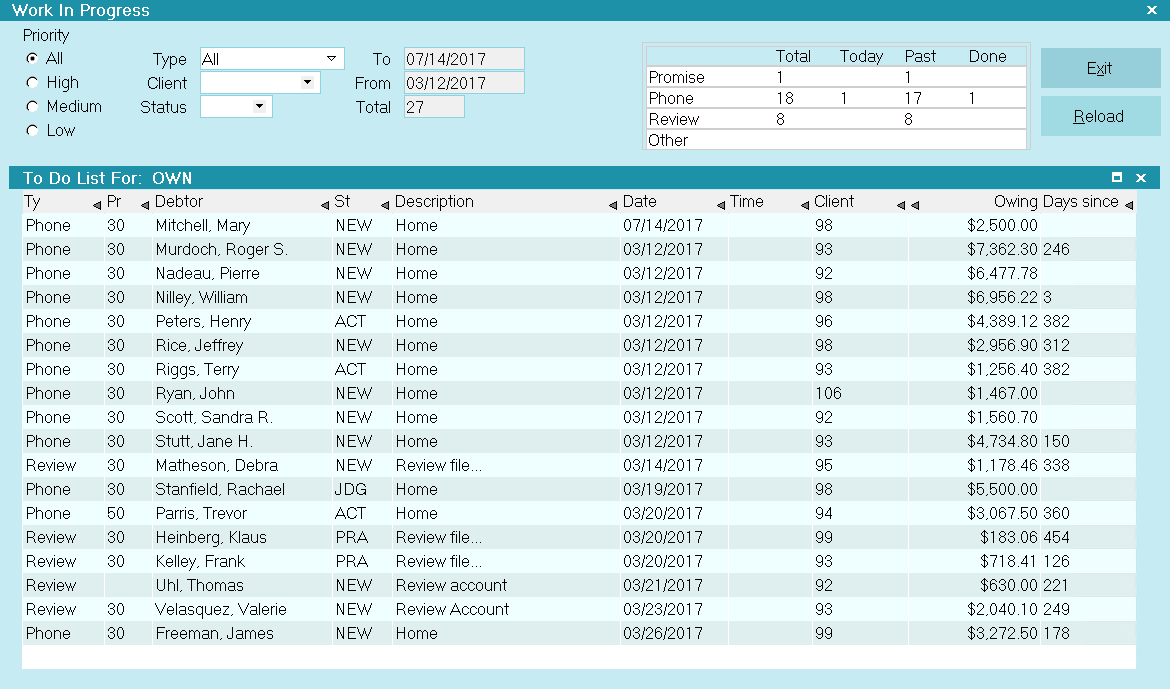
Work In Progress
The Work In Progress screen has a variety of methods an Operator can use to organize and/or sub-WIP
their accounts utilizing the click or pick Filters and insertable columns which have their own
ascending / descending sorting capabilities. These filters and fields may be used separately /
individually and in combination to create a variety of very finely tuned sub-WIPs. There are
additional settings in The Reload Work In Progress List, WIP Reload Filters and WIP Options that
can be used to further refine or expand parameters of interest in the main WIP screen.
Depending on Operator Level, some fields and options will be grayed out (Read Only) and not
accessible. For example, Junior Collector Level 60 will not be able to load anyone else's WIP list
but their own. This user level also does not have access to the radio button/drop-down arrow filters
on the Main WIP screen but IS able to sort Ascending/Descending on WIP columns that present with sort
triangles on the right side of the column header.

Customize Your WIP List Display
You have the ability to add, remove and rearrange your WIP List Display. Organize your WIP columns
in the order of preference, remove those columns you don't need, or add in some that are available
in this view but that you don't currently have visible. All of these are functions each user can do
for themselves. Once you've changed your WIP display, it will remain that way until you change it
again.
To customize your list view:
- Immediately below the sub-Title bar that reads " To Do List For: USERID" are the column headers
of the fields you currently have showing in your WIP List. Right click on the column header
that is positioned to the left of where you want to insert a new field and Right click. You
get a pop up which offers you the choices to "Edit", "Move", "Insert Field", "Remove Field",
and "Restore Default".
- Use your arrow key to move down to Insert Field and click to select.
- A list of all the fields currently available to be inserted will pop up.
- Use your arrow key to navigate to the field you wish to insert and click on it. The field of
interest will now be inserted and positioned to the right of the column you were initially
positioned beside when you right clicked.
- If it isn't where you want it after all, drag and drop by clicking into the column header. You
can also adjust column width by mouse hovering over the vertical dividing boundaries until you
see the bidirectional arrow present itself.
- To Remove a field or Restore Defaults, Right click on a field header record again to raise the
pop up where the options are again available.
- If you do not see a field in your list of those you can Insert, and believe it should be there,
return to your WIP List first try using your "->" Right Arrow key to see if you have more
fields out to the right of the screen that aren't visible. If not, if you have no hidden
columns and still do not see the field name that you are looking for, it is concluded then that
the field of interest is not currently available to be added into the WIP display. Not all
fields are accessible for to be added at this time.
The reason behind the available fields that can be displayed in the WIP list is client driven. These
are common fields that users wanted displayed. Many of the fields in Collect! like Cell Phone
Extension can be re-purposed by Collect! end-users and then displayed in the WIP list.
Days since last payment is especially powerful piece of information: it identifies
at glance your dropped payers as well as pointedly identifies accounts which may be due for a closure
review on the basis of how much time has passed since any financial activity.
For Administrative and Managerial User Levels, all Browse List views can be similarly
modified for individual preference and need. Different screens have different field
availability; what is displayed is what is currently available. This includes all main Browse
lists and sub-file Tab browse list, including those in the Client Tabs.
Reload Work In Progress List
This area enables you to filter contacts to load by Date, Time, Operator or Client. You can also
access WIP Filters and WIP Options from the Reload Work In Progress List.
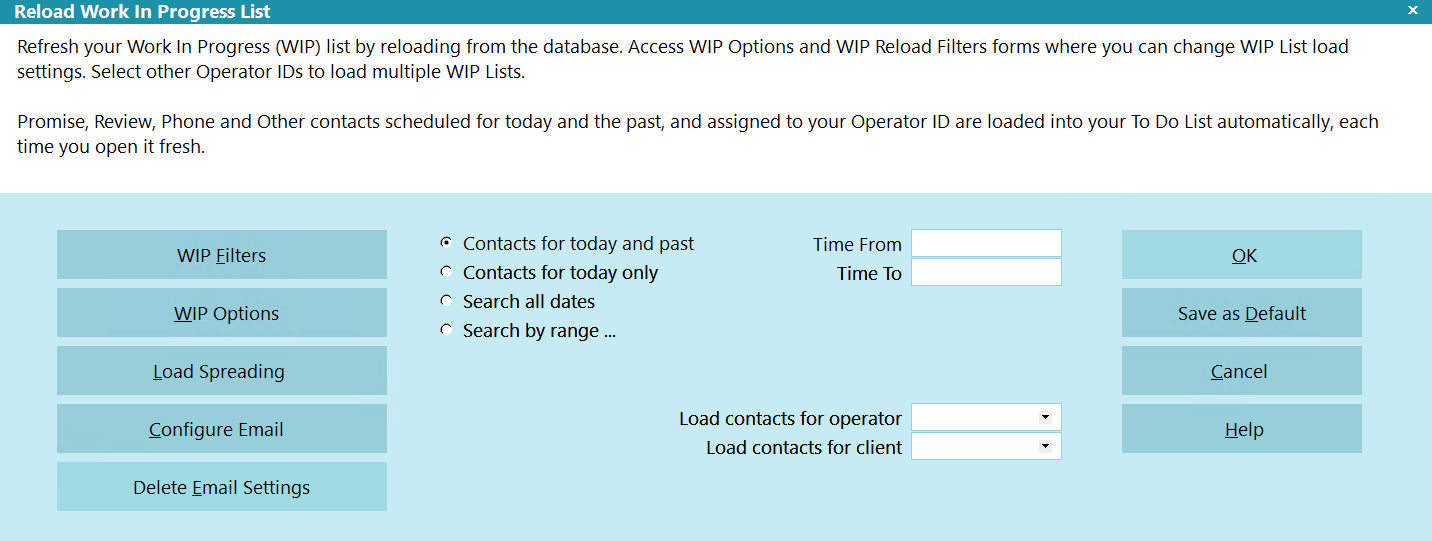
Reload Work In Progress List
You can select settings in this screen that will be applied as WIP defaults for all users or saved
for a specific Operator ID. The shipping default is that the WIP will load Promise, Review, Phone,
and Other contacts automatically for the current Operator ID.
Other types of contacts are not displayed usually, but can loaded ad hoc as needed via WIP Filters.
WIP Filters And Reload Filters
The WIP Filters screen may be accessed two ways:
Click Here to View this Form.
Click Here to Close this Form.
The WIP Reload Filters form allows you to select the types
of contacts to load into your To Do List. Collect! loads all
Promise, Phone, Review and Other contacts by default.
Choosing specific Contact types can make your list shorter
and easier to manage. Fastest load performance is obtained
when you load a single Contact Type.
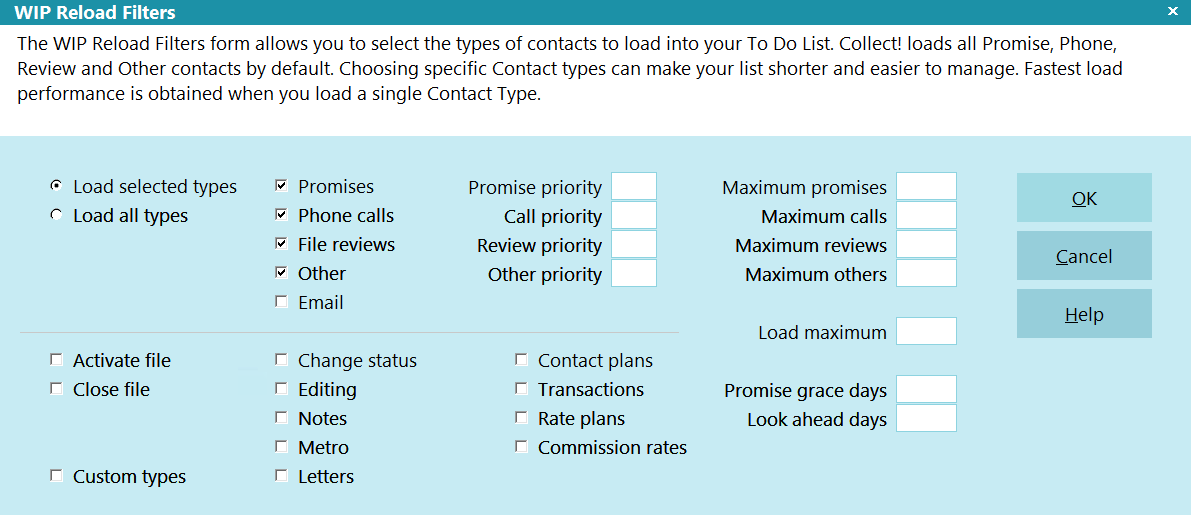
WIP Reload Filters
The WIP Reload Filters form lets you select all contacts
or specific Contact types. When you press the Reload
button on the Work In Progress form, the Reload Work
In Progress List form displays. Press the Select Types
button to access the WIP Reload Filters form.
Making A Selection
Some fields in the WIP Reload Filters form are "switches."
A check in the box switches it ON and unchecking
switches it OFF. Use the TAB key to move from one of
these fields to another. Use the spacebar to check or
uncheck the box. Or click in the box to check or
uncheck it.
Load Selected Types
Switch this ON with a check mark to choose the types to
load into your WIP List. With this option you can be very
flexible regarding the contacts you choose to appear in
your WIP List. Click the choice to mark or unmark it or
use the spacebar.
 Selected types will also be used as defaults
when Collect! searches for pending contacts
when you have enabled Schedule Next Contact
functionality. Please refer to that Help topic
for details.
Selected types will also be used as defaults
when Collect! searches for pending contacts
when you have enabled Schedule Next Contact
functionality. Please refer to that Help topic
for details.
Load All Types
This setting should be used cautiously. It is meant for
administrative purposes and not for normal working of
a collector's WIP List!
Switch this ON with a check mark to force all contacts to
be displayed in your WIP List. All other options are grayed
out when this field is switched ON. Click the choice
to mark or unmark it or use the spacebar.
When you turn this switch ON, Maximum
values you enter in other areas of the form
are disregarded. Also, Collect! changes what
it considers a future Contact. Normally only
Phone calls, Reviews, Promises and Other
Contact types qualify as a future Contact.
When this switch is turned on, ALL Contact
types qualify as future Contacts.
When Load All types is selected, ALL contact types are
set to display and users can not modify which events to
display.
Schedule Next Contact - Pending is also disabled when
this setting is switched ON.
Promises
Switch this option ON to include Promise
contacts in your WIP lists. Click the choice
to mark or unmark it or use the spacebar.
Phone Calls
Switch this option ON to include Phone Call
contacts in your WIP List. Click the choice
to mark or unmark it or use the spacebar.
File Reviews
Switch this option ON to include Review
contacts in your WIP List. Click the choice
to mark or unmark it or use the spacebar.
Other
Switch this option ON to include Other
contacts in your WIP List. Click the choice
to mark or unmark it or use the spacebar.
Email
Switch this ON to show email contacts in your
To Do List. Click the choice to mark or unmark
it or use the spacebar.
Promise Priority
When you limit the number of Promise contacts
loaded you may want to load certain types
before others. Set a priority from 1 to 4 here
with 1 being the highest priority and 4 being
the lowest.
Call Priority
When you limit the number of Phone contacts
loaded you may want to load certain types
before others. Set a priority from 1 to 4 here
with 1 being the highest priority and 4 being
the lowest.
Review Priority
When you limit the number of Review contacts
loaded you may want to load certain types
before others. Set a priority from 1 to 4 here
with 1 being the highest priority and 4 being
the lowest.
Other Priority
When you limit the number of Other contacts
loaded you may want to load certain types
before others. Set a priority from 1 to 4 here
with 1 being the highest priority and 4 being
the lowest.
Maximum Promises
Enter a number to limit the maximum number
of Promise contacts that may be loaded into
your WIP at any one time. If you have a very
large WIP List you can speed up loading
contacts by entering a number here.
Maximum Calls
Enter a number to limit the maximum number
of Phone contacts that may be loaded into
your WIP at any one time. If you have a very
large WIP List you can speed up loading
contacts by entering a number here.
Maximum Reviews
Enter a number to limit the maximum number
of Review contacts that may be loaded into
your WIP at any one time. If you have a very
large WIP List you can speed up loading
contacts by entering a number here.
Maximum Others
Enter a number to limit the maximum number of
Other contacts that may be loaded into your
WIP at any one time. If you have a very large
WIP List you can speed up loading contacts by
entering a number here.
Daily Batch
When marking choices in the WIP Reload
Filters form, you should only flag the types
of contacts that need Operator intervention.
Other types are done in the daily batch.
Activate File
Switch this option ON to include Activate File
contacts in your WIP List. Click the choice
to mark or unmark it or use the spacebar.
Close File
Switch this option ON to include Close File
contacts in your WIP List. Click the choice
to mark or unmark it or use the spacebar.
Custom Types
Switch this option ON to include the user-defined
types with a value of 50 or higher. Click the choice
to mark or unmark it or use the spacebar.
Change Status
Switch this option ON to include Change Status
contacts in your WIP List. Click the choice
to mark or unmark it or use the spacebar.
Editing
Switch this option ON to include Editing
contacts in your WIP List. Click the choice
to mark or unmark it or use the spacebar.
Notes
Switch this option ON to include Notes
contacts in your WIP List. Click the choice
to mark or unmark it or use the spacebar.
Metro
Switch this option ON to include Metro contacts
in your WIP List. Click the choice to mark or
unmark it or use the spacebar.
Letters
Switch this option ON to include Letter
contacts in your WIP List. Click the choice
to mark or unmark it or use the spacebar.
Contact Plans
Switch this option ON to include Contact Plan
contacts in your WIP List. Click the choice
to mark or unmark it or use the spacebar.
Transactions
Switch this option ON to include Transaction
contacts in your WIP List. Click the choice
to mark or unmark it or use the spacebar.
Rate Plans
Switch this option ON to include Rate Plan
contacts in your WIP List. Click the choice
to mark or unmark it or use the spacebar.
Commission Rates
Switch this option ON to include Commission Rate
contacts in your WIP List. Click the choice
to mark or unmark it or use the spacebar.
Load Maximum
Enter the Maximum number of contacts to load at
any one time. This is useful if you have a very large
WIP List that takes some time to load.
This value works in conjunction with the maximum
values for the different types of contacts, such that
contacts of each type will be loaded in order of Priority
up to the Load Maximum limit.
Promise Grace Days
Enter a value here for the number of days to wait
before considering a promise overdue. This means
a promise will only display in the WIP List when
the due date of the promise plus the grace days
exceeds today. This overrides the global WIP settings
for showing "future" or "today and past" contacts.
Look Ahead Days
When Search all dates is switched ON in the
Reload Work In Progress List form, you can limit the
number of days in the future Collect! will load
Contacts for.
- Enter 7 to Look Ahead one week.
- Enter 30 to Look Ahead one month.
- Enter 365 to Look Ahead one year.
- Leave blank to Look Ahead all dates in the future.
OK
Select this button to save any selections you have
made and reload your WIP List showing only the
Contact types you have marked.
Cancel
Select this button to ignore any selections you have
made and return you to your WIP List.
Help
Press this button for help on the WIP Reload Filters
form and links to related topics.
- Via the menu path "System\Preferences\Plan and Reference Tables\ WIP Options", then click the
WIP Filters button in the lower right of the screen
- From the Work In Progress window, click the Reload button followed by the WIP Filters
button.
The Filters window is used to decision which contacts to load. It can also be used to determine
Maximum numbers of Types that the WIP may be built with. The maximums are useful when a desk
becomes too big or badly backlogged, making it difficult to expose the money files and callable
accounts. This window is also where a System Administrator would have defined the parameters for
Look Ahead Days and Promise Grace Days.
WIP Reload Filters
The Reload Work In Progress List Filters control the From/To dates of the events
being loaded: today and past, today only, all dates or a specific date range. It is also possible
to load calling hours that you wish to focus on in the debtor local time by using a specified
From / To Time range. Management can view multiple WIP lists by Reloading and selecting a different
Operator.
This window provides the button navigation to the WIP Filters screen. A utility process in
WIP Filters that simplifies queue reorganizations is the Load Spreading function. This allows you to
redistribute next work dates that may be all priors / too many on a specific date and redirect them
to forward dates in an evenly distributed manner of your choosing.
This same screen is where the software switch for Grace Days is located if your site wishes to set
a default of how many days from a Promise Due date will be allowed to elapse before a Promise is
considered Broken by Promise automations. Leaving this field blank is equivalent to No Grace Days.
You may input a From / To Time in the Debtor's Timezone that will keep your
collectors restricted to legal calling hours. The time in the debtor's locale is always displayed
in the extreme right corner of the "Debtor" window Title Bar. This is the most certain and secure
of methods to ensure legal calling hour compliance. The WIP List will not present an account that
is outside the defined hours.
A less controlling/more Alerting methodology to proactively prevent outside hour calling would be
utilization of control file snippets to either cause phone number fields to change color or a
Warning pop up window to be presented to the user if they open the account outside that debtor's
area calling times. See "Timezone Alerts" in the Help pages for an example or contact Technical
Services to explore your custom options.
WIP Options
Click Here to View this Form.
Click Here to Close this Form.
The WIP Options form displays many settings used to
control the behavior of your Work In Progress (WIP) List.
The settings determine what displays in the WIP List
and assist in managing your contact scheduling. You may
set options on an individual basis for each of your operators
and their WIP settings will be loaded when they load
their WIP Lists.
The WIP Options settings are enabled only when accounts
are worked through the WIP List.
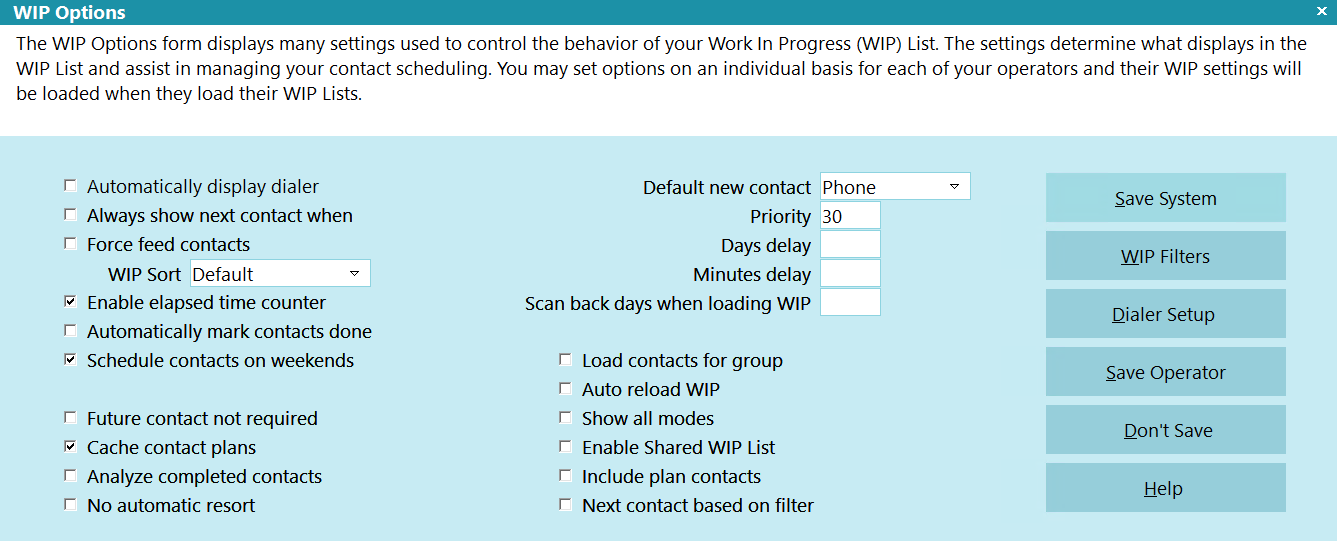
WIP Options
To access this screen:
- From the Work In Progress window, click the Reload button,
then WIP Options.
- From the Main Menu, click the Work in Progress button in
the left side bank of buttons, which will navigate you to the
Work In Progress window. The proceed as above to click the
buttons for Reload, followed by WIP Options.
- To access the system default settings, the menu path is
"System\Preferences\Plans and Reference Tables\WIP Options".
Automatically Display Dialer
Switch ON 'Automatically display dialer' to start the phone
dialing process automatically whenever you move onto a
Phone contact in your WIP List. This switch only works
with Phone contacts in the WIP List.
When this switch is OFF, you will have to go to the account
and press F2 on the phone number you wish to phone, or
select the phone icon beside the field.
To start dialing as soon as you move onto an account,
switch this ON. In the Auto Dialer Preferences form,
switch OFF 'Prompt before dialing and switch ON 'Dial
in background'.
To use this feature, your system phone dialer
must be properly configured and functioning
outside of Collect!. If you can dial a number
using the Windows Phone Dialer, then you
can also dial using Collect!.
Always Show Next Contact When
Switch ON 'Always show next contact when' to
display the Schedule Next Contact - Pending form
whenever you exit from the Debtor form. This is
enabled only when you are working accounts from
your WIP List.
When finished working one debtor, you may move to the
next contact in the WIP list. Collect! will display details
of the next pending contact in the Schedule Next
Contact - Pending form before you are allowed to move
off the account. This provides an opportunity to modify
the next contact before the debtor is dropped from
your current WIP list.
If you turn this switch OFF, Collect! will not display
the details of the next pending contact before exiting
from the account.
You can switch ON 'Next contact based on
filter' and use the WIP Reload Filters form
to set up the types of contacts to display
as pending contacts.
Force Feed Contacts
Switch ON 'Force feed contacts' to control the order
in which operators work the contacts in their WIP List.
The operator must work down the list sequentially. No
matter which contact is selected in the WIP List, Collect!
will always display whatever account is next in line
sequentially.
You can also select the order that Collect! will use when
displaying contacts in the collectors' To Do List.
When this switch is OFF, an operator has the ability to
pick and choose which contacts to work next.
When this switch is ON, Collect! will prompt
the user that an account must be worked.
WIP Sort
This field will set the default sort for the Work in Progress
when doing a reload.
Default
This option will cause Collect! to load the WIP List sorted
according to Collect!'s default behavior.
Contacts with today's date will be first, then dates from
oldest to newest.
Contacts with the same Date will be sorted by Priority,
from oldest to newest. Contacts with the same Priority
will be sorted by Type and then by Name.
Timed contacts always go below normal
contacts and are sorted by Time.
Priority
This option will cause Collect! to load the
WIP List sorted by Priority from highest to lowest.
Contacts with the same Priority will be sorted by Date,
from oldest to newest. Contacts with the same Date will
be sorted by Type and then by Name.
Date
A dot in this radio button will cause Collect! to load the
WIP List sorted by Date from oldest to newest.
Contacts with the same Date will be sorted by Priority
from highest to lowest. Contacts with the same Priority will
be sorted by Type and then by Name.
Score
This option will cause Collect! to load the
WIP List sorted by Score from highest to lowest.
Contacts with the same Score will be sorted by Priority
from highest to lowest. Contacts with the same Priority
will be sorted by Date, from oldest to newest. Contacts
with the same Date will be sorted by Type and then by Name.
Status
This option will cause Collect! to load the
WIP List sorted by Status code WIP Priority from
highest to lowest, then by Status Code from lowest
to highest.
Contacts with the same Status will be sorted by Priority
from highest to lowest. Contacts with the same Priority
will be sorted by Date, from oldest to newest. Contacts
with the same Date will be sorted by Type and then by Name.
Days since last payment
This option will cause Collect! to load the
WIP List sorted by Days since last payment from
oldest to newest.
Contacts with the same Days since last payment will be
sorted by Priority from highest to lowest.
Contacts with the same Priority will be sorted by Date,
from oldest to newest. Contacts with the same Date will
be sorted by Type and then by Name.
Owing
This option will cause Collect! to load the
WIP List sorted by Owing from highest to lowest.
Contacts with the same Owing will be sorted by Priority
from highest to lowest. Contacts with the same Priority
will be sorted by Date, from oldest to newest. Contacts
with the same Date will be sorted by Type and then by Name.
Listed
A dot in this radio button will cause Collect! to load the
WIP List sorted by Listed Date from oldest to newest.
Contacts with the same Listed Date will be sorted by Due Date.
Contacts with the same Date will be sorted by Priority
from highest to lowest. Contacts with the same Priority will
be sorted by Type and then by Name.
Enable Elapsed Time Counter
Switch ON 'Enable elapsed time counter' to record
the length of time an operator spends on each
contact in the WIP List. If the operator stays on an
account longer than 15 seconds, or changes something
on the Debtor form, the elapsed time will be recorded
in the current contact when the operator exits from
the account.
This information can be used in reports for performance
tracking and troubleshooting. For example, you can
easily determine areas where your operators are
spending the most time, which types of contacts require
more time, or accounts that consistently take additional
time.
This feature is enabled only when you work contacts
from the WIP List. If you are browsing a debtor, and
you view, or work, a contact found in this way, the
elapsed time will not be recorded.
Automatically Mark Contacts Done
Switch ON 'Automatically mark contact done' to
automatically mark each contact as completed when you
are finished working it. When you exit from working a
debtor in your WIP list, Collect! will remove the contact
from your To Do List and record the date and time the
contact was marked done.
When this switch is OFF, Collect! will prompt when you have
finished working a contact. You may choose to complete it
or leave it in your WIP List.
Collect! thinks you worked a debtor when
anything changes in the account. You might
change the address, write notes or schedule
a Contact plan. If you do any of these things,
Collect! thinks you have worked the account.
If you just look at a debtor, Collect! knows
you didn't change anything and doesn't
mark the contact as done.
Schedule Contacts On Weekends
Switch ON 'Schedule contacts on weekends' if you
want Collect! to schedule contacts on Saturdays,
Sundays, or holidays when you run a contact plan.
Typically, when you run a contact plan, all dates are
calculated from the current date. If this switch is OFF,
a planned contact that would have fallen on a Saturday,
Sunday, or holiday will be rescheduled for the following
Monday or business day.
For example, if this switch is ON and you have a plan
that sends a letter today and schedules a review in 10
days, the review may land on a Sunday when you're at
home relaxing. If you do not work on weekends, even
on Saturday mornings, turn this switch OFF.
Future Contact Not Required
Switch ON 'Future contact not required' to disable
Collect!'s contact checking functions. When this
switch in ON, Collect! lets you exit from a debtor,
even when no future contacts are scheduled for the
account.
Normally, every active debtor should have at least
one pending contact to ensure that the debtor is not
lost in the system. Leave this switch OFF to ensure
that Collect! checks for a future contact when you are
working your WIP List. If there is no future contact,
Collect! uses the WIP default settings to automatically
schedule a contact. The Schedule Next Contact - Pending
form appears so that you can confirm the contact date
and time.
CAUTION: When you switch this ON, you may
end up with debtors that become disenfranchised
from a WIP list if there is no manually set up
In Progress Contact Event by an Operator in the
types of Review, Promise, Phone or Other. To survey
the system for disconnected debtors, called
"Orphan" accounts in Collect!, click
"Tools\Utilities\Orphaned Account Search" and
follow the prompts.
Include Plan Contacts
Switch this ON with a check mark to consider Plan
contacts as valid future contacts. When this switch
is ON, Collect! will not display the Schedule Next
Contact - Pending form if there is an in progress
Plan contact on the account.
When this switch is OFF, Collect! will display the
Schedule Next Contact - Pending form, even if the
only pending contact on the account is an in progress
Plan contact.
This setting is only visible if you are not
using the 'Next contact based on filter'
switch.
Next Contact Based On Filter
Switch this ON with a check mark to define the
contacts Collect! considers as valid future contacts.
With the switch set, Collect! will use the settings
in the WIP Reload Filters to determine which types
of pending contacts it will search for when you are
finished working an account. Only the contact types
you have selected will be shown when the
Schedule Next Contact - Pending form is displayed.
Cache Contact Plans
Switch ON 'Cache contact plans' to cache contact plan events
locally. This increases performance and is especially
noticeable in multi user operations. The cache is not enabled
by default.
*** VERY IMPORTANT: If you intend to set security
levels on contact plans using the
Contact Plans Access Rights form, this
switch must be turned ON.
If you turn this switch ON, please remember to
turn it off when you edit your contact plans. The
cache is cleared when you close a database
and return to the Welcome To Collect! screen.
Analyze Completed Contacts
Switch ON 'Analyze completed contacts' to display
historical summary information about contacts that
have already been worked.
When this switch is ON, Collect! will analyze completed
contacts and display the results in the WIP graph in the
Work In Progress form. To limit the analysis to a specific
time period, enter a value into the 'Scan back days when
loading WIP' field at the bottom of the WIP Options form.
Switch this OFF to have Collect! work normally, scanning only
contacts that still need to be worked and loading them into
the WIP List.
Do not leave this switch ON by mistake or
the operator will see no contacts when they
load their WIP List. Switch it OFF and reload
to view the operator's contacts.
No Automatic Resort
Switch ON 'No automatic resort' to turn off the default
auto resort function in Collect!.
By default, whenever you update a contact in the WIP
List, Collect! tries to resort the list. When you go from your
sorted WIP List to an account and change something, that
would force a resort in the WIP List. So one minute you are
halfway down the list and the next minute you are at the
bottom of the list. This is due to the auto resort. With this
switch turned ON, you will return to your WIP List just as it
was.
Load Contacts For Group
Switch ON 'Load contacts for group' to have all in progress
contacts for the Operator's group displayed together in the
To Do List. This requires the signed in Operator to have
the Group Option enabled on the Operator Group form and Group
Members filled in.
When enabled, you can insert the CONTACT OPERATOR field into
the To Do List to see whom each contact is assigned to.
Auto Reload WIP
Switch ON 'Auto reload WIP' to have Collect! automatically
check the database for new contacts. When enabled, Collect!
will check every 5 minutes and add new contacts to the bottom
of the list.
By default, Collect! does not check the database unless you
click the Reload button.
Show All Modes
Switch ON 'Show all modes' to load contacts in your WIP
list for accounts with CLOSED and PRECOLLECT modes, as
well as contacts for ACTIVE accounts.
By default, whenever you load the WIP List, only contacts
for ACTIVE accounts are displayed. Show All Modes is
intended for managers who may need to examine contacts for
CLOSED and PRECOLLECT accounts. Normally,
operators should be looking at only contacts for ACTIVE
accounts in their WIP Lists.
Enable Shared WIP List
Switch this ON to enable the Shared WIP Processor.
This is used when you want more than one operator
to work the same WIP List. Operators will quickly
and automatically move to the next available contact
in the WIP List whenever the current WIP is completed
or is being worked by another worker.
Default Values For New Contacts
When you work your WIP List, Collect! notices if there is no
pending contact for the debtor. Collect! prompts you with the
Schedule Next Contact - New form to create a new contact
with the default values you select in the following settings.
Several settings can be set. Collect! uses these as defaults
whenever a new contact is created, either manually or
through the Schedule Next Contact - New form. Contacts
scheduled when you run a contact plan DO NOT use these
default values.
The settings are:
- Default New Contact
- Priority
- Days Delay
- Minutes Delay
These are described below.
Default New Contact
The 'Default new contact' field shows the contact Type
Collect! will create for you by default, whenever you
create a new contact. When Collect! prompts you
with the Schedule Next Contact - New form to create
a new contact, this will be the contact Type displayed
for you.
The contact Type may be modified if needed, when you
create the contact.
Select the down arrow or press F2 to pick from the list
of contact types.
Priority
The 'Priority' field shows the Priority Collect! will assign,
by default, whenever you create a new contact. When
Collect! prompts you with the Schedule Next Contact - New
form to create a new contact, this will be the contact
Priority displayed for you.
The contact Priority may be modified if needed, when
you create the contact.
Priority levels are as follows:
66 to 99 - High
34 to 65 - Medium
1 to 33 - Low
Days Delay
The 'Days delay' field shows the number of days from
today that the next contact will be scheduled. This value
will be added to the current date, by default, whenever you
create a new contact. For example, if you enter 3 here,
the 'Due date' of the next contact will be the current date
plus 3 days. When Collect! prompts you with the Schedule
Next Contact - New form to create a new contact, the
Due Date will be based on the value entered here.
The contact Due Date may be modified if needed, when
you create the contact.
Minutes Delay
The 'Minutes delay' field shows the number of minutes in
the future that the next contact will be scheduled. This value
will be added to the present time, by default, whenever you
create a new contact. For example, if you enter 30 here,
the 'Time' of the next contact will be 30 minutes from now.
When Collect! prompts you with the Schedule Next
Contact - New form to create a new contact, the Time will
be based on the value entered here.
The contact Time may be modified if needed, when
you create the contact. Leaving this blank schedules a
timeless contact.
Contacts that have a Time value set will pop up
when you move from contact to contact in your
WIP List. You'll be given a choice to go to the
timed contact or skip it.
Scan Back Days When Loading WIP
Enter a number of days to scan back when building your
WIP List. This limits the number of days the program
will scan back when loading contacts into your WIP List.
This shortens the load time, but limits historical analysis.
Leave this field blank to load all historical contacts.
If you enter 30, Collect! will load contacts from one
month ago up to today. Contacts older than 30 days
will be ignored. If you enter 60, the WIP loader will
only load contacts from 60 days ago up to today.
Any contacts outside that date range will be ignored.
Save System
Select this button to save changes you have made
and return to the previous form. Collect! saves any
changes you have made into the Collect configuration file
in the Collect! program folder. Collect! will use the new
settings when loading the WIP List, unless a particular
operator has specific settings saved as default into
their own custom configuration file.
WIP Filters
Select the WIP FILTERS button to open the
WIP Reload Filters form where you can control
exactly the types of contacts and the number of
contacts to load into the To Do List. These settings
help to prioritize and organize your work.
Dialer Setup
Select the 'DIALER SETUP button to open the
Auto Dialer Preferences form where you can set or
modify parameters for your auto dialer.
Save Operator
The SAVE OPERATOR (or SAVE AS DEFAULT) button is used
when you are setting WIP options for a specific user.
Select this to save these WIP settings for the current
operator ONLY. These settings will be used whenever the
operator loads their WIP List and does not update the
global configuration for all users.
When prompted, select YES. This creates a configuration
file for the operator in Collect!'s program folder. For
example, own.cfg would be created if you were using
operator OWN. Collect! looks for a .cfg file for the particular
operator when it loads the WIP List. If it doesn't find one, it
loads the Collect! configuration instead with the global settings.
Saving these settings as your default saves the current
Auto Dialer Preferences, Printer settings, the
WIP Options and Filters, and WIP Reload settings.
Once you have saved the Operator Configuration for
an operator, you can use the Copy Operator Configuration
feature, to set the same settings for all operators
in your system with the same User Level.
Don't Save
Select this button to ignore any changes you have
made and return to the previous form.
Help
Select this button for help on the WIP Options
form and links to related topics.
Settings in the WIP Options control the behavior of the WIP list as accounts are displayed and worked.
WIP Options
For detailed descriptions of each separate setting available in the WIP Options window, press F1
on each field or switch option.
Setting Up Operators
Operator Type and User Level control what portions of the system a user will be able to access and
what permissions they will have in those areas: Full Access, No Delete, Read Only, No Access.
Selecting "Collector" as the Operator Type will bring the user directly to their WIP List as soon
as they login. Selecting "System" as the Operator Type will navigate this user to the Main Menu
when they login. From this screen they may access the Quick Search fields but they are not permitted
into the rest of the button or drop-down menu options.
See User Level topics and related links for more detailed coverage on customizing or creating new
Operator Levels.
Setting Up Debtors
Each Debtor must have an Operator assigned to it BEFORE you begin creating any Contact Events that
are to appear in a WIP list. The Contact picks up the Operator ID from the debtor file and inserts
it into the "Collector" ID in the Contact pop up screen as a function of the contact event creation.
There are a variety of methods of getting an Operator ID into the debtor accounts:
- Manually, as you data enter your accounts.
- Batch Process to "Assign accounts to operators".
- Batch Process to "Run contact plans" that assign accounts as per your own distribution model
utilizing conditional logic.
Setting Up Contacts
Each item displayed in the WIP List is a Contact event scheduled for a particular Debtor. Contacts
maybe created manually when you are data entering a Debtor manually or they may be created by running
a contact plan against a tagged list of accounts to insert the same event(s) into multiple accounts
in a batch process.
Contact events have a particular Type, a Due Date, a Description and a Collector ID they are assigned
to. This does not necessarily have to the desk collector working the account. If there is need to
bring the account to the attention of another user in the company, the "Collector" code would be
replaced with the ID of the user you want to see the account for the intended purpose on the
designated date. The Due Date determines when the Event is to appear in the that person's WIP List.
The Description enables the operator to tell at a glance what the item is about; it is also a
sortable field in the WIP display.
Custom Contact Types
You can setup your own Contact types by modifying the pick list for the Contact Type field. Any type
with a value of 50 or higher is considered a custom type. For full functionality, you should modify
the pick list for the Debtor Contact Type field (contact:type), then reference the same pick list
on the Type fields for the following forms:
 WARNING: Modifying System Pick Lists will result in new values not being added as we release
them. To prevent conflict, we do not modify your custom pick lists. Please refer to the
Help page on Contact or Client Contact for more information.
WARNING: Modifying System Pick Lists will result in new values not being added as we release
them. To prevent conflict, we do not modify your custom pick lists. Please refer to the
Help page on Contact or Client Contact for more information.
Setting WIP Options
There are a variety of configurable options to choose from on the WIP Options screen. These play a
very important part in the functioning of the WIP List. You can access WIP Options to set
company-wide defaults via "System\Preferences\Plans and Reference Tables\WIP Options" or click the
Reload button if you are already on a WIP List. To obtain descriptions of each software switch and
preference setting within this window, press F1 and you will be navigated directly to the description
matching your field of inquiry.
WIP Options
Only use the settings you need. By default, Collect! ships with the most commonly used preferences
already set. You can make changes as needed. You also have the flexibility to have your whole
business use the same settings or have individual settings that differ for each of your collectors.
Differences in staff experience levels or job function are reasons why one may wish to utilize
different WIP Options for different users.
Saving Operator Configuration
You can select an operator in the "Load contacts for operator" area of the Reload Work In Progress
List and then proceed to select any settings you need for this operator in the Reload Work In Progress
List, WIP Filters and WIP Options windows.
Select the "Save as Default" button in the WIP Options screen and again in the Reload Work In Progress
List screen to retain your settings. Collect! will create a special configuration file for the
particular operator you have displayed in the "Load contacts for operator" field. A folder and file
will be created in the "Collect\config" path to store individual Operator ID profiles. The next time
the operator signs into Collect!, all the settings you saved will be loaded for that particular
operator.
Once you have saved the Operator Configuration for an operator, you can use the Copy Operator
Configuration feature, to set the same settings for all operators in your system with the
same User Level.
| 
Was this page helpful? Do you have any comments on this document? Can we make it better? If so how may we improve this page.
Please click this link to send us your comments: helpinfo@collect.org