Click Here to Close this Form.
The list of User Levels allows you to select a User
Level to apply to an Operator. This list is also used to
assign form or field rights to a particular operator level.
This provides multi-level password protection and can
be edited by your System Administrator.
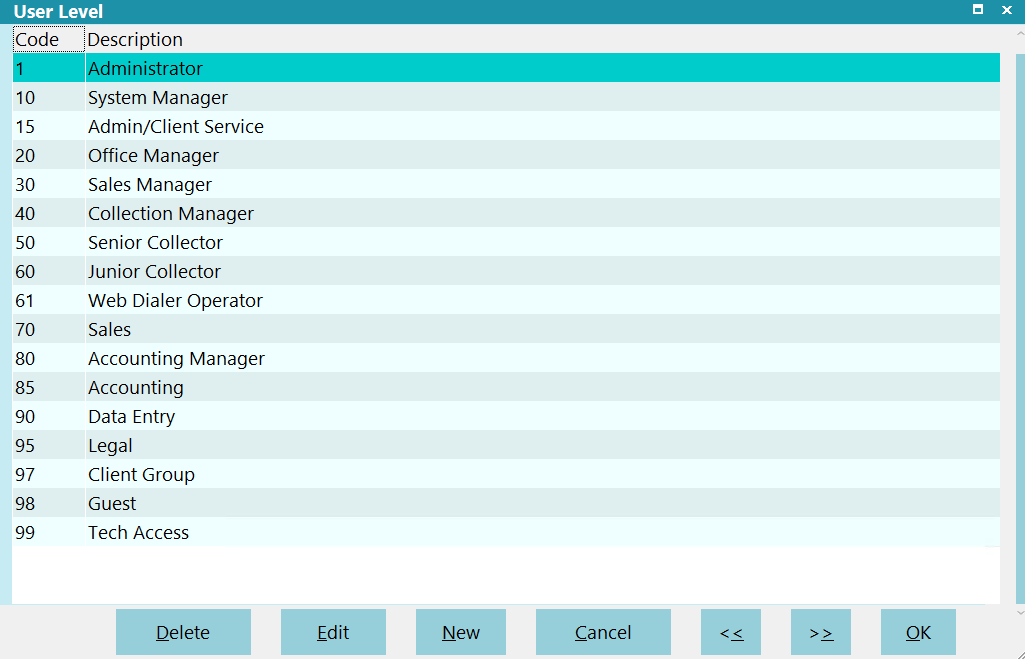
List of Predefined User Levels
When accessed in Edit mode, the list of User
Levels may be modified, levels may be copied
and new levels may be added to the list. The User
Level form lets you assign which forms, fields
and menus a given level of Operator is allowed to
access.
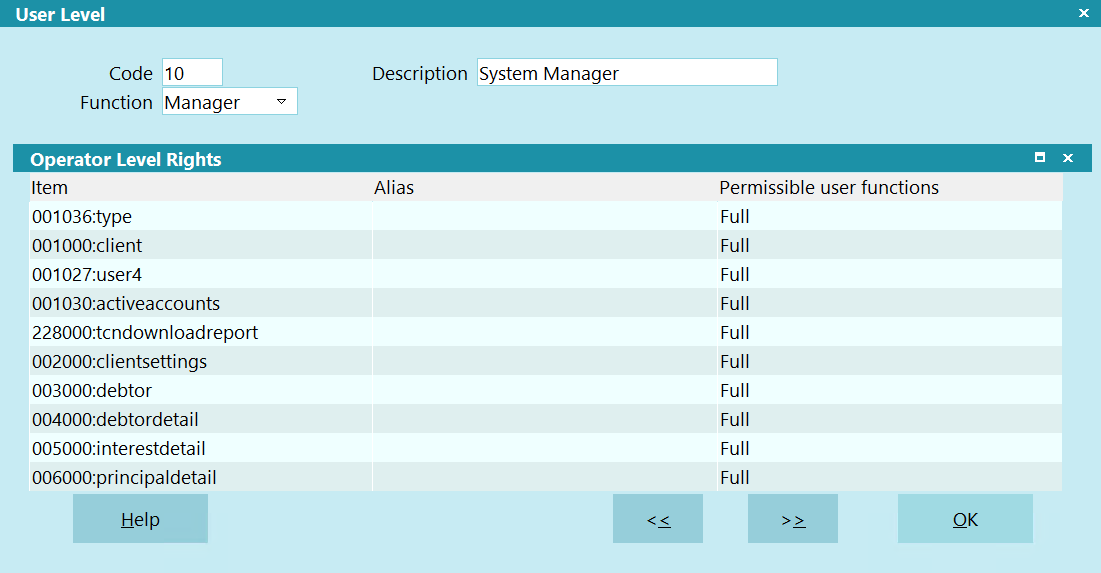
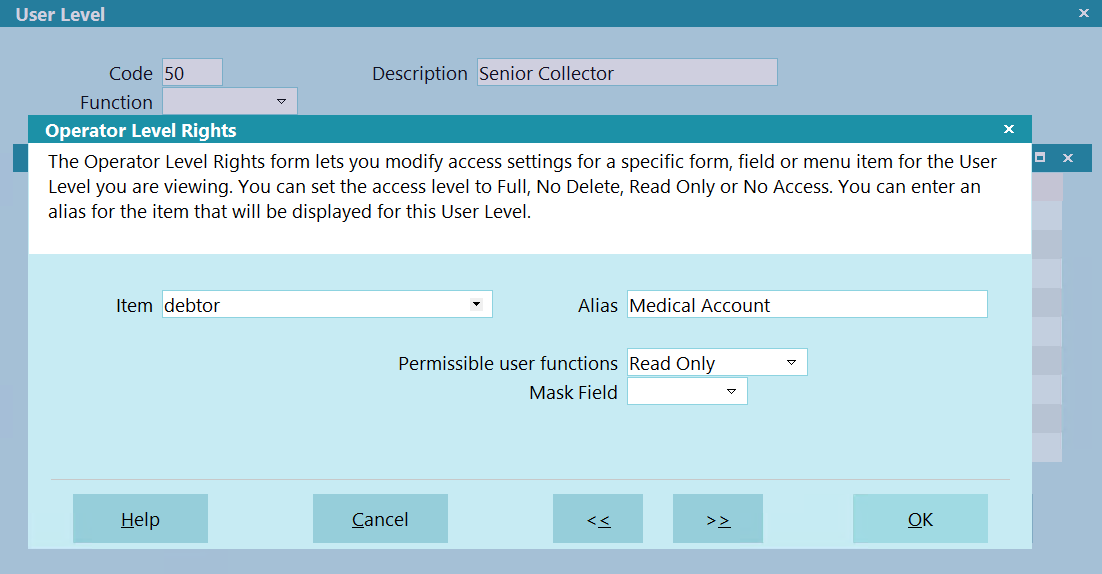
User Level
Code
This is the code for the level of User. It
is a numeric code that can be up to 4 digits.
It is advised that you examine the predefined
User Levels that ship with Collect!.

Description
This is a description of the User Level such
as System Manager. Names can be changed
to be more intuitive to the way you do business.
It is advised that you examine the predefined
User Levels that ship with Collect!.
Function
This field contains a pick list of common functions
within an organization. It is primarily for reporting
and dashboard purposes. For reporting, you can create
a single report that behaves differently for a manager
than a collector. It allows you to minimize duplicate
code. For the dashboard, it will allow you to control
which user levels have access to certain dashboard
reports.
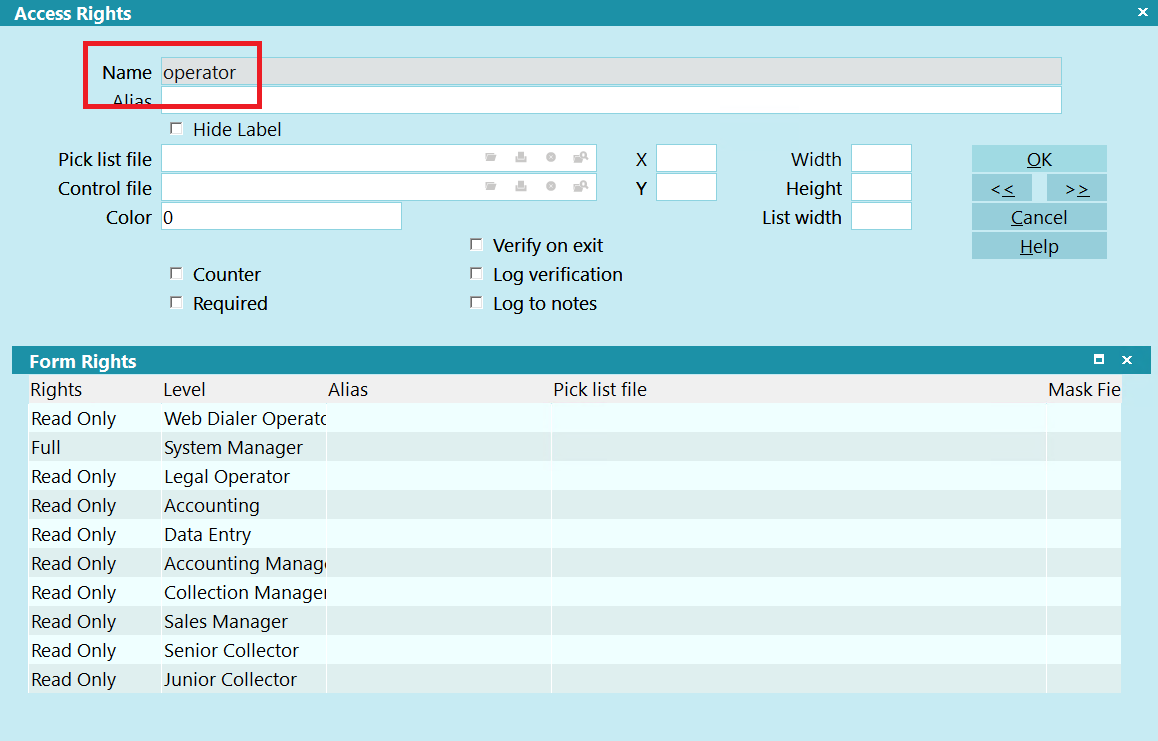
Access Rights
The Operator Level Rights list shows all the
settings assigned to the User Level described
by the Code and Description.
 Click in this sub-form to activate it.
You can now press F1 for help on
Operator Level Rights for users.
Click in this sub-form to activate it.
You can now press F1 for help on
Operator Level Rights for users.
When the Operator Level Rights list is active,
its title bar will change color.
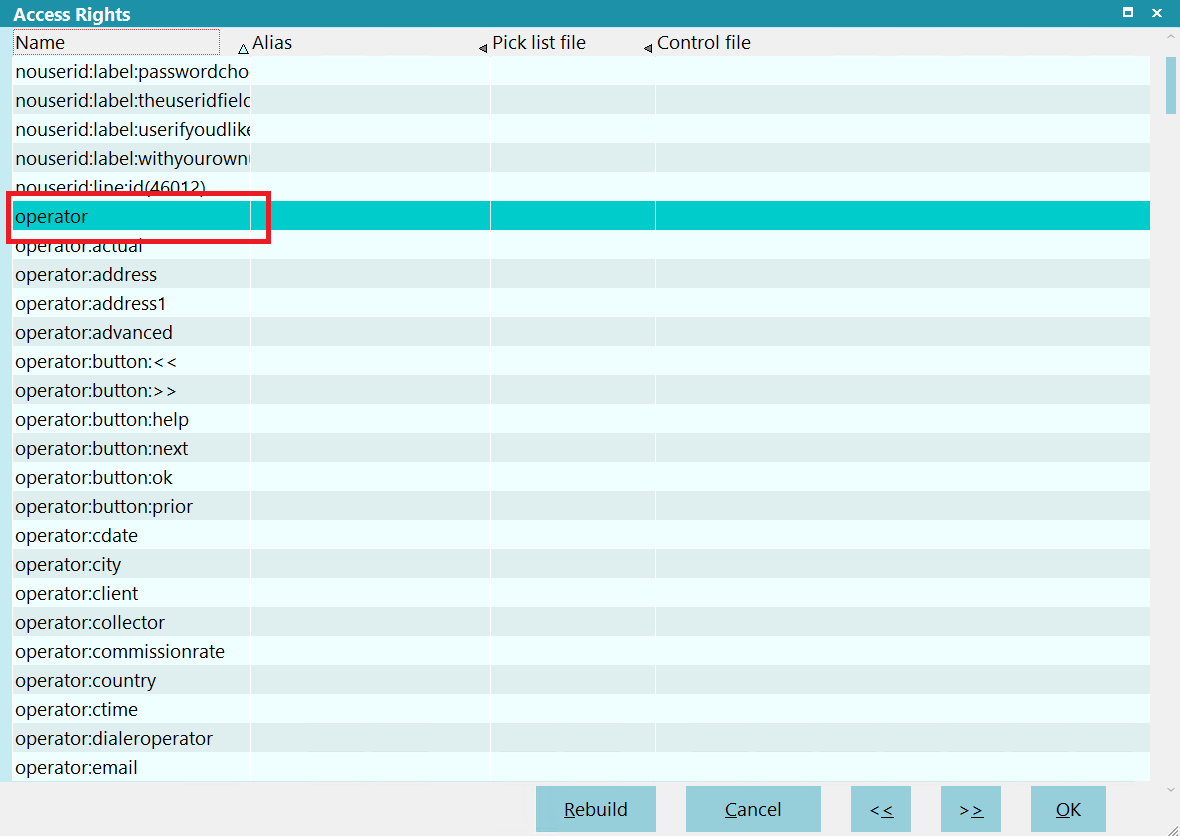
Item
This column displays the name of the form,
field or menu to which the User has access
rights.
Select a line to edit it or press F3 to add
a new item.
Alias
If an Alias has been set for the particular
item, it is displayed in this column.
Select a line to edit it or press F3 to add
a new item.
Permissible User Functions
This column displays the rights assigned to
the particular item in the list.
The access rights settings are:
- Full
- No Delete
- Read Only
- No Access
Select a line to edit it or press F3 to add
a new item.
These permissions are described below with the effect each
setting has when applied to a menu, a form or a field.
Full Access
MENUS: Full access will allow the user to select the
menu item and complete the command.
FORMS: Full access gives the user the ability to add,
edit, delete or create a record. By default they have
access to all fields on the form.
FIELDS: Full access allows the user to edit the field.
In the case of a Full Access form, all fields are by
default editable and do not need to be declared. In the
case of a form assigned Read Only rights, the user can be
allowed to edit only certain fields by enabling any of these
rights to the field.
Read Only
MENUS: If a user has Read Only rights they cannot
activate the menu item. The menu item will appear to
be grayed out showing the user that they do not have
access to this item.
FORMS: Read Only allows the user to view the form but
not add, edit or delete records of this type. By default
you cannot edit any of the fields on a Read Only form.
You may enable editing of individual fields with the field
access rights.
One possibility is to set a form's rights to Read
Only to inhibit the User from adding and deleting a
record. You could then assign individual fields Full Access
to allow the User to change those fields.
FIELDS: Read Only displays the information on the field but
does not allow editing. By default, all fields in a Read Only form
cannot be edited. However, a form that the User is allowed
to edit can be further controlled by inhibiting the user's
ability to edit specific fields by setting them to Read Only.
This again limits the user's rights to specific fields.
 An exception to the rules is the Debtor notes.
Read Only actually indicates new notes can be entered, but
old ones cannot be deleted.
An exception to the rules is the Debtor notes.
Read Only actually indicates new notes can be entered, but
old ones cannot be deleted.
No Access
MENUS: If a user has No Access rights they cannot
activate the menu item. The menu item will be grayed
out showing the user they do not have access rights
for this item.
FORMS: No Access disallows the user from viewing
or editing the record.
FIELDS: No Access causes a field to be hidden and
not editable.
BUTTONS: No Access causes a button to be hidden.
No Delete
MENUS: If a user has No Delete rights they are able to
access the menu item.
FORMS: No Delete allows the user to create new
records and edit existing records of the same type.
However, the user is unable to delete existing records.
FIELDS: No Delete provides the user with the ability
to select the data in a field and access the special
functionality like autodialer, email, and opening files,
but they will not be able to edit the data.
Notes are treated the same as forms where
new notes can be entered, but old ones cannot
be deleted.
No Access Rights
When a user tries to perform function that they do not have
access rights to, Collect! will display a message indicating
the Access Rights number that you can change to grant
access to the particular function.
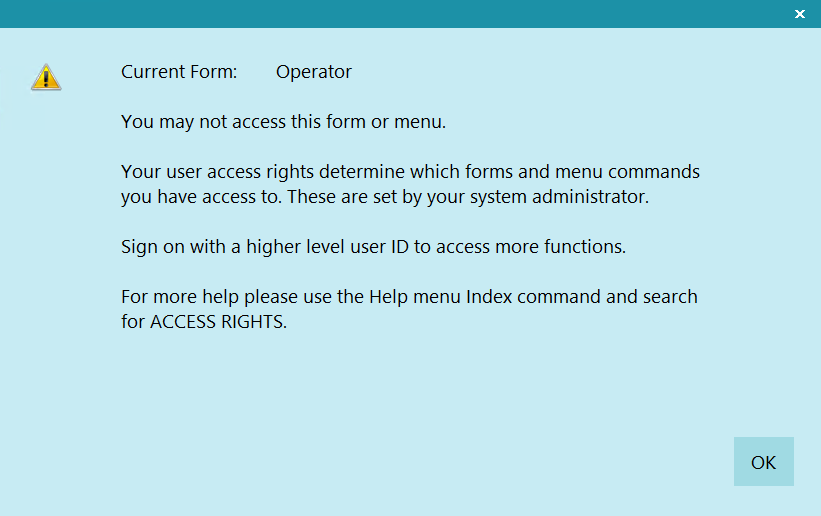
Access Rights Prompt
The Name and Number displayed in this message helps
you locate the particular form in the Access Rights list.
Access Rights Item in List
Access Rights Form Name
Delete
This button is visible only on the list of all
User Levels. Select this to delete the highlighted
item from the database.
Edit
This button is visible only on the list of all
User Levels. Select this to open and modify the
highlighted item.
New
This button is visible only on the list of all
User Levels. Select this to open a new
blank User Level form.
Cancel
This button is visible only on the list of all
User Levels. Select this to close the User Level
list, ignoring any changes you may have made.
You will be returned to the previous screen.
Help
Press this button for help on the User Level
list and links to related topics.
OK
Select this button to save any changes you have
made and return you to the previous form.
<<
Selecting this button will take you to the
previous User Level in the database.
>>
Selecting this button will take you to the
next User Level in the database.
Default User Levels
We have often been asked what the access rights settings
are for all user levels. This document gives an overview of
what the different user levels are allowed to do.
To find out in detail what user levels are allowed to do,
select System from the top menu bar and drop-down
menu will display a list of choices. Select User Levels
to display a list of all user levels in the system. Select
the user level you want to view and page down to see
the items on the list of access rights for this level.
Level 99 - Tech Access
Allowed access to all forms, fields and menu items.
This level is "beyond the access rights" system, so
you can use it to set the access rights for other levels.
Field and form aliases will not show up in this level.
Please reserve it for technical purposes.Do
not use this as a normal operating user level..
Level 10 - System Manager
Allowed access to all forms, fields and menu items
and all printing and batch processing functions.
This level is "within the access rights" system, so
you can use field and form aliases, as well.
Level 15 - Admin And Client Services
This user level has been created to fit the job
description of anyone who is tasked in any of the
following areas:
- New business entry - manual or import
- New client entry or edit of existing clients
- Batch Processing - all types
- System Recalcs
- Posting, editing, deleting client transactions
- Posting, editing, deleting debtor transactions
- Outputting daily letters / internal reports
- Clerical tasks as requested from the collection
floor / they will be able to access a WIP list
- Executing Monthend, printing checks,
invoice/statements & monthend reports
- Outputting credit bureau METRO2 files
This level is more robust than 20, 80, 85 or 90
for users with job titles such as Office Manager,
Accounting Manager or Staff & Data Entry, allowing
more of what is needed and removing that which is not.
This user level does NOT have the ability to:
- access to global system settings or any module setup windows
- delete notes in clients or debtors
- edit or delete coded reports in the Print Menu
- edit or delete coded imports in the File Menu
- access to edit the scheduled events or start the Scheduler
- access Comtech documentation meant for management/system
administrators from the Help menu
- delete debtors
- delete clients
Level 20 - Office Manager
Allowed access to most forms, fields and menu items,
except Company Details and System Diagnostics. User Level
are Read Only. May access all printing and batch
processing functions.
Level 30 - Sales Manager
Sales manager has access to client demographics, but cannot
change their financial details in the client settings form. They can
also browse virtually all records in the database to help their
supporting the clients. Sales managers can also print most
administrative reports, while they do not have access to most
batch processing and account management functions available
from the Tools menu.
Access in the masterdb database for Sales managers
and Sales operators is limited to providing support and client
satisfaction functions. Full access to prospecting information
for these individuals is provided via the Prospecting database.
To review scheduled activity for a client click reload in
the WIP list. The form displayed lets you pick a few things.
Clear the operator ID field and select a client ID and you will
see all contacts scheduled currently for any given client.
Menus:
- Browse, Everything.
- Print, A selection of reports to support client services,
but may not edit reports.
- Tools, Only the 'Dial a Number' function is available
- Options, SMG may view but not edit basic system tables
- System, SMG may view the Operator list and Network activity
Forms:
- Client, SMG can edit client demographic information.
- Client Settings, SMG can view this form.
- Debtor, SMG can only edit the Sales ID on the debtor form.
- Notes,SMG can add new notes but not alter or delete existing ones
- Financial Information, SMG view but not edit financial information and transactions.
- Contacts, SMG can add, edit and delete contacts
- Contact Plans, SMG can view contact plans.
- Attachments, SMG can view debtor attachments
- Status codes - view only
- Transaction Types - view only
- Commission Rate Plans - view only
Level 40 - Collection Manager
The Collection Manager can manage accounts including account
assignment, running contact plans and many batch functions.
The collection manager is typically responsible for day to day
operation of collection activity.
Menus:
- Browse, everything except transactions, invoices, payments and daysheets.
- Print, all daily reports, Client Status and Operator Commission reports.
- Tools, to assist with account management and batch processing.
- Options, CMG may view but not edit basic system tables
Forms:
- Client, CMG can view client information but not edit.
- Client Settings, CMG can view this form.
- Debtor, CMG can edit basic demographic fields on the debtor record.
- Financial Information, CMG can only view financial information and transactions.
- Contacts, CMG can edit, add and delete contacts
- Attachments, CMG can add, edit and delete debtor attachments
- Notes, CMG can add new notes but not alter or delete existing ones
- Contact Plans, CMG can view contact plans.
- Status codes, view only
Level 50 - Senior Collector
Allowed the same as a Junior Collector, plus can use the Browse
Debtors, Contacts and Attachment commands.
Menus:
- Browse, Find By
- Browse, Debtors, Contacts and Attachments
- Print, Reports and Letters
- Tools, Dial A Number and Predictive Dialer
Forms:
- WIP List
- Debtor form
- Contact Events
Letters:
Debtor letters are available to Senior Collectors. To edit access
rights to Reports, please select Print from the top menu bar and
a drop-down menu of choices will display. Select Edit Reports.
The list of reports is displayed. Select the report you want to
change access rights to and the Report Definitions form will be
displayed. Click the Options button on the bottom left of the form.
Select the user levels you want to have access to the report in
the User Level fields.
Contact Plans:
A limited set of contact plans are available to the Senior Collector.
Sign on as SC/SC and go to a debtor. Click the Action button on the
Debtor form and you will see what plans are available. To change the
rights to a Contact Plan, select System from the top menu bar and
a drop-down menu of choices will display. Select
Contact Management Settings and a sub-menu will display. Select
Contact Plans, View and the list of Contact Plans is displayed.
Select the plan you wish to control and the Contact Plan
form is displayed. Click the Security button on the Contact Plan form
to set the access rights for the given plan.
Level 60 - Junior Collector
Allowed access to basically perform collection activities
using the WIP list. They can also use the Auto dialer and
the Predictive dialer if they are set up by the system
administrator.
JC may edit the Debtor Contact name, the phone numbers
and the summary line on the account. JC may also enter
new notes but can't delete existing ones. JC can also
schedule contact events.
Menus:
- Browse, Find By
- Print, Reports and Letters
- Tools, Dial A Number and Predictive Dialer
Forms:
- WIP List
- Debtor form
- Contact Events
Letters:
Debtor letters are available to Junior Collectors. To edit access
rights to Reports, please select Print from the top menu bar and
a drop-down menu of choices will display. Select Edit Reports.
The list of reports is displayed. Select the report you want to
change access rights to and the Report Definitions form will be
displayed. Click the Options button on the bottom left of the form.
Select the user levels you want to have access to the report in
the User Level fields.
Contact Plans:
A limited set of contact plans are available to the Junior Collector.
Sign on as JC/JC and go to a debtor. Click the Action button on the
Debtor form and you will see what plans are available. To change the
rights to a Contact Plan, select System from the top menu bar and
a drop-down menu of choices will display. Select
Contact Management Settings and a sub-menu will display. Select
Contact Plans, View and the list of Contact Plans is displayed.
Select the plan you wish to control and the Contact Plan
form is displayed. Click the Security button on the Contact Plan form
to set the access rights for the given plan.
Level 70 - Sales
The sales operator has read only access to that data required
to answer questions from clients about their accounts.
They can add notes but not change existing notes.
They can schedule a contact.
Menus:
- Browse, Clients, debtors, contacts and attachments.
- Print, Letters.
- Tools, Only the 'Dial a Number' function is available
- Options, SAL may view status codes
Forms:
- Clients, Read only
- Debtors, Read only
- Notes, Add new notes but not edit/delete existing notes
- Cosigners, Read only
- Attachments, Read only
- Status codes, Read only
Level 80 - Accounting Manager
Allowed access to most forms, fields and menu items,
except Company Details and System Diagnostics. User Level
are Read Only. May access all printing and batch
processing functions.
Level 85 - Accounting
Accounting can manage daily and periodic financial aspect of
the system. They cannot change basic system settings, nor
can they delete clients or debtors.
Menus:
- Browse, Everything
- Print, All Reports and Letters but cannot edit reports
- Tools, A selection of tools and utilities focused on account functions
- Options, ACT may view but not edit basic system tables
Forms:
- Client, ACT can view client information but not edit.
- Client Settings, ACT can view this form but not edit it.
- Debtor, ACT can edit limited fields on the debtor record.
- Transaction, ACT can add, edit and delete transactions
- Contacts, ACT can edit, add and delete contacts
- Attachments, ACT can view but not edit debtor attachments
- Notes, ACT can add new notes but not alter or delete existing ones
- ACT may not alter debtor commission, principal or interest values (ACM may)
Reports and Letters:
- ACT can print basic debtor and client letters and reports.
- A selection of reports in the Print menu are available to ACT
Contact Plans:
- A selection of basic contact plans is available to ACT
Level 90 - Data Entry
This operator is allowed to create new debtors but not delete them.
This operator can manage new account data entry including batch
importing access through the File menu Import/Export command.
The operator does not have the ability to change import
specifications. The operator can print select reports for daily accounting
purposes and can perform many functions in the Tools menu.
Menus:
- File, Import/Export
- Browse, Find By
- Browse, Clients, Debtors, Transactions, Contacts and Attachments
- Print, Reports and Letters and select Daily Reports
- Tools, Dial A Number and Predictive Dialer
Forms:
- Debtor Form
- Contact Events
- Attachments
- Transactions, Edit but not delete
Letters:
Debtor letters are available to DEN. To edit access
rights to Reports, please select Print from the top menu bar and
a drop-down menu of choices will display. Select Edit Reports.
The list of reports is displayed. Select the report you want to
change access rights to and the Report Definitions form will be
displayed. Click the Options button on the bottom left of the form.
Select the user levels you want to have access to the report in
the User Level fields.
Contact Plans:
A limited set of contact plans are available to DEN. Sign on
as DEN/DEN and go to a debtor. Click the Action button on the
Debtor form and you will see what plans are available. To change the
rights to a Contact Plan, select System from the top menu bar and
a drop-down menu of choices will display. Select
Contact Management Settings and a sub-menu will display.
Select Contact Plans, View and the list of Contact Plans is
displayed. Select the plan you wish to control and the Contact Plan
form is displayed. Click the Security button on the Contact Plan form
to set the access rights for the given plan.
95 - Legal
The legal operator can edit debtor demographics, schedule
contacts, add notes, and can add and edit attachments. They
may also print letters.
Menus:
- Browse, Clients, debtors, contacts and attachments.
- Print, Letters.
- Tools, Only the 'Dial a Number' function is available
- Options, Company details, status codes and contact plans
Forms:
- Clients, Read only
- Debtors, Basic demographics may be edited
- Cosigners, May be edited
- Attachments, Add, edit and delete attachments
- Notes, Add new notes but not edit/delete existing notes
- Status codes, Read only
- Company Details, Read only
- Contact plans, Read only
Level 98 - Client
All fields are grayed out for the Guest level. Most forms
are inaccessible, however Guest may view status codes.
If the Operator Type is set to 'Client' and a valid Client #
is entered, this level is considered a Client, and they may
view the applicable Client form and the associated debtors
and add Notes. Also, Browse, Find By is enabled for
their accounts.
Client ownership is a hierarchical system that allows
you to use the Owned by client in the
Client form. If the Client # you enter for the Operator owns
other clients, they will also be visible to the particular
operator through the Browse Debtors or Find By menus.
Click Here to Close this Form.
The Operator Level Rights form lets you modify access
settings for a specific form, field or menu item for the
User Level you are viewing. You can set the access level to
Full, No Delete, Read Only or No Access. You can enter
an alias for the item that will be displayed for this User Level.
Operator Level Rights
After making any changes, it is very important
to rebuild rights. Sign in as user level 99
and select File, Maintenance, Rebuild Lists to update Collect! to
recognize any changes you may have made. Please refer
to the Help topic Rebuild Lists for more information.
You must sign out of Collect! completely, returning
to the Desktop, whenever you change to a different User Level,
or some of the rights from the previous level that you were
signed in as may still be in effect.
Item
This field displays the name of the form, field or menu to
which the User has access rights. Click on the field or
the down arrow to open the list of all menu choices, forms
and fields in Collect!
Alias
If you want the name of the form, field or menu to read
differently on the screen, you can type the new name here.
*** IMPORTANT *** Only use up to as many characters
as are in the original name.
If you want to use aliases for all User
groups, ensure that you set up the
aliases in the Access Rights list. Then
make sure that all aliased fields are
referenced in the group rights for User
levels using those aliases.
Mask Field
If you would like to mask a field with stars, you can
select a value in this field. There are 3 options:
- None - No Masking
- Partial - Masks all but the last 4 characters
- Full - Masks all characters
Permissible User Functions
Select the access rights that you wish to allow to all
operators assigned to this User Level.
Access Rights can include:
- Full
- No Delete
- Read Only
- No Access
These settings have different effects
depending on whether you are setting
rights for a menu item, a form or a field.
Please refer to Help topic
How to Use Access Rights for details.
Help
Press this button for help on the Operator Level Rights
form and links to related topics.
Cancel
Select this button to ignore any changes you may
have made and return to the previous form.
OK
Select this button to save any data you have
entered and return to the previous form.
<<
Selecting this button will take you back
to another record.
>>
Selecting this button will take you forward
to another record.

Was this page helpful? Do you have any comments on this document? Can we make it better? If so how may we improve this page.
Please click this link to send us your comments: helpinfo@collect.org