How To Generate And Print Invoices And Statements
This document describes the process of generating and printing Client Remittance Statements/Invoices
and checks. To generate a Client Remittance, you must enter the Month End menu, which is accessed
by clicking the button called "Month End" on the left-hand side of your Main Menu screen. An alternate
menu path is "Print\ Monthly Reports\Generate Statements".
All remittances, meaning Clients with a remittance schedule of Monthly or Clients with multiple
statement cycles per month are all generated in the same menu option: Generate Statements. After you
have cut off posting for the current collection period, enter the Generate Statements menu option by
one of the above-noted navigational paths and follow these steps:
- Generate Statements
- Preview Statements
- Print Checks or Export ACH Upload
- Print Statements
- Print Reports
Month End Form
Click Here to View this Form.
Click Here to Close this Form.
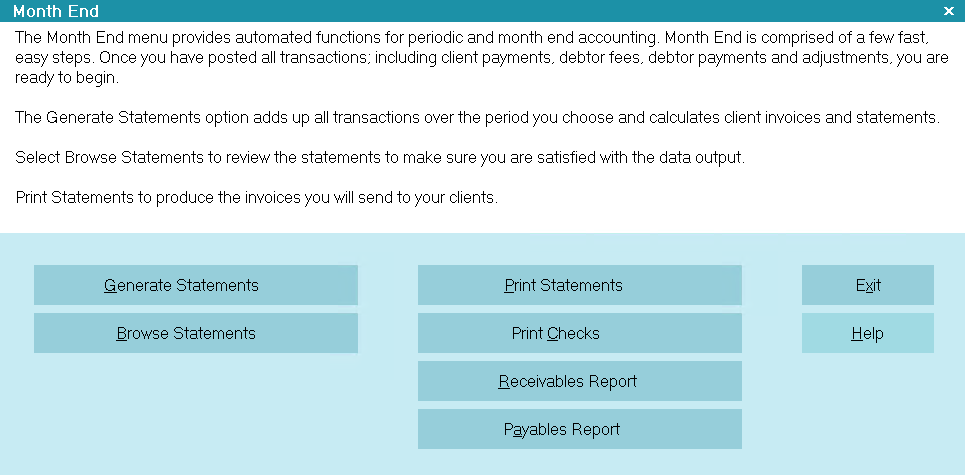
The Month End menu provides automated functions for periodic
and month end accounting. Month End is comprised of a few
fast, easy steps. Once you have posted all transactions;
including client payments, debtor fees, debtor payments
and adjustments, you are ready to begin.
The Generate Statements option adds up all transactions over
the period you choose and calculates client invoices and
statements.
Select Browse Statements to review the statements to make
sure you are satisfied with the data output.
Print Statements to produce the invoices you will send to
your clients.
Print Checks to produce the checks you will send to your
clients.
Print the Receivables Report and the Payables Report
to view summary Month End data.
Please refer to the Help topic
How To Generate And Print Invoices And Statements
for more information.
Generate Statements
Selecting this button takes you to a report
to generate statements and invoices for
the month.

Browse Statements
Choose this button to browse statements
in the system. You can review all statements
in the system.
Print Statements
Select this button to print statements for
the month to your printer.
Print Checks
Select this button to print checks, the
month's payables, to your printer.
Receivables Report
Select this button to print the receivables report.
This is a report of all receivables for the month after
statements have been calculated.
Payables Report
Select this button to print the payables report.
This is a report of all payables for the month, after
the statements have been calculated.
Exit
Selecting this button will return you to the
previous form.
Help
Press this button for help on the Month End
screen and links to related topics.
Statement Dates
When generating statements, you will be asked to enter the date range for the period that that
statements are for. Typically, this would be the first of the month to the end of the month.
Collect! has built-in statement types for Weekly, Biweekly, and Daily.
 WARNING: If you are using a period other than Monthly, ensure that you have set your Client up
properly under the Client Settings.
WARNING: If you are using a period other than Monthly, ensure that you have set your Client up
properly under the Client Settings.
For other date ranges, like 1st to 15th and 16th to end of month, you will have to enter the dates
manually.
 Statement dates should never overlap. By default, Collect! will prevent transactions from
appearing on multiple statements, but the beginning date will affect Collect!'s ability to
look up the prior statement for the Accounts Receivable balances.
Statement dates should never overlap. By default, Collect! will prevent transactions from
appearing on multiple statements, but the beginning date will affect Collect!'s ability to
look up the prior statement for the Accounts Receivable balances.
After the Statements are generated, Collect! will put the day after the last day
of the date range you used. For example, if you ran statements for a month, then it would put the
1st of the following month in the Statement Date field.
WARNING: This is important as Printing Statements and Checks will use this date.
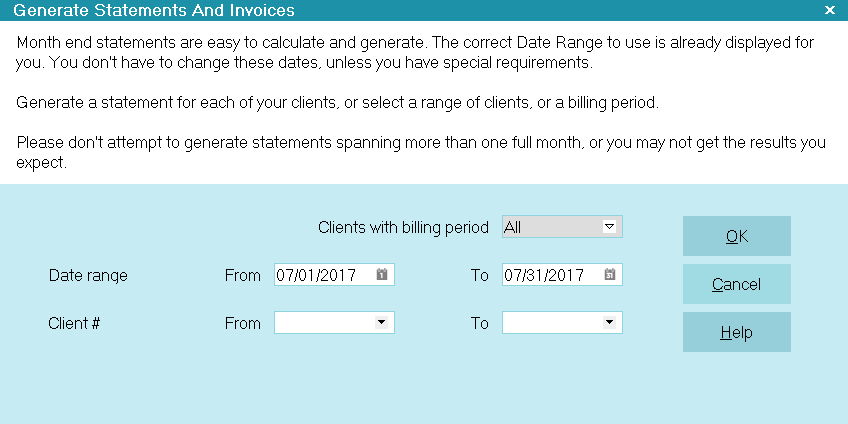
Generate Statements
Click the Month End button on your Main Menu and then click Generate Statements.
Month End form
Clients With Billing Period
Select the drop-down pick list and choose the period that you want to generate for.
WARNING: Selecting all will include all clients for the period that you select. For example,
if you select All, set the date range for last month, and you have a client that is setup
for Weekly, that client will get a statement for a month, instead of a week.
Do NOT select All if you have multiple billing periods.
Date Range
When you select the Billing Period, the dates will auto-fill. You can override them, if you wish.
Client #
If you want to include all Clients, leave both the From and To Fields blank. If you want to run a
single statement by itself, then you may enter one client number in both the From and To fields. You
can also elect to run a sub-section of Clients by selecting a client number range of consecutive
numbers, i.e. From 100 To 155, would only run remittances for Client #s 100 through 155 inclusive.
Click OK in the lower right corner to initiate the generation of your Statement/Invoices. If any
Statements already exist for any Client in the current billing period, you will be asked if you want
to delete them. It is not advisable to retain multiple copies of Statements run on the same billing
period because it becomes confusing which one was test and which one you sent out to your Client.
If there is no reason for there to be a multiple, then accept the default Yes to delete any
duplicates encountered.
Generate Statement/Invoice form
Previewing Statements
After the Statements are generated, Collect! will create Invoice records that look like the below.
The transactions are loaded as Invoice Lines. The invoice is a summary of the invoice lines.
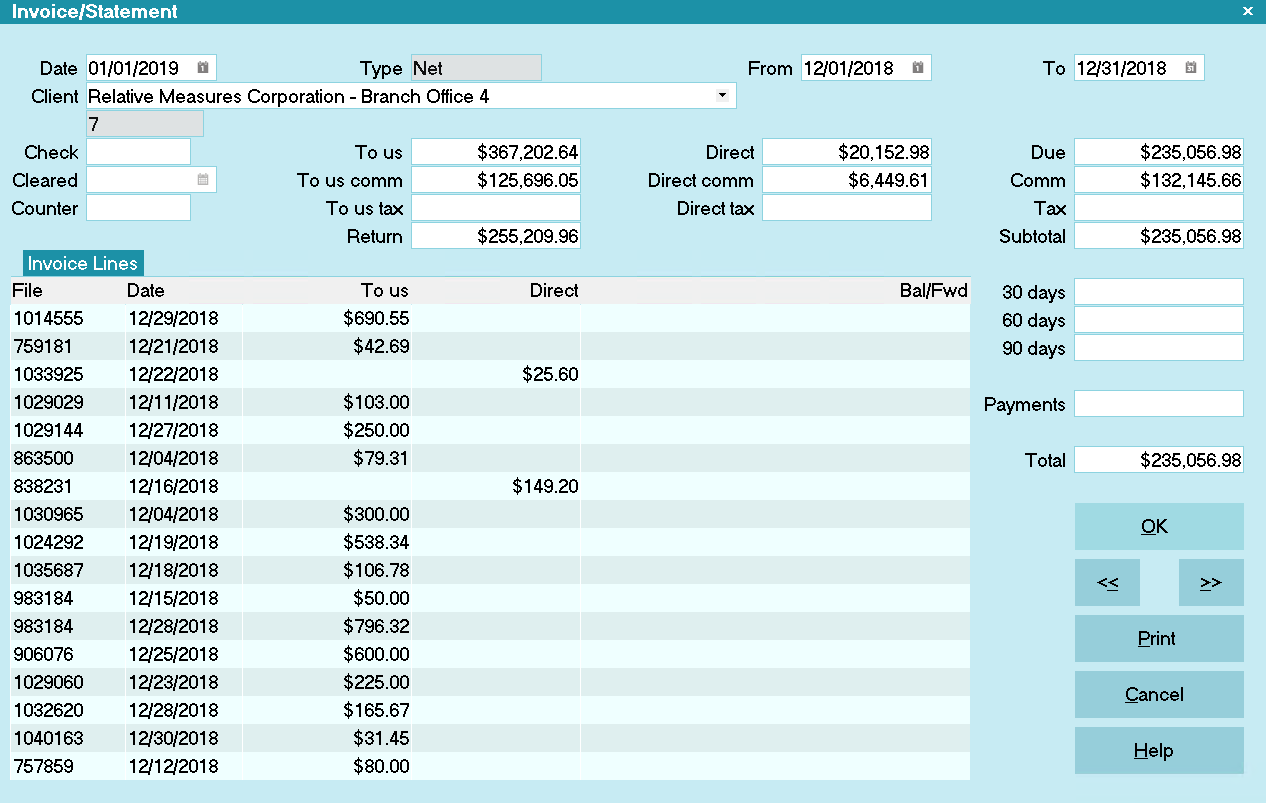
Statement/Invoice form
Due to the complexity of the Invoice record and the different remittance types, we recommend previewing
statements in report form.
On the Month End screen, click the Print Statements button.
Fill in the the parameters of the statements you generated. Reminder, the date range is the last
date of the range you entered, plus 1. For example, statements generated for January 1 to January 31
would have a statement date of February 1.
Click OK, and select Letters.
On the Statements screen, select Preview, then click the Print button.
Review the statements for accuracy.
Printing Checks
This is an optional step. You can use Collect! to print your checks to save time for your accounting
department. If you do not use this feature, you can remove the reference to check number from your
statement reports.
If this is your first time printing checks, you will need to set up your banking information first.
- Click the menu drop-down "Print\ Customize Printing\Edit Report Template".
- Select the applicable check report. There are 3: Check, Gcheck, Ccheck
- Click anywhere in the Report Body to enter this area in Edit mode.
- The following are the spots in the upper portion of the report where the variables are being
declared and defined:
@tvarRoutingNum = "123456789"
@tvarAccount    = "123456789258"
@tvarBank       = "Your Banks Name"
@tvarBankAddr   = "Bank Address Line 1"
@tvarBankAddr2  = "Bank Address Line 2"
Do NOT remove the quotes around the variable's data.
On the Month End screen, click the Print Checks button.
Fill in the the parameters of the statements you generated. Reminder, the date range is the last
date of the range you entered, plus 1. For example, statements generated for January 1 to January 31
would have a statement date of February 1.
Click OK, and select Letters.
Click the Print button.
 You can select Preview if you are running a test.
Enter the first check number to use and click OK.
Unless you have modified the default reports, you must use Check Form #1000 check paper.
Once the checks have printed, you can give them to your accountant to enter in to your accounting
software.
You can use one of the accounting software integrations that we offer in order to automatically
send your receivables and payables data to your accounting software. Alternatively, you can
create a custom export report to export the data to a text file to be imported in to your
accounting software.
If you use your own custom checks that are pre-printed forms which you purchase, contact
us in Technical Services to discuss how we can customize your checks to print out on your
preferred forms.
Export ACH Upload File
If you do not run checks, you can build a custom export report that exports your payables data in
the format defined by your bank your ACH processor.
Simply run the report and upload it to your processor.
Printing Statements
On the Month End screen, click the Print Statements button.
Fill in the the parameters of the statements you generated. Reminder, the date range is the last
date of the range you entered, plus 1. For example, statements generated for January 1 to January 31
would have a statement date of February 1.
Click OK, and select Letters.
On the Statements screen, click the Print button.
Reprint An Individual Statement From The Client Invoice Tab
Navigate to a Client.
Click on the Invoices tab and open the applicable Invoice/Statement.
Navigate to the "Print\Reports and Letters" menu.
Select the applicable Statement report:
- Statement for Net Invoices
- GStatement for Gross Invoices
- CStatement for Combined Invoices
Printing Reports
This is optional, but recommended to give you a high level overview of your Receivables and Payables.
You can run your Receivables and Payables reports before printing your checks to get another
view on whether there are errors.
On the Month End screen, click the Receivables Report button.
Fill in the the parameters of the statements you generated. Reminder, the date range is the last
date of the range you entered, plus 1. For example, statements generated for January 1 to January 31
would have a statement date of February 1.
Click OK.
On the Accounts Receivable Report screen, click the Print button.
Repeat for the Accounts Payable Report.
Select Preview, if you don't want to print the report to paper.
| 
Was this page helpful? Do you have any comments on this document? Can we make it better? If so how may we improve this page.
Please click this link to send us your comments: helpinfo@collect.org