How To Take Billing Tree Credit Card Payments
This page is the guide for processing Credit Card payments in Collect! via the integrated Billing Tree module.
Billing Tree Credit Card Setup
To be able to use Credit Card payments, there are two preliminary steps to be completed:
1. You require licensing from Comtech Systems Inc. to license the Billing Tree Module on your site. For pricing information
and licensing, please contact us at 250-391-0466 or email sales@collect.org.
2. You require an active account with Billing Tree. They will provide you with a url/web address and pin number to access the
Credit Card Gateway. Contact information for Billing Tree can be found at their website www.mybillingtree.com.

Single Credit Card Transaction
There are two choices with which to post Credit Card Payments: single transactions and
recurring arrangements.
Click the Credit Card button in the lower right corner of the Debtor screen to access the Credit Card Payment Tasks window.
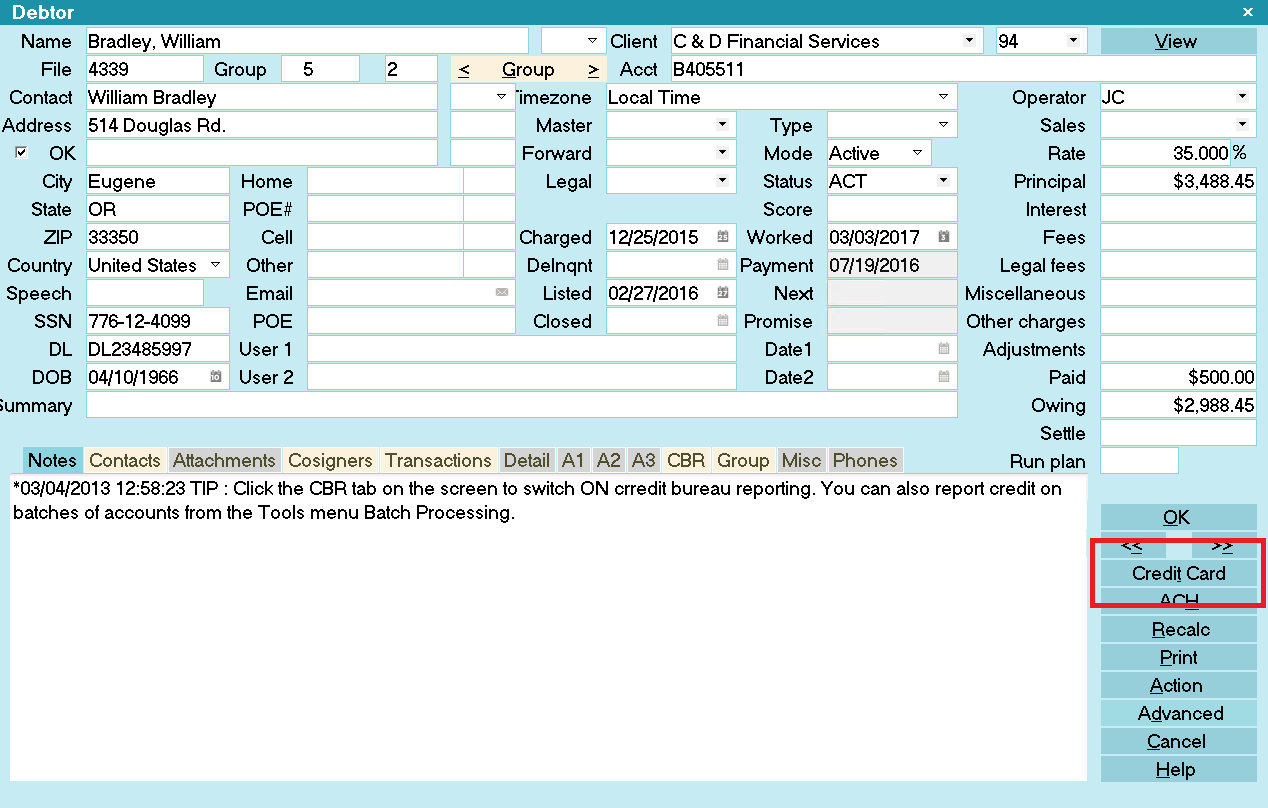
Select the Credit Card button
 If this is the first time you are accessing this screen,
after signing into Collect!, you will be prompted to
enter your Credit Card Source Key and PIN.
If this is the first time you are accessing this screen,
after signing into Collect!, you will be prompted to
enter your Credit Card Source Key and PIN.
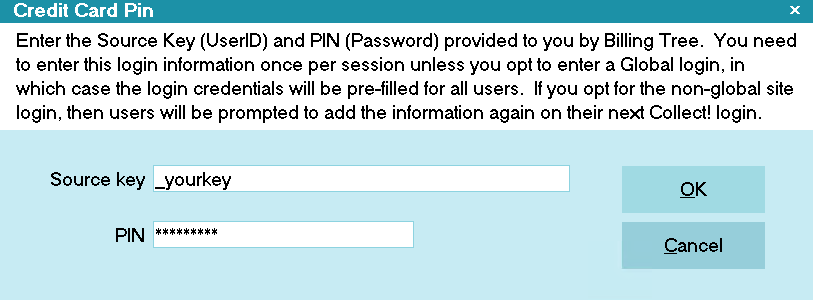
Billing Tree Credit Card PIN
Once you enter your Source Key and PIN, they stay in effect until you sign out of Collect!.
 If you have entered a system-wide Password into the
Credit Card Setup screen, you will not
be prompted to enter a Password unless you
are in any of User Levels 1, 10 or 99.
If you have entered a system-wide Password into the
Credit Card Setup screen, you will not
be prompted to enter a Password unless you
are in any of User Levels 1, 10 or 99.
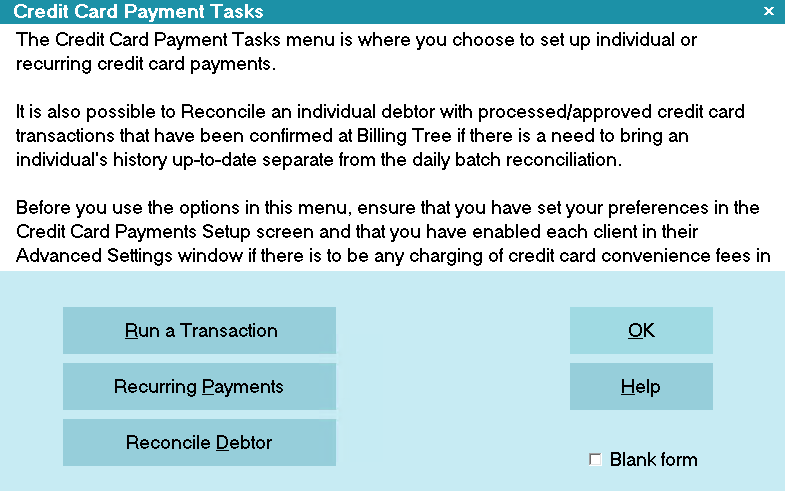
Credit Card Payment Tasks
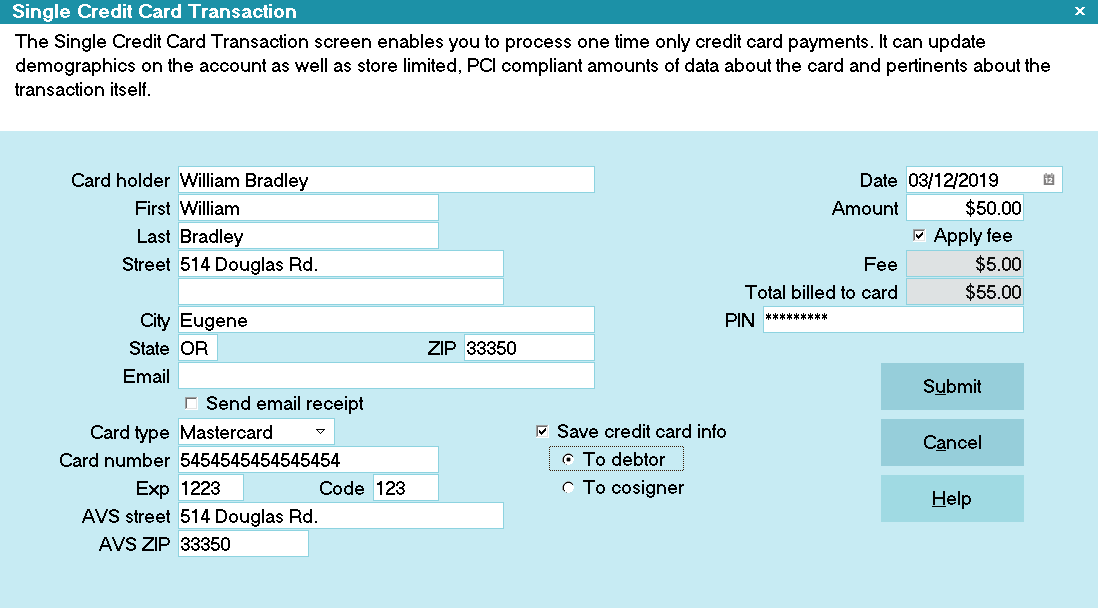
Click RUN A TRANSACTION to open the Single Credit Card Transaction screen.
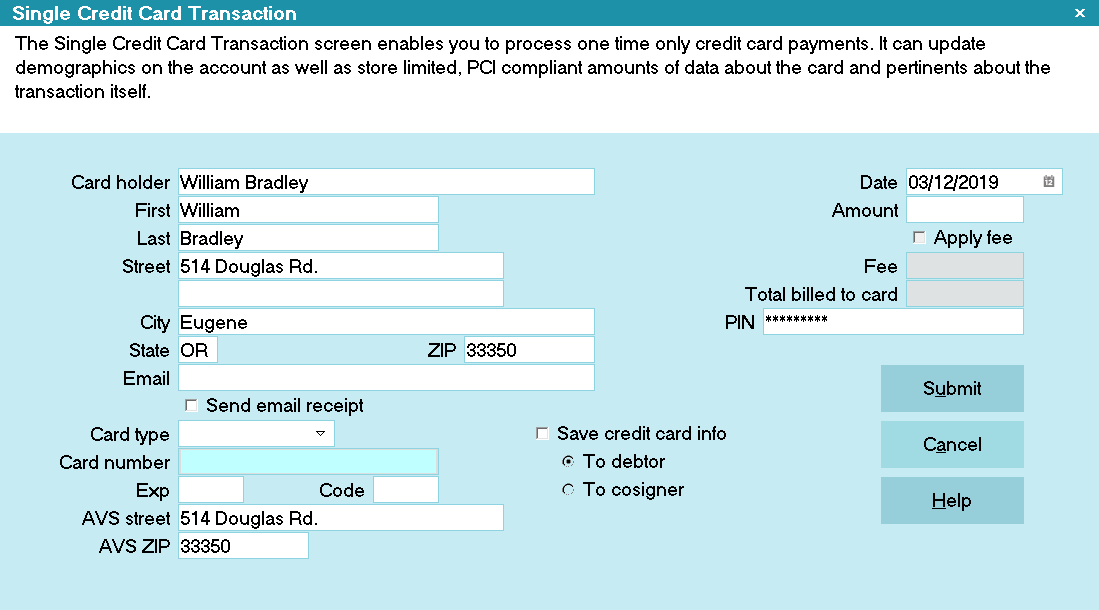
Single Credit Card Transaction
Some of the fields will be auto-filled for you as the window opens. Credit card information that you enter will be stored
in the Debtor Detail tab.
Special points of note on this intake screen are:
a) A valid billing address for the card holder is required.
b) A valid 2-character state code is required.
c) A valid zip code is required. The transaction
will be rejected if an attempt to put in a placeholder,
non-valid zip is attempted in the absence of one which
is known.
d) If you enabled convenience fees for this debtor's client,
the check box will be accessible and require your endorsement
to charge the convenience fee by checking the "Apply fee"
box first, before you see the fee amount populate.
Save Credit Card Info
The "Save credit card info" switch is ON and grayed out. You can select either "To Debtor" or "To Cosigner" but Collect!
has to store the credit card information when
you are using Billing Tree for recurring payments.
The switch to "Save credit card info" enables you to update your debtor screen with any new address or name information.
To update this information, click the radio button labeled "To debtor" and a dot will appear beside the field.
This will also save the credit card information to the Debtor Detail tab on the main debtor screen.
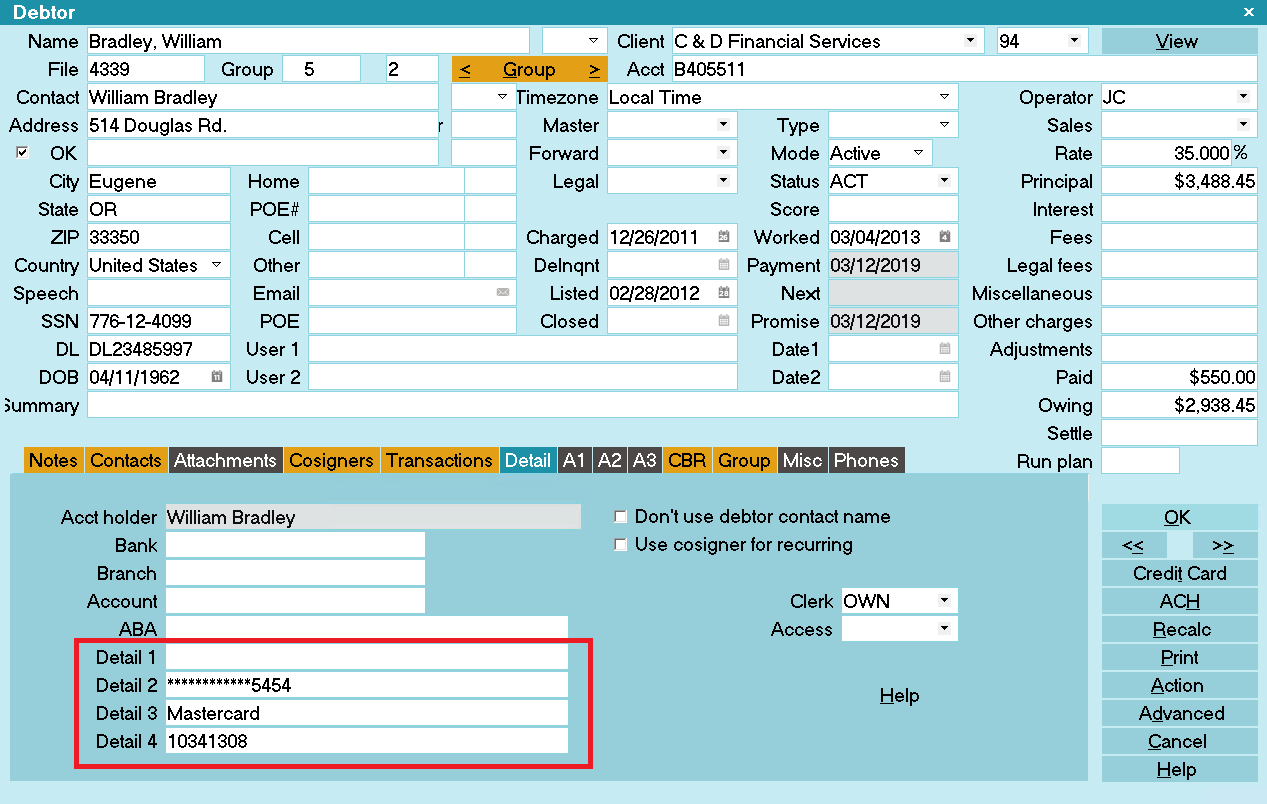
Credit Card Info Saved to Debtor Detail
Detail 2 is the masked Credit Card Number.
Detail 3 is the Credit Card type.
Detail 4 is Billing Tree's unique Client Number for the stored debtor. *** IMPORTANT: Don't
change this number! If you plan to use Billing Tree, this field must be left blank. The module will manage this field itself.
Be aware that this does overwrite any information
that is currently stored in the Debtor Detail 2,
Debtor Detail 3, and Debtor Detail 4 fields.
Alternatively, you can save the information
to the Cosigner and Collect! will create a new
Cosigner record.
Save Credit Card Info To Cosigner
You can save all the Name, Address and Credit Card information to a new Cosigner window, if the payer is not the
Debtor. Collect! will set the Cosigner class to CC Payer.
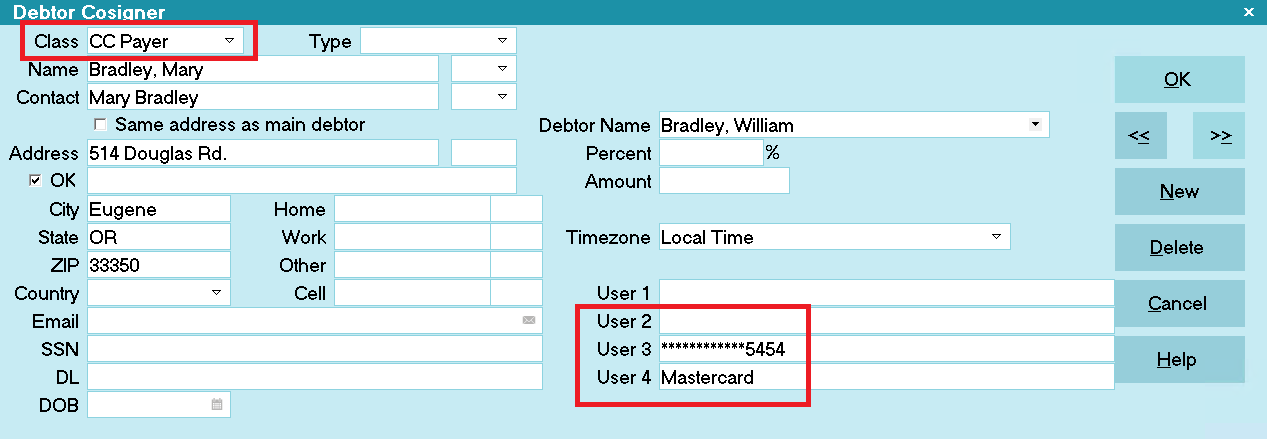
Name, Address and Credit Card Info Saved to Cosigner
User 3 is the masked Credit Card Number.
User 4 is the Credit Card type.
At any given time, Collect! only stores one
CC Payer Cosigner and one Recurring
Credit Card Payments Schedule per file.
When if you save the credit card information to the Cosigner, the Client # is still stored in the Debtor Detail 4
field because the stored record is always the Debtor.

Client Number in Debtor Detail
Detail 4 is Billing Tree's unique Client Number for the stored debtor. *** IMPORTANT:
Don't change this number!
Leave this switch ON for the duration of
your payment schedule so that Collect!
can verify the credit card information
for the payer in the CC Payer Cosigner
window during electronic reconciliations
with Billing Tree.
If you wish to charge a convenience fee, you must
have enabled Credit Card convenience fees in your Credit Card Setup
screen and also for the individual Clients in the
Advanced Settings screen.
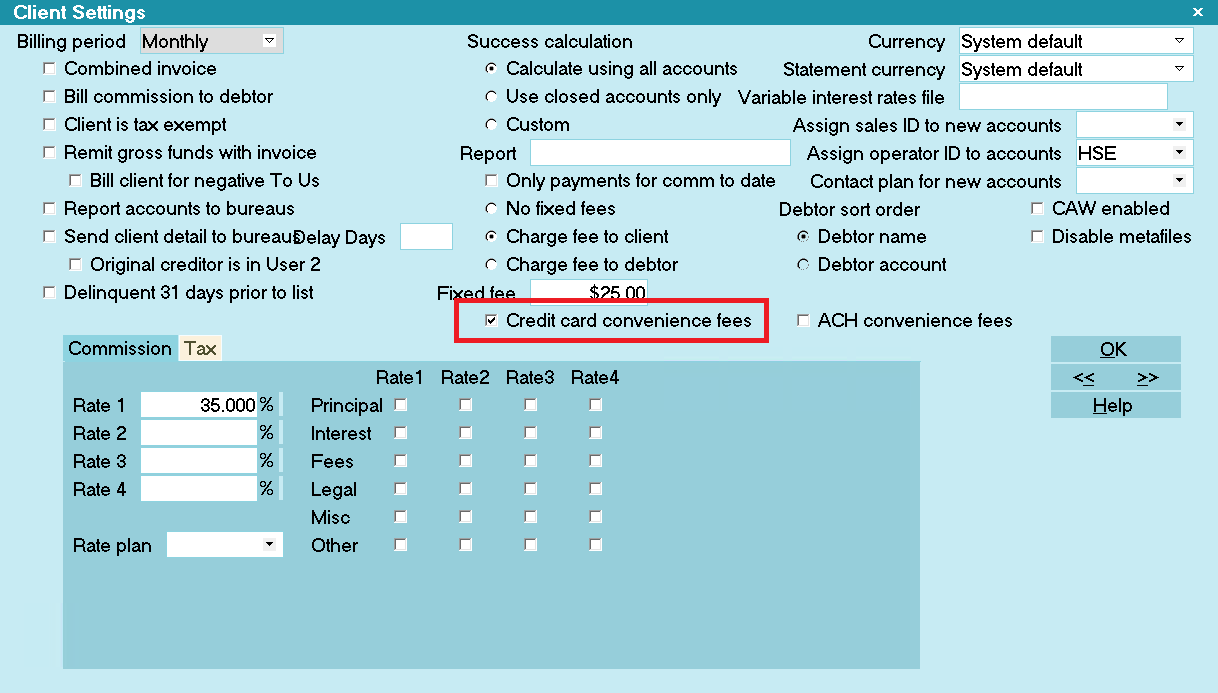
Client Settings screen
If enabled, you will be able to check the Apply Fee box and the designated fee amount will auto-populate.
The Apply Fee check-box and Fee amount field both remain appear grayed out if the convenience fee is not enabled.
You can fill in other details as needed, save the credit card and address information to the Debtor or Cosigner
and submit the payment.
Ready to Submit Single Credit Card Transaction
Collect! sends the credit card information to Billing Tree immediately. If the credit card is accepted, Billing Tree
stores the payment for processing by USA ePay at day's end.

Credit Card Transaction Approved by Billing Tree
Approved single credit card payments are posted
in Collect! immediately, including convenience
fee transactions, if applicable, but they are
NOT sent to USA ePay by Billing Tree
until day's end. It is possible that a credit card
transaction will subsequently come back declined or
disapproved in future days' time.
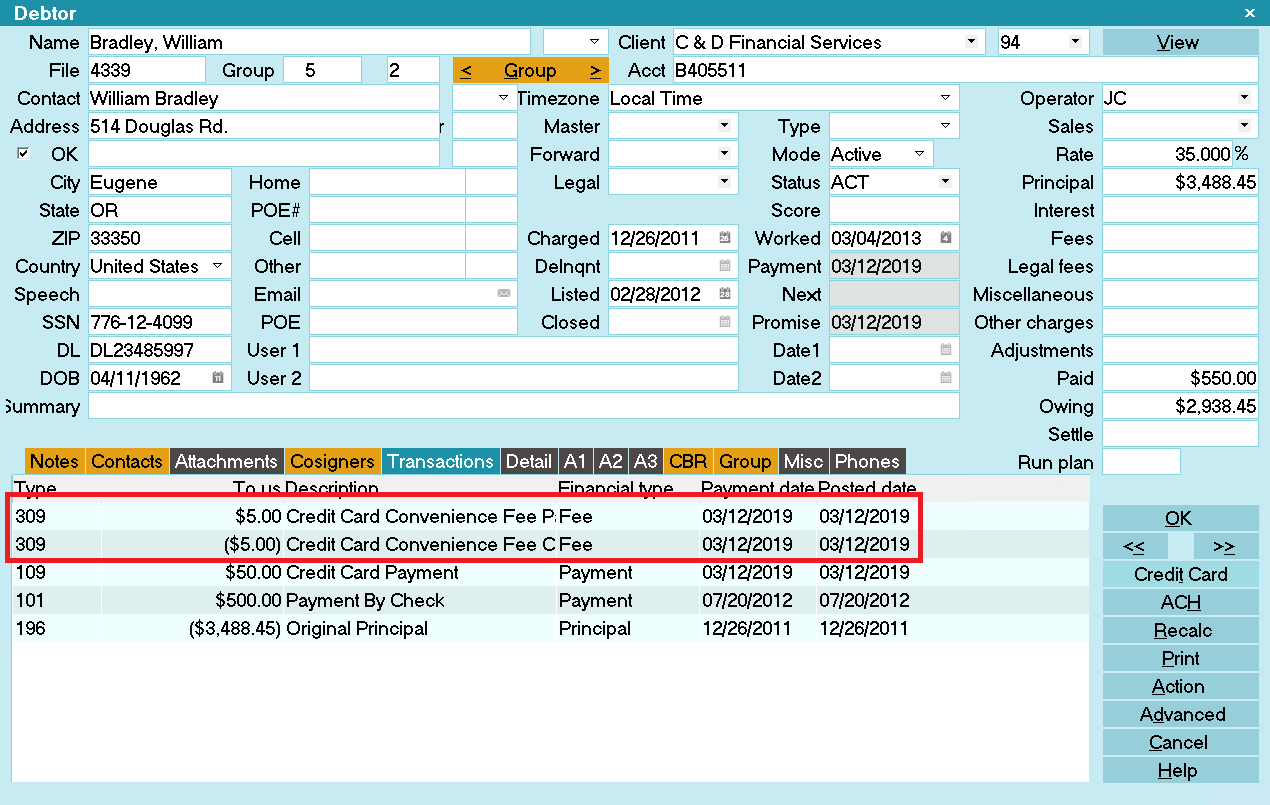
Credit Card Transactions Posted
Transaction Details
Processing confirmation details are stored in the Transaction Detail tab when your Credit Card payments are finalized.
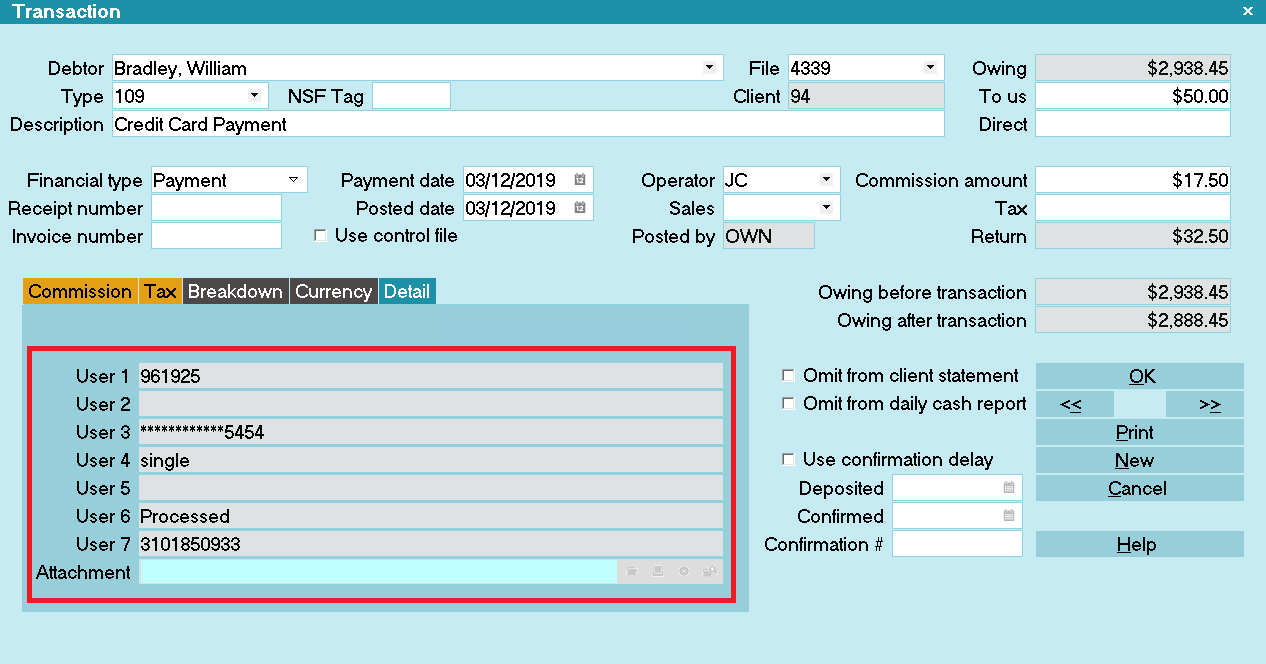
Transaction Details
User 1 is the Authorization Code.
User 2 stores the Payer's name if the Payer is not the Debtor.
User 3 is the masked Credit Card Number.
User 4 stores the source of the transaction. There are 3 options:
- single = Single Transaction run from Collect! by an Operator
- recurring = Recurring Transaction that was posted during the CC Reconciliation.
- vterm = Web Portal Transaction that was posted during the CC Reconciliation.
User 6 displays "Processed" for successful submits.
User 7 is the unique Transaction Reference Number assigned to this credit card payment.
 WARNING: To prevent duplicate postings and charges to the debtor, the user fields are all set to
Read Only regardless of your user level.
WARNING: To prevent duplicate postings and charges to the debtor, the user fields are all set to
Read Only regardless of your user level.
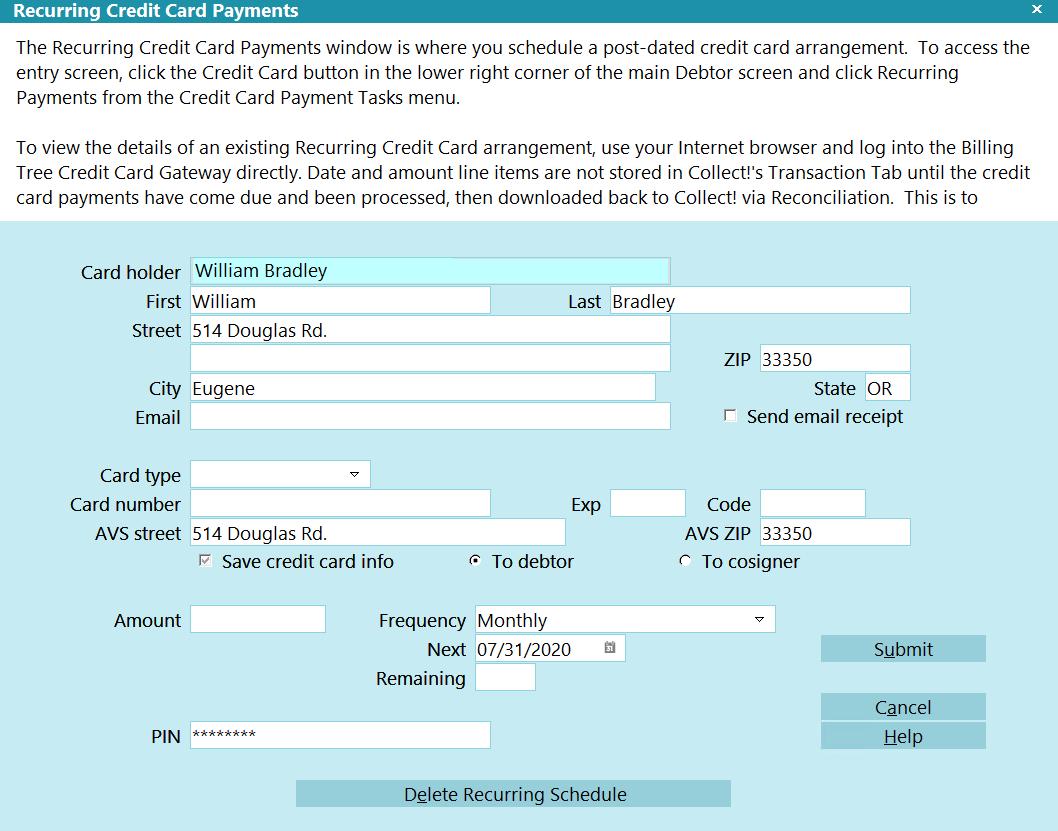
Recurring Credit Card Payments
Click the 'Credit Card' button in the lower right of the the Debtor Screen.
Select the Credit Card button
If this is the first time you are accessing this
screen, after signing into Collect!, you will be prompted
to enter your Credit Card Source Key and PIN.
Billing Tree Credit Card PIN
Once you enter your Source Key and PIN, they stay in effect until you sign out of Collect!.
If you have entered your Password into the
Credit Card Setup window, you will not be
prompted to enter a Password. Only User
Levels 1, 10 and 99 will see the Password
prompt.
Credit Card Payment Tasks
Click the RECURRING PAYMENTS button to open this entry window.

Recurring Credit Card Payments
Some of the fields will be auto-filled for you as soon as you open the window.
Credit Card Guidelines prohibit the charging
of convenience fees on all but the first
entry in any recurring schedule arrangement.
Our module is compliant with these regulations
and and currently does not support convenience fees
on recurring payments.
You can fill in other details as needed on the entry screen, save the credit card and address information to the Debtor
or Cosigner and Submit the payment schedule to the Billing Tree Gateway.
Collect! will automatically adjust the final payment ONLY IF the owing amount is lower
than the final payment. For example: the final payment will adjust down if the payment amount
is $10.00 and the owing is $9.99 or lower. The payment amount will NOT adjust up of the payment amount
is $10.00 and the owing is $10.01 or higher. Collect! will also set the remaining payment to 1.
Ready to Submit Recurring Credit Card Payments Schedule
If the card is accepted, Billing Tree stores the card details for the recurring credit card payments. This is a requirement
for PCI compliance. There will be a redacted version of the card number retained only, with no expiry date or cvv numbers
being retained in system for PCI Compliance.
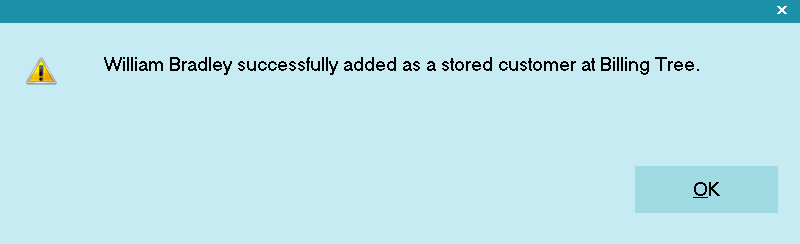
Credit Card Schedule Stored at Billing Tree
Recurring credit card payments are not posted
in Collect! until you run batch "Reconcile
Credit Card History" the day on or after the payment
comes due.
The module then creates a Promise contact to assist the collector with keeping the track of the payment schedule.
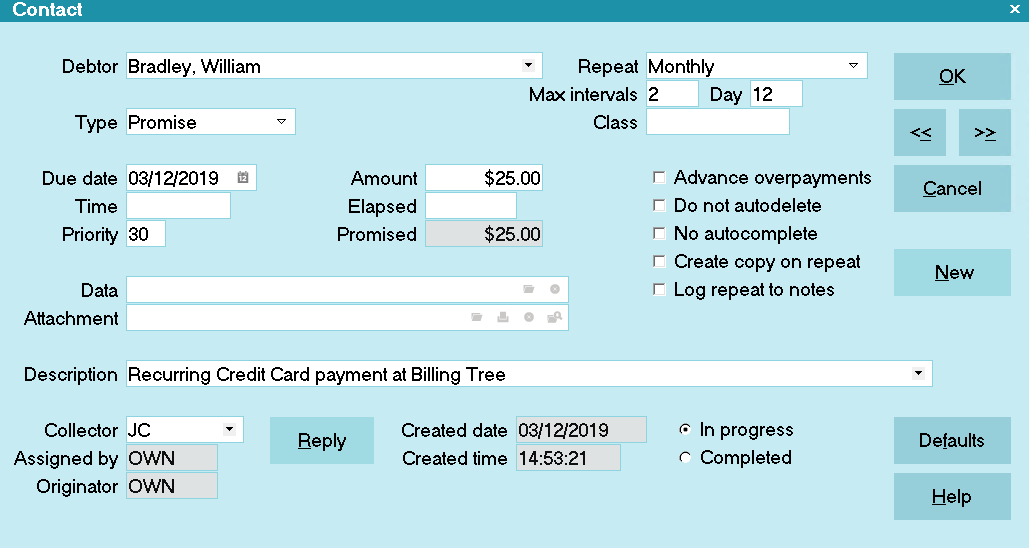
Promise Contact for Recurring Credit Card Payments
The module also inputs a post-dated Review Contact to make sure the collector is reminded of the end of the payment schedule
as well.
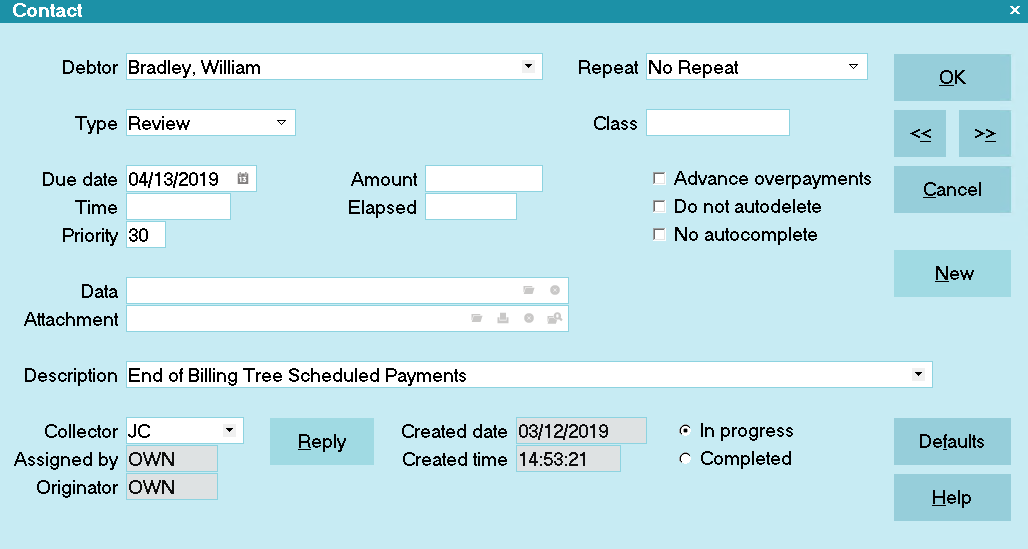
Review Contact for Recurring Credit Card Payments
Change Payment Information
On the Debtor, click the CREDIT CARD button.
Click the RECURRING PAYMENTS button to open this entry window.
Click the DELETE RECURRING SCHEDULE to cancel the contract with Billing Tree.
Setup a new payment arrangement as per How to schedule recurring payments.
Recurring Credit Card Payments
EFT Notices
The module includes an EFT Notice Setup which allows you to be able to schedule all pre-payment reminder and/or
authorization letters which you may be legislatively required to send to your debtors making Electronic Funds Transfer
payments by reliably sending them out "X" days ahead of the payment due dates.

EFT Notices and Reviews
In compliance with EFT requirements, the module has the ability to automatically schedule authorization letters and
EFT notices for recurring credit card and ACH payments.
You can access this setup window from the menu path "System\Preferences\ Billing Tree Setup\EFT Notices Setup".
It allows you to be able to select which letter you wish to send from the letter library you have stored in your Print Menu
and set a predefined number of days ahead of any due date that the letter should be sent.
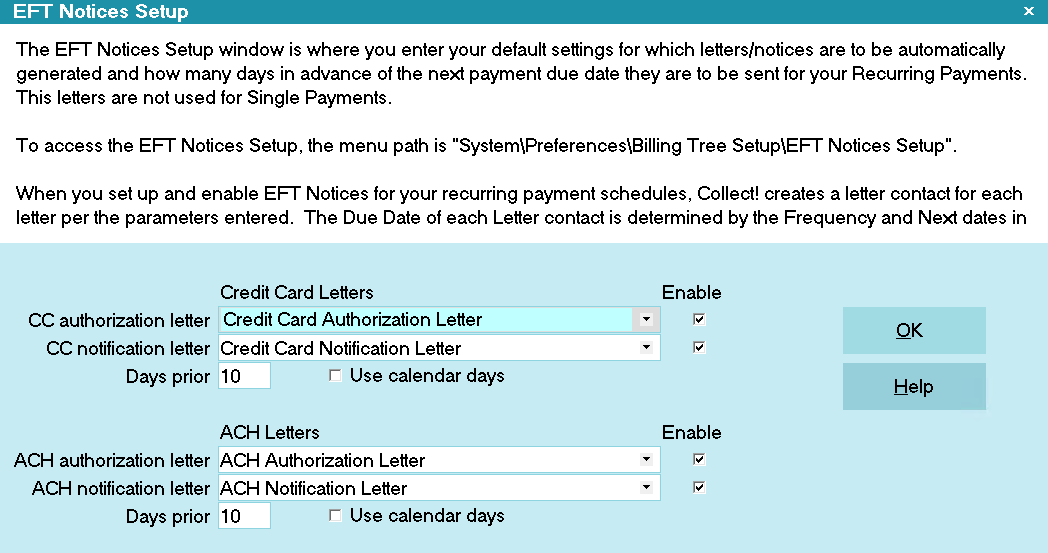
EFT Notices Setup
It is your responsibility to ensure that
any letters you send to debtors are
compliant in format and content with
legislation and regulations in your
region.
View EFT Notices samples.
Run A Contact Plan
If you set a contact plan in the 'Run plan on recurring' field on the ACH Payments Setup form, it will run when the
recurring payments is posted.
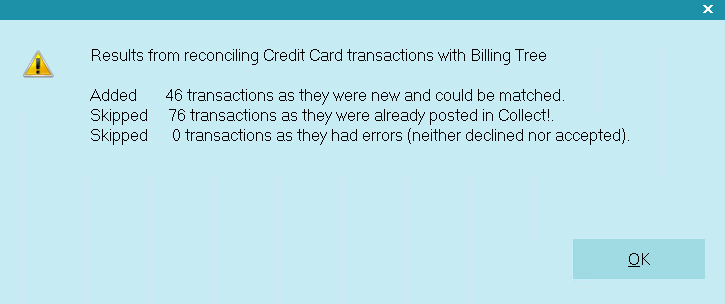
Reconcile Credit Card History
The Reconcile Credit Card History is a batch process that queries Billing Tree for all credit card payments processed
by them but have not been posted in Collect! yet. This will include any payments which any Debtors have made directly
on the Billing Tree website, provided they have used their Collect! file number as their unique identifier on the
Gateway website along with any recurring payments which came due since your last Reconcile. You will also receive any
new declines / chargeback (reversals) when you run the Reconcile process.
WARNING: If the last reconcile date is more than 7 days into the past, Collect! will prompt you during the
reconciliation process to confirm that you want to proceed. If you run the task via the Task Scheduler,
Collect! will not run the reconciliation and will put an entry in the Application Log that the task failed.
Reconcile Credit Card History

Credit Card Transactions Posted
Debtors may enter their own payments directly at
the Billing Tree Gateway provided they are
advised to use their Collect! file number as
their unique identifier/account number.
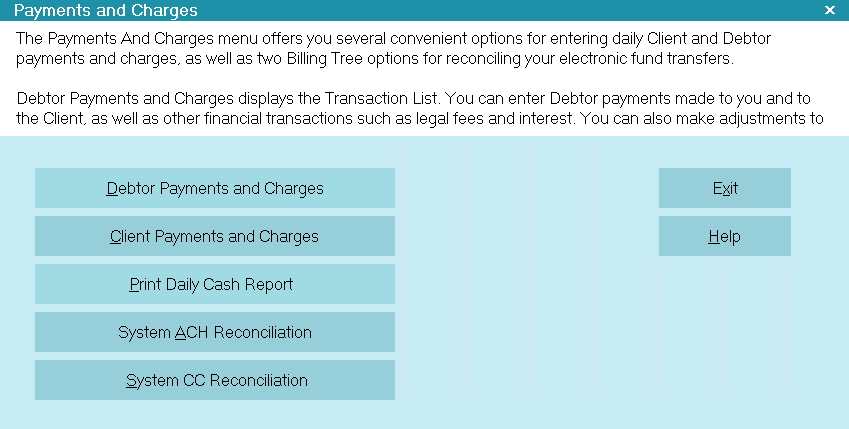
To download the latest batch of credit card transactions not yet posted in Collect!, follow the menu path
" Daily Administration\ Payments and Charges\Reconcile Credit Card History". Selecting this process will query Billing Tree
for all approved transactions, declines and/or reversals which have taken place since your last reconciliation.
WARNING: If you use different Billing Tree login IDs for staff
with different permissions, i.e. for max amount allowed
to submit, then it is necessary to run separate
reconciliations for EACH separate Billing Tree
login.
Once the process is invoked, as information is exchanged between Collect! and Billing Tree. You will see a summary
screen with batch download results. If payments cannot be matched, for reasons such as invalid file number or
some kind of modification to a pre-existing transaction which now no longer matches Billing Tree's records, then these items
will be written out to an exception report stored in your logs folder; Collect\Log Files\BillingTree\CreditCard. The file naming
convention is "Unmatched", followed by the date in YYMMDD format, and lastly the time stamp HHMMSS. Transactions in
this report require manual review and posting in Collect!.
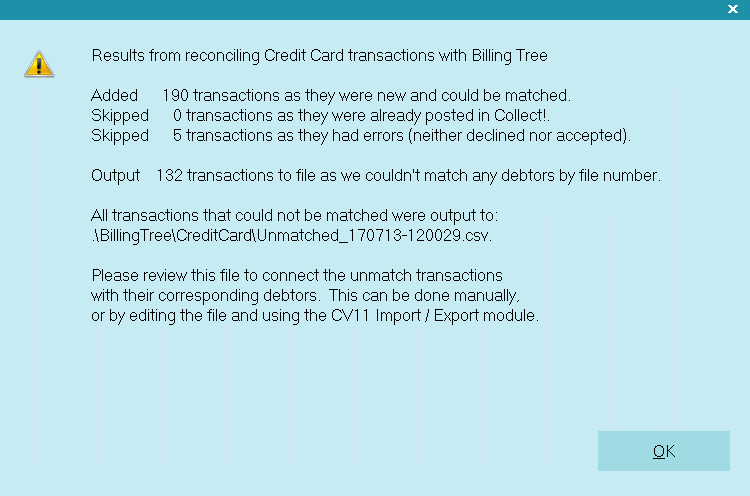
Reconcile Credit Card History Results
If a credit card is declined when an attempt is made by Billing Tree to process a recurring payment, then Collect! processes
the payment as "Declined" and uses your settings from the Credit Card Setup options.
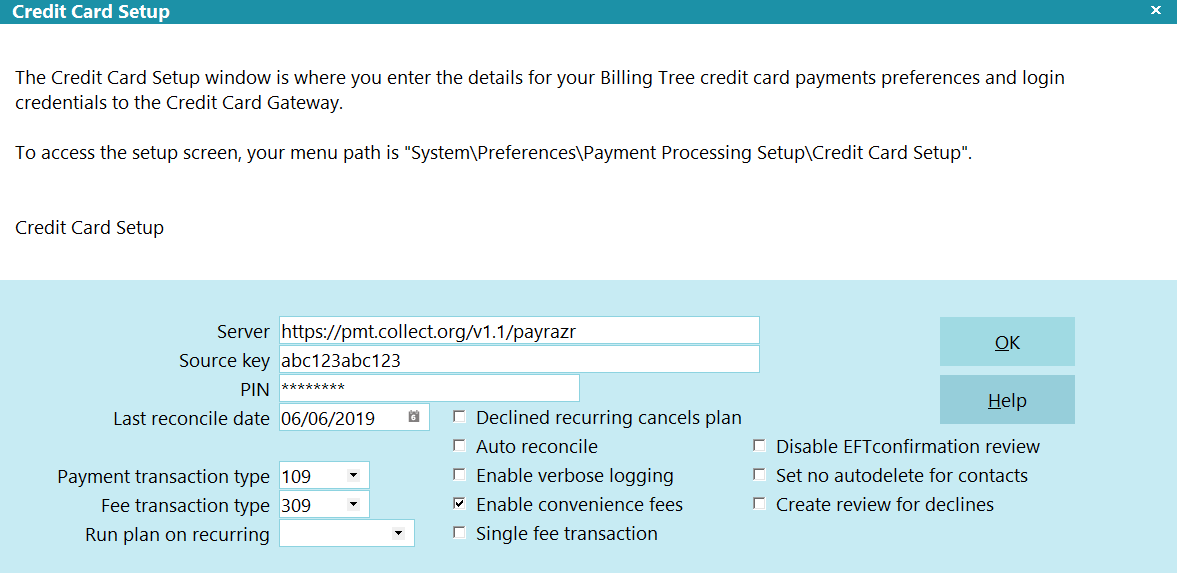
Credit Card Setup
If a file number match is made during reconciliation but the transaction is skipped or errored out
for any reason, you will see a Note line logged to the specific debtor account that the transaction belongs to, identifying
what was skipped or errored. The note line will be prefixed "Failed Transaction:" and indicate that an "Error" occurred,
as well as provide the Payment Date and amount. This is a transaction that would need to be manually reviewed for what
caused the issue and corrective action would depend on what was ascertained as root cause (i.e. was the transaction manually
modified between upload of transaction and download of process confirmation).
It also writes a detailed log into the path "Collect\Log Files\BillingTree\CreditCard\usaepay.txt".
Users who are also licensed for the Scheduler Module have an enhanced automation
with the Reconcile process being available in the Scheduler Task list of options. You may run this
process unattended. Contact us at sales@collect.org for module pricing.
Reconcile Debtor
The Reconcile Debtor function enables you to query Billing Tree for any credit card payments that may have been processed by
Billing Tree for a particular Debtor but not yet posted in Collect!.
Reconcile Debtor
When you run the Reconcile Debtor function, Collect! displays a summary screen to let you know what, if any, action was
taken. If transactions are found for this debtor that are not in Collect! then the payments will be posted as soon as the
Reconcile Debtor function runs.
Reconcile Debtor Results
WARNING: If you use different Billing Tree login IDs for staff
with different permissions, i.e. for max amount allowed
to submit, then it is necessary to run separate
reconciliations for EACH separate Billing Tree
login.
Processing transaction confirmation will appear in the Transaction record, where the Confirmation # is stored in the lower
right of the screen and additional information specific to the transaction is retained in the Transaction Detail Tab.
Viewing Results
Collect! launches several steps when you reconcile.
Credit card payments that have been processed by Billing Tree since your last reconcile are posted in Collect!. Key
details are stored in the Transaction Detail tab.
Transaction Details
If Billing Tree is unable to process a payment due to a stored credit card being declined, Collect! posts a zero value
transaction. "Omit from client statement" is switched ON. Several details are written to the Transaction Detail tab.
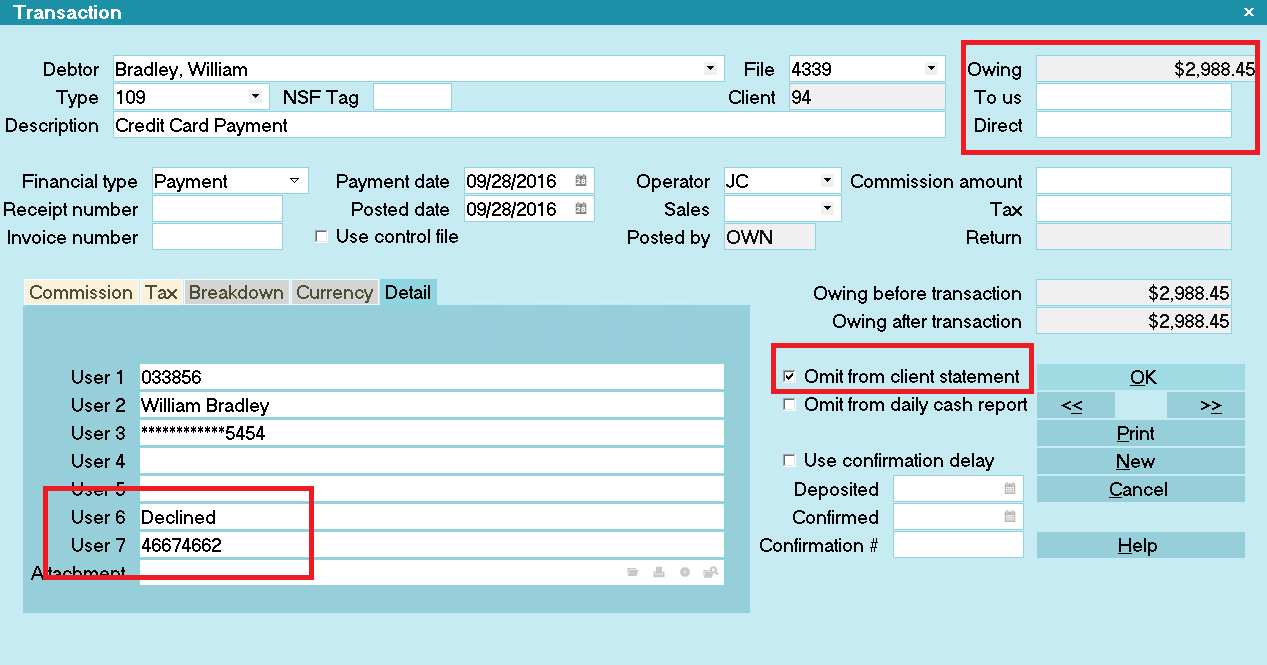
Credit Card Declined
User 6 displays "Declined" for
rejected credit card transactions.
Credit Card Setup
If a credit card is reported as "Declined" when you reconcile credit card history, Collect! can automatically stop the
recurring payment schedule. If you switched ON "Declined recurring cancels plan" in the Credit Card Setup, Collect!
uploads notification to Billing Tree to cancel the payment schedule. Collect! will remove the EFT notices.
If any payments have been posted at the Billing Tree rather than through Collect!, they are also processed when
you reconcile. If they cannot be matched to debtors in your database, a file is stored with all relevant information so that
you can process the payments as required. It is stored in the Collect\Log Files\BillingTree\CreditCard folder.
For example: Collect\Log Files\BillingTree\CreditCard\Unmatched_180519-130554.csv, where 180519 represents May 15th, 2015
and 130554 represents a time stamp in the format HH:MM:SS.
Viewing Application Log Entries
You may also find additional information in the Collect! Application Log when you run your reconcile and errors
are encountered PROVIDED you had checked the box for 'Enable Verbose Logging' in your initial Credit Card Setup screen.
Switch ON " Misc" and "Error" in the Collect! Log Viewer
settings to quickly filter the Application Log for
Billing Tree module entries.
If a file number match is made during reconciliation but the transaction is skipped or errored out for any reason,
you will see a Note line logged to the specific debtor account that the transaction belongs to identifying what was
skipped or errored. The note line will be prefixed "Failed Transaction:" and indicate that an "Error" occurred, as well
as provide the Payment Date and amount. This is a transaction that would need to be manually reviewed for what caused the
issue and corrective action would depend on what was ascertained as root cause (i.e. was the transaction manually modified
between upload of transaction and download of process confirmation).
| 
Was this page helpful? Do you have any comments on this document? Can we make it better? If so how may we improve this page.
Please click this link to send us your comments: helpinfo@collect.org