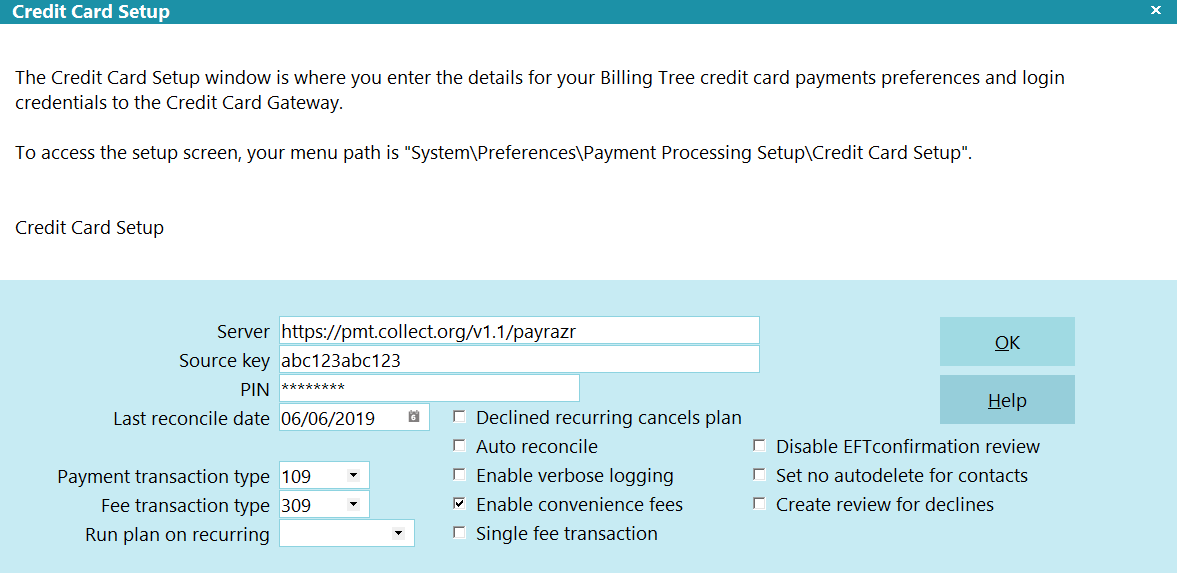
Credit Card Setup
The Credit Card Setup window is where you enter the details
for your Billing Tree credit card payments preferences
and login credentials to the Credit Card Gateway.
To access the setup screen, your menu path is
"System\Preferences\ Payment Processing Setup\Credit Card Setup".
Credit Card Setup
Server
This is where you enter the url (web
address) of the Billing Tree Credit
Card Gateway.
Billing Tree Customers
https://mypayrazr.com/ApiServiceWeb/GatewayService.svc
USA ePay customers:
https://usaepay.com/soap/gate/4DECDB2A

Source Key
Enter your Source Key assigned to you by
Billing Tree. It is typically a random
series of letters and numbers about 25
digits long.
PIN
Enter your PIN (password) assigned to you
by Billing Tree. It is typically numeric.
A globally set Source Key and PIN will be
presented to high level users (1, 10 & 99)
much like a 'Remember Me' login presents
anywhere else - it will be auto-filled. If
there are no changes to the info, these
users need only click OK to proceed to
the next screen. All other user levels
will not see or be presented with the
Billing Tree signon popup once it has
been globally configured.
Last Reconcile Date
This is the last date that "Reconcile Credit
Card History" was run successfully. If you have
never run " Reconcile Credit Card History,"
enter the date immediately PRIOR to when you
will begin using the module.
The Last Reconcile Date should NOT be
manually manipulated once you are actively
using your interface and you have started
running "Reconcile Credit Card History"
batch processes.
 WARNING: If the last reconcile date is more
than 7 days into the past, Collect!
will prompt you during the reconciliation
process to confirm that you want to proceed.
If you run the task via the Task Scheduler,
Collect! will not run the reconciliation
and will put an entry in the Application Log
that the task failed.
WARNING: If the last reconcile date is more
than 7 days into the past, Collect!
will prompt you during the reconciliation
process to confirm that you want to proceed.
If you run the task via the Task Scheduler,
Collect! will not run the reconciliation
and will put an entry in the Application Log
that the task failed.
Payment Transaction Type
Select the Transaction Type that you want
to use for your credit card payments. This
Transaction Type must already exist in your list
of Transaction Types and it must be
a Financial Type "Payment".
Convenience Fees
You are able to select the preference to
allow or disallow the charging of convenience
fees in general. You must also select on a
per Client basis in the Client Advanced Setting
screen which of your clients will allow the
convenience to be charged to its debtors.
To charge convenience fees, it is every
site's individual responsibility to ensure
you are lawfully able to charge these fees
in your your region and as per your clients'
individual wishes in this regard.
If your company is going to be charging convenience fees
to debtors for Credit Card payments, in addition to enabling the
feature in the Credit Card Setup window, you do need to enable an
indicator in each client Advanced Settings screen in order
to enable the fees for that specific client.
Click the Advanced button in the lower right corner of the
client screen and you will see a screen as follows, and
the "Credit Card convenience fees" switch is shown in the red box.
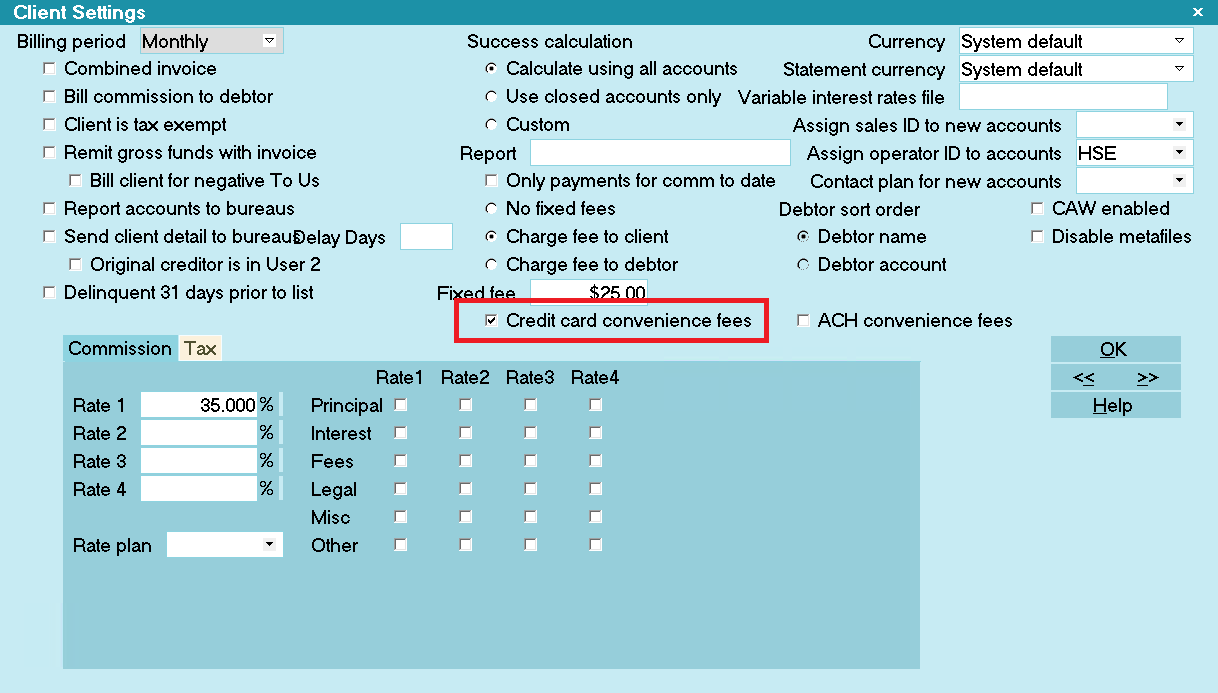
Client Settings screen
 If you have a large client base which practicality
would preclude manually updating this switch
for ALL clients (or a large tagged list), contact
Technical Services for assistance with a write back
to enable a volume of clients in mass for this
switch.
If you have a large client base which practicality
would preclude manually updating this switch
for ALL clients (or a large tagged list), contact
Technical Services for assistance with a write back
to enable a volume of clients in mass for this
switch.
Enable Convenience Fees
Switch this ON with a check mark if you want
to allow the addition of a Convenience Fee
when processing credit card payments. You
must also select a Transaction Type to use
for the fee.
If you switch this ON, then any Clients
whose Debtors may be charged this fee
must also have the "Credit card
convenience fees" switch enabled in their
Client Advanced Settings screens.
Single Fee Transaction
Switch this ON with a check mark if you want
to only post one fee transaction for the fee
amount. The payment will reflect the full
amount of the payment.
Switch this OFF if you want the system to post
the fee transaction, the a payment to fee, then
the payment transaction separately with payment
amount less the fee.
Fee Transaction Type
Choose the Transaction Type that you want
to use for credit card Convenience Fees. This
Transaction Type must already exist in your
list of Transaction types and it must be a
"Fee" type with the fee amount or percentage
to use entered.
If you have switched ON "Enable" for
convenience fees, then you must select
a Transaction Type to use for applying
the fee.
Declined Recurring Cancels Plan
Click this ON with a check mark to set your
preference that any declined card is to cancel
the payment plan on the account. The end-user
is responsible for ensuring any arrangements
stored on the source Billing Tree Gateway are
completely deleted at the source if this is the
action intended. The Collect! module functions
to disassociate its own automations when triggered
by a declined card.
The built-in functionality will automatically
mark your Promise Contact as Stopped, change
your Due Date in the Review Contact marking
the end of the original terms to be the same
as the delete date and also delete any remaining
CC Notification letters scheduled.
Auto Reconcile
Click this ON with a check mark to automatically
reconcile a debtor when a credit card payment
is posted on it. Each time a credit card payment
is posted, Collect! will contact Billing Tree
to see if there are any other payments that are
missing.
Enable Verbose Logging
Click this ON with a check mark to enable
verbose message logging to the Application Log
for troubleshooting your Billing Tree credit card
payment processes.
It is recommended to enabled this switch so that
Technicians have all information available if
any assistance is required with any interface
issues.
Disable EFT Confirmation Review
Click this ON with a check mark to stop Collect!
from creating the review contact that is dated
2 days before the payment is due with the description
of "Confirm EFT plan authorization."
Set No Autodelete For Contacts
Click this ON with a check mark to enable Collect!
to check the 'Do not autodelete' box on all contacts
created for Billing Tree recurring payments.
Create Review For Declines
Click this ON with a check mark to have Collect!
create a review contact when a declined payment
is posted to an account.
Run Plan On Recurring
Whenever a recurring plan is setup, this plan will run
automatically.
OK
Select OK to close the Credit Card Setup window.
Help
Select the HELP button for help on Credit Card Setup
and related topics.
| 
Was this page helpful? Do you have any comments on this document? Can we make it better? If so how may we improve this page.
Please click this link to send us your comments: helpinfo@collect.org