How To Take Billing Tree ACH Payments
This page is the guide for processing ACH payments in Collect! via the integrated Billing Tree module.
Billing Tree ACH Setup
There are two preliminary steps to complete before being able to access and use the ACH interface:
1. You require licensing from Comtech Systems Inc. to enable the Billing Tree Module for your site. For pricing information
and acquisition, please contact us at 250-391-0466 or email sales@collect.org.
2. You require an active ACHNow account with Billing Tree. They will provide you with all the
login credentials necessary for the module to connect to the ACH Gateway automatically. You may also use your
login credentials for direct/external access to the Gateway via your Internet browser.

Single ACH Transaction
There are two choices with which to post ACH Payments: single transactions and
recurring arrangements.
Click the ACH button in the lower right corner of the Debtor screen to access the ACH Payment Tasks window.
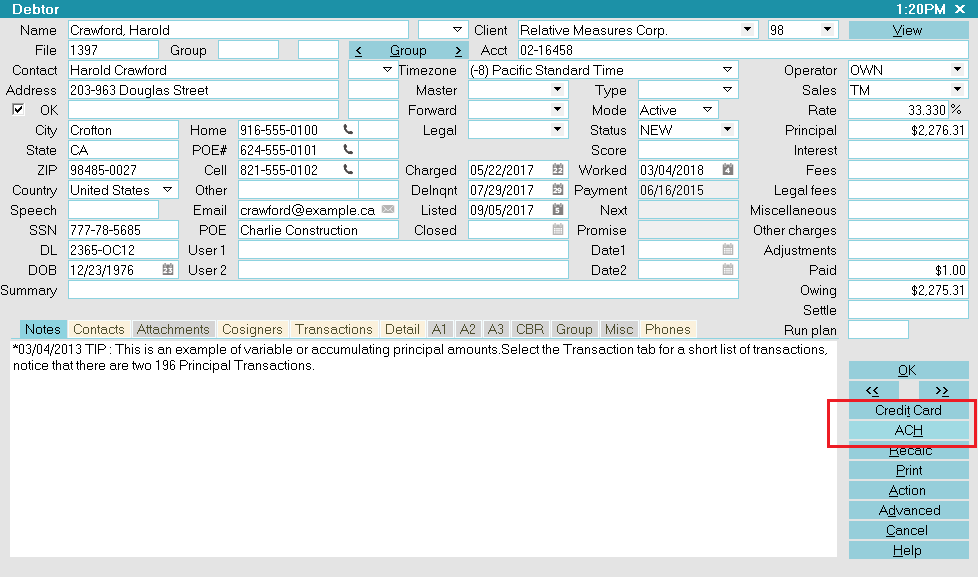
Select the ACH button
 If this is the first time you are accessing this screen,
after signing into Collect!, you will be prompted to
enter your ACH UserID and Password.
If this is the first time you are accessing this screen,
after signing into Collect!, you will be prompted to
enter your ACH UserID and Password.
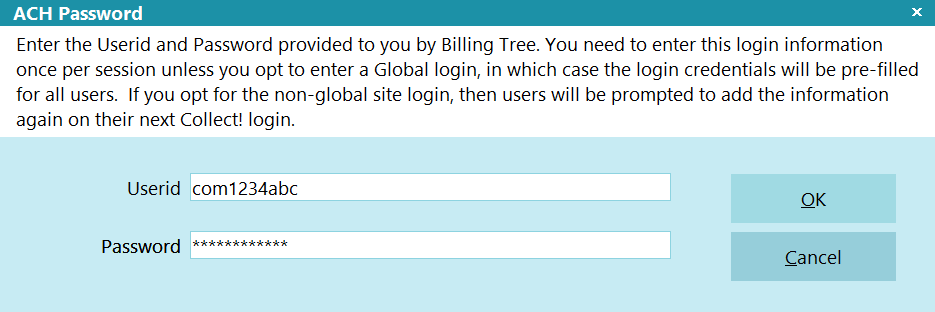
Billing Tree ACH Password
Once you enter your UserID and Password, they stay in effect until you sign out of Collect!.
 If you have entered a system-wide Password into the
ACH Payments Setup screen, you will not
be prompted to enter a Password unless you
are in any of User Levels 1, 10 or 99.
If you have entered a system-wide Password into the
ACH Payments Setup screen, you will not
be prompted to enter a Password unless you
are in any of User Levels 1, 10 or 99.

ACH Payment Tasks
Click RUN A TRANSACTION to open the Single ACH Transaction window.
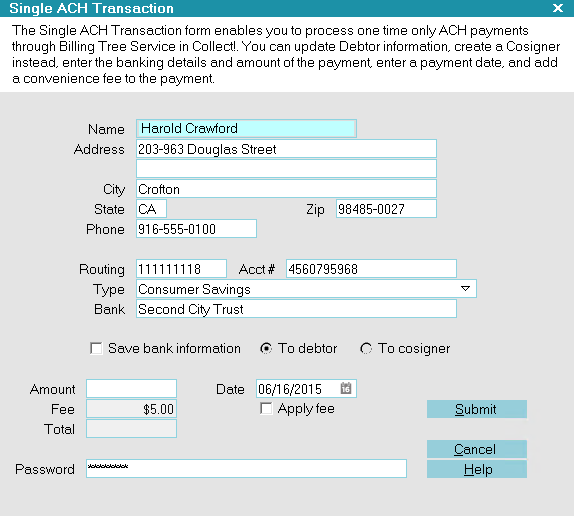
Single ACH Transaction
Some of the fields will be auto-filled for you on the screen. Banking information is stored in the
Debtor Detail tab. If you already have banking information for this debtor correctly entered into
the right fields in the Detail tab, you should see the banking fields also auto-fill with data.
This will
post the transaction on the server. To stop the payment from happening, you will need to delete
the applicable transaction in Collect! and say YES to the prompt asking if you want to remove
the transaction from the payment processor.
Save Bank Information
The switch to "Save bank information" invokes a write back of information as you entered it into the Payment intake
window and stores it in the Debtor Detail Tab.
You also have the ability to designate whether this information will save to the main Debtor or into a Cosigner
window, with the Class designation of ACH Payer. Older versions of Collect! use "Other" as the Class.
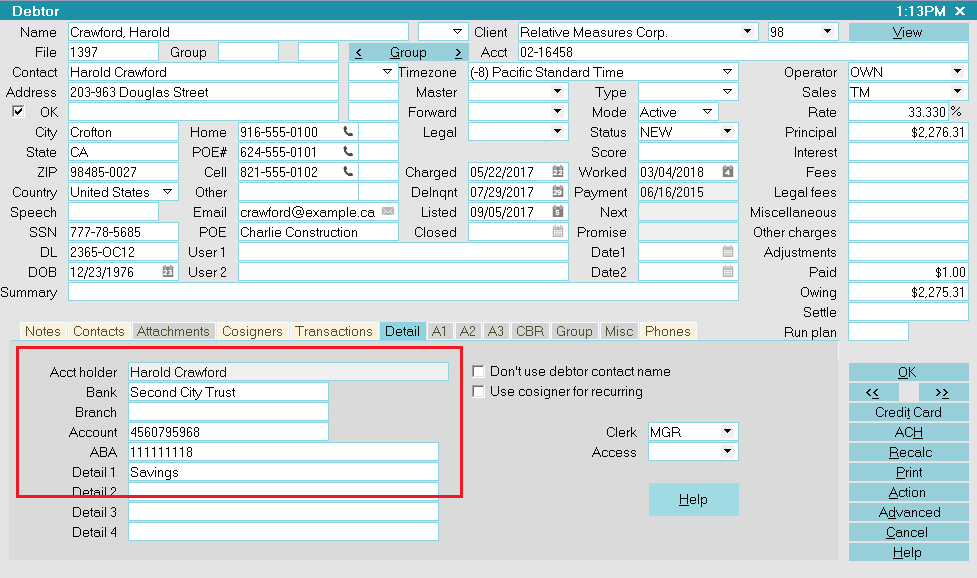
Bank Information Saved to Debtor Detail
Bank is the payer's Bank.
Account is the payer's Bank Account Number.
Transit Number is the Bank ABA routing number.
Detail 1 is the Bank Account type.
The module will overwrite any information that
is currently stored in the Debtor Detail Bank,
Account, ABA and Debtor Detail 1 fields.
If your company has any data storage convention
that uses areas in the Detail Tab, you may wish to
contact Technical Services to discuss your options
to migrate this information into a special Attachment
Tab window we can create for you BEFORE you roll out
live with the module.
Save Bank Information To Cosigner
Alternatively, you can save the banking information to a Cosigner window with the Class designation ACH Payer.
Older versions of Collect! use "Other" as the Class.:
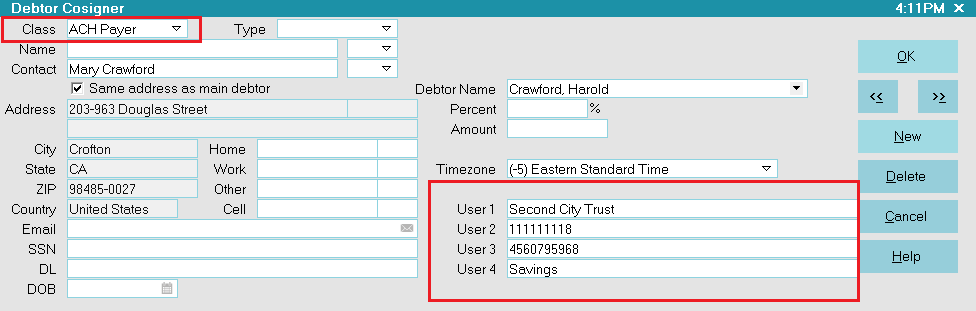
Name, Address and Bank Information Saved to Cosigner
User 1 is the payer's Bank.
User 2 is the Bank ABA routing number.
User 3 is the payer's Bank Account Number.
User 4 is the Bank Account type.
If you wish to charge a convenience fee, you must
have enabled ACH convenience fees in your ACH Setup
screen and also for the individual Clients in the
Advanced Settings screen.
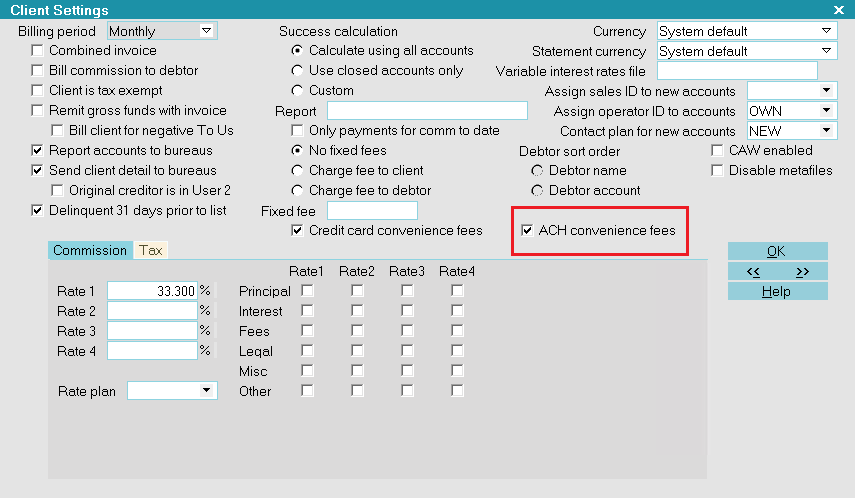
Client Settings
If enabled, you will be able to check the Apply Fee box and the designated fee amount will auto-populate.
The Apply Fee check-box and Fee amount field both remain appear grayed out if the convenience fee is not enabled.
You may then fill in other details such as save the banking and address information to the Debtor or Cosigner
and submit the payment.
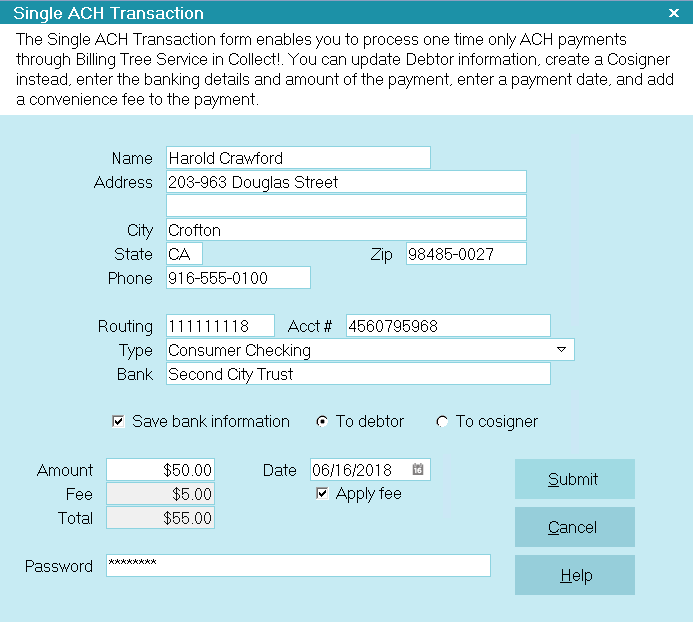
Ready to Submit Single ACH Transaction
Collect! then posts the payment, and fee if applicable.
Single ACH payments are submitted to Billing Tree
immediately. Any transactions that go NSF
will be reversed in Collect! when you run
Reconcile ACH History.
Transaction Details
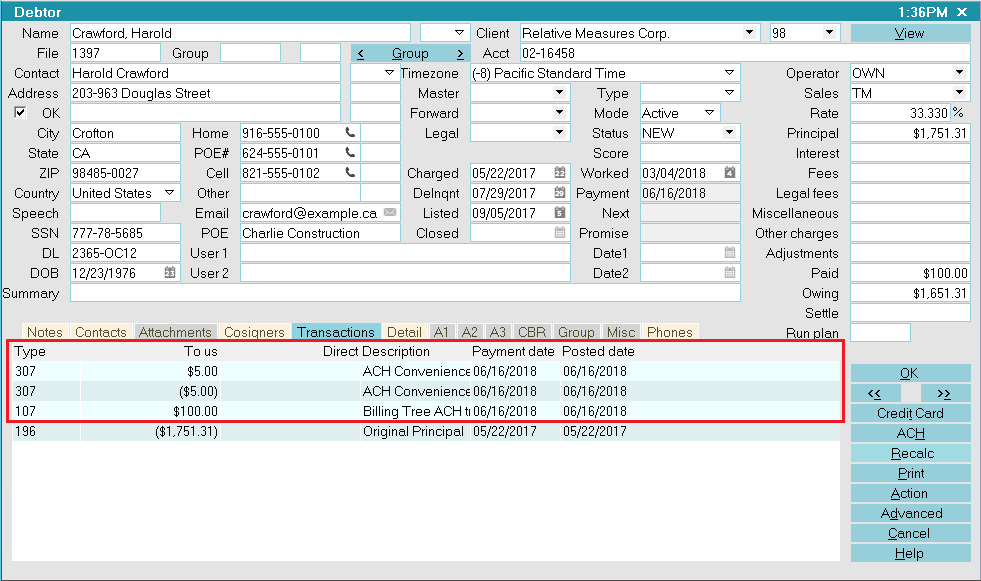
ACH Transactions Posted
When ACH payments are reconciled, Billing Tree uploads confirmations
to your system and stores the confirmation details to the Transaction
Details Tab for the line item it matches for the debtor. This
information will come as a result of Reconcile ACH History on either a
per debtor or company-wide batch process.
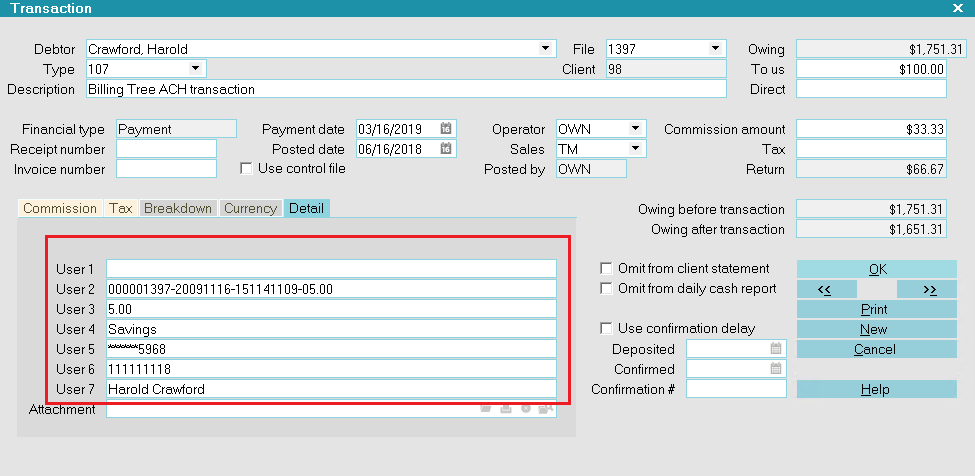
Transaction Details
Banking unique tracking and confirmation details are stored on each debtor
record as follows:
User 2 is a unique Reference # {filenumber-date-time-fee}.
User 3 is the fee amount.
User 4 is the Bank Account type.
User 5 is the masked Bank Account Number.
User 6 is the Bank's ABA routing number.
User 7 is the Payer, either the Debtor or the Cosigner.
Confirmation # is a unique Transaction ID assigned to this
ACH payment during the Billing Tree process.
 WARNING: To prevent duplicate postings and charges to the debtor, the user fields are all set to
Read Only regardless of your user level.
WARNING: To prevent duplicate postings and charges to the debtor, the user fields are all set to
Read Only regardless of your user level.
Recurring ACH Payments
Click the ACH button in the lower right of the Debtor screen to enter the ACH Payment Tasks menu.
Select the ACH button
If this is the first time you are accessing this
screen, after signing into Collect!, you will be prompted
to enter your ACH UserID and Password.
Billing Tree ACH Password
Once you enter your UserID and Password, they stay in effect until you sign out of Collect!.
If you have entered your Password into the
ACH Payments Setup window, you will not be
prompted to enter a Password. Only User
Levels 1, 10 and 99 will see the Password
prompt.
ACH Payment Tasks
Click the RECURRING PAYMENTS button to open this entry window.
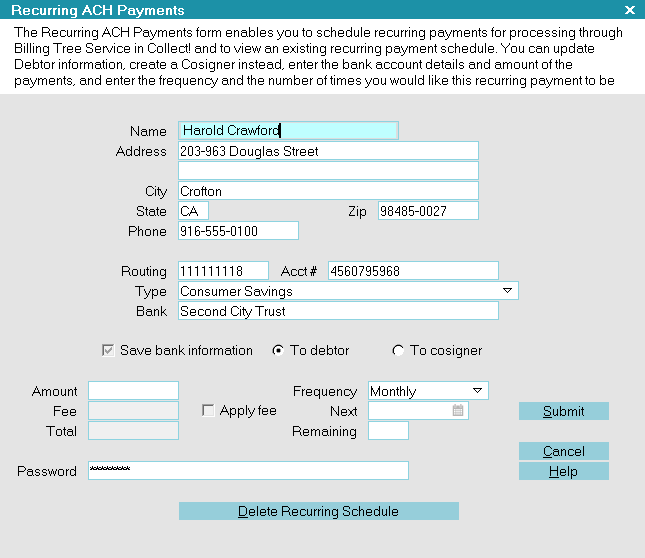
Recurring ACH Payments
Some of the fields will be auto-filled for you on the screen. Banking information is stored in the
Debtor Detail tab. If you already have banking information for this debtor correctly entered
into the right fields in the Detail tab, you should see the banking fields also auto-fill with data.
If you wish to charge a convenience fee, you must
have enabled ACH convenience fees in your ACH Setup
screen and also for the individual Clients in the
Advanced Settings screen.
Client Settings
It is the above preliminary setup steps that enable and control ability and amount to be charged per transaction.
Until you check the Apply Fee box, the Fee amount remains grayed out.
If the fee is not allowed at all or disallowed for certain clients, the Fee and Apply Fee fields will be read-only/grayed out.
You can fill in other details as needed, save the banking and address information to the Debtor or Cosigner
and submit the payment.
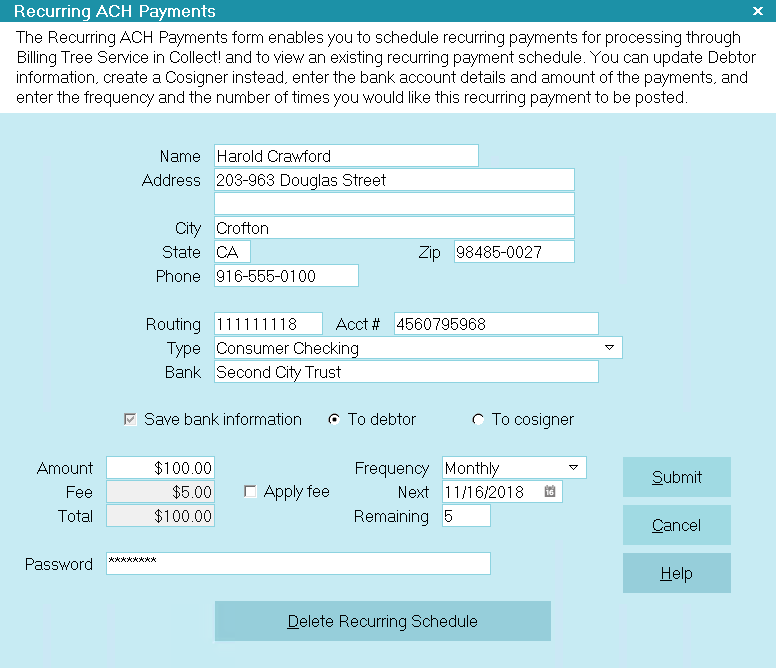
Ready to Submit a Recurring ACH Schedule
Collect! posts the payment transactions with Payment Dates entered according to the schedule you set up. The Posting
Dates are filled with the date you initiated the recurring ACH arrangement UNLESS you check the ACH Setup Field
called "Posted date blank on recurring". This feature will leave the posted date with no entry until the date the
transaction is reconciled.
These post-dated transactions do not affect your current balance on account because the due dates are in the future
and the software doesn't consider them as finalized transactions until they have been finalized by the module via
Reconcile ACH History as they come due.
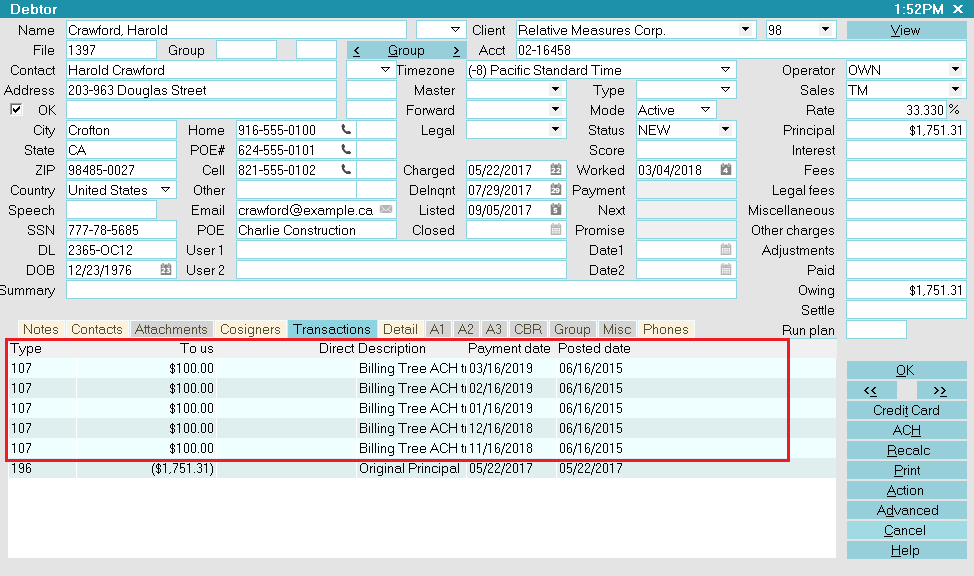
The whole post-dated arrangement is then posted in the Transaction
tab on the Debtor account. This is strictly an ACH recurring
arrangement aspect. By comparison, Recurring Credit Card arrangements
are not stored in Collect! and do NOT appear in the Transaction tab
until the payment comes due and has been processed by Billing Tree.
Recurring ACH payments are stored in Collect!
immediately, but they are NOT uploaded to Billing
Tree until a transaction in the series has become
current-dated AND your site has run its batch
Reconcile ACH History process. This is opposite
of how the module manages recurring Credit Card
arrangements. With recurring credit card plans,
the schedule is held exclusively on the Billing
Tree Gateway for PCI compliance and is uploaded to
them once you click Submit.
ACH Transaction Schedule Posted
Recurring ACH payments are not finalized in Collect!
until you run Reconcile ACH History.
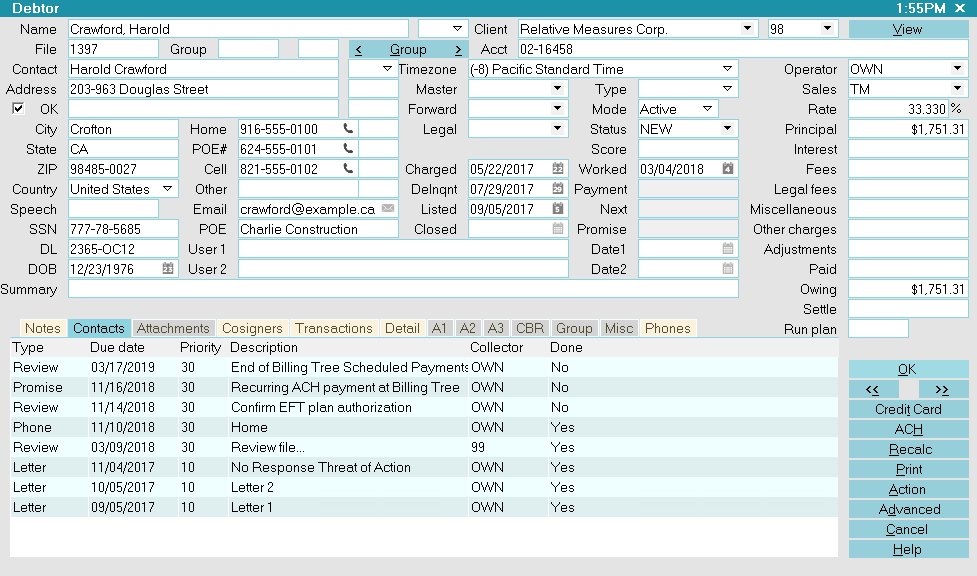
The module creates a Promise Contact that will stay in the Collector's WIP to assist in keeping track of the the
payment schedule.
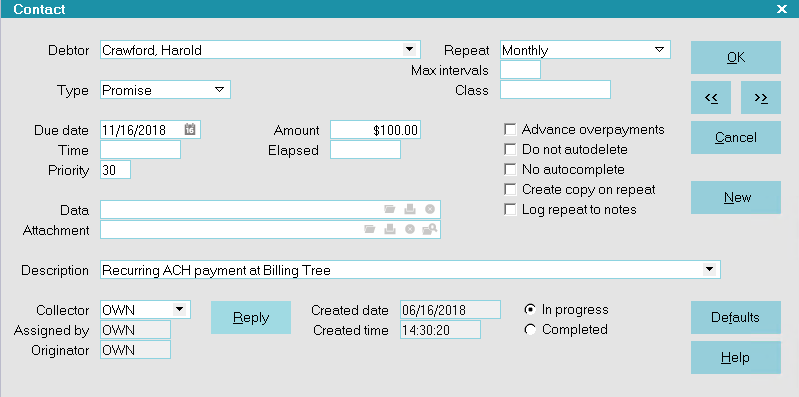
Promise Contact for Recurring ACH Payments
Collect! automatically sets up a Review Contact to remind you of the end of the payment schedule.
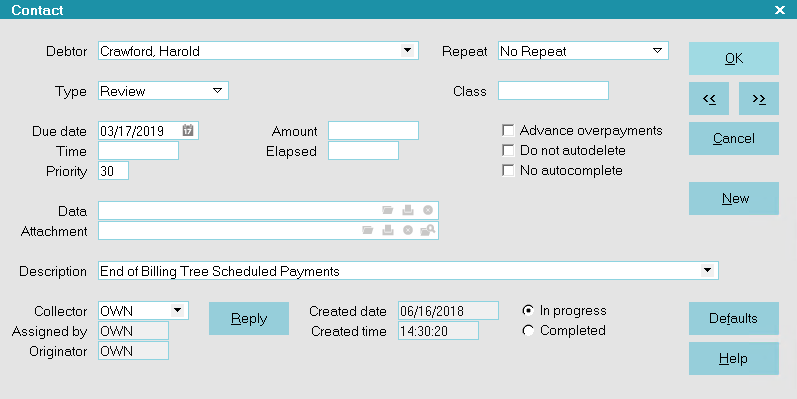
Review Contact for Recurring ACH Payments
Change Payment Information
On the Debtor, click the ACH button.
Click the RECURRING PAYMENTS button to open this entry window.
Click the DELETE RECURRING SCHEDULE to remove all the posted-dated transactions from Collect! and cancel the contract
with Billing Tree.
Setup a new payment arrangement as per How to schedule recurring payments.
Recurring ACH Payments
EFT Notices
The module includes an EFT Notice Setup which allows you to be able to schedule all pre-payment reminder and/or
authorization letters which you may be legislatively required to send to your debtors making Electronic Funds Transfer
payments by reliably sending them out "X" days ahead of the payment due dates.
EFT Notices and Reviews
In compliance with EFT requirements, the Billing Tree Module enables you to automatically schedule authorization letters
and EFT notices for recurring credit card and recurring ACH payments. You can access this setup screen from the
Billing Tree Setup menu.
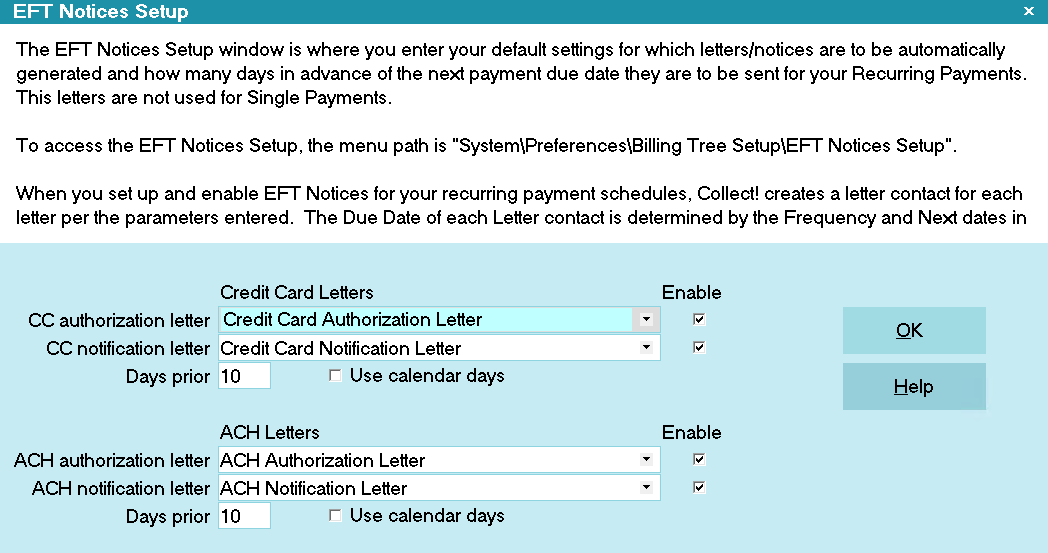
EFT Notices Setup
It is your responsibility to ensure that
any letters you send to debtors are
compliant in format and content with
legislation and regulations in your
region.
When you submit a recurring ACH payment schedule, Collect! will automatically schedule letters and Review Contact events
according to your setup and arrangement parameters.
EFT Notices and Reviews
View EFT Notices
Run A Contact Plan
If you set a contact plan in the 'Run plan on recurring' field on the ACH Payments Setup form, it will run when the
recurring payments is posted.
Reconcile ACH History
The Reconcile ACH History function uploads payments which have now become currently due to the ACH Gateway. It is a batch
process that will also download any new NSFs/chargebacks, as well as any payments a debtor may have made on their own
directly at the Billing Tree portal that your office is as yet unaware of.
You can Reconcile ACH History once per day or multiple times as you wish. The system keeps track of reported payments and
will not duplicate a transactions which has already been posted.
WARNING: If the last reconcile date is more than 7 days into the past, Collect! will prompt you during the
reconciliation process to confirm that you want to proceed. If you run the task via the Task Scheduler,
Collect! will not run the reconciliation and will put an entry in the Application Log that the task failed.
If you have set the check-box in ACH Setup for 'Posted date blank on recurring', this download process is what will write the
Posted Date into your processed item in the Transaction Tab.
Reconcile ACH History
Collect! displays a summary screen to let you know what actions were taken, how many of each kind of transaction was uploaded
and/or downloaded. It also writes an exception file if any transactions cannot be matched.
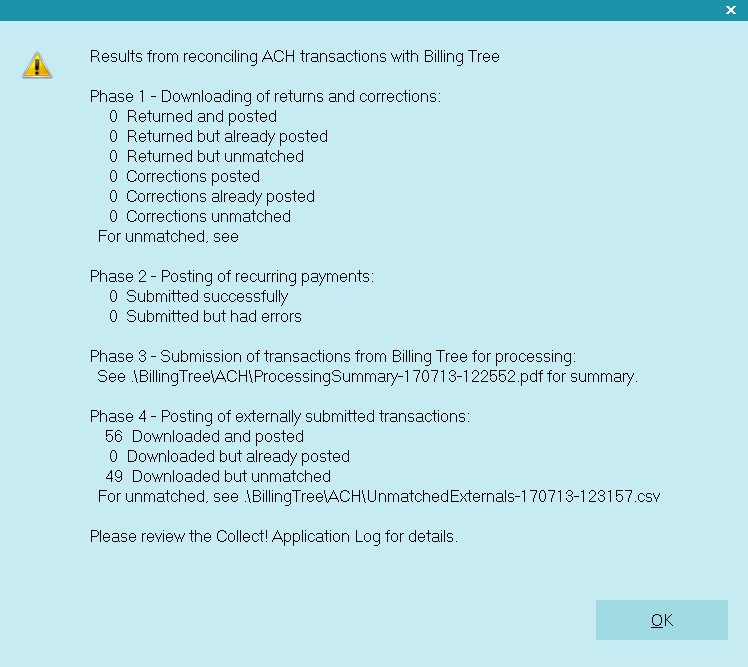
Reconcile ACH Summary of Results
It also writes a detailed log into the path
"Collect\Log Files\BillingTree\ACH\achnow.txt".
If unmatched returns are downloaded, you will find the exception reports located in the folder located via the path
Collect\Log Files\BillingTree\ACH.
It downloads any external payments (made by debtors at the ACH Gateway directly and not through your office) that it has
received and which are not posted yet on your system. If there are any transactions which cannot be matched to a
Collect! file number, it writes an exception report and stores it in the path "Collect\Log Files\BillingTree\ACH\UnmatchedExterna
ls".
The file name "UnmatchedExternals" will include a date/time stamp associated with the download so that each exception report
has a unique file name.
Users who are also licensed for the Scheduler Module have an enhanced automation
with the Reconcile process being available in the Scheduler Task list of options. You may run this
process unattended. Contact us at sales@collect.org for module pricing.
Viewing Results
The module does the following tasks as triggered by data or events related to the reconcile ACH history process:
ACH payments whose payment due dates have come due now are submitted to Billing Tree.
To recap the initiating event, when you first create a recurring ACH payment schedule, the module creates a transaction for
each payment.
ACH Payment Transactions
The Transaction Detail for these transactions looks like this:
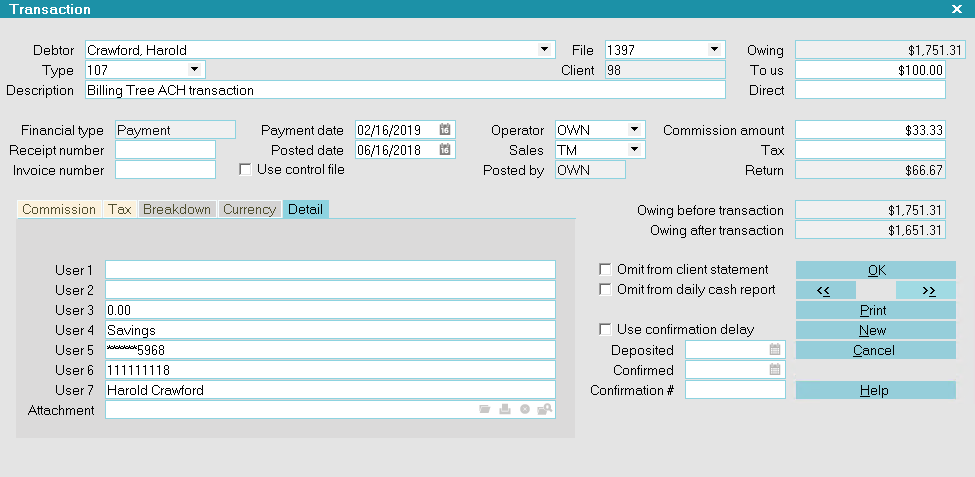
Recurring ACH Payment
The User 2 field of the Transaction Detail Tab is populated with a unique Reference # that is downloaded from
Billing Tree.
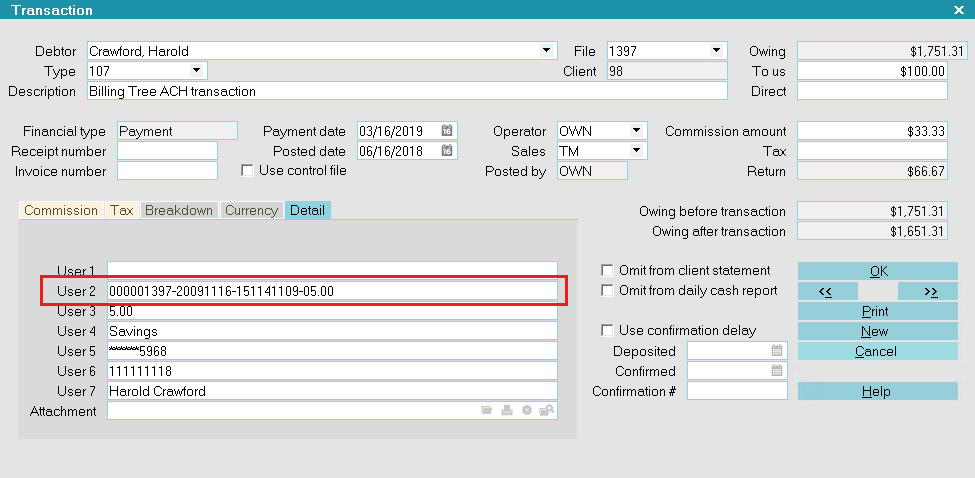
Reference # in User 2
The Confirmation # field in the lower right corner of the of the Transaction Detail Tab is populated with Billing Tree's unique
Transaction ID.
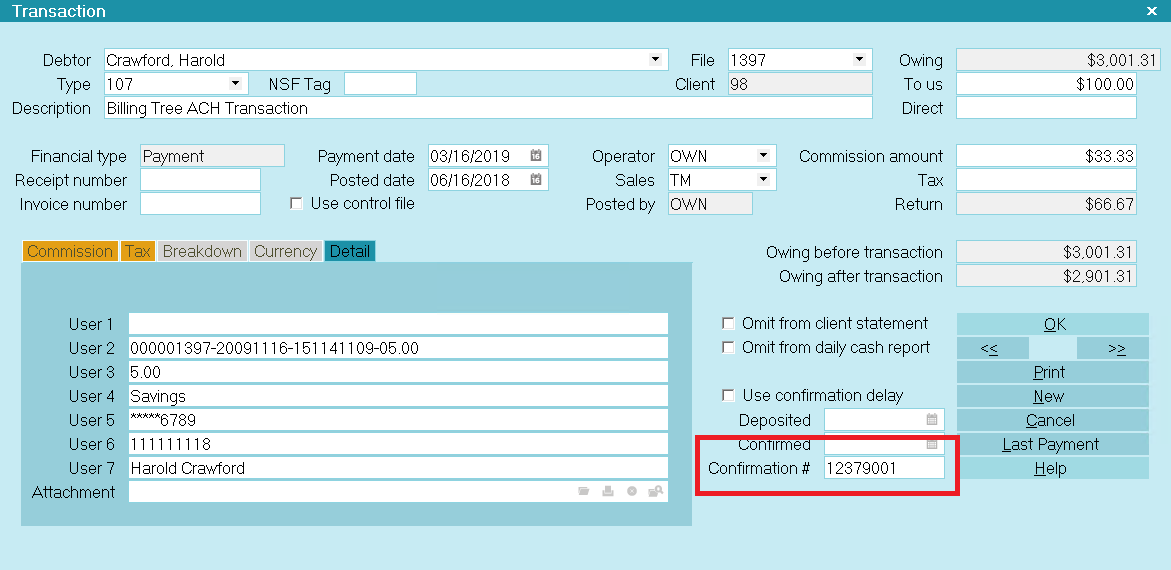
Transaction ID in Confirmation #
If the ACH payment schedule includes a convenience fee, this transaction will appear posted on the account once a
recurring payment is processed successfully.
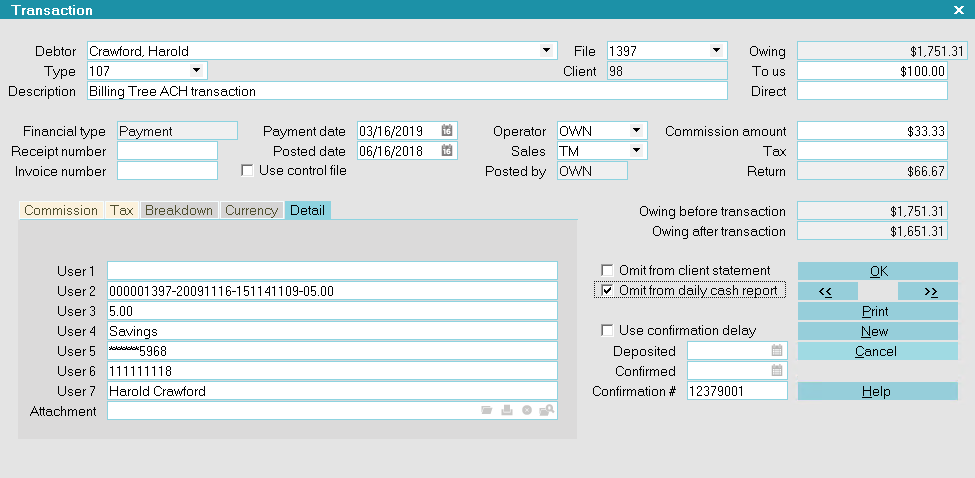
Convenience Fee Transaction
If any previous payments come back as NSF, the system is triggered to reverses the payment and any
convenience fee charged according to your ACH Setup preferences. Also, depending on your Transaction Type settings,
if you have an NSF Contact Plan in place on Transaction Type 105, the actions in that
contact plan will be executed on any ACH reversals as well when you next run your
" Process automatic contacts previously scheduled" in your Daily Batch Processing, if that includes charging an NSF to the
debtor as well, then you will see the application of that charge after you have run your
"Process automatic contacts previously scheduled" anytime subsequent to the Reconcile ACH History process.
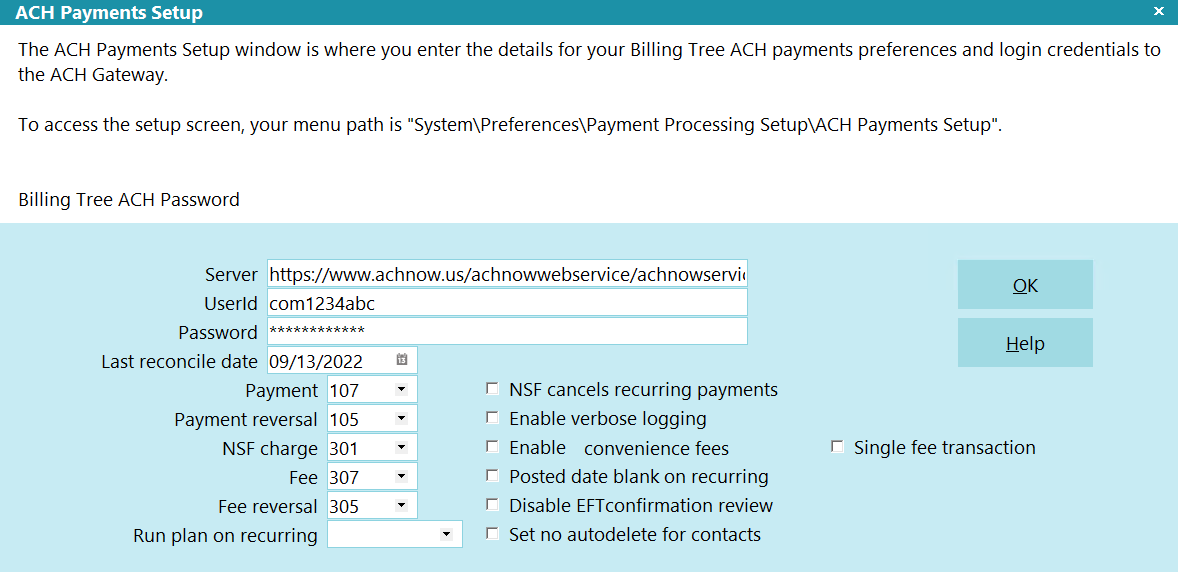
ACH Payments Setup
If you have the "NSF cancels recurring payments" switch enabled in your ACH Setup, then receipt of an NSF through the
Reconcile ACH History process will trigger an automatic stop of the schedule by deleting out all the details of the
recurring payments including deleting EFT Notices.
If any payments have been posted at the Billing Tree rather than through Collect!, they are also processed when you reconcile.
If they cannot be matched to debtors in your database, a file is stored with all relevant information so that
you can process the payments as required. It is stored in the
"Collect\Log Files\BillingTree\ACH\UnmatchedExternals-180519-163821.csv", where the numeric part of the file name are the
date (May 19, 2018) and the time was HH:MM:SS being 16:38:21 when the exception report was created.
A processing summary PDF is stored for each reconcile that you run. It is also stored in the
"Collect\Log Files\BillingTree\ACH\ProcessingSummary-180519-164459.pdf" folder, where the date is May 19, 2018 at 16:44:69
time stamp when the file was downloaded.
It also writes a detailed log into the path "Collect\Log Files\BillingTree\ACH\achnow.txt".
Viewing Application Log Entries
If the Reconcile ACH History results reported any errors, these can be examined in the Application Log, accessed in the
menu path "System\ Diagnostics\Application Log".
Application Log Entry for Billing Tree ACH Error
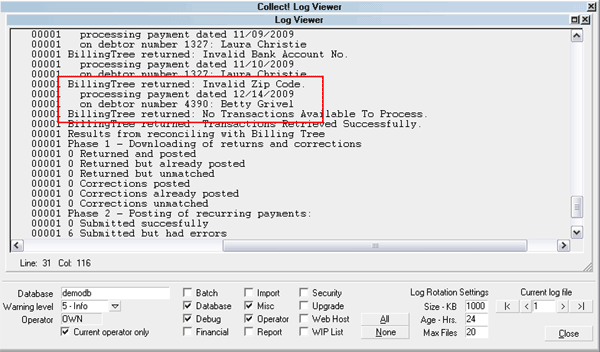
Switch ON " Misc" and "Error" in the Collect! Log Viewer settings
to quickly filter the Application Log for Billing Tree
Module entries.
Additionally, the process also writes a detailed log into the path "Collect\Log Files\BillingTree\ACH\achnow.txt".
| 
Was this page helpful? Do you have any comments on this document? Can we make it better? If so how may we improve this page.
Please click this link to send us your comments: helpinfo@collect.org