How To Copy Records
This document discusses copying records in Collect!.
PLEASE BE SURE YOU HAVE A RECENT BACKUP
OF YOUR DATABASE BEFORE COPYING RECORDS.
Introduction
It is possible to copy many kinds of records and very easily
select a group of records to copy. This feature works well for
contact plans, operator settings, status codes, transaction types,
reports, commission rate plans and user levels. When you copy
a Contact Plan, for instance, all of the events in that plan are copied.
There are a few important restrictions:
1. If you were to copy a Debtor record, the Debtor information
would be copied but any contacts and transactions are not copied.
Neither is the Client information copied. So, it is not recommended
to copy debtors or clients.
2. User Levels cannot be copied from one database to another.
They lose their settings. You can make a copy in the
SAME DATABASE, though, so that you can adjust the
settings of a level without losing the original--in case you
need to restore it.
3. Import maps cannot be copied from one database to another.
They lose their settings. Within the same database, you must
carefully examine any definitions that you copy to ensure
that the settings are intact.
 WARNING: Please do not attempt to copy debtors or
clients and their related information. You may corrupt
your database. Don't attempt to copy User Levels
between databases.
WARNING: Please do not attempt to copy debtors or
clients and their related information. You may corrupt
your database. Don't attempt to copy User Levels
between databases.

Open List And Select Records
1. Using the pull down menus, open the type of record you
wish to copy. This can be any kind of list, including Contact Plans,
Operators, Transaction Types, Commission Rate Plans, Reports,
or User Levels.
 Please do not attempt to copy debtors, clients or
other records with subrecords. This related information cannot
be carried over in the copying procedure.
Please do not attempt to copy debtors, clients or
other records with subrecords. This related information cannot
be carried over in the copying procedure.
2. Using the arrow keys and the spacebar, select the item or
group of items you want to copy.
 To select items, highlight the item using the
arrow keys and select it by pressing the spacebar.
When you do this, the selected line will turn yellow.
As you select more items, the ones you already selected
will turn blue. To deselect an item, use the arrow keys again
and when you are on the item, press the spacebar. The
yellow highlight will disappear and the item will turn
black then appear with a normal white background when
you move off of it.
To select items, highlight the item using the
arrow keys and select it by pressing the spacebar.
When you do this, the selected line will turn yellow.
As you select more items, the ones you already selected
will turn blue. To deselect an item, use the arrow keys again
and when you are on the item, press the spacebar. The
yellow highlight will disappear and the item will turn
black then appear with a normal white background when
you move off of it.
3. You can use Search Criteria to narrow down a very large list
to a more manageable size, perhaps even filtering it to only
those records you want to copy.
4. If you want to copy a whole list, click in the list to activate
it and press the key combination CTRL+A to select all the
records.
Copy The Records
5. Now, pull down the Edit menu and choose Copy
or use the key combination CTRL+C.
6. Collect! will prompt that you have copied records.
Read the prompt carefully. If there is already something
in the Clipboard, you must decide whether to add to
it or copy over it, so read carefully and choose YES
or NO.
Open The Target Location
7. If you are going to paste into the same list, you don't have
to do anything but paste. So, proceed to Pasting The Records
Into The New Location. However, if you are going to paste
the records into a different database in Collect! you have
to exit the one you are in and sign into the other one. So,
proceed to Step 8.
Do not attempt to copy user levels between databases.
8. Use whatever means are necessary to exit from the Collect!
menus and the database you are signed into until you are
at the Collect! Welcome screen.
9. At the Welcome to Collect! screen, choose the database
you want to enter and press the Start button to sign in.
You must use an ID and password that the
other database recognizes.
10. Once you are signed in, pull down the menus at the
top of the Collect! screen and open the same type of list
you took your records from.
Pasting The Records Into The New Location
11. Whether you had to enter a new database, or are still at
the same list in the old one, you can now paste your records
from the clipboard into the list.
12. Pull down the Edit menu and choose Paste or use the
key combination CTRL+V to paste your items into the list.
13. You should open and check the items you pasted to
make sure they copied as you expected them to.
14. Give your new copies unique names and descriptions
so you do not have duplicate entries in your lists.
After copying any kind of record, check to make sure that all
information did copy over as expected.
Cancel Copy
When Collect! displays the message that you have copied
a record, you can select CANCEL to abort the copy process
and clear the clipboard.
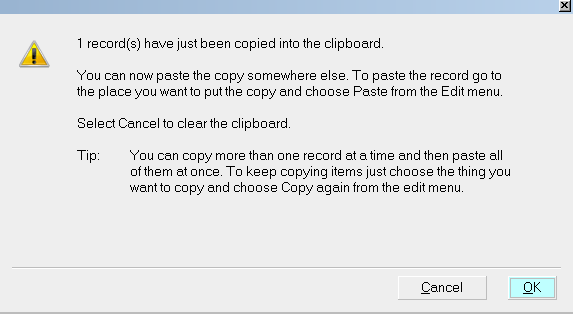
Copy Record Message
Summary
The information provided in this topic applies generally to
copying records. You can find more details in the help
topics for different kinds of copying such as Contact Plans
or Reports.
Where you paste copied items depends on what you copied.
If copying to the same database, records are pasted into the
same list that they were copied from. For instance, perhaps
you want to use an existing Operator setting, make a copy,
and alter it slightly for another Operator on your team.
If copying to the Masterdb database, a record copied from the
Demonstration database must be pasted into the same type of
list as it was copied from in the other database.
For more details, please examine the Help topics for the
type of copy procedure you are performing.
See Also
- How To Copy Reports To Master Database
- How To Copy Contact Plans To Master Database
- How To Copy Operators To Master Database
- How To Copy User Levels
- How To Search For Records
- How To Start Using Collect!
|
Was this page helpful? Do you have any comments on this document? Can we make it better? If so how may we improve this page.
Please click this link to send us your comments: helpinfo@collect.org