Changing A Field To Read Only
You may wish to make a field, or a whole form, Read Only.
This makes information available to your user, but you can be
assured that it will not be changed by mistake. Read Only
fields are greyed out and cannot be edited.
There are two ways to change a field or form to Read
Only for specific user levels. One is through the Form Rights
form and the other is through the Operator Level Rights
form.
To demonstrate this, we will make the Client field in the
Debtor form Read Only as shown below.
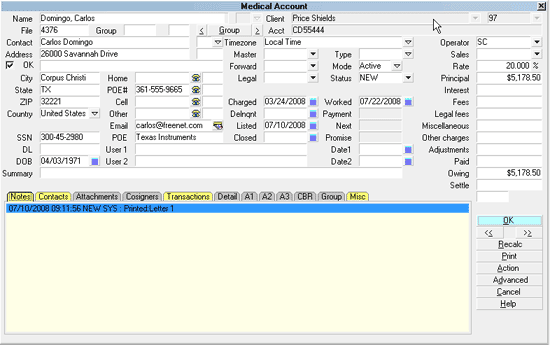
Client Field as Read Only
Please refer to
Preparing To Make Changes To Access Rights
before modifying access rights settings for any
user group.
Set Access Rights Using Form Rights
1. Sign into Collect! in EXCLUSIVE mode at User Level 99.
2. Using one of the methods described in
Access Rights Basics, open the Access Rights
form for the correct form or field that you want to
modify. For this example, we are using the
Client field on the Debtor form.
You may see one or more user levels listed in the
Form Rights subform already. These are user levels
that the form or field properties already apply to.
You can modify this list, delete entries, or add new ones.
3. Check the field labeled Name
when the Access Rights form is displayed to make
sure you are editing the correct form or field.
4. Click into the Form Rights subform. If there are no
entries in it already, you will be prompted to create
one. Choose YES to open the Form Rights form.
5. Select the down arrow next to the field
labeled Level and select the
user group that you want to grant Read Only access.
For this example, we are selecting Senior Collector.
 Or, to edit an entry that is already listed in the
Forms Right List, select the entry and when the Form
Rights form displays, make sure the Level field displays
the user group that you want to grant Read Only access.
Or, to edit an entry that is already listed in the
Forms Right List, select the entry and when the Form
Rights form displays, make sure the Level field displays
the user group that you want to grant Read Only access.
6. Select the down arrow next to the field
labeled Rights and select Read
Only to apply this setting to the field or form.
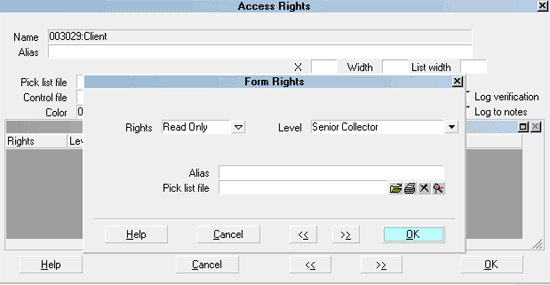
Form Rights set to Read Only
7. Leave the other settings as they are for now and
press OK or F8 to save your changes and return to
the Access Rights form. Now you will see this
User Level displayed in the Form Rights subform.
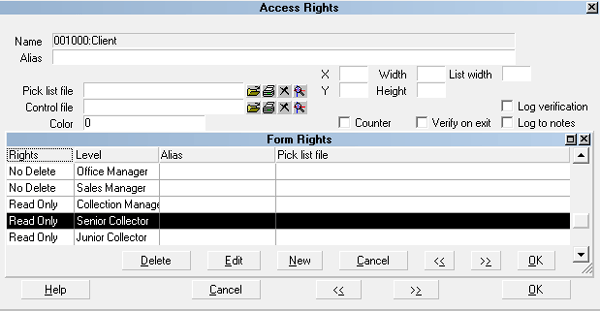
User Level displayed with Read Only access
8. Press the NEW button again, or select from the Form Rights
list, if you want to make this form or field Read Only for
another User Level.
9. When you are finished, press OK or F8 to save
your changes.
10. Select System from the top menu bar and then select
Rights, Access Rights. Select the REBUILD button to
update Collect! to recognize your changes.
11. Next, sign out of Collect! and then sign in as a user
with the user level you applied Read Only to. Examine the
form and/or fields that you made Read Only for this user
level. Read Only areas are greyed out and are not editable.

Set Permissible Functions Using Operator Level Rights
1. Sign into Collect! in EXCLUSIVE mode at User Level 99.
2. Open the User Level form for that you want to modify.
For this example, we are using Senior Collector.
You may see one or more operator levels listed in the
Operator Level Rights subform already. These are forms and
fields that have properties set specifically for this user level.
You can modify this list, delete entries, or add new ones.
3. Check the fields labeled Code
and Description when the User
Level form is displayed to make sure you are editing
the correct level.
4. Click into the Operator Level Rights subform. If there are no
entries in it already, you will be prompted to create one.
Choose YES to open the Operator Level Rights form. You can
also open this form by selecting an existing entry in the list
or by pressing F3.
5. Ensure that the form or field displayed in the field
labeled Item is the item that you want
to modify.
If you are creating a new entry, select the down arrow
next to the field labeled Item to select the
item from the list of all forms and fields.
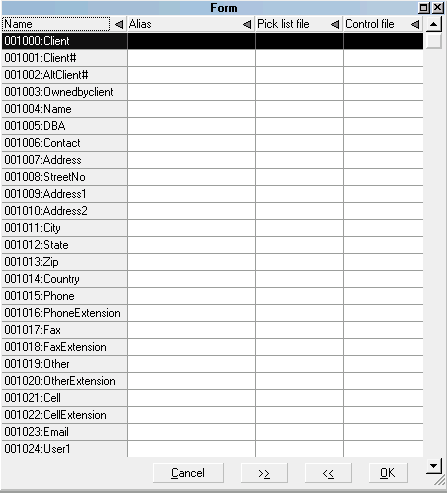
Forms and Fields list
Be sure to scroll to the correct item in the list. We are
using the Client name in the Debtor form. Notice that this is
number 003029.
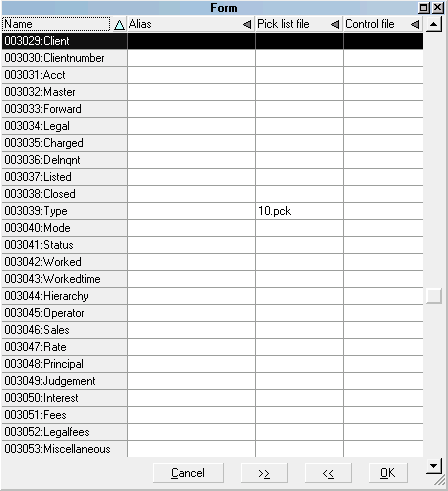
Debtor's Client field entry in Forms and Fields list
6. Select the down arrow next to the field
labeled Permissible functions and select
Read Only from the pick list that is displayed for you.
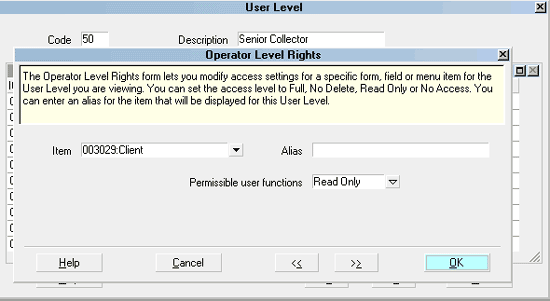
Operator Level Rights set to Read Only
7. Leave the other settings as they are for now and press OK
or F8 to save your changes and return to the User Level form.
Now you will see this item displayed in the
Operator Level Rights subform.
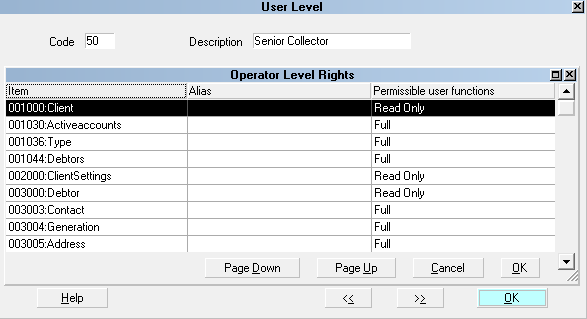
User Level with Read Only access for Client Field
8. Press F3 again, or select from the Operator Level Rights list,
if you want to make changes to another form or field for this
User Level.
9. When you are finished, press OK or F8 to save your
changes.
10. Select System from the top menu bar and then select
Rights, Access Rights. Select the REBUILD button to
update Collect! to recognize your changes.
11. Next, sign out of Collect! and then sign in as a user with
the user level you applied Read Only to. Examine the form
and/or fields that you made Read Only for this user level.
Read Only areas are greyed out and are not editable.
Text Editor Access Rights
If you need to set access rights on a per field basis for
Text Editor windows, you can enable a switch in the
Screen and Messages form.
Select System from the top menu bar and then select
Preferences from the drop-down choices. Select
OPTIONS, SOUNDS AND COLORS to open the
Screen and Messages form. Switch ON "Field level
editor access."
With this switch enabled, you can set access rights
for any field that uses the Text Editor to display data
and the Text Editor will take on the same access level
that you set for the field. So if you make a field Read Only,
then the file that you attach to that field will open in
Read Only mode in the Text Editor.
This enables you to set access rights individually for Notes,
Contact Data and Attachment, Attachment File and any
other fields that use Collect!'s Text Editor to display contents.
See Also
- How To Set Field Or Form Properties
|
Was this page helpful? Do you have any comments on this document? Can we make it better? If so how may we improve this page.
Please click this link to send us your comments: helpinfo@collect.org