Report And Printer Setup
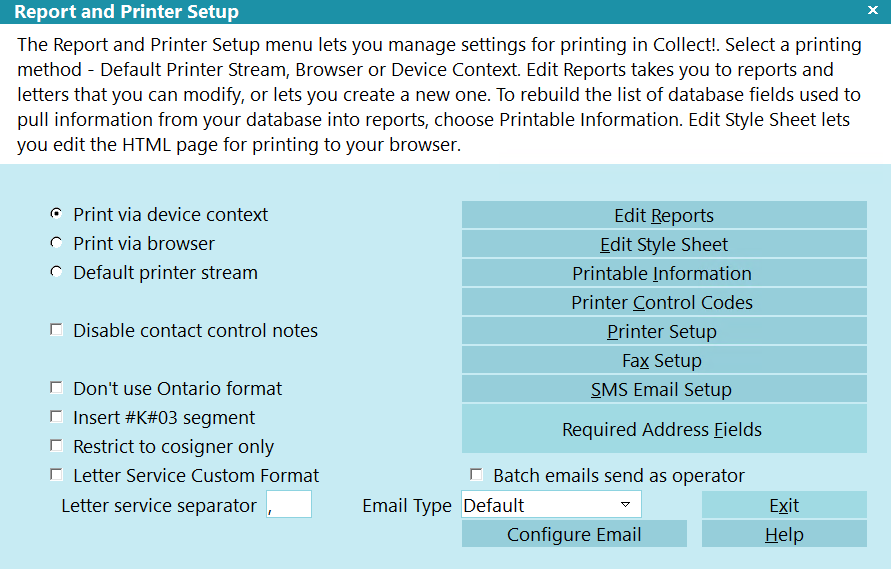
The Report and Printer Setup menu lets you manage settings
for printing in Collect!. Select a printing method - Default Printer
Stream, Browser or Device Context. Edit Reports takes you to
reports and letters that you can modify, or lets you create a
new one. To rebuild the list of database fields used to pull
information from your database into reports, choose
Printable Information. Edit Style Sheet lets you edit the HTML
page for printing to your browser.
View the list of printers Collect! can print to in your system by
selecting Printer Setup. Select Printer Control Codes to customize
the printer codes for fonts, bold, underline and other options. These
codes work along with the printing method you choose. They
determine how your reports are displayed.
Fine-tune the Address OK functionality used during batch printing
by selecting Required Address Fields. This lets you set your
required address lines easily in one place rather than relying
solely on the "Address OK" switch on each account.
Report and Printer Setup
Print Via Device Context
This setting uses Windows printing features. When you
select it, you can print documents containing images and
graphics. It is suggested that new users leave this setting
switched ON as Collect!'s default system-wide printing
setting.
On an individual Operator level, this setting can be
over-ridden by settings on the Operator form.

Print Via Browser
Select this setting to switch ON default system-wide
printing through HTML pages and your Internet browser.
When you use this setting, Collect! will use your system
or operator style sheet as the HTML framework for your
report. This produces an attractive quickly formatted report
that you can preview on the screen, print to your browser,
or save and attach to an email or fax.
On an individual Operator level, this setting can be
over-ridden by settings on the Operator form.
 A great use of this setting is for Quick Prints that
look attractive. The resulting HTML pages can
then be printed to your printer from your browser.
A great use of this setting is for Quick Prints that
look attractive. The resulting HTML pages can
then be printed to your printer from your browser.
Select the 'Edit Style Sheet' button to modify the HTML
page that Collect! uses for printing via browser.
Default Printer Stream
This setting is for backward compatibility with older
versions of Collect!. It allows you to continue printing
your older reports accurately in a familiar format. This
setting cannot read Collect!'s new graphic commands,
however.
Switch this ON for system-wide printer stream printing.
On an individual Operator level, this setting can be
over-ridden by settings on the Operator form.
Please choose the 'Print Via Device Context' setting if
you intend to print our new reports and templates, or to
design your own reports using graphics or images.
Disable Contact Control Notes
Switch this ON to disable the note lines that are
written for letters that are skipped when printing
due to the letter failing a Contact Control rule.
Don't Use Ontario Format
Switch this ON if you are using the Letter Service module
and you wish to produce your Letter Service file in a CSV
format rather than the default, Ontario file format. This
format will prepend the output with some CSV data related
to the debtor that is being output. Please refer to the help topic
How to Setup Letter Service File Format - Not Ontario Format
for more information.
Insert #K#03 Segment
Switch this ON if you are using the Letter Service
module and you wish to send the #K#03 segment
in your Letter Service file. This requirement should
be confirmed with the Letter Service provider that
you are using.
When NCOA check is enabled for letter service,
the #K#03 segment will be included for debtors
with Address OK switched ON. Debtors with
unverified addresses - Address OK switched OFF -
will be preceded by the #K#02 segment, instead.
If NCOA check is not enabled, the #K#03
segment will precede every debtor printed to
the letter service file, that means both verified
and non-verified addresses.
Please refer to How To Use Letter Service
for more information.
Restrict To Cosigner Only
Switch this ON if you want your Letter Service report
to only consider Cosigner records where the "Class"
is set to "Cosigner." When the switch is OFF, all
Cosigners will be reported for each account if you
have agreed to "Print to Cosigners" in your Letter
Service process.
Letter Service Custom Format
Switch this ON if you are using the Letter Service module
and you wish to produce your Letter Service file in a custom
format rather than the default, Ontario file format. When
outputting to the letter service file, Collect! will not
prepend or append any data. Please refer to the help topic
How to Setup Letter Service File Format - Not Ontario Format
for more information.
 Selecting this switch overwrites the "Don't use
Ontario format" switch, so it is not necessary to
switch both on.
Selecting this switch overwrites the "Don't use
Ontario format" switch, so it is not necessary to
switch both on.
Letter Service Separator
The character entered in this field will be used by
Collect! as a field separator when outputting data
to a Letter Service file. By default, the comma is
used, but you may want to use a semicolon, for
instance. This depends on the requirements of the
outsourcing service you are using.
Batch Emails Send AS Operator
 WARNING: At present, this option only applies to
the SQL email configuration.
WARNING: At present, this option only applies to
the SQL email configuration.
By default, when you send emails as reports (Scheduled Batch
Letters or Print -> Reports and Letters), Collect! uses the
system email account below to send emails. The reply address
is the email on the Company Details form.
Check this box, if you want to use the email account and
reply address of the Operator who initiated the email(s).
Email Type
Select an option for sending emails. The options are:
- Default: This option will use the Email Type configured
on the Operator Email form. If the
Operator is also set as Default, then MAPI will
be used.
- SMTP: Select this option if you are routing your emails
through an email server. This option is used if you
have an email server that either doesn't require
user authentication or all users use the same
email account.
- SQL: Select this option if you have enabled emailing in
Microsoft SQL Server. When selected, the Operator
can navigate to the Reload Work in Progress List
form and click the Configure Email button to
enter their email settings.
- MAPI: Select this option to send emails via your local
email client that is set as the default in Windows.
Microsoft has been moving to deprecate MAPI, so
this option may not be available in your operating
system.
Configure Email
Click this button to configure your email settings for the system.
This option is the email account to be used for Batch Letters, which
is typically sent from a system account, rather than an individual
Operator.
At present, the only email configuration that is supported is with
Microsoft SQL.
You cannot have multiple email accounts for a single operator,
so clicking this button will automatically delete any existing
configuration.
Edit Reports
Select this button to view the Report Definition list of
all the reports and letters that are in the system.
From this list, you can view, edit, delete and create
new reports.
Edit Style Sheet
Select this button to open your default System Style
Sheet in your Internet browser. You can edit this HTML
style sheet or create a new one for an individual operator.
Collect! ships with a sample style sheet
template in the Demonstration database.
This is stored in the Collect\bin\Styles folder.
It is named "System.html." Edit this
System.html to suit your own Company.
To use Style Sheets, you must select Print via Browser
as your printing method.
Printable Information
Select this button to view the Printable Field list. This
is a list of all the fields in the database that can be
included in reports. From this list, you can choose
REBUILD to rebuild the list of database field codes.
Printer Control Codes
Select this button to view the list of Printer Control
Codes. These are the printer commands that determine
font and page attributes for your printer. From this list,
you can modify a code, if necessary. You can also
create a custom printer control code.
Printer Setup
Select this button to view the Printer Setup form. You
will see a list of all the printers you have used in your
system. You can select one of the printers to view or
change the settings for printer type. Please see the
Troubleshooting section below for more information.
Fax Setup
Select this button to open the Fax Setup form where
you can enter default phone numbers to use when
using the Print To Fax feature.
SMS Email Setup
Select this button to open the SMS Email Setup form
where you can enter default phone numbers to use
when using the SMS Email feature.
Required Address Fields
Select this button to open the Required Address
Fields form where you can specify mandatory fields
that must be filled when printing your letter batch.
Help
Press this button for help on the Report and Printer Setup
dialog and links to related topics.
Exit
Selecting this button will close this form and return
you to the previous form.
Troubleshooting Report And Printer Setup
Collect! uses your operating system's default printer settings.
You can view the printers you have installed by looking
at the Control Panel, Printers. If a printer is installed and has
been selected as the default printer for your system, then
Collect! will use this printer the first time you print from
within Collect! Then that printer will show up in the list that
is displayed when you select the PRINTER SETUP button.
These settings are stored in a text file named printers.cfg in
the program home folder. This file can safely be deleted
and Collect! will create a new one.
Collect! enables you to store up to 32 printers in your
printer list.
You must shut down Collect! completely and
restart the RDS Server to update the printers.cfg. When
you do this, Collect! will read your list of installed printers
and populate the list to be shown in Collect!'s Printer Setup.
| 
Was this page helpful? Do you have any comments on this document? Can we make it better? If so how may we improve this page.
Please click this link to send us your comments: helpinfo@collect.org