How To Use Account Toss With Custom Distribution
The Account Toss with Custom Distribution is an external process which allows you to do more complex
desk distributions by being able to define more criteria. This may be utilized for new business as
well as desk re-organizations. The process relies on a tagged list of accounts and subjects the
same to the Distribution Rules as defined in a csv data table template. This process may be used
instead of the legacy batch process to assign accounts to operators: in addition to
distributing on the basis of more parameters, this process will also do basic Round Robin if there
are multiple desks that qualify to receive accounts in any set of parameters defined. This process
may be used standalone for it's own functionality OR in conjunction with the Heatmap and Workflow
processes that shipped with the scenario package. If your utilize Team Distribution and
requires no other special criteria, you may have no need of this process and would continue
as normal with your new business desk allocation.
Prerequisites
This utility is part of the Inventory Management Scenario Package. You can obtain the Inventory
Management packes by logging into the Member Center and downloading the Scenario Package
from here.
 WARNING: Do not attempt to modify the layout of the DistributionRules.csv layout yourselves. This
will cause the report which reads this data table to fail. It only considers the
parameters as shown and is not editable on-the-fly for columns considered in distribution;
just the content you can input into the columns provided will be considered.
WARNING: Do not attempt to modify the layout of the DistributionRules.csv layout yourselves. This
will cause the report which reads this data table to fail. It only considers the
parameters as shown and is not editable on-the-fly for columns considered in distribution;
just the content you can input into the columns provided will be considered.
This is a process consisting of two parts:
- A CSV file called DistributionRules.csv
- A report called Account Toss with Custom Distribution

Distribution Rules Overview
DistributionRules.csv is a csv data table whose purpose is to feed the desk
allocation criteria to step 2 of the process, which is a report. This new process allows a much
higher degree of specificity to direct accounts to desks. This streamlined method of allocating
accounts will allow you to do less additional steps to curate your account assignments to
individualized desks.
The template you receive contains the following header:

DistributionRules.csv File Headers
The columns are pre-formatted for correct usage to be either text or numeric, with or without
2-decimal places.
Your distribution rules will be different and you will need to populate your data table according
to how you want your accounts in a tagged list to be distributed.
The following is a populated sample for new business demonstration purposes:

DistributionRules.csv Sample File Data
Mandatory Fields: ScoreFrom/ScoreTo OR OwingFrom/OwingTo are
required fields. Both can be used, but at least one of these must be present.
They can be the same for all operators, but at least one of these ranges must be filled per row.
The Custom Distribution will operate in order of criteria contained in the table from this point
forward: First, by Score Range. If none, then by Owing Range. The remainder
of the criteria are taken into account on a per Client#, and then
by State/Province: in that order.
If multiple IDs have the exact same criteria, for example because it's known the section can be
large and multiple collectors are needed to staff it, this process will Round Robin available
accounts matching the criteria until such time as there are no more accounts to distribute. Like
any other allocation system, it doesn't recall next time which collector got the last
account last time: it needs to be accepted that this is how any allocation process works:
it will start again at the top of the list of eligible collectors for accounts matching criteria
to make distribution decisions.
Column A - CollectorOrTeamID: This column identifies the collector ID for whom the
allocation criteria in this row pertains to. If you do not plan on using any of the other criteria,
you are best served using the native Distribution Team ID from your Operator List.
Columns B & C – ScoreFrom and ScoreTo: If your agency scores and distributes
accounts to collector and/or pool desks on the basis of low/medium/high score ranges, then set up
FromTo ranges in these columns. For correct usage, the entire possible range must be covered by the
widest anticipated score spread. Example: if you use Fico Scores, they range from 1-999. However,
if your data source that you obtain scores from reports back to you values that can be 0 (no hit),
then your From range should start at 0. If your agency does Probability Scoring that has min-max
values from 1 to 4 (or 1 to 10), then the entire range needs to be represented by the desks
receiving business. If this column is blank, it will be ignored and the allocation will rely on
the Owing range.
Columns D & E – OwingFrom and OwingTo: If your agency wishes to designated
specific assigned ranges to pool and/or collector desks, use this column to define the ranges
From/To each desk. The entire min-max range of possible amounts needs to be covered by the desks
in the list. The very lowest assigned amount would be 0.01. No agency will ever receive a single
account that maxes our field size, and as such, we'd recommend setting your max to be 9999999.99
on the last desk receiving highest balances. If you work mortgage deficiencies, it is possible
for you to receive accounts in the millions of dollars owed. The max field size in Collect! is
12x 9's plus 3 more characters for decimal and cents. If this column is blank, then it will be
ignored and the allocation will rely on the Score range.
Column F – State/Province: This column can be used if your agency allocates to
collectors on the basis of licensed state or province or other regional preferences. States/Provinces
must be entered comma separated with no spaces. If this column is blank, then it
will be ignored.
Column G – State/Province Exclude?: Enter Yes if you have
designated desks that should NOT receive regional distribution where collectors are NOT licensed.
If this column is blank, then it will be ignored.
Column H – Client #: If your agency utilizes client teams, or has individual
collectors that service a specific client, you can designate which desks receive business for
designated client numbers. Client #s must be entered in a comma separated list with no
spaces. If this column is blank, then all client #s are considered eligible.
Allowing agents to be portfolio specialized allows you to focus your efforts and obtain more
meaningful statistics as different kinds of business an agency receives can require:
- different skillsets/knowledgebase and/or automations
- length or complexity of conversation necessary to get the account paying
- length of time to begin liquidating
- have different rates of liquidation when examined in an apples-to-apples comparison performance
report, such as our incremental analysis report called Spin Down.
Column I – Client # Exclude?: Enter Yes if you have designated
desks that should NOT receive specific client #s. If this column is blank, then it will be ignored.
Column J – ContactPlan: This column may be used to indicate different runplans on
a per desk basis, if applicable. If blank, this column will be ignored.
 If your agency has need of multiple distribution tables for different purposes, example,
commercial versus consumer or non-medical versus medical etc. OR wishes to use this process
to do bulk desk reassignments such as if collapsing old desks for staff shuffles, a creative
use of this process would be to house more than named template in your styles
folder, examples:
If your agency has need of multiple distribution tables for different purposes, example,
commercial versus consumer or non-medical versus medical etc. OR wishes to use this process
to do bulk desk reassignments such as if collapsing old desks for staff shuffles, a creative
use of this process would be to house more than named template in your styles
folder, examples:
- NewBusConsumer.csv
- NewBusCommercial.csv
- NewBusMedical.csv
- NewBusNonMed.csv
- DeskReOrg.csv
Then, you would need only to remember two things:
- Modify the necessary template as needed
- Remember to copy/paste the intended template,
overwriting DistributionRules.csv each time a different allocation is being
performed. This would prevent the need to be repetitively revising the template
from one potential use to the next, depending on your individual preferences.
Distribution Rules Preparation
Before executing the report, it's essential to configure the DistributionRules.csv file. Follow
these steps to ensure proper setup:
- File Placement: Save the DistributionRules.csv file as a CSV format in a
location accessible via Collect! Ensure the file is placed within the Collect\bin\style
folder for optimal accessibility.
- Configuration Steps: Open the DistributionRules.csv file using a suitable
text editor or spreadsheet application. Configure the distribution rules within the CSV file
according following guidelines:
- CollectorOrTeamID: In this field enter the operator ID or the Team
ID to whom the account should be transferred to.
If a Team ID is entered then accounts will be distributed among the team members
evenly. This field is mandatory.
- ScoreFrom and ScoreTo: These fields determine the
score range that the account should fall within in order to be moved to the operator.
The score field uses the debtor score field, if your system uses a different field for
scoring then update the report by adjusting @tvarScoreField* = "de_owned_by_debtor" to
@tvarScoreField* = "de_risk_score" or any field that matches yours.
If either ScoreFrom and ScoreTo is empty or equal to zero the score filter
will be ignored for this operator.
- OwingFrom and OwingTo: These fields determine the owing
range that the account should fall within in order to be moved to this operator.
If either OwingFrom and OwingTo is empty or equal to zero the score filter
will be ignored for this operator.
- State/Province: This field if left empty it will be ignored. It takes
a comma separated list of states/province with no spaces to which the account should fall
within in order to move the account to the current operator.
Data Example: CA,WA,ID.
- State/Province Exclude?: Enter Yes if you have
designated desks that should NOT receive regional distribution where collectors are NOT
licensed. If this column is blank, then it will be ignored.
- Client#: This field if left empty it will be ignored. It takes a comma
separated list of client numbers to which the account should fall within in order to move
the account to the current operator.
Data Example: 1000,1005,4000.
- Client # Exclude?: Enter Yes if you have designated
desks that should NOT receive specific client #s. If this column is blank, then it
will be ignored.
- ContactPlan: Populate this field with the contact plan code that needs
to be run as soon as the account is moved to the new operator. Leave empty to not run a
contact plan. The report will prompt you to run contact plan or not.
If multiple operators possess identical settings, the report endeavors to
distribute the accounts evenly among them, considering the number of accounts assigned to
each operator.
Account Toss With Custom Distribution Report
A report called Account Toss with Custom Distribution is the engine which launches
your allocation using the criteria contained in the DistributionRules.csv file.
The report has shipping default entries for the following variables. These are modifiable to a
degree. Please read the descriptions following the screenshot very carefully:
- @tvarfilePath* = "D:\CollectClient\bin\styles\"
The default path in the report can be left for Collect! Cloud Sites. Premise sites
will need to update the path to the styles folder on your network.
- @tvarCoTypes* = "1,3,5,6"
This pertains to which contact events you want to have updated to a new desk
desk ID if found In Progress on accounts being distributed: Phone, Promise, Review, and Other,
respecitively.
- @tvarScoreField* = "de_owned_by_debtor"
This refers to the shipping default Score field on the main Debtor screen. If for
any reason you store Score in another field, the SQL name needs to be input in the above variable.
- @tvarOwingField* = "de_owing"
If you wished to use another field besides Owing from the main Debtor screen, such
as Principal, you'd replace the field above with the SQL name. In this example, the replacement
would be "de_principal".
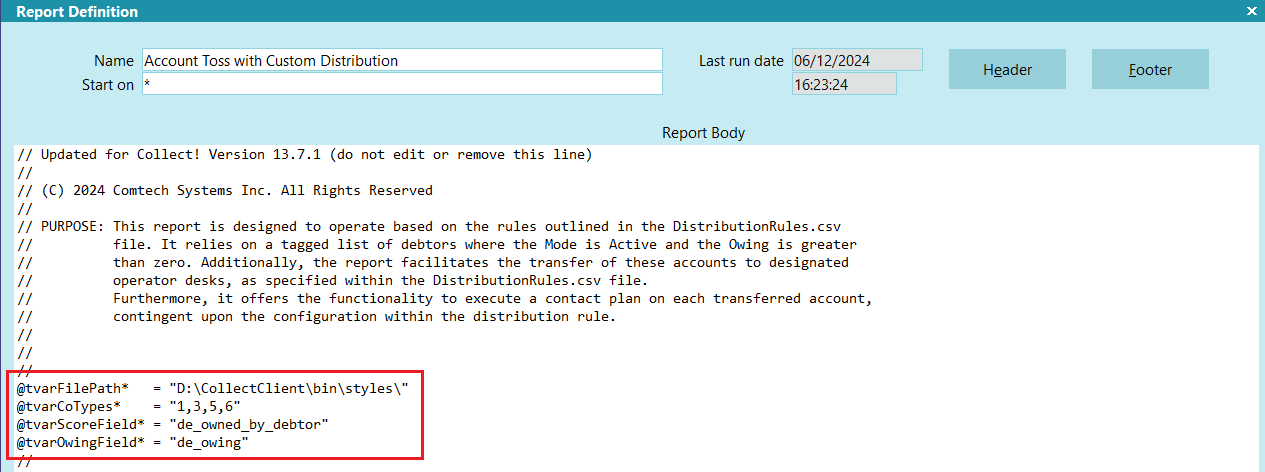
Report Default Variables
It relies on there being a Tagged List of Debtors already in place. If no tagged
list exists, the you will receive a pop-up advising that there is no tagged list of accounts, to
ensure to tag a list, then rerun the report. This report Starts On Anywhere.
When executed, the report will present the you with a pop-up allowing for preference choices to
be made:
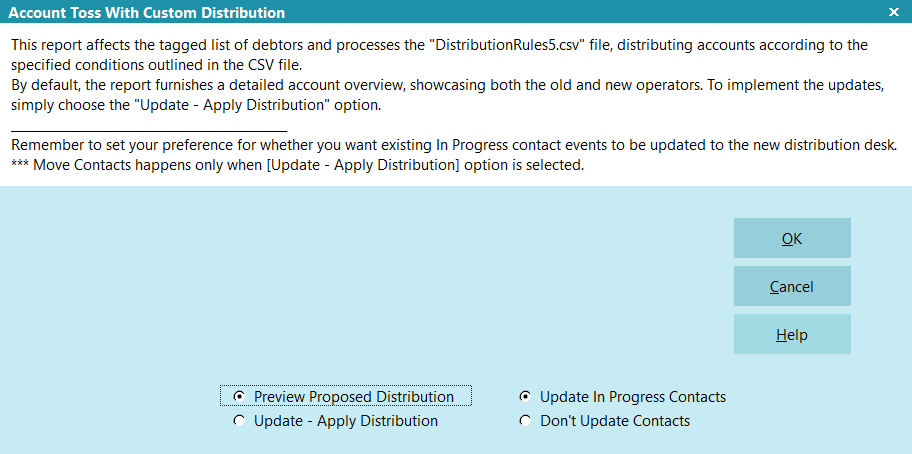
Report Main Prompt
Each option of Preview Proposed Distribution and Update – Apply
Distribution constitutes one execution of this report. It doesn't automatically proceed
from Preview to Update; you would have to rerun the report if
you wish to Preview before committing to Update.
The Update In Progress Contacts and Don't Update Contacts are
ignored if you are running the report in Preview Proposed Distribution mode.
If you select Preview Proposed Distribution, you will receive an output that looks
like the following:
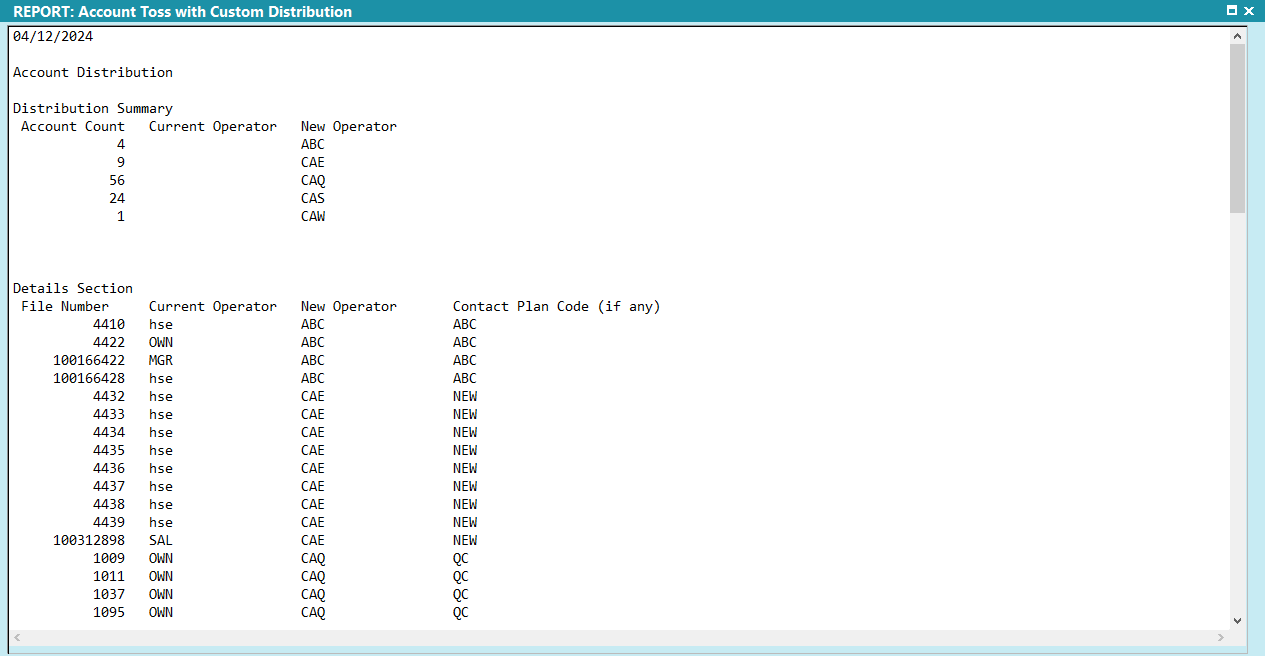
Preview Proposed Distribution
This provides a Summary portion in the upper part of the output and a Detail on a per account basis
in the batch of tagged accounts below.
The ability to Preview Proposed Distribution can prevent accidental updates. If
you are new to this process and want to be certain of your results before committing to database
updates, then Preview first is recommended. If you are familiar with the process and/or have used
the same DistributionRules.csv content before, you may wish to proceed directly to Update –
Apply Distribution which will make changes to accounts and execute Runplans,
if any.
| 
Was this page helpful? Do you have any comments on this document? Can we make it better? If so how may we improve this page.
Please click this link to send us your comments: helpinfo@collect.org