How To Add A Font To The Report Writer
Collect!'s Report Writer ships with several predefined fonts that you can select when creating
reports and letters. Reports and letters shipped with Collect! have been designed in simple and
effective styles, using a basic list of font sizes and types. It is also possible to use your own
favorite fonts in the letters and reports that you design.
You can add your own font choices to the list of Printer Control Codes or simply specify your own
font in the Report Body itself. We will discuss each of these methods in this topic.
 Please be aware that the fonts that you choose may result in a change in the spacing and column
line-up of pre-designed reports. You may have to adjust some of the fields and text to format
your report or add formatting symbols.
Please be aware that the fonts that you choose may result in a change in the spacing and column
line-up of pre-designed reports. You may have to adjust some of the fields and text to format
your report or add formatting symbols.
The two methods for adding fonts to the Report Writer are:
- Adding a font to the list of Printer Control Codes
- Setting a font with the @FONT command
Adding A Font To The List Of Printer Control Codes
The Printer Control Codes list has a complete set of codes for each type of printing that is supported
by Collect! - DC, Ink Jet, Laser and HTML. Since each type of printing has its own set of fonts,
you must add your font to the list of each type of printing that you want to do. This example will
demonstrate adding the the font to DC. This assumes that your Printer Setup is set to "Print via
device context."
- Select Print from the top menu bar and then select Settings, Printer Control Codes.
- When the list of Printer Control Codes is displayed, maximize the list so that you can see all
the columns.
- Look at the column labeled "Printer" and ensure that you are in the DC section of the
Printer Control Codes list. Scroll down and look for one that is marked as "Not Used." You can
use them for your own fonts. If one is not available, look for an opening in the alphabet in
the DC section, other than L or P.
- Open one of the available Printer Control Codes or click New to create one.
- If you created a new one, give it a code. It must be an uppercase letter.
- In the 'Name' field, enter a name that defines this font for you.
- In the 'On' field, enter the actual name of the font and its size. Please examine an existing
font to see how this is done. Below is an example. Notice the way it is typed and the use of
quotes and other symbols. You must enter your font the same way. To do this, it is necessary
to know the actual name and size of the font that you want to use.
The FONT FACE (TYPE) and SIZE that you choose must be already installed on the computer you
are printing from.
Examples:
<font face="Arial Narrow" size="18">
<font face="Copperplate Gothic" size="24">
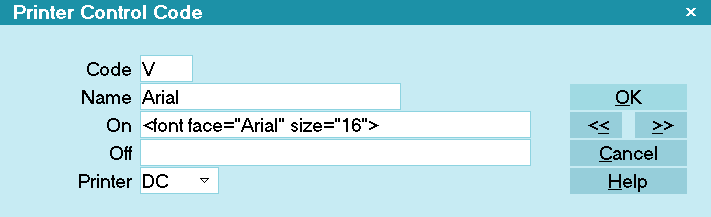
Printer Control Code
- Leave the 'Off' field empty.
- Choose 'DC' from the 'Printer' drop-down list.
- Click the OK button. You should be returned to the list of codes. Notice your new code in the
list.
Now you can use your new code in a report or letter. You will use the code (Example: @K) and it will
print in the font face that you have chosen. Print a sample report and examine the formatting and
position of text. Adjust if necessary to suit your needs.

Set A Font Using The @Font Command
The @FONT command may used for DC printing, that is, whenever you are set to "Print to Device Context."
You can use this command to simply call a font right in your Report Body. Any font that is installed
on your computer will be recognized.
Syntax: @FONT({font-family},{font-size})
(font-family} - Do not use quotes even if there are spaces in the font-family name.
{font-size} - This is the height of the font in standard DC command measurements of 100/inch.
Example:
@FONT(Lucida console,22)
The @FONT command is not case-sensitive. You can write @Font or @font and that will work too.
Do not use quotes even if there are spaces in the font-family name. The second argument is the height
of the font in standard DC command measurements of 100/inch.
The font you set will stay in effect until you change it or end the report.
You can also use the standard Printer Control Codes for fonts in the same report. So you could set
one font for part of the report and then call another font for a different part of your report. Each
font command stays in effect until you call another font command.
 Whenever you set a font or printing characteristic, it must be turned off or it will carry
over to the next report or letter that you print. It is always a good practice to explicitly
declare, in the Report Options, a Printer Initialization and Printer Termination setting for
each report or letter that you use.
Whenever you set a font or printing characteristic, it must be turned off or it will carry
over to the next report or letter that you print. It is always a good practice to explicitly
declare, in the Report Options, a Printer Initialization and Printer Termination setting for
each report or letter that you use.
@Font Command With Variables
You can also set the font using @FONT with variables.
Example:
@varFace* = "AR Berkley"
@varSize# = 22
@FONT(@varFace,@varSize)
Font Attributes
All font attributes such as BOLD, UNDERLINED, CENTERED and other commands are recognized normally
when you set the font with @FONT. It simply changes all the output to the font you have specified
including any other formatting you have set already in the report.
Summary
In addition to the predefined fonts shipped with Collect!, you can use your own favorite fonts in
the letters and reports that you design You can add your own font choices to the list of
Printer Control Codes or simply specify your own font in the Report Body itself.
Please be aware that the fonts that you choose may result in a change in the spacing and
column line-up of pre-designed reports. You may have to adjust some of the fields and text
to format your report or add formatting symbols.
| 
Was this page helpful? Do you have any comments on this document? Can we make it better? If so how may we improve this page.
Please click this link to send us your comments: helpinfo@collect.org