Operator Security
The Operator Security section of the Operator form controls
access levels and other security settings pertaining to this
operator.
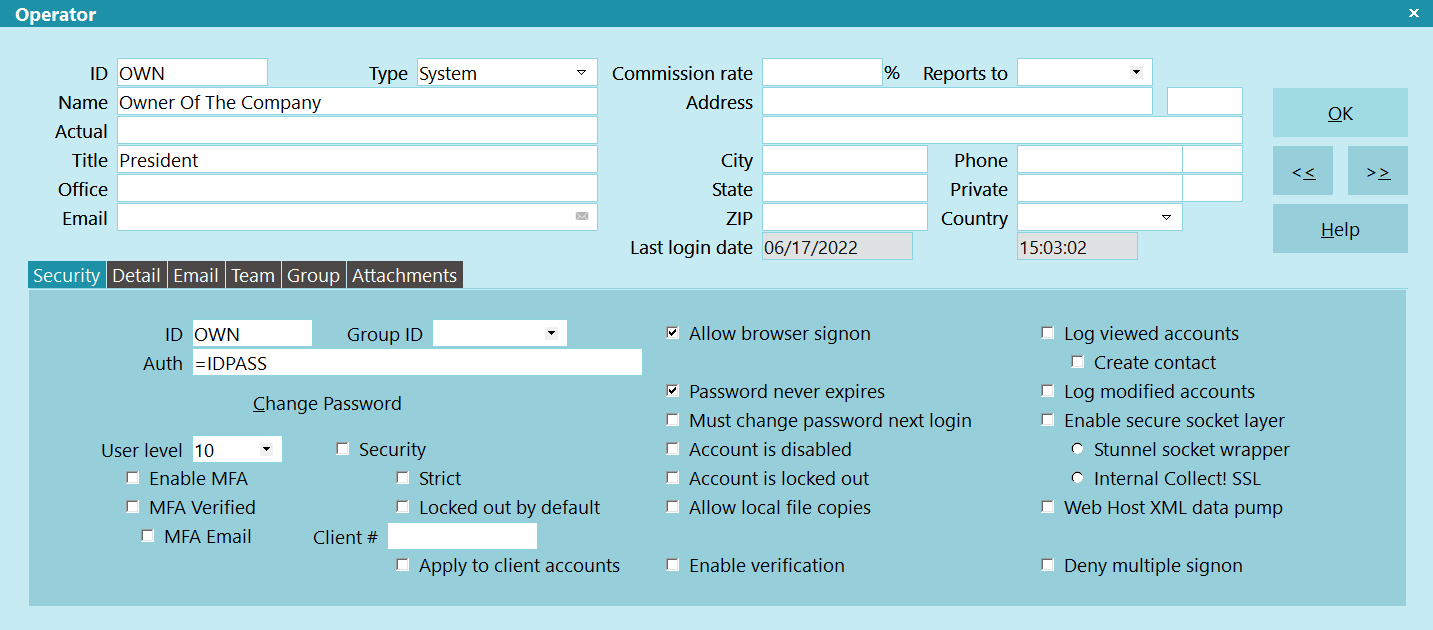
Operator Security tab
 Several of these settings may be used to easily
and effectively restrict access to your accounts using
methods described in Help topic,
How to Restrict Access to Accounts.
Several of these settings may be used to easily
and effectively restrict access to your accounts using
methods described in Help topic,
How to Restrict Access to Accounts.
These and other available settings are explained below.
ID
This is the short identification code assigned to the
Operator or Sales Team. This ID is used to set every
parameter in Collect! that relates to the operator. The
ID that you choose for each Operator must be UNIQUE.
If you are using Sales Team functions then you should
assign distinct ID codes to Distribution Teams. It is suggested
that you use codes that clearly designate Sales Team
IDs as different from your individual Operator IDs.
 You cannot use "System" or "Admin" for
your ID. These are reserved words.
You cannot use "System" or "Admin" for
your ID. These are reserved words.

Group ID
This is a user-defined field where you can select an ID
from the Operator pick list. This enables you to group
Operators for your own purposes. This is a loosely
organized group with no automatic functionality. You can
use it to track performance, calculate commissions or
set other options. To use this field in a report, you can
use WHERE (@os.gi = {myID}) to find all members of
the group. Please refer to Help topic, Operator Group
for details about creating a more formal group of operators
with added functionality.
Auth
Collect! allows you to associate your Windows account with
your Collect! account. When you sign in for the first time,
with a valid password, you will receive a prompt asking if
you want to Automatically sign in with Windows Authentication.
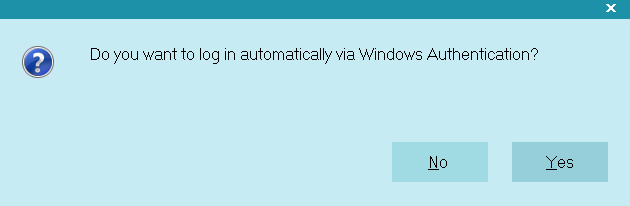
Sign on with Windows Authentication
If you select YES, your Window ID will be written to this
field. When you sign into any computer on your network
and open Collect!, it will automatically sign you in.
If you select NO, the value '=IDPASS' is written to this
field. Each time you sign into Collect!, you will be prompted
to enter an ID and password.
If you have an operator who needs access to multiple
operator accounts in Collect! such as an IT person or
someone who works in multiple departments, you can
put the Windows ID in the AUTH field of multiple
operators. When that Windows user signs in, they
will be given a list of operator IDs to select from.
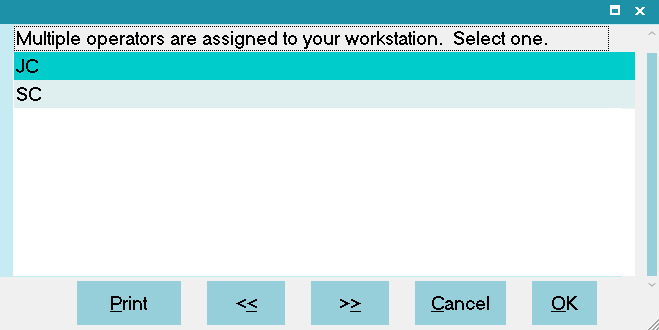
Sign on with Windows Authentication for Multiple Operators
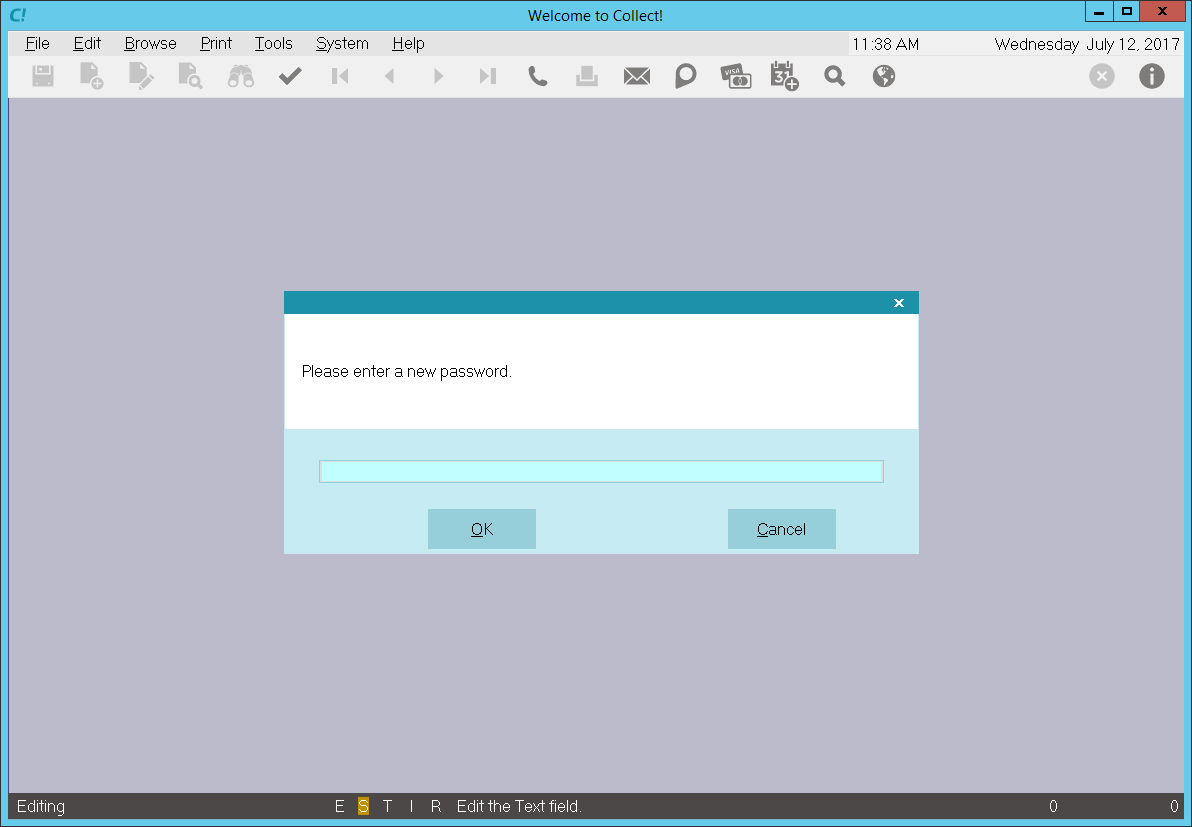
Password
This is the password used when the Operator signs on to
the system. Passwords can be the same among a group
of users. This field is ignored for Sales Team definitions.
The Password may be up to 21 characters and/or numbers.
Passwords are case-sensitive.
When creating a new operator, you will need to click OK
to commit the operator to the database first, then go
back in to set the password.
Click the CHANGE PASSWORD button to either set or change
an operator's password.
You cannot use a password of ******** ( 8 asterisks).
If an error occurs when you create a Password, you
will be sent back to the Change Password form to correct the
error. You can still leave the Operator without correcting
the error by pressing ESC on your keyboard.
User Level
This is the level of the User. This can range from a Junior
Collector with very limited access rights, to a System
Manager who has complete control over Collect! Press
F2 when you are in this field, or select the down arrow
next to the field. Either way, the list of User levels is
displayed for you to make a choice. You can create
your own User levels with their own set of rights. This field
is ignored for Sales Team definitions.
It is recommended that you use the predefined
User Levels provided by Collect! and modify
them if needed. You should have a good idea
of the rights of each Level before you assign
a Level to your Operators.
You should only use User Level 99 for
administrative purposes. Assigning a User
Level 99 may result in losing functionality
that relies on Collect!'s access rights
system.
The value in this field may be used in contact
plans to trigger events based on the Debtor
Operator's User Level.
Enable MFA
When this switch is ON, MFA will be enabled for the Operator
and the user will be expected to type in an MFA code after
signing in with the normal user name and password.
MFA Verified
This switch is turned on the first time they sign in with a
valid MFA code. If the switch is turned off a new secret will
be generated when they sign in and they will be presented
with a new bitmap to scan. If the switch is on, their existing
secret will be used to verify the MFA code they enter.
MFA Email
If this switch is on, an email will be sent to the Operator
with their one-time password. This requires a valid email on
the Operator record and is meant as an alternative to the QR Code.
This requires Collect! to be setup for email and the Operator
record to have a valid email address. Please see the Help
topic How To Setup Sending Email In Collect! for more information.
Security
When this switch is ON, Collect! will allow this operator
to access accounts which you have restricted, either
through the Debtor Detail form or through the other
security settings available in Operator Security. You
can customize this further using the 'Strict' switch below
this check box.
Please see How to Restrict Access to Accounts for
instructions on using this feature.
The security options also work for client operators
like sales people. When enabled, you can restrict
access to clients to operators by filling in the
Client Operator, Assign Accounts to Operator, or
Assign Sales to Operator fields. If you have Sales
Teams, you can specify a team on the Client Operator
field.
You cannot switch OFF 'Security' if you have
switched ON 'Strict' as 'Strict' can only be
applied to accounts when 'Security' is
switched ON. If you want to switch
OFF 'Security', remove the check mark
from 'Strict' and then you can remove the
check mark from 'Security'.
Strict
This switch controls whether or not restricted accounts
appear to the operator. When this switch is ON, this
operator cannot see any accounts which they do not
have access to. The accounts are completely invisible
to the operator, even when browsing or printing a report.
When this is switched OFF, this operator will be allowed
limited, read-only access to these restricted accounts.
When you switch ON 'Strict', the 'Security'
check box above it will be marked
automatically as 'Strict' can only be applied
to accounts when 'Security' is switched ON.
Please see How to Restrict Access to Accounts for
instructions on using this feature.
Locked Out By Default
When you have 'Security' switched ON, you can switch
this ON to lock out this operator from all accounts in
your database. This is a comprehensive way to apply
account access control without having to set each
account.
Only accounts that have this Operator ID in the
Debtor Operator or Sales field will be able
visible to the operator. If you want to grant
access to other individual accounts to this
operator, put the operator's ID in the
Debtor Detail Clerk or Access field or put in
a Team ID that this operator belongs to.
This setting can be further enhanced with the use of
the 'Strict' setting. Please see How to Restrict Access to Accounts
for instructions on using this feature.
This setting is ignored if the Operator Type is CLIENT.
Client #
Use this field to restrict this Operator to only view accounts
for this particular Client. Only the accounts for this Client #
will be accessible to the Operator.
This is tied into a hierarchical client ownership
system. If the Client # you enter here owns
other clients, they will also be visible to this
particular operator through the Browse Debtors
and Find By menus. All other accounts will not
be visible.
This setting is ignored if the Operator Type is CLIENT. In
that case, you MUST enter the Client # in the field beneath
the field labeled 'Actual' in the top part of the Operator form.
Apply To Client Accounts
Switch ON this setting if you want to enable this Operator to
view Client accounts while restricting access to only the
Client # you have set, or any Clients owned by the Client #
you have set.
This is useful for your Sales Operators. It enables
them to view and edit the Client accounts you
want them to see. When you combine this with
Client Hierarchy, you can set up a very nice
working environment while ensuring proper
restrictions.
You can also setup operator teams for security. For example,
if you have an account that should be accessible by a team
instead of just a single operator, you can assign the
operator to a team and assign the debtor to the team instead
of the operator. Alternatively, you can put the team ID on
the debtor's Access field located on the Debtor Detail form.
Please refer to the Help topic How to Setup a Security Team
for more information.
Enable Verification
Switch this ON to prompt operators to confirm important
information before they exit a form. This is a very useful
feature for confirming data or simply to make sure the
operator has important information that you need.
There are a few steps necessary to set up this
procedure. Please refer to Help topic,
How to Prompt To Verify Field On Exiting A Form
for details. This will explain how to proceed with
verification on the field of your choice.
Allow Browser Signon
Switch this ON to allow this operator to access
Collect! over the Internet using Collect!'s Web Host.
This switch works with the
Web Data Entry feature. It has
no effect on the use of Collect!
in ordinary network setups.
Please refer to Web Host for more information.
Password Never Expires
If you set a number of days globally in the 'Renew
password every' field in the Password Settings
form (accessible through the System menu, Rights
option, at the top of Collect!) then operators will be
prompted to renew their passwords. Switch
ON 'Password never expires' with a check mark to
avoid the system prompting the user to renew the
password.
Must Change Password Next Logon
Switch this ON with a check mark to force the user
to change their password the next time they sign
into Collect!.
Account Is Disabled
When you switch this ON with a check mark, the
operator will not be allowed to sign into Collect!
A message will be displayed informing the operator
of this with a suggestion to contact the system
administrator.
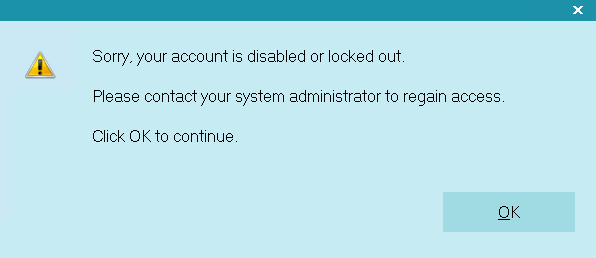
Account Is Locked Out
You can enable this switch with a check mark
to lock a user out of your system. They will not be
able to sign in at all. To re-enable the account so
that the user can sign in, clear the check mark
from this field.
If you set a number of tries in the 'Lock out after'
field in the Password Settings form, this will
set a limit to the number of signon attempts
Collect! will allow a user. When a user has
entered too many incorrect passwords, this switch
will become enabled and they will not be able to
sign in at all. To re-enable the account so that the
user may sign in, clear the check mark from
this field.
Show Passwords
Switch this ON to unhide Operator Passwords. The
effect is immediate. Once you have switched ON
Show Passwords, you can navigate through the list
of Operators and all the Passwords will be visible.
The "Show passwords" switch is visible only if you
are signed in at User Level 99. It works only for
User Level 99, for security reasons. No other level
can unhide or view Operator Passwords.
Allow Local File Copies
Switch this ON to automatically store printed files locally.
Operators with the switch ON will be able to print documents
to a local My Collect! Documents folder inside the My
Documents folder of the currently logged on Windows user.
You are making local copies of files on operators'
machines. Debtor or client data may be stored in
these documents. If you are a high security
company and cannot store data off the server,
don't use this switch.
Because the files are local, this preserves your single
socket connection to the server. Operators with this
switch ON will be able to print documents even through
the Client executable.
This switch has no effect on HTML files, because these
files may have external dependencies.
Log Viewed Accounts
Switch this ON to log account activity to the Application Log.
Every account that this operator views will be written to the
log with a date/time stamp.
Collect! considers as "Viewed" opening the Debtor form and
any part. Creating or modifying Contacts and Attachments
are recorded as "Viewed" as well.
Please refer to Help topic, Collect! Log Viewer for more
information about the Application Log.
Create Contact
This box works in conjunction with Log Viewed Accounts above.
Switch this ON to create a Review contact on the Debtor that
the account was viewed. In addition to the date and time the
account was opened, it will also store the Elapsed Time
that the Operator was on the account. The Contact Type will
be "Operator Viewed."
Log Modified Accounts
Switch this ON to log account activity to the Application Log.
Every account that this operator modifies will be written to
the log with a date/time stamp.
Collect! considers as "modified" any change to the actual
Debtor form, the creation or modification of Notes, Cosigners,
Transactions, Debtor Detail and the Misc tab. Also, any
changes to the Credit Report Details tab.
Creating or modifying Contacts and Attachments
from the Debtor are not considered as modifying
the Debtor. However, this logged as "Viewed"
because the Debtor form is open.
Please refer to Help topic, Collect! Log Viewer for more
information about the Application Log.
Enable Secure Socket Layer
Switch this on to enable SSL automatically when a
Web Host operator logs into Collect!. This setting
is used with the following two settings to determine
how the SSL will be used.
Stunnel Socket Wrapper
When this setting is chosen, Collect! automatically starts
the Web Host with the /W1s argument. This must be used
with a third party SSL utility.
Internal Collect! SSL
When this setting is chosen, Collect! automatically starts
the Web Host with the /W1ss argument. This uses the
internal SSL functionality of Collect!. No external utilities
are needed. Collect! will use Port 443 for HTTPS by
default, or you can set a different port using the /y argument.
Web Host XML Data Pump
This setting allows a user to pipe data directly into
Collect! using XML. The Operator Type must be
Web Host to use this feature. Collect! automatically
starts Web Host with the /W3 argument. Use with
Trusted Hosts to add a layer of security. Please
refer to Help topic, Web Host XML Data Pump for
more information.
Deny Multiple Signon
Switch this ON with a check mark to restrict this
Operator to signing into only one instance of Collect!
at any given time.
When this switch is ON and the Operator attempts to
sign on more than once, this will generate an error
message. The event will be written to the Application Log
and Collect! will shut down.
This evaluation takes place during the
opening of a database when Collect!
retrieves the Operator record.
| 
Was this page helpful? Do you have any comments on this document? Can we make it better? If so how may we improve this page.
Please click this link to send us your comments: helpinfo@collect.org