How To Use Access Rights
There are three areas in Collect! where you can make changes to access rights settings. This topic
will give the steps for accessing each one of the areas.
Access Rights Form
This form may be used to make changes to a particular menu item, form, or field. You may set an
alias, a pick list, a control file, color, and other settings. You may also select the Form Rights
sub-form to apply additional changes.
 WARNING: The Access Rights that begin with the hash (#) symbol are for data level rights in
the REST API. They do not affect User Interface level rights.
WARNING: The Access Rights that begin with the hash (#) symbol are for data level rights in
the REST API. They do not affect User Interface level rights.
Click Here to View this Form.
Click Here to Close this Form.
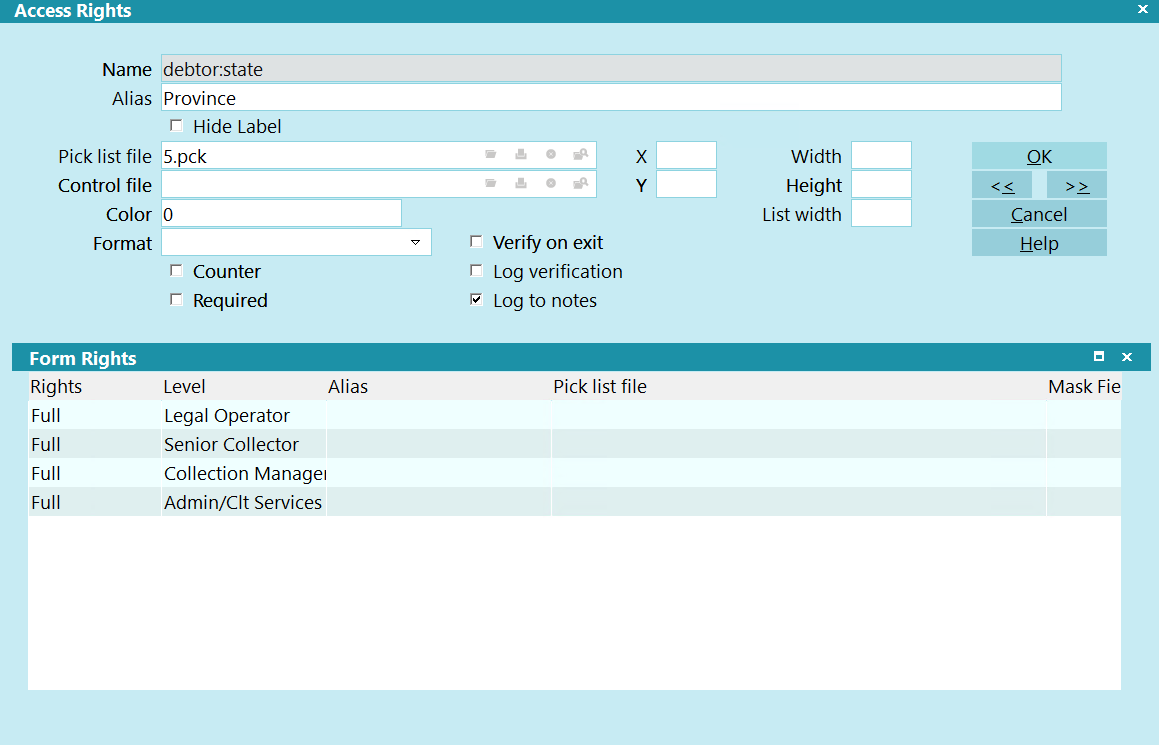
The Access Rights form contains many settings that
control security and properties for menus, forms, fields
and buttons in Collect!. This provides great flexibility and
control over all aspects of your use of Collect!
Using the Access Rights form, you can change
form and field labels, set a field color, attach a pick list
or a control file. Read/write privileges for various user
levels can be set, including who is allowed to access
particular menus, form and fields in your system. You can
also switch on logging changes to notes or verify that
correct data is entered in a field.
Access Rights
WARNING: The Access Rights that begin with the hash (#)
symbol are for data level rights in the REST API.
They do not affect User Interface level rights.
No Access Rights
When a user tries to perform function that they do not have
access rights to, Collect! will display a message indicating
the Access Rights number that you can change to grant
access to the particular function.
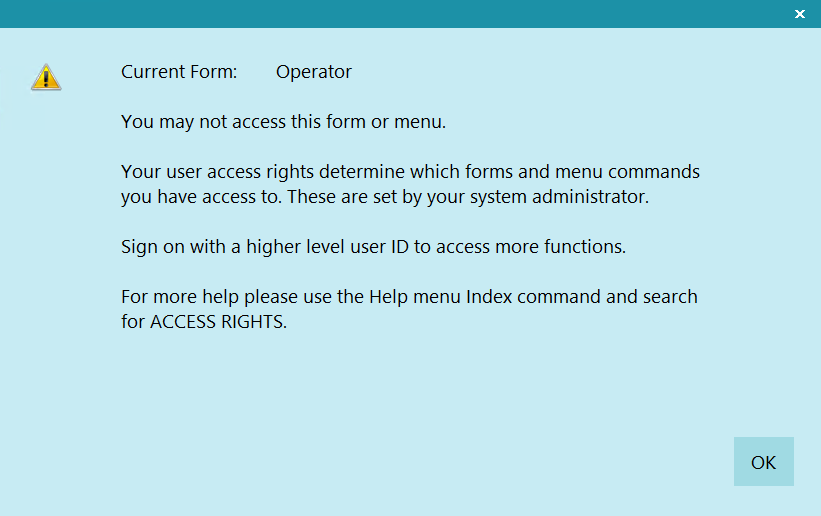
Access Rights Prompt
The Name and Number displayed in this message helps
you locate the particular form in the Access Rights list.
Access Rights Item in List
Access Rights Form Name

Name
This is the form, field or menu name.
For Forms, the name is shown on the top line of the
form. Field names are displayed to the left of the field,
and Menu names are as you see in the pull down Menus.
In the Access Rights form, the Name field is grayed
out and cannot be changed. Collect! needs to read
this information for its internal work. However, Collect!
allows you to change the name that is displayed for
the item.
To modify or change the name that appears
after Collect! is run, use the ALIAS field.
Alias
This is a name you can use to override the default form
or field name. If you enter a name into this field, the
name you enter will replace the default name ordinarily
displayed by Collect! for that item. The change will take
effect the next time you sign into Collect! This Alias can be
overridden on a User Level because there is also an Alias
field in the Form Rights form.
WARNING: If you decide to use aliases,
DO NOT rebuild the form rights or
printable information lists when signed
in as a User with aliases.
Hide Label
Switch this ON to hide the label for this field
when a form opens.
Pick List File
Click one of the buttons on this field to select
a Pick List or edit one that is already attached
to this field.
Pick lists can be attached to just about any
field in the system. A Pick List gives the user
a list choices to choose from for the field.
Control File
Click one of the buttons on this field
to select a Control File or edit one that
is already attached to this field.
Control Files can be attached to just about
any form or field in the system. A Control
File can cause actions to occur depending
on the value entered in the field. For
instance, if the user enters "New York", the
field could change color and a Contact Plan
could run.
X
This specifies the x coordinate on the
screen where the field is located. This
allows you to move a field on a form.
Y
This specifies the y coordinate on the
screen where the field is located. This
allows you to move a field on a form.
Width
This is the number of character units
the field displays on the screen. This
allows you to change the displayed
width of a field on a form.
Height
This is the height of the field displayed
on the screen. This is only valid for lists.
It allows you to change the number of
rows that show when the list is displayed
on the screen.
List Width
This controls the display of the field in lists. Setting
this value to zero stops the field from displaying in
lists. Giving it a value causes the field to show up
in lists.
You can use this setting to cause a field of your
choice to show up in a list in Collect!. For instance,
the Debtor list could also display the Country
field.
Color
This controls the default background color of a field
when it is displayed. By default, this field is set to 0
which results in a white background. To change the
background color for a field, enter a valid six character
RGB color code in hexadecimal form, as in standard
HTML color usage.
Format
This option allows you to reformat the text of a field
using a selection of predefined formats. Only one option
can be selected.
 This field is only visible for Alphanumeric
String fields.
This field is only visible for Alphanumeric
String fields.
Counter
Switch ON the Counter switch to make the field
a counter.
Counter fields automatically increment by 1
when a new record of the given type is created.
Counters, if they are used, have a folder under
the database folder. In the counter folder, each
counter has a file named {form}{field}.cnt. The
file contains the next available count for the field.
When a new record is created, the system
checks the counter files for any counter fields
in the record, reads the file, updates the counter
and rewrites the file with the next available value.
Verify On Exit
Switch this ON with a check mark to prompt the user to
verify the data in this field before exiting the form. There
are a few steps necessary to perform this procedure.
Please refer to the Help topic
How to Prompt To Verify Field On Exiting A Form for details.
This will explain how to proceed with verification on the
field of your choice.
The verification prompt will only appear if the data in the
field has changed.
Log Verification
Switch this ON with a check mark to write to the debtor's
Notes whenever the user verifies the data in this field.
There are a few steps necessary to perform this procedure.
Please refer to the Help topic
How to Prompt To Verify Field On Exiting A Form for details.
This will explain how to proceed with verification on the
field of your choice.
Log To Notes
Switch this ON with a check mark to write to the
debtor's Notes whenever a change is made to
this field.
If you are importing data into a field with this option enabled,
it will log the change to the notes.
Required
Switch this ON with a check mark to enforce this field
to be required when filling in this form. There
are a few steps necessary to perform this procedure.
Please refer to the Help topic
How to Prompt to Verify a Field on Exiting a Form for details.
This will explain how to proceed with verification on the
field of your choice.
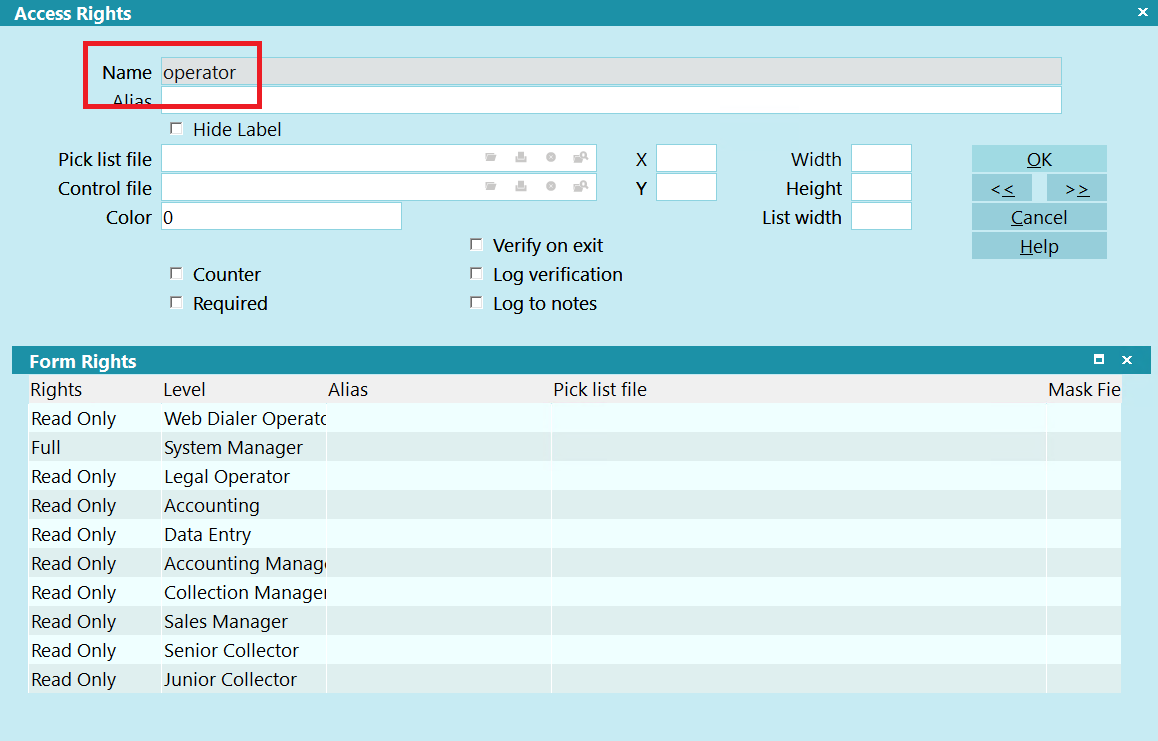
User Levels
The Form Rights list displays those Users who have rights
to access a given form, field, or menu, and the extent of
their rights.
Press F5 or select the Form Rights list to activate it.
Notice that its title bar changes color and buttons
appear at the bottom of the form. You may create a
new line or edit an existing line item. Press F1 for
help on the Form Rights form and fields.
RIGHTS
This field displays the Access Level rights
allowed to this field or form.
LEVEL
This column displays an Operator Level that
is allowed to access the item.
ALIAS
If you have changed the field label for this
item for a particular User group, the Alias
is displayed in this column.
PICK LIST FILE
If there is a Pick List file attached to this field
for a particular User group, it will be displayed
in this column.
Help
Press this button for help on the Access Rights
form and links to related topics.
Cancel
Select this button to ignore any changes
you have made and return you to the
previous form.
OK
Select this button to save any changes
you have made and return you to the
previous form.
<<
Select this button to go to the previous
record in the database.
>>
Select this button to go to the next record
in the database.
Rebuild
This choice is only available on the Access Rights List.
Select it to refresh the list.
The list of access rights contains every field, menu item, form and
button in Collect!. Whenever you make changes to access rights on
a form or field level, it is necessary to rebuild this list so that your
changes will take effect.
Also, there are other times when it is necessary to rebuild this list:
To correct settings for operator levels.
This occurs when you upgrade your database. If you find that
you cannot sign into Collect! using your former ID and Password
after an upgrade, you will have to rebuild the list of access rights.
To correct access rights to forms or fields.
If you find that your operators cannot access a form or a field
that they accessed formerly, rebuilding the list of access rights
often sets things right again.
To correct some printing issues.
Sometimes a report or letter does not print correctly due to an
access rights issue. In that case it is especially important to
rebuild your Printable Information list as well as your
Access Rights list. This is described below.
Each form, field and menu item is listed in the Access Rights
table. For each item in the Access Rights list, you can assign
Users who are allowed to access the form, menu or field, and
you can determine if they can only read or read and write to
the item. Please refer to help on Access Rights and
How To Use Access Rights for information about
assigning rights to users.
Collect! rebuilds this table automatically whenever it detects
changes. It only needs to be rebuilt manually if you experience
difficulties with User Access Rights as described above or if
you make changes to rights for certain forms or fields.
If you choose to rebuild the table, you may have to reassign
rights to some User levels, although the program takes great
pains to leave your rights designations intact.
WARNING: If you are using aliases, you must sign in
as User Level 99 to rebuild this list or it will not be
built correctly.
Rebuild Access Rights
- Sign into Collect! as User Level 99.
- Select System from the top menu bar and then select Rights,
Access Rights.
- Click the Rebuild button at the bottom of the screen.
- Your Access Rights will be updated.
- Sign out of Collect! completely and return to the
Desktop. Then sign into Collect! at various User Levels to
ensure that your access rights are working properly.
You must sign out of Collect! completely, returning
to the Desktop, whenever you change to a different User Level,
or some of the rights from the previous level that you were
signed in as may still be in effect.
After rebuilding the Access Rights list, rebuild your
Printable Information list as well and your Import Definitions.
These three lists relate to fields and forms in Collect! and they
are related to each other. It is always a good idea to rebuild
them all at once.
Rebuild Import Field Definitions
- Sign into Collect! as User Level 99.
- Select File from the top menu bar and then select Import/Export.
- Choose Update Definitions. (Choose 'Yes' if prompted)
- Your Import Field Definitions will be updated.
Rebuild Printable Information
- Sign into Collect! as User Level 99.
- Select Print from the top menu bar and then select
Settings, Report and Printer Setup.
- Choose Printable Information. The Printable Field list will display.
- Click the Rebuild button at the bottom of the screen.
- When Collect! rebuilds this list it will shut down to take effect.
- Sign in again and your Printable Information is now updated.
Form Rights Form
This sub-form of the Access Rights form may be used for more specialized settings for a menu item,
form, or field. You may set an alias, a pick list, and a rights level. The settings in this form are
for a particular user level that you select.
Click Here to View this Form.
Click Here to Close this Form.
The Form Rights form contains several settings
that allow you to set security privileges and
display properties for a selected menu, form
or field in Collect! for a particular user level.
The chosen user level may have its own alias
name for the field, form or menu item and its
own pick list attached to it.
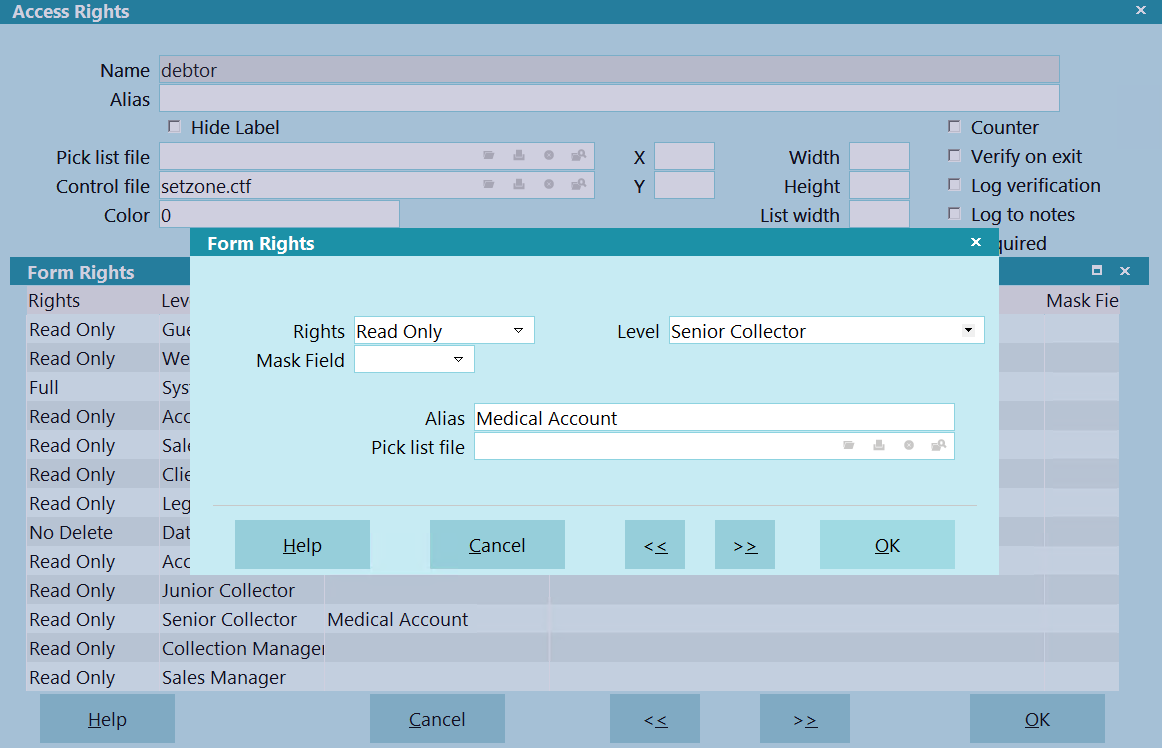
Form Rights
When you are viewing the Access Rights
form, you may see a list of users displayed
in the Form Rights sub form. The Form Rights
list displays those Users who have rights to
access the given form or menu, and the extent
of their rights.
Rights
Use the arrow to drop-down a list of Access Rights choices.
Access Rights include Full, No Delete, Read Only and No
Access.
These settings have different effects
depending on whether you are setting
rights for a menu item, a form or a field.
Please refer to Help topic
How to Use Access Rights for details.
Level
Click in this field or on the down arrow to open the
Operator Level list. Choose a user level to allow it
to access the item. You can set up your user groups
and their rights through the System menu by choosing
Rights, User Levels. Collect! ships with several default user
groups which you can modify, if necessary.
WARNING: Please be careful. If you inhibit
the System Manager from accessing the
Access Rights list you will be unable to
change the rights in the future!
Mask Field
If you would like to mask a field with stars, you can
select a value in this field. There are 3 options:
- None - No Masking
- Partial - Masks all but the last 4 characters
- Full - Masks all characters
Alias
This name overrides the system default name for
the form or field whose Access Rights you are
modifying. When the specific user group chosen
in the Level field signs into Collect!, the alias you
type in here will display as the name of this menu,
form or field. For example, you may have a group
of operators who work certain account types, while
other operators manage different account types.
Each group can have the forms it uses in Collect!
set up with labels that suit its particular function.
The names you choose should be very intuitive
and logical.
WARNING: Do not rebuild your Access Rights
list when signed in as a User with aliases.
Pick List File
The Pick List File shows you the name of the
Pick List attached to this field. Pick lists can
be attached to just about any field in the system.
Pick Lists give the user a list of choices to choose
from for the field.
 The Form Rights Pick List field gives you
the ability to assign a special pick list to
a particular user level. This is very useful
for limiting the operator's choices. For
instance, you can create one pick list for
your system level users and another for
your collectors. An example would be the
Debtor Status field. Perhaps you want
your collectors to be able to change the
Status, but limit them to a few choices.
This is where you could benefit from
setting the pick list in Form Rights for
the user level you have assigned to
your collectors.
The Form Rights Pick List field gives you
the ability to assign a special pick list to
a particular user level. This is very useful
for limiting the operator's choices. For
instance, you can create one pick list for
your system level users and another for
your collectors. An example would be the
Debtor Status field. Perhaps you want
your collectors to be able to change the
Status, but limit them to a few choices.
This is where you could benefit from
setting the pick list in Form Rights for
the user level you have assigned to
your collectors.
Help
Press this button for help on the Form Rights
dialog and links to related topics.
Cancel
Select this button to ignore any changes you may
have made and then return to the previous form.
OK
Selecting this button will save any data
you have entered and return you to the
previous form.
<<
Selecting this button will take you back
to another record.
>>
Selecting this button will take you forward
to another record.
Operator Level Rights Form
This sub-form of the User Level form may be used to set rights for a particular user level. You may
select a particular menu item, form, or field to set permissible user functions for. An alias may
also be set that applies to the user level.
Click Here to View this Form.
Click Here to Close this Form.
The Operator Level Rights form lets you modify access
settings for a specific form, field or menu item for the
User Level you are viewing. You can set the access level to
Full, No Delete, Read Only or No Access. You can enter
an alias for the item that will be displayed for this User Level.
Operator Level Rights
After making any changes, it is very important
to rebuild rights. Sign in as user level 99
and select File, Maintenance, Rebuild Lists to update Collect! to
recognize any changes you may have made. Please refer
to the Help topic Rebuild Lists for more information.
You must sign out of Collect! completely, returning
to the Desktop, whenever you change to a different User Level,
or some of the rights from the previous level that you were
signed in as may still be in effect.
Item
This field displays the name of the form, field or menu to
which the User has access rights. Click on the field or
the down arrow to open the list of all menu choices, forms
and fields in Collect!
Alias
If you want the name of the form, field or menu to read
differently on the screen, you can type the new name here.
*** IMPORTANT *** Only use up to as many characters
as are in the original name.
If you want to use aliases for all User
groups, ensure that you set up the
aliases in the Access Rights list. Then
make sure that all aliased fields are
referenced in the group rights for User
levels using those aliases.
Mask Field
If you would like to mask a field with stars, you can
select a value in this field. There are 3 options:
- None - No Masking
- Partial - Masks all but the last 4 characters
- Full - Masks all characters
Permissible User Functions
Select the access rights that you wish to allow to all
operators assigned to this User Level.
Access Rights can include:
- Full
- No Delete
- Read Only
- No Access
These settings have different effects
depending on whether you are setting
rights for a menu item, a form or a field.
Please refer to Help topic
How to Use Access Rights for details.
Help
Press this button for help on the Operator Level Rights
form and links to related topics.
Cancel
Select this button to ignore any changes you may
have made and return to the previous form.
OK
Select this button to save any data you have
entered and return to the previous form.
<<
Selecting this button will take you back
to another record.
>>
Selecting this button will take you forward
to another record.
Preparing To Make Changes To Access Rights
Collect! menus, forms and fields may be customized in many ways to provide the functionality you need.
This ability to dramatically change the format of your Collect! environment is a powerful feature
when used correctly. It is important to prepare any changes you may want to make and to be aware
beforehand of the effects these changes will have for your users.
Collect! ships with sample User Levels that grant very reasonable Access Rights to different levels
of operators. We recommend using the carefully planned default settings in Collect! for a while
before attempting to customize the program's display. It is very possible that you might want to make
a small change to an existing Level, for instance, making one more field accessible or not, or taking
away delete rights at one particular spot.
It is best advised that you do not try to change everything all at once. Take one step at a time and
test. Try out changes in the Demonstration database. When you are comfortable the changes you have
tried, then you may apply them to your Masterdb database. You could even work on an exact copy of
your existing user levels, make and test your changes, and when you are satisfied, copy a few files
to your Masterdb database and be up and running.
When you make changes to Collect!'s user interface, the underlying values of menus, forms and fields
remain the same. This means that the number and name of each menu choice, form and field is still
the same and the data type handled by the field does not change. For instance, a date field is still
a date field even if you change its caption to "Interest." The printable information report writer
code for the field remains the same. For instance, you would still use @de.na to bring the Debtor
Name into a report, even if you are calling it the Patient Name.
The Demonstration database has been set up to show the functionality of access rights, using
user levels. Before making changes, it is a good idea to examine the Demonstration database
to get an idea of what Collect! can do for you.
The easiest way to make a changes is to customize one of the pre-defined user levels that is
closest to your needs.
To view sample settings, select System from the top menu bar and then select Rights, User Levels.
Try signing into Collect! with the sample Operators provided to see what each user level can do.
You must sign out of Collect! completely, returning to the Desktop, whenever you change to
a different User Level, or some of the rights from the previous level that you were signed
in as may still be in effect.
Restricting user access to forms may result in unexpected behavior. So this must be carefully thought
out in all its ramifications. For instance, if you make a form No Access while allowing the user to
choose it from a pick list, they will not be able to complete the command. This is also true when
a user runs a contact plan that updates a form. The user must have Full Access to the form to update
it. This is also true of reports that write back to the database.
It may be useful to actually hide a field or button so that the user does not even see it. Additional
areas for consideration are Web Host access and Client access. You may want to restrict access to
your database in those ways also.
Accessing Access Rights
The Access Rights form may be accessed in many ways. Providing you have access to the various menus
and forms, you can use one of the following ways to get to the Access Rights form.
When you use one of these methods to display the Access Rights form, it is very important
to examine the field labeled Name to ensure that you are looking at the Access Rights
form for the correct menu, form or field item.
- Select System from the top menu bar and then select Access Rights from the drop-down choices.
The list of Access Rights for all forms and fields will appear. Select an item in the list
to view the Access Rights form for that form, field or button.
- Select System from the top menu bar and then select Form Properties from the drop-down choices.
The Access Rights form will display for whichever form is currently open.
- Select System from the top menu bar and then select Field Properties from the drop-down choices.
The Access Rights form will display for whichever field or button is active, has focus, or is
highlighted at the moment.
- From the Main Menu, select System Administration to display the System Administration menu.
Select Setup And Configuration to display the System Setup menu. Then select Security and Aliases
to display the Security and Aliases menu. Select Access Rights and Aliases to display the
Access Rights list. Select an item in the list to view the Access Rights form for that form,
field or button.
- When you are on a form or field, right-click your mouse and select Properties. This will display
the Access Rights for whichever form, field or button is active at the moment.
- When you are on a form or field, press Alt + F1. This will display the Access Rights for
whichever field or button is active at the moment.
Once you have opened the Access Rights form, you can use it to modify field labels, change user access
to a form or field, or prompt users to verify field data on exiting a form. Pick lists, control files
and changing list views are also dealt with through the Access Rights form. These and other related
topics are addressed in How To Set Field Or Form Properties.
The topic of Access Rights is really deep and impacts on your whole system. User levels have been
carefully designed to give you access rights settings that you can use for a variety of users depending
on their function in your organization. Please refer to help on User Level for details and please make
sure you choose your User Levels carefully when setting up your Operators.
User Level 99 is not affected by access rights, or form and field properties. If you make
changes, sign in as a level other than 99 to see the effects of your settings.
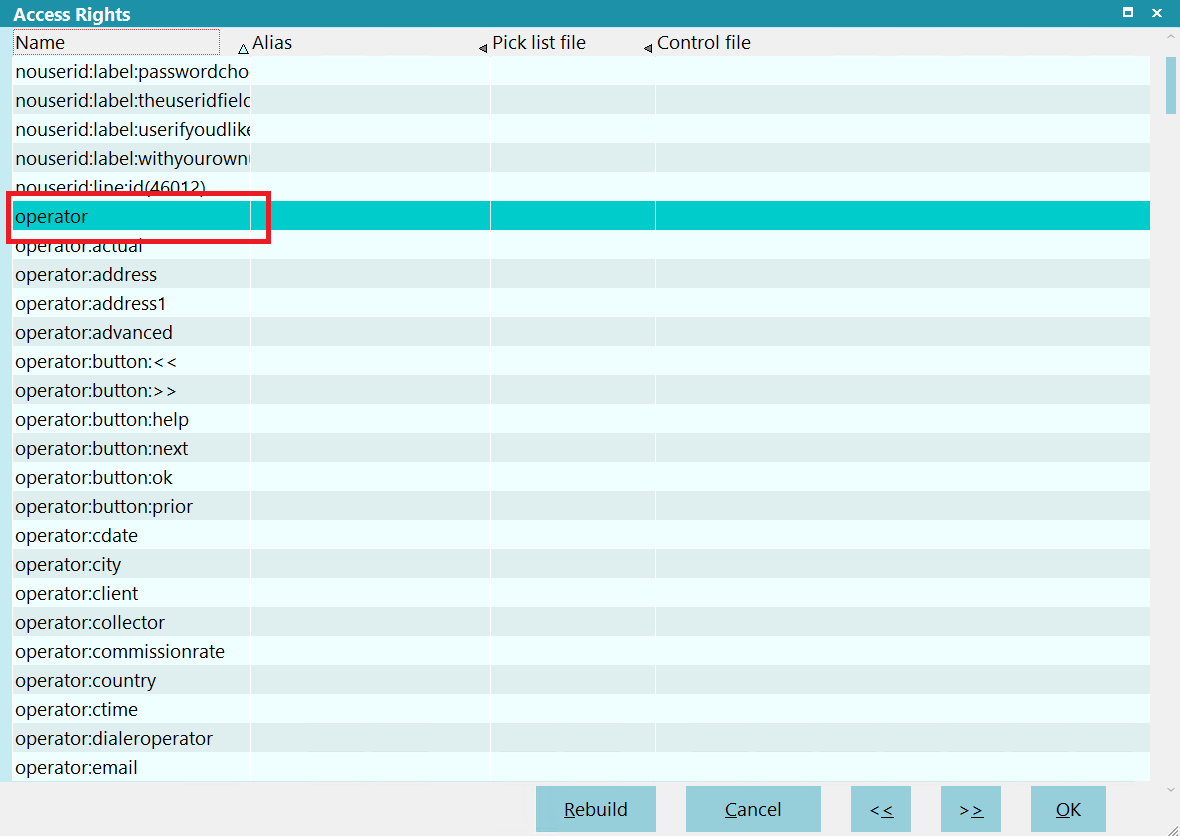
Access Rights List
- Sign into Collect! with User Level 99.
- Select System from the top menu bar and then select Access Rights from the drop-down choices.
This will display the list of all Access Rights for menus, forms and fields in Collect!.
Items in the list are displayed with the name of the form first, followed by names of fields
and buttons. For instance, client is the Client form. All the fields on
the Client form start with "client:" followed by the field name without spaces.
(For example, client:client#, and client:name)
- Select the item in the list that you want to change access rights for. This will display the
Access Rights form for the item. Examine the field labeled Namewhen the
Access Rights form is displayed to ensure that you are editing the correct item.
- Make any required changes on the Access Rights form. Open the Form Rights sub-form to make
changes for a particular user level.
- Press OK or F8 to save your changes and return to the Access Rights list.
- If you wish, you may select another item to change.
- Sign out of Collect! and sign in as you would normally.
You must sign out of Collect! completely, returning to the Desktop, whenever you change to
a different User Level, or some of the rights from the previous level that you were signed
in as may still be in effect.
Form Rights
- Sign into Collect! with User Level 99.
- Open the Access Rights form for the item you wish to edit. Examine the field labeled
Namewhen the Access Rights form is displayed to ensure that you are editing
the correct item.
- Open the Form Rights sub-form for the item, or press F3 or the new button to create new
Form Rights.
- Select the down arrow next to the field labeled Rights and choose an access
rights level.
These settings have different effects depending on whether you are setting rights for a menu
item, a form, or a field. Please refer to Help topic User Level for details.
- Press the down arrow next to the field labeled Level and select the User Level
you wish to apply this access level to. You can also choose an Alias, or Field Label that will
only apply to this User Level.
- You can also choose or create a Pick List that will only apply to this User Level.
- Press OK or F8 to save your changes.
- Press the NEW button if you want to modify another User Level.
- When you are finished, press OK or F8 to save your changes.
- Sign out of Collect! and sign in as you would normally.
You must sign out of Collect! completely, returning to the Desktop, whenever you change to
a different User Level, or some of the rights from the previous level that you were signed
in as may still be in effect.
Operator Level Rights
- Sign into Collect! with User Level 99.
- Select System from the top menu bar and then select User Levels from the drop-down choices.
This will display the list of all user levels.
- Select the User Level that you want to change. This will open the User Level form for the
Operator Level you wish to edit. Examine the fields labeled Code and
Description when the User Level form is displayed to ensure that you are
editing the correct level.
- Open the Operator Level Rights sub-form for the item you wish to edit, or F3 or the new
button to create a new item.
- Make sure the field labeled Item displays the correct item. Or, if this is
a new entry, press the down arrow next to the field and select the item you wish to apply
this access level to.
- Select the down arrow next to the field labeled Permissible user functions
and choose an access rights level.
These settings have different effects depending on whether you are setting rights for a
menu item, a form or a field. Please refer to Help topic User Level for details.
- Press the down arrow next to the field labeled Item and select the item you
wish to apply this access level to. You can also choose an Alias, or Field Label that will
only apply to this User Level.
- Press OK or F8 to save your changes.
- Select another item from the Operator Level Rights list if you wish to continue making
modifications, or press F3 for a new form.
- When you are finished, press OK or F8 to save your changes.
- Sign out of Collect! and sign in as you would normally.
You must sign out of Collect! completely, returning to the Desktop, whenever you change to
a different User Level, or some of the rights from the previous level that you were signed
in as may still be in effect.
Troubleshooting
If you modify your user rights, you may encounter cases where you thought rights were assigned, but
the users still cannot access a particular field in a form.
Each form has its own access rights. Normally, if you allow a user to edit a form, they can edit all
fields in the form. But what about fields which refer to a form to which the user has no rights?
For example, imagine you create a group of users allowed to edit the Debtor form, but not allowed to
access the Client form. When they type the Debtor name, Collect! will not complain. However, when
they go to pick a client for the debtor, Collect! will display a message indicating the user doesn't
have rights to access the form. This is because they are trying to access the Client form which they
have no right to access.
To allow the user to pick the client, give the user Read Only rights to the Client form. The user
will then be able to choose a client for the debtor, but is still prohibited from modifying the
client information.
Configuration Files
When you change access rights for particular operators, Collect! may create a separate configuration
file for the operator. Subsequent modifications may not seem to apply. Try deleting the Configuration
file and then create your settings again. The Configuration file can be found in the Collect\config
folder. You will find a folder for each operator who has their own configurations set. If an operator
has no config file, then the global configurations are read for that operator.
You must sign out of Collect! completely, returning to the Desktop, whenever you change to
a different User Level, or some of the rights from the previous level that you were signed
in as may still be in effect.
No Access Rights
When a user tries to perform function that they do not have access rights to, Collect! will display
a message indicating the Access Rights number that you can change to grant access to the particular
function.
Access Rights Prompt
The Name and Number displayed in this message helps you locate the particular form in the Access
Rights list.
Access Rights Item in List
Access Rights Form Name
| 
Was this page helpful? Do you have any comments on this document? Can we make it better? If so how may we improve this page.
Please click this link to send us your comments: helpinfo@collect.org