How To Setup Credit Bureau Reporting
Once you have set up your account with the Credit Bureau(s) of your choice, you should have the
information needed to set up credit reporting in Collect!.
This Help topic describes how to setup the credit reporting features and how Collect!'s credit
reporting functions work. This requires familiarity with setting up Company Details and Debtors in
Collect!, as well as experience using Collect! in your day to day business operations.
When you set up your credit bureau reporting correctly, Collect! takes care of all the details by
automatically scheduling a Metro contact for each debtor that you want to report. After you report,
Collect! forwards this contact for the next reporting period. Collect! tracks changes in the debtor's
profile for credit bureau purposes and reports the correct codes to the bureau.
 The Credit Bureau Reporting module is optional and must be purchased prior to use for
reporting credit.
The Credit Bureau Reporting module is optional and must be purchased prior to use for
reporting credit.
You can easily send credit reports to the major credit bureaus using the standard Metro2
(426 character format) file format.
 WARNING: Reporting credit is a legal matter. You are responsible for ensuring that the information
you are sending is accurate and complete. Do not report credit without being ABSOLUTELY SURE
about your legal rights and the legal rights of the person or entity you are reporting.
WARNING: Reporting credit is a legal matter. You are responsible for ensuring that the information
you are sending is accurate and complete. Do not report credit without being ABSOLUTELY SURE
about your legal rights and the legal rights of the person or entity you are reporting.
We will go through several steps in this topic:
Setting Company Details
Your Company Details need to be entered. Some of this information is output to the credit bureau
file. Also, in the DETAIL tab for the Company Details form there is one setting you need to use
ONLY IF you are a Credit Grantor.
Click Here to View this Form.
Click Here to Close this Form.
The Company Details form stores name and address information
about your company. This can be printed on reports and letters
and is used in credit bureau reporting. Some Client Settings
values are set up automatically for you based on information you
enter in the additional fields on this form.
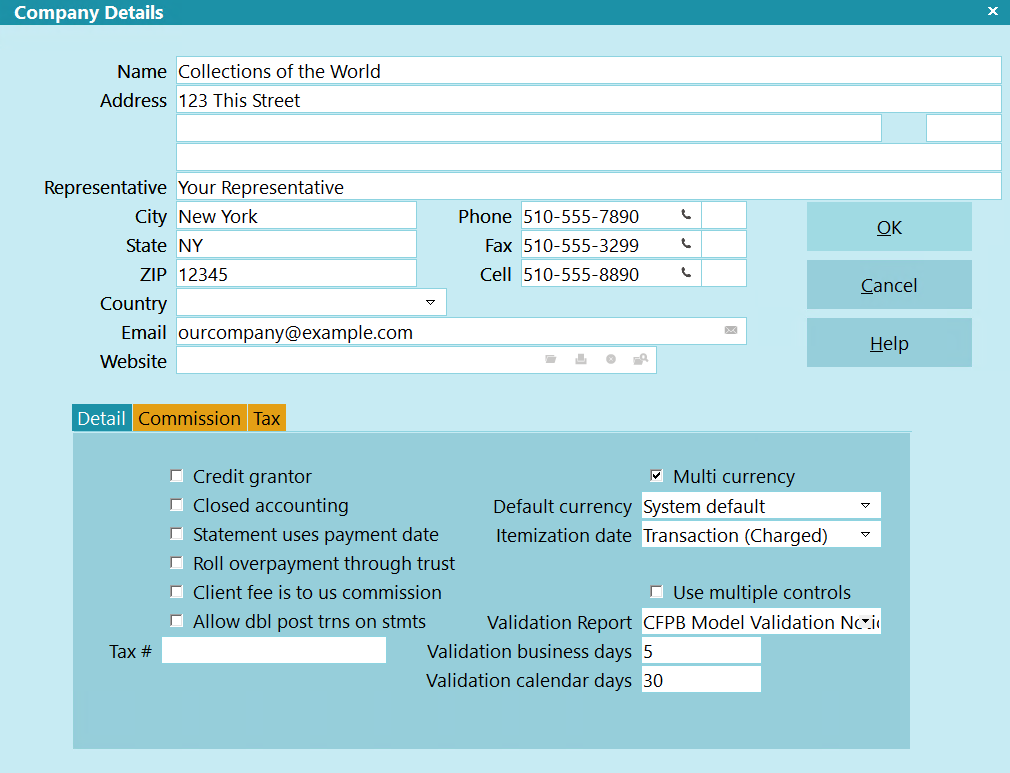
Company Details
The Company Details form is a very convenient way to store and
access your company information. Any field of the Company Details
form can be pulled into a report or letter from anywhere in the
system because all the Company Detail information is loaded into
memory when you sign into Collect! Name, Address and Phone
lines are used for credit bureau reporting. You can run multiple
companies by logging into different databases. Each database
stores its own company details.
Name
Enter the name of your company as you would
like it to appear on reports and letters. If you
are using the credit reporting module,
please enter your company's name as you would
like it to appear in credit bureau Metro2
output file header records.

Address
Enter your Street Address. There are three
address lines on this screen. The
information you enter in these lines
can be pulled into reports and letters.
The information in these three lines is
also included in header record of your credit
bureau Metro2 output files.
The format with which you enter your
information is up to each agency. However,
we recommend using Postal Addressing
Standards that are applicable to your
country. These are generally available
by looking up the website of the postal
service for your region.
Example:
Name - Your Company Name Goes Here
Address - Your Company Address
Address 2 - Company Addr2
Address 3 - Company Addr3, or Website Address
Representative - Default Report Name or Leave Blank
City - Your Company City
State - Your 2 Position State/Province Code
Zip - Your Zip/Postal Code
Country - Choose From Pick List or Leave Blank
Email - Any Company Email Address or Leave Blank
Address 2
This address field can hold your second
address line or other information you may
wish to store for later use/output to
reports or letters.
Address 3
This address field can hold your third
address line or other information you may
wish to store for later use/output to
reports letters.
Representative
Optional. Enter the name of your company
representative. This may be the Owner
or President's name. Some of the sample
letters and reports have this field built in
as a placeholder, but these can also be
removed or commented out of the report by
placing two slashes in front of the printable
field code: i.e //@cd.re<
State
Enter your agency's State Code.
ZIP
Enter your agency's ZIP/Postal Code.
Country
Optional. Use the drop-down arrow pick
list to select your Country OR leave blank
if you do not wish to see this field
expressed in reports/letters.
Email
Optional. This field is used to enter your
agency's central email address or the email
address of your main representative.
Website
Optional. This field is used to enter your
agency's website address.
Phone
Enter your main office Phone number.
This Phone number field is pulled into
many of the sample reports and letters.
Decide on a phone format for your company.
Such as, with hyphens or with parenthesis
around area codes or all numerics/no spaces.
You will find establishing a phone format
convention will ease all lookups by phone
in your system. Lookups read the field
exactly as entered.
Some format examples:
123-456-7890
123.456.7890
(123)456-7890
18004567890
1234567890
You can switch ON 'Only numerics in phone
fields' "System\Preferences\Options, Sounds
and Colors\Screen and Messages" so that the
system will disallow non-numeric data in
your phone fields.
If you use the Credit Bureau module, the
Phone number is required and is output
to the header record of the Metro2 formatted
text file when created. The Credit Bureau
module will strip out any non-numeric data
automatically and will use a maximum of 10
digits in compliance with the Metro2 File
Format specifications.
Phone Ext
Optional. This field can be used to enter
an extension for the Phone field, left blank
or re-purposed for user-defined storage of
other data.
Fax
This Fax number field is pulled into
many of the sample reports and letters.
Decide on a phone format for your company.
Such as, with hyphens or with parenthesis
around area codes or all numerics/no spaces.
You will find establishing a phone format
convention will ease all look ups by phone
in your system. Look ups read the field
exactly as entered.
Some format examples:
123-456-7890
123.456.7890
(123)456-7890
18004567890
1234567890
You can switch ON 'Only numerics in phone
fields' "System\Preferences\Options, Sounds
and Colors\Screen and Messages" so that the
system will disallow non-numeric data in
your phone fields.
Fax Ext
Optional. This field can be used to enter
an extension for the Fax field, left blank
or re-purposed for user-defined storage of
other data.
Cell
Optional. The Cell number is another phone
number for your company. It is not included
in default shipping sample reports/letters.
Decide on a phone format for your company.
Such as, with hyphens or with parenthesis
around area codes or all numerics/no spaces.
You will find establishing a phone format
convention will ease all look ups by phone
in your system. Look ups read the field
exactly as entered.
Some format examples:
123-456-7890
123.456.7890
(123)456-7890
18004567890
1234567890
You can switch ON 'Only numerics in phone
fields' "System\Preferences\Options, Sounds
and Colors\Screen and Messages" so that the
system will disallow non-numeric data in
your phone fields.
Cell Ext
Optional. This field can be used to enter
an extension for the Fax field, left blank
or re-purposed for user-defined storage of
other data.
Detail
Press F1 for help with Detail Tab system switch
settings and fields which will define key
software behaviors by setting your cursor into
any of the displayed items for selection.
Commission
If all your clients use the same Commission
Rates, you may set a global system default that
will be applied to all clients in the Commission
Tab. Press F1 for detailed help from any field
in this tab.
Tax
If all your clients are subject to the same
rate of Tax on your collection services, you
may set a global system default that will
be applied to all clients in the Tax Tab.
Press F1 for detailed help from any field
in this tab.
Tax Rate
Enter the tax rate, if applicable. This
rate will be entered automatically in the
client settings for every new client that
you enter in your system.
If your agency services multiple regions with
different taxation percentages, do NOT enter
data in this tab on the Company Details.
Instead, fill out the Tax tab on a per client
basis to ensure the correct rate is passed from
the Advanced Client Settings to the debtor
accounts as you enter them.
Tax Rate is a percentage field: i.e. if the
rate is 7%, you would enter 7.0. Tax is
calculated on the commissions that you earn,
not on the total amount you recover.
If you are in a region that has two types of
tax, such as Canada, enter the sum total
percentage tax which you are required to
charge into the Rate 1 field.
The Tax Rate field holds up to 6 digits
(or 5 digits and a period, e.g. 7.4563)
and is referenced in reports by using
the Printable Field Code @cd.tr
The system provides a field to enter a
Taxation # that is alpha numeric, allowing
you input a brief descriptor as well:
(EX:GST# 1050505050505).
Leave the Tax tab blank if you do not
charge tax OR if you have specific rates
that are input into Client Tax Tabs on a
per client basis.
Don't Calculate Tax
Switch this ON if you do not calculate tax.
OK
Click this button to save your changes
and return you to the previous screen.
Cancel
Click this button to ignore any changes
made and return to the previous screen.
Help
Click this button for help on the Company
Details window and links to related topics.
Report AS Credit Grantor
The 'Credit Grantor' field is only switched ON if you are reporting as a Credit Grantor. This setting
affects othercredit reporting settings so only switch it ON if you are a Credit Grantor.
When you set this switch, the Delinquency Date is used to report the Date of Occurrence for all
status codes except 4, 10, 13 and 61 to 68. In those cases, the date the contact was scheduled is
sent as the date of occurrence. When you leave this switch off, the Date of Occurrence is always
taken from the Delinquency date, regardless of status code.
Leave this switch off if you are operating a collection agency.
If you are not sure if you are a credit grantor, discuss this with your CBR representative.
Delinquency Date For Credit Grantor
When you have switched ON 'Report as credit grantor' in the Company Details form, an unmet promise
will show up as delinquent in the debtor's Delnqnt field.
You must also switch ON 'Calculate delinquency date' in the debtor's Financial Detail form.
The 'Calculate delinquency date' check box is visible only when you are in Credit Grantor mode.
If you are a Credit Grantor, a number of things affect the Delinquency Date based on your settings.
The Delinquency Date is normally set to 31 days after the promise date. Thus, if you set a promise
contact on the account and no payment is received, when 31 days have lapsed, the Delinquency Date
will be set to the promise date plus 31 days.
 Promise contacts contain a dollar Amount, and the promise is only satisfied when the full Amount
has been paid. Set the term Payment Amount in the Interest Detail form and Collect! can manage
payments, underpayments and overpayments. Please refer to How To Manage Contacts for details.
Promise contacts contain a dollar Amount, and the promise is only satisfied when the full Amount
has been paid. Set the term Payment Amount in the Interest Detail form and Collect! can manage
payments, underpayments and overpayments. Please refer to How To Manage Contacts for details.
In the Credit Bureau Setup form, you can switch ON 'No posted date mods delinquency'. When this is
switched ON, Collect! uses the Payment Date of the promise transaction as the ' Delinquency Date '
for the account, rather than allowing the default 31 day delay in determining delinquency.
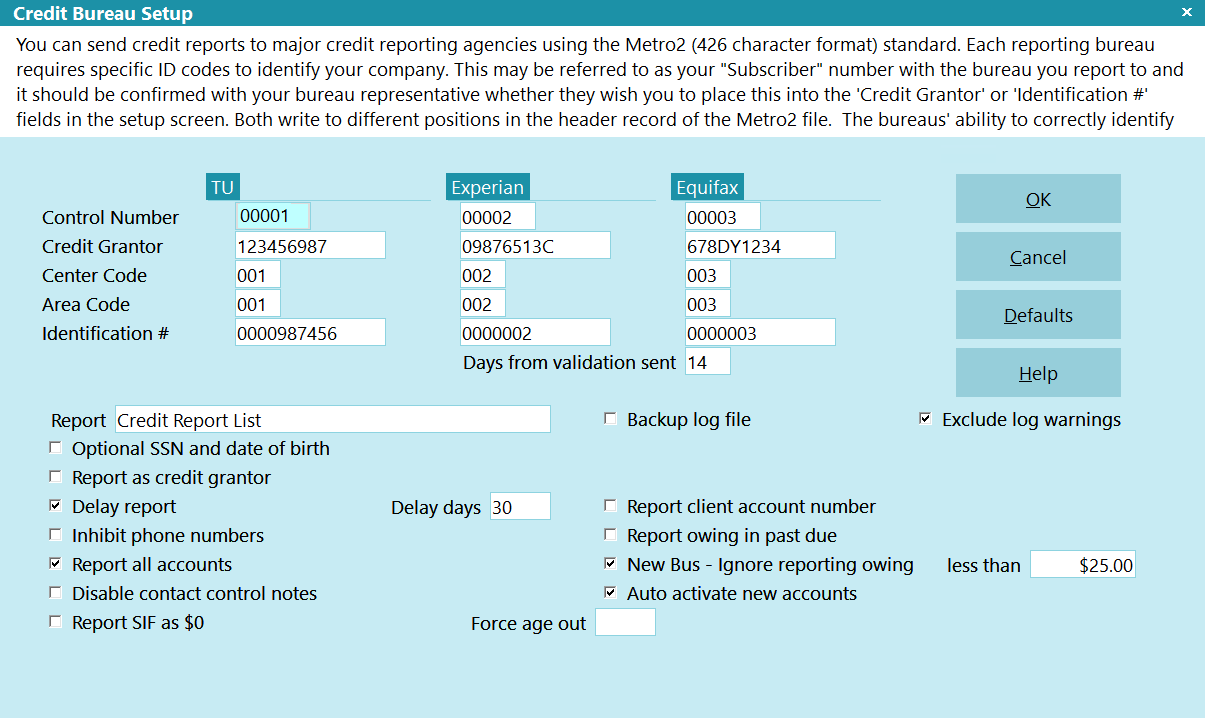
Credit Bureau Setup
The Credit Bureau Setup form holds many global settings for your Credit Bureau information.
When you set up your Account/Contract with the Credit Bureau of you choice, they supply some
information that will help you set up the fields in the Credit Bureau Setup form.
Open the Credit Bureau Setup form form System/Preference/Credit Bureau Setup.
Click Here to View this Form.
Click Here to Close this Form.
You can send credit reports to major credit reporting agencies
using the Metro2 (426 character format) standard. Each reporting
bureau requires specific ID codes to identify your company. This
may be referred to as your "Subscriber" number with the bureau
you report to and it should be confirmed with your bureau
representative whether they wish you to place this into the
'Credit Grantor' or 'Identification #' fields in the setup screen.
Both write to different positions in the header record of the
Metro2 file. The bureaus' ability to correctly identify your
company will determine if your reporting files are accepted or
rejected. Please discuss the requirements with your
credit reporting agency.
Credit Bureau Setup
Once you start reporting to the credit bureaus, the Debtor's file
number must not change while the account is being reported on.
Click here for more
information.
WARNING: Reporting credit is a legal matter. You are responsible
for ensuring that the information you are sending is accurate and
complete. Do not report credit without being ABSOLUTELY SURE
about your legal rights and the legal rights of the person or entity
you are reporting.
Credit Reporting Agencies
Collect! provides for reporting to the three major credit
reporting agencies:
- Trans Union
- Experian
- Equifax
The Metro2 is a standard format. The bureaus above
simply read their identification information from
the header record. If you have another bureau, such
as a country outside North America, and they support
the Metro2 format, you can still use this module to
report to them.
Reporting Credit With Collect!
There are 3 phases in Credit Reporting in Collect!:
- Setups
- Global settings from the \Preferences\Credit Bureau Reporting,
generally done once and not updated again
- Advanced Client Settings, on a per client basis
- Initialization of NEW accounts to report OR
modification of bureau 'condition' or 'status' on per
account and batch of accounts levels for accounts
already reporting
- Creation of the Metro2 text file to send to your bureau(s).
Reporting companies are responsible for deleting accounts
which have exceeding the allowable reporting period. To
this end, we provide a report called the 7 Yr Age Out List,
with instructions for use that should be part of every
reporting company's Phase 3 process on a regular basis.
From the point that you have setup your credit bureau reporting
correctly, Collect! will take care of the accounts
automatically thereafter:
- If you have the Report all accounts switch ON, it will
report the account each time you run a CBR process to
output the Metro2 file, and continue to report until
such time as you officially send a Delete Metro (DA) on
the account, which will terminate further reporting.
- If you have the Report all accounts switch OFF, after
reporting the account the first time, it will only
report again if there has been a change to the account
details or balance. You are required to be compliant
with legislation and regulations in your region.
Effective 09/01/2016, it became required for USA
companies to report all accounts (full file) each time
they furnish a credit reporting file.
- Automatically updates the bureau status to PIF (AS62)
if the balance owing becomes $0.00
If you are a credit reporting company, UNLESS an
adjustment to make the balance owing zero is intended
to reflect a PIF reporting to the bureau, you should
not adjust balances owing to zero prior to closing an
account in Collect!.
Default Values
It is important to fill in all fields for the credit bureau(s) of your choice
in the Credit Bureau Setup form. USE THE DEFAULT VALUES listed
below, if you have not been supplied an actual value from your
credit bureau.
Control Number
The Program Identifier or Control Number contains a
unique identification number assigned to you by the
credit reporting agency.
Unless otherwise specified, fill this field with 00001.
(Alpha-numeric, length 5)
Uc
TRANS UNION PROGRAM IDENTIFIER
This is a unique number assigned to you by the credit
reporting agency.
Unless otherwise specified, fill this field with 00001.
(Alpha-numeric, length 5)
Wco
EXPERIAN PROGRAM IDENTIFIER
This is a unique number assigned to you by the credit
reporting agency.
Unless otherwise specified, fill this field with 00001.
(Alpha-numeric, length 5)
Xco
EQUIFAX PROGRAM IDENTIFIER
This is a unique number assigned to you by the credit
reporting agency.
Unless otherwise specified, fill this field with 00001.
(Alpha-numeric, length 5)
Credit Grantor
This is called the Subscriber Code in Trans Union terminology.
(Alpha numeric, length 10)
This is called the Subscriber Code in Experian terminology.
(Alpha numeric, length 10)
This is called the Membership Number in Equifax terminology.
For Equifax subscribers, enter the 10 character ID code
provided by Equifax here. (Alpha numeric, length 10)
Your unique subscriber codes will be placed at the top of the
file that Collect! creates for you to send to the credit bureau.
If reporting to Equifax and/or Trans Union, place the
Subscriber ID they give you into the Credit Grantor field.
Ug
TRANS UNION CREDIT GRANTOR
This is called the Subscriber Code in Trans Union terminology.
(Alpha numeric, length 10)
Wg
EXPERIAN CREDIT GRANTOR
This is called the Subscriber Code in Experian terminology.
(Alpha numeric, length 10)
Xg
EQUIFAX CREDIT GRANTOR
This is called the Membership Number in Equifax terminology.
For Equifax subscribers, enter the 10 character ID code
provided by Equifax here. (Alpha numeric, length 10)
Center Code
The Computer Center Code uniquely identifies which
data processing center generated the tape.
Unless otherwise specified fill with 001.
(Alpha numeric, length 3)
Uce
TRANS UNION COMPUTER CENTER CODE
The Computer Center Code uniquely identifies which
data processing center generated the tape.
Unless otherwise specified fill with 001.
(Alpha numeric, length 3)
Wce
EXPERIAN COMPUTER CENTER CODE
The Computer Center Code uniquely identifies which
data processing center generated the tape.
Unless otherwise specified fill with 001.
(Alpha numeric, length 3)
Xce
EQUIFAX COMPUTER CENTER CODE
The Computer Center Code uniquely identifies which
data processing center generated the tape.
Unless otherwise specified fill with 001.
(Alpha numeric, length 3)
Area Code
The Area Code is used only if the data processing center
produces files for more than one location. It contains an
identity code, which should be developed by the subscribe
for the location whose data is being reported.
Unless otherwise specified fill with 001.
(Alpha numeric, length 3)
Ua
TRANS UNION AREA CODE
The Area Code is used only if the data processing center
produces files for more than one location. It contains an
identity code, which should be developed by the subscribe
for the location whose data is being reported.
Unless otherwise specified fill with 001.
(Alpha numeric, length 3)
Wa
EXPERIAN AREA CODE
The Area Code is used only if the data processing center
produces files for more than one location. It contains an
identity code, which should be developed by the subscribe
for the location whose data is being reported.
Unless otherwise specified fill with 001.
(Alpha numeric, length 3)
Xa
EQUIFAX AREA CODE
The Area Code is used only if the data processing center
produces files for more than one location. It contains an
identity code, which should be developed by the subscribe
for the location whose data is being reported.
Unless otherwise specified fill with 001.
(Alpha numeric, length 3)
Identification #
The Identification Number is used to uniquely identify a
credit grantor. Report your internal code to identify each
branch, office and/or credit center where information is
verified. This number must be unique and at least five digits
long. Note that the entire field should never be zero, blank
or 9 filled. This field must be consistent on a month to
month basis. Notify your credit bureau representative before
changing this code.
Unless otherwise specified fill with 0000001.
(Alpha numeric, length 7)
UID
TRANS UNION IDENTIFICATION/VENDOR #
The Identification Number is used to uniquely identify a
credit grantor. Press F1 for details.
Unless otherwise specified fill with 0000001.
(Alpha numeric, length 10)
Wid
EXPERIAN IDENTIFICATION/VENDOR #
The Identification Number is used to uniquely identify a
credit grantor. Press F1 for details.
Unless otherwise specified fill with 0000001.
(Alpha numeric, length 10)
Xid
EQUIFAX IDENTIFICATION/VENDOR #
The Identification Number is used to uniquely identify a
credit grantor. Press F1 for details.
Unless otherwise specified fill with 0000001.
(Alpha numeric, length 10)
Days From Validation Sent
This is the number of days after the Model Validation notice
has been sent when a Debtor can be reported to the Credit
Bureau. When the Model Validation is Printed, Emailed, or
Texted, that date plus this value is used to determine when
reporting will start.
If a letter is returned, then unchecking the Debtor's
Address OK box will disable reporting, ONLY IF the Debtor
has not already been reported. Once a Debtor has been reported,
reporting will continue, regardless of address status.
If you have a longer delay specified in the Delay Report
field below or on the Client Settings, then that date will
still take precedence on the delay. For example, if you
have a delay of 14 days for the Model Validation and a
delay of 180 days for Medical debt, then the first report
will be after 180 days.
Report
This is the name of the summary report listing all Debtors
sent to the credit bureaus. The default report lists Debtor
name, principal, owing etc. You can edit the report to suit
your needs.
This is strictly for internal informational purposes and
is not necessary to generate. It is equally simple to
open the actual Metro2 output file in a pure text reader
such as Notepad and view your file contents if you wish
to see how many accounts you are reporting.
TU.001, EFX.001, EXP.001 text files that you remit
to the bureaus should NOT be opened in any word
processing program (including Wordpad) as these will
change the pure text format, making the files
unreadable by the bureaus. Notepad / Notepad++, and
UltraEdit are 2 common pure text editors that are fine
for the purpose of opening/viewing credit reporting
files before you deliver them to the bureaus.
Optional SSN And Date Of Birth
Switch ON 'Optional SSN and Date of Birth' to prevent
Collect! from checking the debtor for a valid SSN
or DOB when reporting to the bureau. When checked,
Collect! will NOT stop accounts that are missing an
SSN and also missing a DOB from being reported.
WARNING: As of 2017, US Credit Bureaus require
that any accounts being submitted must
have either an SSN or DOB. If you are
in the US, do not enable this option.
This option is for non-US customers
where the SSN and DOB are not a
requirement.
Report AS Credit Grantor
This switch is connected to a field in the Company Details
window, labeled Credit grantor. Checking this switch
ON (or OFF) in either window will perform the same step
in both locations (checking or unchecking the box).
Whether this switch is ON/OFF in both places has an
effect on where information is sourced from on the Debtor
accounts when fields are being written into the Metro2
text file.
Only companies who are 1st party credit grantors should
check this switch. Collection Agencies and Attorney
Offices should not check this box ON from either
Company Details or Credit Bureau Setup screens.
When this switch is turned ON, the Delinquency Date
is used to report the Date of Occurrence for all bureau
status codes except 4, 10, 13 and 61 to 68. In those
cases, the date the Contact was scheduled is sent as the
date of Occurrence. See your Metro2 handbooks from your
credit bureaus for more information regarding bureau
status codes.
When the this switch OFF, the Date of Occurrence is
always taken from the Delinquency Date.
Report By Industry
The default setting is Collection Agency/Attorney. 1st
party credit grantors are the only companies that should
modify this setting, and in so doing, choose the Industry
type available that most closely reflects the nature of
their business. The pick list may NOT be modified with
any custom insertions as these values are hard-coded
'as is' by the Metro2 layout acceptable to the bureaus
Enter the Industry Code you wish to include in this
report. Only Debtors with this setting in the
Credit Report Details Reporting Industry field will be
processed for reporting.
This enables you to keep all your Collections accounts
together in one report and all your Mortgage Loan accounts
in a different report, for instance.
Please refer to How To Setup Credit Bureau Reporting
for more details.
Valid Industry Codes are:
0 - Check Credit
1 - Collection Agency
2 - Credit Card
3 - Credit Union
4 - Debt Counselor
5 - Educational
6 - Family Support
7 - Government Agency
8 - Installment Loan
9 - Loan Finance
A - Mortgage Loan
B - Retail
C - Sales Finance
D - Savings And Loans
E - Service And Professionals
Delay Report
Check this box ON to cause Metro Contact Event
Due Dates to be Delayed by a fixed number of days from
the current date. The field to enter the number of days
to be added to the current date (i.e. 30 days, 45 days)
will appear only when the switch to Delay report has been
checked.
Some of our USA collection agencies often utilize this
feature to encompass the FDCPA validation/dispute
period, only after which they will commence credit
reporting. Other Collect! users find that this feature
allows them to be compliant with specific client
directives, where they are bound by contractual agreement
with the creditor not to report the accounts for 'x'
days from listing.
This switch controls whether an account is eligible to
be reported effective the day it is initialized/turned
ON for reporting,
OR
should be put off for a prescribed number of days from
the date it is turned it ON. This is a global setting
that will apply to ALL accounts initialized UNLESS there
is a different number of Delay Days selected on a per
client basis: the Delay Days in Advanced Client Settings
overrides the global setting.
The Advanced Client Settings override is in place as
well to allow companies to be compliant with upcoming
credit reporting requirements for Medical accounts in
effect as of 09/15/2017.
To cause Metro Contact Event Due Dates to reflect the
current date when you turn ON Debtor accounts for
CBR reporting, do NOT the check Delay report switch.
Delay Days
This field is only displayed when you have checked
Delay report ON and is where you input the number of days
you want to wait before the account is eligible to be
reported.
For example, if today's date is 01/01/2018 and your
Delay days is set to 30, when you turn a debtor ON for
CBR reporting, the Due Date on the Metro Contact event
will be 01/31/2018.
If a client has a separate Delay days set to 60 when
the global setting is 30, then turning a debtor ON for
CBR reporting under that client on 01/01/2018 would
result in that account's Metro Contact having a
Due Date of 03/02/2018.
Inhibit Phone Numbers
Switch ON 'Inhibit phone numbers' to prevent Collect!
from sending phone numbers to the credit bureau.
The output file will contain all zeroes in the phone
number position. This ensures debtor privacy if
you have unlisted phone numbers in your database.
This is a global setting, it cannot be set on an
individual account basis.
Report All Accounts
When this is switched ON with a check mark, Collect! will
report all debtors in your database that have been setup
for credit bureau reporting. With this box unchecks,
Collect! will only report accounts that have been changed.
This box is on by default to comply with the
2016 USA reporting requirements change requiring
all accounts to be included in a credit report.
Disable Contact Control Notes
Switch this ON to disable the note lines that are
written for accounts that are skipped when exporting
due to the account failing to qualify for reporting
due to a Contact Control rule.
The account will still appear in the CBR Log
so you can review before submitting to the bureaus.
Accounts that are skipped are usually due to the
Model Validation notice not being sent out.
If you have not defined a Model Validation notice,
then your accounts will be reported normally.
Backup Log File
When this is switched ON with a check mark, Collect! will
make a copy of the cbrlog.txt into the cbr\backup folder
after the CBR process is complete. The name of the file
will be formatted as yyyymmdd_cbrlog.txt.
When this switch is ON, you will not be prompted
to clear the log file after reviewing it.
Report Charged Date
This switch is intended for credit grantors ONLY who have
also turned ON the Credit grantor switch in
Company Details / Credit Bureau Reporting Setups.
Check this ON to report the account's Charged Date as the
debtor's Date Opened, instead of the Listed Date.
Even if checked ON, this switch will not function if the
company is a 3rd party collection agency / attorney's
office, which is not identified in setups as being a
credit grantor.
If you do not enter a Delinquency Date, Collect!
automatically uses the Charged Date for
credit bureau reporting. Also Collect!
automatically reports the Charged Date when
you are reporting NSF checks. You do not
need to switch on 'Report Charged Date'.
No Posted Date Mods Delinquency
When this is switched ON, Collect! uses the Payment Date
of the promise transaction as the Delinquency Date rather
than allowing the default 30 day delay in determining
delinquency.
This is used only in Credit Grantor mode.
Report Client Account Number
By default, Collect! uses the Debtor File Number as the
ID for credit bureau reporting. It is recommended that
you leave Report Client Account Number switched OFF
and let Collect! report using the Debtor File Number,
unless you are sure you need to do otherwise.
It is necessary to make a global decision for the company:
will you report accounts by your Client's Account Number
(Acct on the Debtor screen) or by your Office's
File Number on the Debtor screen. Once this decision is
made and you begin reporting, you cannot change this
setting again.
Check Report client account number ON if you will use
the client's account number,
OR
do NOT check this switch if you will report by the
debtors' file numbers as assigned by Collect! when
entered into your system. Reporting by File number is
the more popular selection as some creditors do not
provide an account number and the bureaus reject debts
reported without a reference number associated with
the debt.
WARNING: Reporting accounts by one setting, i.e.
client's account number followed by a change
(perhaps accidental) to report with your company's
file number will result in the same account
appearing twice on a debtor's credit report as though
they were different accounts completely; the bureaus
cannot differentiate when the debt is reported with
different 'account numbers' insofar as Metro2 layout
is concerned. This creates a serious situation between
your company and the bureaus that requires drastic
steps to resolve.
To avoid the possibility of the above occurrence, this
switch will become Read Only for all User Levels after
you have run your first report. Even where the switch is
being left unchecked in the OFF position, meaning you are
reporting by File number, it will still make the field
Read Only so a user doesn't inadvertently turn it ON at
some future point in time.
Report Owing In Past Due
Switch this ON with a check mark to report the Debtor's Owing
in the Past Due position of the CBR file. Normally, this field is
zero filled if you are not a credit grantor, but you can use
this switch to fill it with the Owing.
New Bus - Ignore Reporting Owing
If this field is checked, then debtors being reported for the
first time will not be enabled if their owing is less than the
value in the LESS THAN field.
Less Than
This field is used by the NEW BUS - IGNORE REPORTING OWING
field above. If the above field is checked, then debtors being
reported for the first time will not be enabled if their owing
is less than the value in this field.
Auto Activate New Accounts
Switch this ON with a check mark to automatically enable an
account for reporting to the credit bureaus. This feature
works on manually created accounts and imported accounts.
This feature only works if the Client is setup to report
to the bureaus in the Client Settings.
Exclude Log Warnings
Switch this ON with a check mark to exclude any Info and
Warning messages from the CBR log where the accounts were
still sent.
Force Age Out
If populated, the System will automatically stop reporting accounts
to the credit bureau after the specified time.
Enter a value, in YEARS, into this field.
The date that the system uses to calculate the period is the same
date that is put into the Base Segment in Position 25.
For non-Credit Grantors, it will be the Delinquency Date. If that is
not populated, then it will be the Charged Date.
For Credit Grantors, it will always be the Delinquency Date.
Help
Press this button for help on the Credit Bureau Setup
form and links to related topics.
Defaults
When reporting a Debtor to the Credit Bureaus, there are
certain settings that need to be reported to the bureaus.
Select this button to display the Credit Report Preferences
form where you can choose default credit reporting settings.
When you flag a Debtor to be reported to the Credit Bureau,
these default settings will automatically apply to the Debtor.
You can override these defaults on an individual Debtor level
through the Credit Report Details dialog. To access this
dialog, select the CBR tab on the Debtor form.
Cancel
Selecting this button will ignore any changes you have
made and return you to the previous form.
OK
Selecting this button will save any changes you may have
made and return you to the previous form.
Now that you are looking at the Credit Bureau Setup form, let's discuss the fields. You will notice
that there are 3 rows of fields called TU (Trans Union), Experian and Equifax.
These are the names of the Credit Bureaus. Here you will input your member information from the
Credit Bureau.
You can report to one or several bureaus. If you are reporting to Trans Union, you will fill in the
fields under TU. If you are reporting to Experian, you will fill in the fields under Experian. If
you are reporting to Equifax, you will fill in the fields under Equifax. Please refer to the
Credit Bureau Setup form in this link for more
details on each of the fields.
Before going on, make sure you know which Credit Bureau or Credit Bureaus you will be reporting
to and that you have the information the Credit Bureau supplied to you in front of you to
help you fill in the fields.
Default Values For CBR Settings
Your unique subscriber codes will be placed at the top of the file that Collect! creates for you to
send to the credit bureau.
- If reporting to Equifax and/or Trans Union, place the Subscriber ID they give you into
the "Credit Grantor" field.
- If reporting to Experian, place the D-Number into the "Control Number" field.
- Other fields are filled with defaults as shown in the screen shot.
It is important to fill in all fields for the credit bureau(s) of your choice in the Credit Bureau Setup
form. Only a few fields hold actual values as indicated below. The rest of the fields should be
filled with a default value, such as zeroes and one, as shown.
Credit Bureau Setup Settings
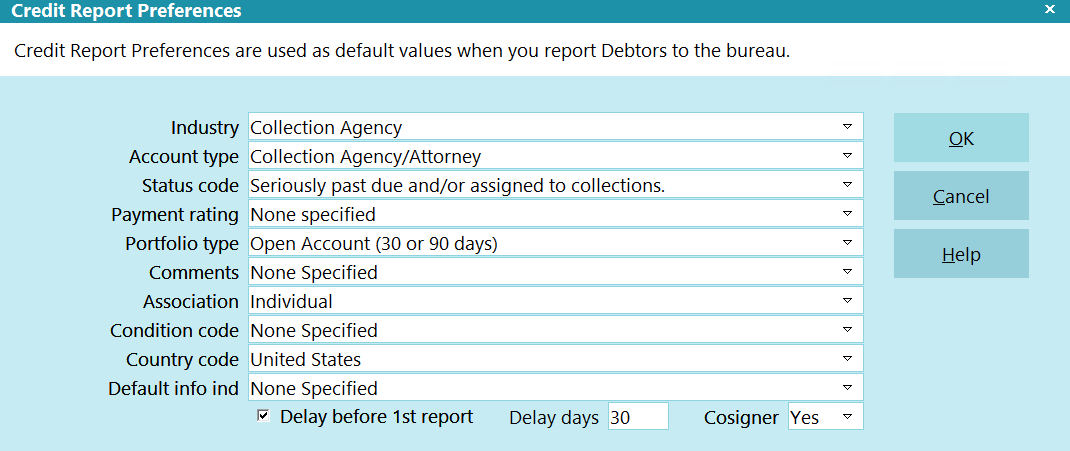
Credit Report Preferences
Credit Report Preferences
Select the DEFAULTS button on the Credit Bureau Setup form to view the Credit Report Preferences.
These default settings are used for every account you switch ON for reporting. They can be changed
globally or on a per debtor basis.
Click Here to View this Form.
Click Here to Close this Form.
Credit Report Preferences are used as default values when
you report Debtors to the bureau.
These default settings are used for every account you switch
ON for reporting. They can be changed globally or on a per
debtor basis. When you select an item from the pick list,
the corresponding code will be set in the Debtor's
Credit Report Details.
Credit Report Preferences
The pick lists on the fields are interdependent. You will notice
that the available choices change depending on what you
have selected for other fields.
Default values from the Metro2 Standard are
provided for normal collection and credit management
reporting. Please refer to your Metro2 Manual for help
selecting from the pick lists. If you are not sure which default
values you should use, please discuss with your credit
bureau representative.
WARNING: Reporting credit is a legal matter. You are
responsible for ensuring that the information you are sending
is accurate and complete. Do not report credit without being
ABSOLUTELY SURE about your legal rights and the legal
rights of the person or entity you are reporting.
The Credit Report Preferences form is accessed by
selecting the DEFAULTS button on the Credit Bureau Setup
form.
Industry
This field contains the industry type that classifies the reporting
agency. Common examples of Industry are "Collection Agency"
and "Mortgage Loan."
Valid Industry Codes are:
0 - Check Credit
1 - Collection Agency
2 - Credit Card
3 - Credit Union
4 - Debt Counselor
5 - Educational
6 - Family Support
7 - Government Agency
8 - Installment Loan
9 - Loan Finance
A - Mortgage Loan
B - Retail
C - Sales Finance
D - Savings And Loans
E - Service And Professionals
This is the field that holds the value Collect! uses
if you want to "Report by Industry" as described
in Credit Bureau Setup.
Account Type
This field contains the account type code that identifies the
account classification. You will notice that the choices
depend on what you have selected as the "Industry" in
the previous field.
Status Code
This field contains the status code that properly identifies
the current condition of the account. Available Status Codes
change depending on the "Account Type." For instance,
a "Collection Agency/Attorney" reports statuses such
as "Seriously past due" and "Paid in Full." While an
accounts such as "Real Estate Mortgage" reports statuses
like "Current" or "150 days past due."
Collection Agencies will predominantly be reporting in
bulk as "Seriously past due and/or in collections"
unless they are specifically running a batch of Deletes,
or adjusting their reporting with a Special Comment
like Dispute (XB in the METRO2 file).
Collect! Debtor status codes and bureau status codes
are not in any way connected or interdependent.
A change in a Collect! debtor Status Code field
has NO CHANGE on a debtor's credit reporting file
scheduled for the next reporting date.
Payment Rating
This field contains settings for specifying whether
or not an account is Current or Past Due. It is only
visible for certain Status Codes that Collect! does
not handle automatically. Please refer to
How to Setup Credit Bureau Reporting for details.
Portfolio Type
This field contains the type of the debt. The pick list offers
choices for common credit and loan types. Examples of
Portfolio Type are "Open Account" and "Line of Credit."
Comments
This field is used in conjunction with the Account Status to
further define the account. Special comment codes, when
found, will however take precedence over the value in
Account Status.
Association
This is used to designate an account in compliance with the
ECOA. This setting can be changed for an individual Debtor
through the Credit Report Details form accessed from the
Debtor form.
Condition Code
This field allows for reporting of a condition that is required
for legal compliance; e.g., according to the
Fair Credit Reporting Act (FCRA).
Country Code
This is the country that the Debtor lives in.
The list of default country codes provided by Collect! shows
only a few of the most used country codes. Please refer to
your Metro2 Manual if you need to use a different code.
Default Info Ind
This field provides for entering a value indicating a
bankruptcy condition that applies to the Debtor
cosigner.
Delay Before 1St Report
Switch this On to Delay before the first Credit Report. Enter
the number of days to delay in the Delay Days field.
This switch is used in conjunction with the
Credit Report Details form accessed from the
Debtor form. When you switch ON "Report to
credit bureau" in the Credit Report Details form,
the "Start reporting" date will be calculated
according the defaults you set here. You can
override these by choosing a new "Start
reporting" date in the Credit Report Details
form for a particular Debtor.
Delay Days
Enter the number of days that you wish to delay before
reporting a new Debtor or an existing Debtor that you
choose to report to credit bureaus. The number you enter
here will be calculated into the "Start reporting" date in the
Credit Report Details form accessed from the Debtor form.
Cosigner
This field is used to determine if the Debtor has a cosigner
to be reported on. ECOA choices and details are filled in on
the Debtor Cosigner form. Select the Cosigners tab in the
Debtor form to access Cosigner information for the Debtor.
Press F1 when the Debtor Cosigner form is displayed. The
Help topic contains valuable information about credit bureau
reporting formats for each field.
Help
Press this button for help on the Credit Report Preferences
form and links to related topics.
Cancel
Selecting this button will ignore any changes you
have made and return you to the previous form.
OK
Selecting this button will save any changes
you may have made and return you to the
previous form.
Default values from the Metro2 Standard are provided for normal collection and credit management.
If you are not sure which default values you should use, please discuss with your credit bureau
representative.
Client Type
The Client Type field is used. In credit reporting terms, this is the Creditor Classification.
Open one of the Clients you wish to report and select the down arrow beside the Type field and pick
a Creditor Classification from the list of choices.
You must choose a valid creditor classification for each Client that you intend to report.
If the choice you need is not in this list, please discuss this with your representative as
these choices come directly from the Credit Reporting Guidelines.
Client Settings
The Client Settings form stores several selections used by Collect! when reporting is switched ON
for a Debtor and when the file is produced.
- Open one of the Clients you wish to report and select the ADVANCED button.
Client Form
- Select ADVANCED and the Client Settings form will now be displayed.
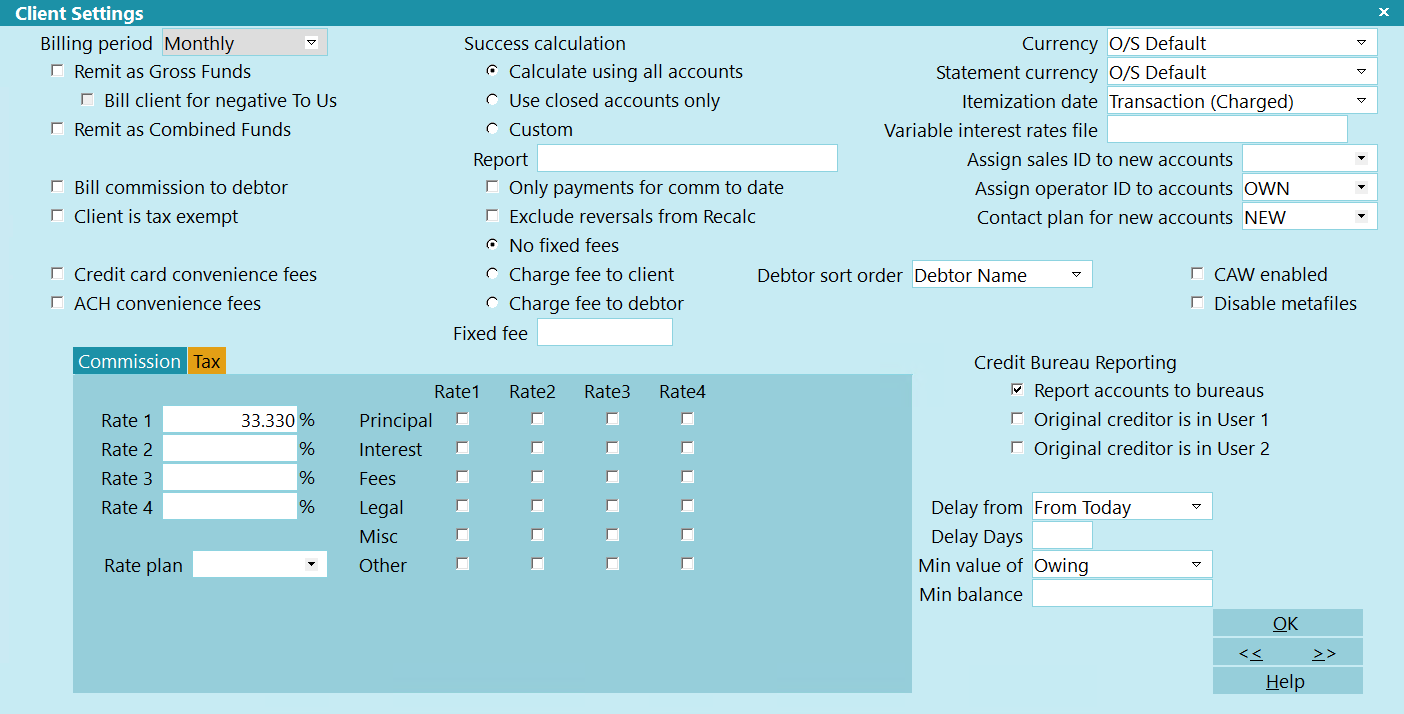
Client Settings Form
You will notice in the Client Settings form, that on the right side, two of the boxes relating to
Credit Bureau reporting are checked.
Report accounts to bureaus When this is checked, Collect! knows that the Client
is set to report credit. When this Switch is off, Collect will warn you that it is not set up to
report credit.
Send client detail to bureaus When this is checked, the client's details will be
sent to the Bureau. This is a requirement for Collection Agency reporting.
WARNING: You must provide a delinquency date for all accounts reported to the Credit Bureau.
The delinquency date appears on the Debtor form and is defined as the date of the first
delinquency that led to the derogatory status being reported.
K1 Segment Original Creditor Client Detail
If you are not a Credit Grantor, You must be sure put a check in the box labeled Send client
detail to bureaus in the Client Settings form to send the K1 segment.
The date an account is charged off or placed for collection is not the delinquency date. The
delinquency date should be the date the account became past due. The date of the delinquency is
necessary to purge accounts from the Credit Bureau database in accordance with the
Fair Credit Reporting Act (FCRA).
Debtor Information
WARNING: Reporting credit is a legal matter. You are responsible for ensuring that the information
you are sending is accurate and complete. Do not report credit without being
ABSOLUTELY SURE about your legal rights and the legal rights of the person or entity you
are reporting.
Many fields on the Debtor form are included in the credit report, so you need to make sure they are
filled in correctly.
When sending reports to credit bureaus, it is the user's responsibility to make sure that the name
and the address fields are in the required format.
The following information is entered in the Debtor form.
Click Here to View this Form.
Click Here to Close this Form.
The Debtor form stores all information that you need to work
and manage your accounts. Personal, financial and in-house
management information is displayed on the form. Tabs enable
you to open sub-forms to access various types of related
information, such as contacts scheduled for the debtor,
financial transactions posted, bank information and other
debtor details, cosigners and attachments. When you select
financial fields on the Debtor form, additional financial details
are displayed in summary screens.
Debtor
Collect! uses the information entered in the Debtor form to:
- Help you manage your collectors' workloads
- Perform financial calculations
- Print a broad array of reports
- Keep track of all activity on each account
Information on the Debtor form can be loaded automatically
for each new Debtor that you create. This speeds up data entry
and minimizes errors. First, the settings and details are entered
into the other areas of Collect!. Then they are readily available
when each new Debtor is entered.
Name
The Name of the debtor entered as 'Last, First / Middle initial'.
Please ensure your spelling is correct. This field is INDEXED.
If you type a comma in the name, Collect! will split first and
last names automatically and put the result into the Contact
field below. For example, JONES, SAM = Sam Jones.
If you do not place a comma between the last and first name,
Collect! will assume the name is a business name.
FOR CBR: Hyphenate multiple last names,
e.g. 'Van-Deusen, Jack'.
FOR CBR: Please put ONE Debtor name ONLY
in this field. If you have a Cosigner,
use the Cosigner form.
FOR CBR: Don't include Generation titles in the
name here. Use the Generation field.
FOR CBR: When reporting Commercial accounts,
Collect! can detect a business name as long
as there is no comma in the Name. If there
are commas in the business name, please
ensure that you switch ON "Business/Commercial"
in the ECOA designation when setting up this
account for reporting.
Legal Entity
Press F2 or select the arrow to pick the Legal Entity
title of the Debtor. For example, Jr, Sr, II, III, Ltd. or Inc.
This field is optional.
FOR CBR: If there is a Legal Entity title for this
Debtor, it MUST go here, NOT in the
Name field.
File
The File Number of this account is automatically created
by Collect!. It looks at the highest numbered debtor and
adds 1 for numbering a new debtor. File Number is a
UNIQUE identifier for each account, up to 9 digits in
length. You must not have duplicate File Numbers in
your database.
Collect! uses this File Number for several functions, such
as storing Attachment and Data records attached to the
account. It is also sent as the UNIQUE identifier when
processing accounts for credit bureaus, letter service
and 3rd party data exchanges.
This field is INDEXED.
FOR CBR: The File Number must not change
while the account is being reported.
Collect! does allow you to modify the File
Number, if needed. Remember that you can
use up to 9 digits here. Each account must
have a UNIQUE File Number.
Contact
This is the name of the Contact person at the address
or phone number. This field is INDEXED. Unless you enter
a different name manually, Collect! uses the information in
the Debtor Name field to construct the Contact name.
Generation
Press F2 or select the arrow to pick the Generation of the
contact person. (Jr, Sr, II, III etc.) This field is optional.
Address
This is the Address of the debtor, if it is known. Two lines are
available. If you enter text into the first line, the Print switch
(Address OK) will be set automatically. This will enable printing
notices to this debtor using contact plans and action codes.
When you change an existing debtor Address line, the old
address line will be written automatically to the debtor's Notes.
*** IMPORTANT *** If you ever intend to report to
Credit Bureaus, you must use one of the
following address formats or an error will result.
FOR CBR: There are two acceptable formats:
Format 1:
Address  = street address, suite or apartment number
Addr1    = blank
City     = city
State    = state
Zip      = zip
Country  = country code
Format 2:
Address  = street address
Addr1    = suite or apartment number
City     = city
State    = state
Zip      = zip
Country  = country code
Street Number
Optionally, you can enter the Street Number here. This
provides a means of searching and/or filtering by street name.
This field is optional.
FOR CBR: Do not use this field if you intend to
report to the credit bureaus.
Addr 1
This is another Address line for the debtor. Use this line to enter
Suite or Apartment number if you intend to report to credit bureaus.
If you have a data file that you want to import that combines
city, state, and zip into one field or string
(Example: Los Angeles CA 90210), you can import it into the
Addr 1 field and the import module will separate the string
into the applicable city, state, and zip fields. In order for
this to work, the city, state, and zip fields can not have any
existing data in the fields.
Street Type
Optionally, you can enter the Street Type here. This field
is a numeric field.
You can add a pick list to this field for your own
needs.
FOR CBR: The information in this field is not sent to
credit bureaus.
Address OK
The Print Notice (Address OK) switch controls whether or not
letters are printed to this debtor. If the box contains a check mark,
letters will be printed. If it is blank, letters will NOT be printed for
the debtor. Only set this switch to print (by clicking into the box
to create a check mark), if you have a valid address to send notices
and letters to. Collect! checks the first line of the address. If it
finds an address, it will turn this switch ON automatically by
entering a check mark in it.
FOR CBR: Entering the correct address status
is important if you are reporting to CBR.
If this box is blank or you remove the check mark
from the box by clicking into it, the address fields
in the Debtor form change color. This is to alert the
operator that there is no valid address for this
debtor. This is the first step in skip tracing.
You can fine-tune Address OK functionality for
printing your daily letter batch. Please refer to
Help topic, Required Address Fields for
additional options for validation addresses.
City
Enter the City Name here.
This field is INDEXED.
FOR CBR: truncate the rightmost positions
in this field to 20 characters. Alternatively,
you can use the standard 13-character
U.S. Postal Service city abbreviations.
State
Enter the State Name or Code here.
This field is INDEXED.
FOR CBR: You must enter State Codes in this
field. Refer to your CBR manual for
correct State Codes.
ZIP
Enter the Zip or Postal Code here.
This field is INDEXED.
FOR CBR: The zip or postal code must be entered
and it must be correct. The zip code may
be either 5 or 9 digits for U.S. zip codes,
or 6 digits for Canadian postal codes.
For example: 12345-6789 or 123456789 for U.S.and
X2Y 3Z4 or X2Y3Z4 for Canada.
Country
Enter the Country where the Debtor lives.
This field is INDEXED.
FOR CBR: The Country Code is read from the
Country Code field in Credit Report Details
for the debtor. Collect! uses standard
two-character country abbreviations
specified in the Metro 2 manual.
If you are not doing Credit Bureau Reporting, this field is optional.
Speech
This field allows you to track the language that the Debtor speaks.
This is a string field.
Timezone
This field holds a POSITIVE or NEGATIVE integer
indicating the Timezone of this Debtor. Timezones
are standard integer values calculated from GMT
(Greenwich Mean Time). You can use the value in
this field to load contacts in the operator's
work queue according to the account's local time.
Please refer to Reload Work In Progress List for
details.
The control file that manages Debtor timezones
is called setzone.ctf and is stored in your
"\Collect\masterdb\control" folder.
When the timezone is not "Local Time," the
title bar displays the Debtor's current
time.
SSN
This is the Social Security Number of the Debtor.
If you are NOT reporting to credit bureaus, you
can use this field for other purposes.
This field is INDEXED.
FOR CBR: Either this field or DOB should be filled in.
Some locations require either DOB or SSN to
be populated. By default, accounts with both
fields blank will not be included in the report.
Please refer to How To Setup Credit Bureau Reporting
for more information. If SSN is not known,
LEAVE BLANK. Although the bureaus do accept
0 or 9 filled positions, filling a placeholder
value could disrupt Account Matching and Find By.
DL
Debtor's Driver's License. You can use this
field for other purposes. This field is INDEXED.
DOB
This is the Debtor's Date of Birth.
This field is INDEXED.
Press F2 or select the small calendar icon. Select a
Date from the calendar that is displayed. Use the arrows
to scroll through years. Or type the date as MM DD YY.
If you are not reporting to credit bureaus, you can use
this field for other purposes. This field is INDEXED.
FOR CBR: Either this field or SSN should be filled in.
Some locations require either DOB or SSN to
be populated. By default, accounts with both
fields blank will not be included in the report.
Please refer to How To Setup Credit Bureau Reporting
for more information. If DOB is not known,
LEAVE BLANK.
Group
The Group button allows you to group this debtor. When the
Debtor is in a group, the Group will display a Group ID
number and a Group Member number. All members in the
group share the same Group ID. The Group ID is INDEXED.
If the debtor is already grouped, the Group button will display
as orange, instead of gray, and will display the debtor's
Group ID and Member number. To view other debtors in the
group, click the forward or backward arrow or press the Group
button to view Matching Accounts, or select the GROUP
tab.
If the debtor is not part of a group, you will be
prompted to choose debtors to form a group.
If the debtor is already part of a group, then
Matching Accounts information displays.
Pressing the "G" key on your keyboard
will prompt you to add this account to
a group.
Group Member
If this debtor is grouped, it will be assigned a
sequential number based on the order in which it
was added to the group.
If your Group Member IDs are no longer
sequential due to removing members from
the group, you can run the Tools, Utilities,
Group Member Renumbering utility to
restore sequential numbering to each group.
Home
This is the Home or Personal Telephone Number of the debtor.
This field is INDEXED.
When you change an existing phone number, the
old number will automatically be written to the debtor's
notes. Select the telephone icon to initiate the
Phone Dialer to dial this number.
If your system is not setup for using
the Phone Dialer, you will not be able to
use this feature.
You can switch ON 'Only numerics in phone fields'
in Screens and Messages to remove any non-numeric
data from your phone fields.
Home Extension
This field is used to enter an Extension to the phone
number if needed. It might also be used to enter an
ID number.
POE#
This is the Work or Business Telephone Number of the debtor.
This field is INDEXED.
When you change an existing phone number, the old
number will automatically be written to the debtor's notes.
Select the telephone icon to initiate the Phone Dialer
to dial this number.
If your system is not setup for using
the Phone Dialer, you will not be able
to use this feature.
You can switch ON 'Only numerics in phone fields'
in Screens and Messages to remove any non-numeric
data from your phone fields.
Work Extension
This field is used to enter an Extension to the phone
number if needed. It might also be used to enter an
ID number.
Cell
This is the Cellular or other number where you can reach the
debtor. This field is INDEXED.
Select the telephone icon to initiate the Phone Dialer to
dial this number.
If your system is not setup for using the
Phone Dialer, you will not be able to use
this feature.
You can switch ON 'Only numerics in phone fields'
in Screens and Messages to remove any non-numeric
data from your phone fields.
Cell Extension
This field may be used to enter an Extension
to the phone number if needed. It might also
be used to enter a Cellular ID number.
Other
Use this field for an additional Phone Number. This field is
INDEXED. Select the telephone icon to initiate the
Phone Dialer to dial this number.
If your system is not setup for using the
Phone Dialer, you will not be able to use
this feature.
You can switch ON 'Only numerics in phone fields'
in Screens and Messages to remove any non-numeric
data from your phone fields.
Other Extension
This field may be used to enter an Extension
to the phone number if needed. It might also
be used to enter an ID number.
Email
This field is used to enter the debtor's Email
Address. This field is INDEXED. Select
the field icon to open the Send Mail form
where you can compose an email and send it
to this debtor.
POE
Place of employment.
User 1
This field is for your own definition and use.
If you are reporting to credit bureaus, this
field may contain Original Creditor information.
Please refer to Client Settings for details.
User 2
This field is for your own definition and use, but it may have
another function if you are reporting to credit bureaus.
If you are reporting to credit bureaus, this
field may contain Original Creditor information.
Please refer to Client Settings for details.
Client
Enter the Name of the Client in this field. You can
pick from your list of clients by pressing the F2 key
when the Client field is highlighted.
Your clients MUST be set up before
you begin to enter debtors.
Only Clients with the INACTIVE switch
OFF will appear in this list.
Acct
This is the Reference Number assigned to this debtor by
the client. This is printed on statements to your clients.
This field is INDEXED.
Client Number
This is the Client Number assigned by Collect!.
When you select a Client for the Client field,
the Client Number displays in this field. Also,
you may select a Client by selecting the pick
list attached to this field.
This field will change automatically if you change
the client's Number in the Client form.
You must set up clients before you
begin to enter Debtor information.
Only Clients with the INACTIVE switch
OFF will appear in this list.
View
Select this button to open the Client form for
this Debtor's client. This enables you to quickly
view the client's information with a single click.
Master
Click the arrow to view clients that you may select from for
this field. This list will only display clients with a
category of MASTER.
WARNING: This field is limited to 4 characters only.
If you are using longer Client Numbers
you may want to use the Client Owner
feature instead to create a Client with
a shorter client Number.
Client ownership is a hierarchical system that
allows you to use the "Owned by client"
in the Client form.
Forward
Click the arrow to view clients to whom you can forward this
account. This list will only display clients with a category
of FORWARD.
Legal
The Legal field gives you a place to put an attorney that
you may want to forward this account to. Click the arrow
to display a list of clients. This list will only display
clients with a category of LEGAL.
You will have to setup your attorney client
first so that it shows up in the list of all clients.
Please refer to the How To Post Attorney Fees section
on the How to Post a Transaction page
for information about setting up an attorney
client.
Charged
This is the date the debt was originally incurred by the debtor.
This date is also used when applying an age-based
commission rate plan to the account. In that case, both Listed
and Charged dates are required to calculate the account age.
FOR CBR: If you do not enter a Delinquency Date, Collect!
automatically uses the Charged Date. For credit
grantors, a switch in the Credit Bureau Setup
form, 'Report charged date', allows the Charged
Date to be used instead of the Debtor's Listed
Date as the 'Date Opened' for CBR reporting
purposes.
Delnqnt
This is the date the account went Delinquent. This is usually
the date the account went 31 days past due.
Enter this date manually if you are a collection agency.
FOR CBR: This is the 'Date of Occurrence'. If you do
not enter a Delinquency Date, Collect!
automatically uses the Charged Date.
FOR CBR: If you are a CREDIT GRANTOR and you
have switched ON 'Report as credit grantor'
in the Company Details form, an unmet
promise or a missed payment will show up
as delinquent in the debtor's Delnqnt field.
You must also switch ON 'Calculate
delinquency date' in the Financial Detail
form. The 'Calculate delinquency date'
check box is in effect only when you are
in Credit Grantor mode.
This date affects a person's credit
rating, so use it carefully.
Delinquency Date For Credit Reporting
If you do not fill in a Delinquency Date, the credit
reporting function will use the Charged date, also known
as the 'Date of Last Service' or 'Service Date' and will
issue warnings to you.
You MUST not manufacture dates for accounts reported
to credit bureaus. This date must be provided by client.
The Delinquency Date is defined as the date of the first
delinquency that led to the derogatory status being reported.
The date of delinquency is necessary to purge accounts
from the bureau databases in accordance with the
Fair Credit Reporting Act (FCRA).
The date an account is charged off or placed for collection,
is NOT the Delinquency Date. The Delinquency Date
should be the date the account became 31 days past due.
Listed
This is the Date the debtor was Listed with your agency.
Listed Date is automatically filled in when you create a
new debtor. This field is used in numerous reports and
is important to accurately keep track of your accounts.
This field is INDEXED.
FOR CBR: When reporting to credit bureaus,
this date is used for 'Date Opened'.
For credit grantors, a switch in the
Credit Bureau Setup form, 'Report charged
date', allows the Charged Date to be used
instead of the Debtor's Listed Date as
the 'Date Opened' for CBR reporting purposes.
Closed
This field shows the Date When the Account was
Closed. It is visible only when an account is closed.
This field is INDEXED.
When you set the Mode to CLOSED, this
field auto-fills with the current date. This
may be modified as needed for your
purposes.
FOR CBR: This date is used for 'Closed Date'.
Time-Bar
If you have configured Statue of Limitations, then this
date will populate with the date based on those settings.
The initial "Start Date" will be based on the Itemization Date
set on the Financial Summary Totals form.
After payments are received, then the last payment Transaction
date is used to calculate the Time-Bar date, unless either the
Exclude Payment Date on the Statute of Limitation record is
checked, or if this is a Judgement account.
For the Last Payment, this field uses the last actual
payment transaction, regardless of what is in the
Last Payment field on the Debtor form. Please refer
to the Use NSF Date option on the Payment Posting Options
form for more information.
# Attempts
If you have configured Contact Controls for Type Phone, then
Collect! will use the settings on that record to display the
Number of Attempts that you have made to the Debtor in the
period specified on the Contact Control record.
#RPC
If you have configured Contact Controls for Type Phone, then
Collect! will use the settings on that record to display the
Number of Right Party Contacts that you have made to the Debtor
in the period specified on the Contact Control record.
Type
This is a free form field. You can define your own types of
debts, or use this field as a sort criteria. This field is INDEXED.
You can attach a pick list to this field (as you can with
most fields in Collect!). Select System from the top menu
bar and then select Layout and Languages, Field Properties
to attach a pick list.
Mode
This is a very important field. The setting you
choose here affects contact management and
financial calculations. This field is INDEXED.
Select the field or select the arrow to choose
one of the following modes.
Active - activates the account.
Closed - closes the account and deletes all
pending Contacts, UNLESS a Contact has
the switch "Do not autodelete" set. However,
Promises and Transactions will be marked
completed when an account is closed,
regardless of the "Do not autodelete" setting.
Precollect - treats the debtor as 'Closed' but
does not delete Contacts.
Suspend - treats the debtor as 'Closed' but
does not delete Contacts.
Mode And WIP List
Only ACTIVE accounts appear in WIP Lists.
CLOSED or SUSPENDED accounts do not show even
if they have contacts scheduled for the day.
Closed Mode And Interest
When you close an account with interest, Collect!
posts a Total Accrued Interest transaction, Type 499,
for all interest that has accrued over the time that you
have been calculating interest on the account. If you
should re-open the account at a future date, this
record can be used to start up interest calculations
again.
Collect! needs Transaction Type 499, with
the correct settings, to perform the
calculations. If you do not have
Transaction Type 499, you can copy it
from your Demonstration database or
request it from Collect! Member Services.
Mode And CBR
Mode does not affect credit bureau reporting. As
long as "Report to credit bureau" is switched ON in
the Debtor's Credit Report Details, Collect! will continue
to report this Debtor, no matter what Mode is selected.
Status
This is the Status of the Account.
This field is INDEXED.
Press F2 or select the arrow to pick from a
list of Debtor Status codes. You can create
your own account status codes.
WARNING: Debtors with a blank status will be excluded
from the financial summary totals on the client
form and from the day sheets.
Score
Use this numeric field to store the
Debtor's credit score. This field holds up to
9 digits. Previous entries are logged
to notes whenever the Score is updated if
you have your 'Log to Notes' Access Right
switch checked. Right click in the Score
field to open the Access Rights window.
This field can be displayed in the Collector's
WIP List for targeted queuing of High to Low
Score accounts.
To insert the field into a WIP display, Right
Click on the column header beside where you
wish to insert the field. You will get a popup
which has options to Insert Fields. Select
this option and use your Up/Down arrow keys to
scroll down to Score until it is highlighted,
then click OK to insert the field.
Fields can be dragged and dropped if you wish
to rearrange the positioning.
The Score column can be sorted ascending or
descending by clicking on the black triangle
at the extreme right side of the field title.
Worked
This is the Date the debtor was Last Worked by an
operator.
The Worked Date is filled in, or updated,
automatically only when an operator is physically
working the account by doing one of the actions
listed below:
- An operator creates or modifies the notes on
the account.
- An operator runs a contact plan on the account.
The Worked Date is not updated by any other
method. You can not edit this field. It is used in
numerous reports and is important to accurately
keep track of your accounts.
When the Worked Date is the current date, this
field turns red to alert the operator that this
account has already been worked today.
Validation
If you have specified a Validation Report on the Company Detail
form or in a Contact Control record, then this field will populate
with the date the Validation Report/Letter was sent (Contact
marked done via print, email, or text), plus the number of
business and calendar days specified on the Company Detail
form or the Contact Control record.
Example, if you specify Letter 1 for the Validation Report,
5 business days, and 30 calendar days, then when Letter 1
is printed, Collect! will take the current date, add 5
days (excluding Saturday, Sunday, and holidays), then add
30 days (including weekends and holidays). A Letter printed
on Monday, January 1 would first add 5 business days to
Monday, January 8. It would then add 30 calendar days
to February 7.
Payment
This is the Date of the Last Payment made by the debtor.
Collect! automatically changes that date whenever a
transaction is posted for the debtor.
FOR CBR: When reporting to credit bureaus, this
date is used as the Date of the Last
Consumer Payment.
If the debtor has made a payment to the agency,
the Payment Date is used instead of the Charged
Date above.
You can inhibit Collect! from automatically altering the
date with a switch in the System menu,
Preferences, Plans and Reference Tables,
Payment Posting Options form.
This is a system field and cannot be re-purposed.
WARNING: You can control the Last Payment Date based on
the posting of reversal payments. Please refer
to the Use NSF Date option on the
Payment Posting Options form for more information.
Next
This is the Next Payment Date field. The debtor's Next field
contains a date when you are applying Amortized interest
to the account. It is the date that the next payment is due.
This field is read only.
Next Payment Date is calculated as follows:
If the debtor is neither delinquent nor overpaid, according to
the amount in the Payment Amount field, then the Next Date
is the date the next scheduled payment is due, based on the
interest settings in the Interest Detail form. For example, if it
is early September, and the account is paid up, then the next
payment date could be September 31 or some such date in
the near future.
If the debtor is delinquent, then the Next Date shows
the last date when the debtor should have made a
payment. For example if it is September, and no payment
has been received for the July 31 payment, then the
next date would show July 31 in RED to indicate
delinquency.
If the debtor has overpaid, then the Next Date rolls forward
into the future to reflect the number of monthly payment
periods that have actually been covered in the overpayment
amount.
The 'Report as credit grantor' switch must be
turned ON in the Credit Bureau Setup form to
activate the Next payment date calculations
for Credit Bureau Reporting.
Promise
When a debtor has made a promise to pay, this field shows
the date that the promise is due. If the date is not displayed,
try pressing the Recalc button.
If there is more than one promise recorded for this debtor,
the date of the earliest unmet promise is displayed here.
Promises can be entered into Collect! by
creating a Promise Contact or by creating a
Transaction with no Posted Date. In either
case, Collect! will automatically display the
earliest due date of the debtor's promises in
this field IF "Automatically manage promises"
is switched ON in the Payment Posting Options
form.
When a promise becomes Past Due, this field is displayed
in red unless the "Report as credit grantor" switch is ON in
the Credit Bureau Setup form. In that case, only, past due
promises are considered delinquent and the date is displayed
in the Delnqnt field on the Debtor form.
You can open the Payment Posting Options
form through the System menu, Preferences,
Plans and Reference Tables.
Date1
This is a date field for your own definition and use.
Date2
This is a date field for your own definition and use.
Summary
This is a single Note Line to Summarize the account status
and add any pertinent vital information.
Last Action
This field is a shortcut to activating a Contact Plan. If you
know the code of the Contact Plan you wish to run on this
debtor, you can type it here or press F2 to pick from a list.
This field is located to the left of the OK button on the
Debtor form.
Typing the code here will not execute the plan
unless you press ENTER to leave the field.
Operator
This is the ID of the Operator assigned to this account.
It is important to fill in this field since many other account
related functions depend on this Operator ID. For instance,
if you are using Account Access Control, this ID may be
used for restricting access to the account. Also, contact
scheduling and timely working of the account often rely
on this ID.
This field is INDEXED.
Press F2 when this field has focus or click
the arrow to pick from a list of available Operators.
Only Operators with the ACCOUNT IS DISABLED switch
OFF will appear in this list.
Sales
This is the ID Code of the Salesperson assigned
to this account. When payments are posted, this ID is
used to determine collector's commission.
This field may also be used to display a Team ID
for commissions or for account access control.
This field is INDEXED.
Press F2 when this field has focus or select the
arrow to pick from a list of available Operators.
Only Operators with the ACCOUNT IS DISABLED switch
OFF will appear in this list.
Rate
This is the current Commission Rate for payments
made by the debtor. If a commission rate is entered
in your Client Settings, the Rate field will be filled
automatically when you choose a client or enter a
new debtor for a client. You can override the setting
by entering a rate that applies only to this debtor.
Information is not entered in this field directly. The
Rate field displays information taken from the
Commission section of the Financial Detail form. Click into
his field or start typing to pop up the form where you can
select the Commission section to enter a enter a new
commission rate, or rate plan, and other commission
details for this account.
Any transactions that you post for this debtor load
the settings from the Financial Detail form.
Principal
This is the amount of the Original Debt, or the sum of
all transactions posted to the Principal account. (This
means Principal is dotted in the transaction 'Account'
column.) Information is not entered in this field directly.
The Principal field displays information taken from
the Financial Detail form. Click into this field, or start
typing, to pop up the Financial Detail form where you
can enter a Principal Amount or view the Principal Paid
To Date and other details for this account. Please press
F1 when the Financial Detail form is displayed for help
about the fields and buttons on this form.
When the debtor has a judgment, the Principal field will
be "overlaid" by the Judgment field which will be shown
in color. In this case, the Owing field will be calculated
based on the Judgment Principal and Judgment Interest,
rather than the Original Principal and Interest.
You can also set the debtor's currency here, if you have
the 'Multi Currency' switched ON in the Company Details
form.
If you are a Credit Grantor, you can choose to
display 30/60/90 fields on the Debtor form by
switching ON 'Show 30/60/90' in the Financial
Detail form.
For revolving compound interest accounts or
Amortized loan accounts, please access
the help available for these topics.
If you start typing the Principal in this field,
Collect! will open the Financial Detail field
with the Original Principal highlighted to
speed up your data entry.
Judgement
When a judgment has been awarded, this field will
display the amount of the judgment. This field "overlays"
the Principal field. To view the amount of the Original
Principal, click in the field to bring up the Financial Detail
form.
All transactions posted prior to the
Judgment Date are ignored.
If a debtor has a judgment, all principal type transactions
that are not 194s are ignored and ALL transactions prior to
the Judgment Date are ignored.
Judgment interest calculation, if enabled, will always be
based on the 194 transaction, if present.
Multiple 194 and 195 transactions are ignored. The active
one is the most recent of each. If a Judgment Date is set,
ALL other Principal type transactions are ignored.
Interest
This field displays the Total Interest for this account. This
is the sum of Original Interest and all Accrued Interest
on this account. Information is not entered in this field directly.
The Interest field displays information taken from the
Financial Detail form. Click into the Principal field to pop
up the Financial Detail form where you can set and view all
interest details for this account.
Click into the Interest field or start typing to display
the Debtor Transaction Summary to view the list of
Interest transactions posted to this account. Press F1
for help when the Debtor Transaction Summary
is displayed.
If you want interest to be calculated for a given debtor, you
must enter an interest rate for the account in the
Financial Detail form. For revolving compound interest
accounts or Amortized loan accounts, please access
help when on these topics.
When the debtor has a Judgment, the Principal field
label changes to " Judgment" and the field is displayed in
color. Also, the Interest field displays only Judgment
Interest. The amount displayed in the Owing field is
calculated based on the Judgment Principal and
Judgment Interest, rather than the Original Principal
and Interest.
Fees
This field is a summary of all Fee transactions belonging
to this debtor. Information is not entered in this field directly.
The Fees field displays information taken from the
Financial Detail form.
To view Total Fees and Fees Paid To Date, click into
the Principal field to display the Financial Detail form.
There you can also Add Commission to the debtor's
Owing, assign fixed fees to both the client and the debtor
and view the Total Commissions earned to date on this
account.
Click into this field or start typing to pop up the
Debtor Transaction Summary form where you can view
a list of all Fee transactions posted to this account.
Legal Fees
This field is a summary of all Legal Fee transactions belonging
to this debtor. Information is not entered in this field directly.
The Legal Fees field displays information taken from the
Financial Detail form.
To view Total Legal Fees and Legal Fees Paid To Date, click
into the Principal field to display the Financial Detail form.
Click into this field or start typing to pop up the
Debtor Transaction Summary form where you can view
a list of all Legal Fee transactions posted to this account.
Miscellaneous
This field is a summary of all Misc transactions belonging
to this debtor. Information is not entered in this field directly.
The Misc field displays information taken from the
Financial Detail form.
To view Misc and Misc Paid To Date, click into the Principal
field to display the Financial Detail form.
Click into this field or start typing to pop up the
Debtor Transaction Summary form where you can view
a list of all Misc transactions posted to this account.
Other Charges
This field is a summary of all Other transactions belonging
to this debtor. Information is not entered in this field directly.
The Other Charges field displays information taken from the
Financial Detail form.
To view Other and Other Paid To Date, click into the Principal
field to display the Financial Detail form.
Click into this field or start typing to pop up the
Debtor Transaction Summary form where you can view
a list of all Other transactions posted to this account.
Adjustments
This field is the sum of all Adjustment transactions
belonging to this debtor. Information is not entered in this
field directly. The Adj field displays information tallied
from Adjustment transactions posted for this account.
Click into this field or start typing to pop up the
Debtor Transaction Summary where you can view
Adjustment transactions already posted to the account.
Paid
This is the Amount Paid by the debtor. This can be a
negative number if there are charges incurred on
the account. Information is not entered in this field
directly. The Paid field displays information tallied
from Payment transactions posted for this account.
Click into this field or start typing to pop up the
Debtor Transaction Summary where you can view
Payment transactions already posted to the account.
30 Days
This is the amount outstanding since the last statement.
This field is visible only if the Show 30/60/90 switch is
ON (checked) in the Financial Detail form. Values only
show in this field if you are applying Amortized Interest
and there is a date in the "Next" field that Collect! can use
for evaluation.
This field is useful if you are a Credit Grantor.
The 'Report as credit grantor' switch must be
turned ON in the Credit Bureau Setup form to
activate the 30/60/90 calculations for
Credit Bureau Reporting.
60 Days
This is the amount outstanding from between 30 and 60 days.
This field is visible only if the Show 30/60/90 switch is
ON (checked) in the Financial Detail form. Values only
show in this field if you are applying Amortized Interest
and there is a date in the "Next" field that Collect! can use
for evaluation.
This field is useful if you are a Credit Grantor.
The 'Report as credit grantor' switch must be
turned ON in the Credit Bureau Setup form to
activate the 30/60/90 calculations for
Credit Bureau Reporting.
90 Days
This field displays amounts owing longer than 60 days.
This field is visible only if the Show 30/60/90 switch is
ON (checked) in the Financial Detail form. Values only
show in this field if you are applying Amortized Interest
and there is a date in the "Next" field that Collect! can use
for evaluation.
This field is useful if you are a Credit Grantor.
The 'Report as credit grantor' switch must be
turned ON in the Credit Bureau Setup form to
activate the 30/60/90 calculations for
Credit Bureau Reporting.
Over 90
This field displays amounts owing longer than 90 days.
This field is visible only if the Show 30/60/90 switch is
ON (checked) in the Financial Detail form. Values only
show in this field if you are applying Amortized Interest
and there is a date in the "Next" field that Collect! can use
for evaluation.
This field is useful if you are a Credit Grantor.
The 'Report as credit grantor' switch must be
turned ON in the Credit Bureau Setup form to
activate the 30/60/90 calculations for
Credit Bureau Reporting.
Owing
This is the total amount Owing, the remaining balance
outstanding on this account. Information is not entered in this
field directly. The Owing field displays an amount tallied
from Original Principal and Interest, plus charges and interest
accrued, minus debtor payments. This is dependent on whether
the debtor has a Judgment. If a Judgment is recorded, then
the Judgment Principal and Judgment Interest are used
instead of the original values.
Click into this field to open the Debtor Financial Summary
This form shows all the charges and payment details for the
debtor's account, including total charges, total payments
and total owing amounts for Principal, Interest and Fees.
Overpayments and adjustments are displayed. For interest
and loan accounts, any amounts needed to bring the account
to current are also shown.
Settle
This field indicates an optional settlement amount for this debtor.
The amount entered here may be used to calculate
the promised payment amount when scheduling
a Promise with a contact plan. Please see Help
topic, Event for more information.
Run Plan
Enter a Contact Plan to run on this account. You can press
F2 to view the list of available plans.
If you are on a grouped account, Collect! will prompt
asking if you want to run the contact plan on just
the account you are on or if you want to run the plan
on all group members.
Sub-Form Tabs
This area of the Debtor form contains tabs to sub-lists of
related Debtor information. The areas that may be
accessed are as follows.
- Notes
- Contacts
- Attachments
- Cosigners
- Transactions
- Detail
- A1
- A2
- A3
- CBR
- Group
- Misc
- Phones
- Emails
- Addresses
Each of these sub-forms allow you to view records
related to this account and add new ones. If the tab is
displayed as ORANGE that means there are records in
that area.
Notes
Select the NOTES tab to view Notes for this account
or add new ones. Notes allow you to type free form
text. Today's date, the current time and the operator ID
are inserted automatically on the first line of text that
you type.
Users with Read Only rights to the Notes Text Editor
will be able to enter new notes but may not delete
existing ones.
Group Members who have the "Cascade Notes" switch enabled
in the "Member Setup" section of the Group tab will also
have their notes copied to all other Members of the Group.
If another user is modifying the notes and you try
to click into the notes, you will get a notification
that the other user is in the notes and you will have
to wait until they are finished.
This option also applies to notes created via Contact Plans.
Contacts
Select the CONTACTS tab to view contacts scheduled
for this account. This links to all contacts made for this
debtor. You may select an existing contact or create
a new one.
Attachments
Select the ATTACHMENTS tab to view Attachments
stored for this account. You may view existing attachments
or create a new one. Check the A1, A2 and A3 tabs to
access attachments that you classified as Type 1, Type 2
and Type 3.
Cosigners
Select the COSIGNERS tab to view the list of all related
parties assigned to this account, such as Attorney, Employer,
Spouse, Bank and others. You may view an existing
Debtor Cosigner or enter a new one.
Transactions
Select the TRANSACTIONS tab to view transactions
posted to this account. You may select an existing
Transaction or create a new one. This links to any
payments, promises or other related transactions
regarding this debtor.
You must set up transaction types
before you can post transactions.
Detail
Select the DETAIL tab to view the Debtor Detail
sub-form where you can enter information about a bank
account, as well as other details.
A1
Select the A1 tab to access attachments that
you classified as Type 1 in the Type field of the
Attachment. If there is a pick list on this field,
it will be the value that has the "1" in the list.
A2
Select the A2 tab to access attachments that
you classified as Type 2 in the Type field of the
Attachment. If there is a pick list on this field,
it will be the value that has the "2" in the list.
A3
Select the A3 tab to access attachments that
you classified as Type 3 in the Type field of the
Attachment. If there is a pick list on this field,
it will be the value that has the "3" in the list.
CBR
Select the CBR tab to view the Credit Report Details
sub-form where you adjust the Credit Reporting settings
for this debtor or switch ON Credit Bureau reporting.
Use this sub-form to specify reporting and cosigner
details and a reporting date.
Your data must be entered in the correct
format if you intend to report to credit
bureaus. Review popup help for each field
that has a FOR CBR: note or press F1
when you are on the Debtor form to display
help for examples of formats for name,
address and other fields used in reporting to
credit bureaus.
Group
Select the GROUP tab to view the list of Group Members
in this account's Group. This will only display if a Group ID
and Member number are displayed in the GROUP button.
Misc
Select the MISC tab to set additional switches for this
account. This is an area where you can set flags as
needed or store additional information on the account.
There are several user-defined Currency, Date, Number,
Time and Switch fields. Please refer to Help topic, Misc,
for more details.
Phones
The Phones tab displays phone numbers listed for this
account. Pertinent information is displayed in the listed
columns. Select an item to view further details, or select
one of the buttons to create a new record or modify an
existing one. Please refer to Help topic, Phone for
more information.
Group Notes
The Group Notes tab displays all notes from all Group Members
who have the "Share Notes" switch checked in the "Member Setup"
section on the group tab. Each note line contains the
respective file number of the account that the note line
belongs to.
OK
Select this button to save any changes you
have made and return you to the previous form.
Pressing the "O" key on your keyboard
will close the Debtor form.
<<
Select this button to take you
to the previous debtor in the database.
>>
Select this button to take you to the next debtor
in the database.
Pymt Form
Press this button to open the Payment Processing Form
to process a Debtor Payment via the Payment Processing Module.
Pymt Accts
Press this button to open the Payment Account Information
list, which displays a list of card and check information
stored on file for this debtor.
Recalc
Press this button to Recalculate and Update any fields
containing financial information relating to this debtor.
Pressing the "R" key on your keyboard
will Recalc this Debtor.
Mode And Recalc
RECALC is not done on CLOSED accounts, but accounts
with other modes are recalculated. The only exception is
when a payment is posted - if the account is closed then
the total is still recalculated.
Basically, if you close an account, its financial figures
are frozen where they are at the time you closed the
account, unless a payment is posted, at which time,
and only then, a Recalc actually alters the Owing.
Print
Select this button to view a list of reports available for
printing that relate to debtors.
You must setup your reports and
letters before you begin to enter
debtor information.
Pressing the "P" key on your keyboard
will display the list of reports that you
can print from the Debtor form.
Run Plan
Select the RUN PLAN button to pick a Contact Plan to run
on this account.
Pressing the "A" key on your keyboard
will display the list of contact plans that you
can run on this account.
If you are on a grouped account, Collect! will prompt
asking if you want to run the contact plan on just
the account you are on or if you want to run the plan
on all group members.
Advanced
Clicking this button opens the Financial Detail form, where
you can enter information relating to debtor's Principal,
Commission Rate, Taxes and Fees, as well as Interest and
Payment Plans.
Pressing the "D" key on your keyboard
will display the Financial Detail form.
Cancel
Select the CANCEL button to discard any changes
made to the Debtor form. You will be prompted to
discard the changes. If you selected SAVE or F8,
those changes will not be discarded. Also, any
Contacts or other records created from the Debtor
form will not be canceled.
Pressing the "C" key on your keyboard
will cancel your changes and close
the Debtor. You will be prompted to save
or discard changes.
Help
Select the HELP button for information on the
Debtor form and links to related topics.
Pressing the "H" key on your keyboard
will display the Help topic, Debtor.
File Number
By default, Collect! sends the Debtor File Number of the account to the credit bureau. Once you start
reporting to the credit bureaus, the Debtor's File Number must not change while the account is being
reported.
You must not have duplicate File Numbers in your database. This is Collect!'s UNIQUE identifier for
each account.
The CBR module allows you to report Client Account Number instead of file number. Please note
that this makes troubleshooting more difficult as you may have multiple accounts numbers
across different clients. In either case of File or Acct, you must make a decision on which
one to use before you start reporting because you cannot change it after your first report
is sent.
Name
The Name of the Debtor entered as 'Last, First Middle Initial'. Please ensure your spelling is
correct. If you do not type a comma in the name, Collect! will assume the name is a business name.
Multiple last names must be hyphenated. e.g. Van-Deusen, Jack.
Only enter one Debtor's Name in this field. If you have a Cosigner, use the Cosigner form.
Generation
Use this field for generation, not the Name field. (Jr., Sr., II, III, etc.)
Address
For accurate reporting of addresses, checkout the handbook called Postal Addressing Standards at
your local US Post Office. Use standard postal abbreviations for type of street.
Do not include the # symbol in the apartment number. The Credit Bureau rejects addresses
with the # sign. If no zip code is found, THE ACCOUNT WILL STILL BE REPORTED, but the missing
Zip will be logged to the CBR log if the Address OK box is checked.
Addr 1
Do not use words like "Suite", "Apt.", etc. or the '#' symbol, just enter the Number of the suite
or apartment.
City
Truncate the rightmost portion of this field to 20 characters, or use the standard 13-character
U.S. Postal Service city abbreviations.
State
Enter the State or Province code in this field. Us the correct Postal Service codes.
For Example: WA for Washington
You can use a Pick List on the State field to control the output.
ZIP Codes
The zip code may be either 5 or 9 digits for U.S. zip codes, or 6 digits for Canadian postal codes.
Country
Enter the standard two-character country abbreviation.
You can use a Pick List on the Country field to control the output.
SSN
If SSN is not known, LEAVE BLANK. Although the bureaus do accept 0 or 9 filled positions, filling
a placeholder value could disrupt Account Matching and Find By.
DOB
If DOB is not known, LEAVE BLANK.
Some locations require either SSN or DOB. By default, Collect! will not include accounts in
reports where both fields are blank.
Delinquency Date
You MUST not manufacture dates for accounts reported to credit bureaus. This date
must be provided by client. The Delinquency Date is defined as the date of the first delinquency
that led to the derogatory status being reported. The date of delinquency is necessary to purge
accounts from the bureau databases in accordance with the Fair Credit Reporting Act (FCRA).
If you do not fill in a Delinquency Date, the credit reporting function will use the Charged date,
also known as the 'Date of Last Service' or 'Service Date.'
The date an account is charged off or placed for collection, is NOT the Delinquency Date.
The Delinquency Date should be the date the account became past due.
Credit Report Details
This form holds all the current settings for an individual who is being reported. This is where you
switch ON Credit Bureau Reporting for an account. Most of the fields fill automatically based on your
other settings. Any field can be changed as needed provided you follow correct reporting practices.
Click Here to View this Form.
Click Here to Close this Form.
The Credit Report Details form is used to set credit
reporting details for a debtor and cosigners.
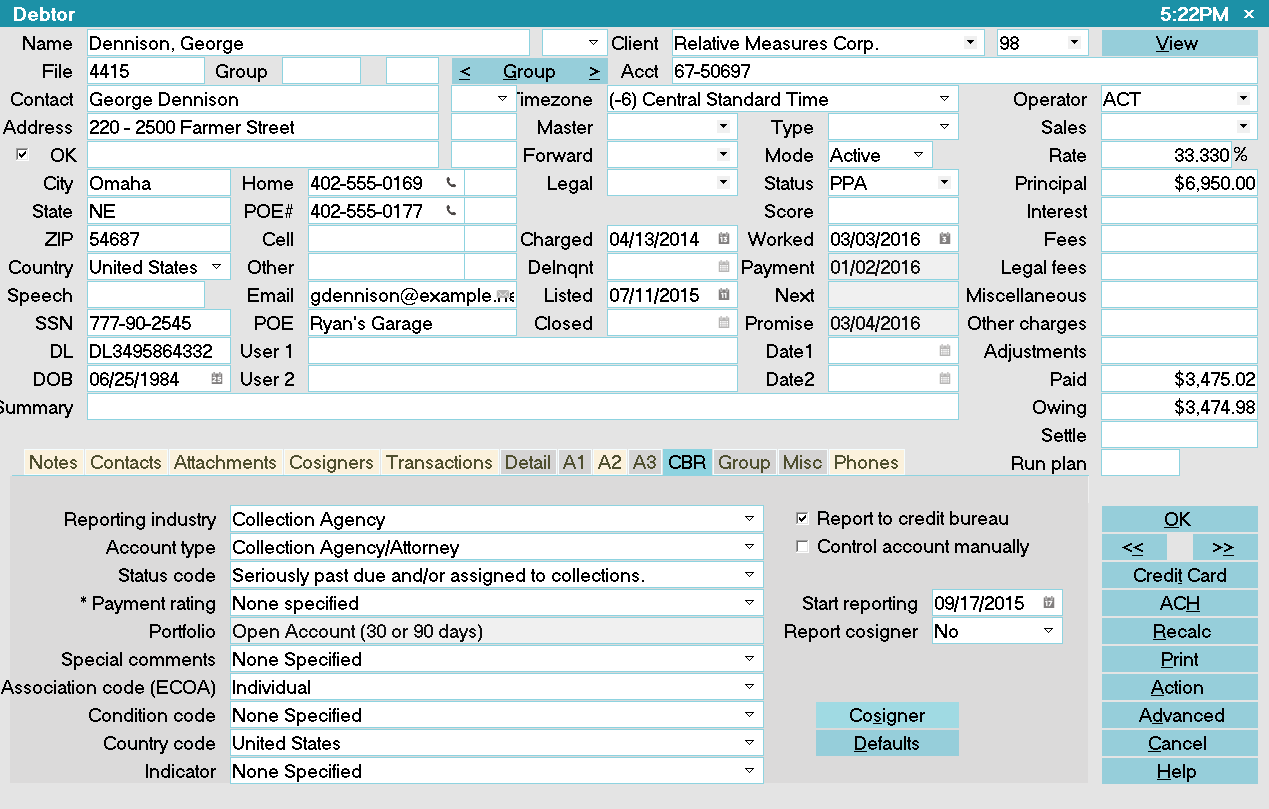
Credit Report Details
Options used as default values when you report Debtor credit
are set in the Credit Report Preferences form. These settings
can be changed here, at the individual Debtor level, if necessary.
In most cases, the defaults should be fine. You may need to
set the Association field on an individual level.
If you are having trouble deciding what values should be set,
contact your local credit bureau representative.
Choices provided are for normal collection and credit
management agencies. You can choose an item from the pick
list to enter its corresponding code in the credit report settings.
WARNING: Reporting credit is a legal matter. You are
responsible for ensuring that the information you are sending is
accurate and complete. Do not report credit without being
ABSOLUTELY SURE about your legal rights and the legal rights
of the person or entity you are reporting.
Reporting Credit With Collect!
When you setup your credit bureau reporting correctly, Collect!
takes care of all the details by automatically scheduling a Metro
contact for each debtor that you want to report. After you report,
Collect! forwards this contact for the next reporting period. Collect!
tracks changes in the debtor's profile for credit bureau purposes
and reports the correct codes to the bureau.
The Credit Report Details form is where you keep track of the
debtor's status for credit reporting purposes. Changes that you
make to the settings on this form will be reflected in your
credit bureau report.
Report To Credit Bureau
When this flag is checked, the Debtor is set to be reported to
the credit bureaus.
Please make sure you have permission from
your client to report this debtor. You may want
to visit the Client Settings to ensure that
credit bureau reporting is enabled.
Control Account Manually
When this is switched ON, Collect! will not change the
credit reporting Account Status when processing Metro
contacts for reporting to credit bureaus. This means
you will have to manually select the required Status from
the pick list when the account's status changes.
By default, the Account Status for reporting,
such as "Seriously past due" or "Paid in full,"
changes depending on the reporting industry
and the state of the account. Ordinarily, you
do not need to control accounts manually.
Collect! puts additional information into the
Payment Rating field where necessary to
retain information, (e.g. 30-60-90 days
overdue for credit grantors).
This is useful for special requirements, such as
changing an ECOA Association Code at a
later date, after the Account is Paid in Full.
Or, setting the Account Status to Paid in Full
when posting Early Payoff or adjustments with
advanced Interest settings.
If you switch this box ON by checking Control Account Manually,
the system will completely skip over this account if you have
not manually invoked an In Progress Metro Contact Event on the
debtor each time you want to report, i.e. Monthly. Unless
there is a specific reason to turn this feature ON inside
individual debtors, it is best left OFF, in the default position.
Start Reporting
By default, this field will show Today's Date unless there is
an In Progress Metro Contact on the account. In that case,
it will display the date of the Metro Contact, instead.
If you are manually initializing an account to report
(as opposed to \Batch Processing\Prepare accounts for CBR),
the date populated will automatically reflect any global or
client specific Delay Days that are to be applied before
allowing the account to report. This is reflected in a
forward-dated Start Reporting date that carries to the
Due Date in the Metro contact that is created when you
check the 'Report to credit bureau' switch ON.
If you want to adjust the date further on a per debtor basis
AND the In Progress Metro has already been created, by
clicking on the Calendar icon at the right of the 'Start reporting'
field or simply keying in MM/DD/YYYY format the date you want
the account to first report, this will also update the
Metro in the Contacts tab.
This date should not be changed if an account has
already been reported and the account is NOT
being controlled manually.
If the 'Delay Report' switch is ON in the
Credit Bureau Setup form, the Delay Days
value will be reflected here. The extra days are
only added to Today's Date if this is the first
time you are setting up credit bureau reporting
on this account. You can select a different date
if you wish.
Reporting Industry
This field contains the industry type that classifies the
reporting agency. The list of default industries provided
by Collect! covers normal collection and credit
management. When you select one of the industries
in the list, other pick lists change to enable you to set
the account type based on the industry.
Please refer to your Metro2 Manual for help
in choosing from the pick list.
Account Type
This field contains the account type code that identifies the
account classification. The list of default account types
provided by Collect! covers normal collection and credit
management. The choices for this field change depending
on the industry selected for the Reporting Industry.
Please refer to your Metro2 Manual for help
in choosing from the pick list.
Status Code
This field contains the status code that properly identifies
the current condition of the account. The list of default status
codes provided by Collect! covers normal collection and
credit management. Please refer to your Metro2 Manual for
help in choosing from the pick list.
Payment Rating
This field contains settings for specifying whether
or not an account is Current or Past Due. It is only
visible for certain Status Codes that Collect! does
not handle automatically. Please refer to
How to Setup Credit Bureau Reporting for details.
Portfolio
This field contains the type of the debt. The pick list offers
choices for common credit and loan types. Please refer to
your Metro2 Manual for help in choosing from the pick list.
Special Comments
This field is used in conjunction with the Account Status
to further define the account. Special comment codes,
when found, will however take precedence over the value
in Account Status.
The list of default choices provided by Collect! covers
normal collection and credit management. Please refer
to your Metro2 Manual for help in choosing from the
pick list.
Association Code
This is used to designate an account in compliance with
the ECOA. This setting can be changed for an individual
Debtor while you are on the Credit Report Details form
accessed from the Debtor form.
The list of default choices provided by Collect! covers
normal collection and credit management. Please refer
to your Metro2 Manual for help in choosing from the
pick list.
Condition Code
This field allows for reporting of a condition that is
required for legal compliance; e.g., according to the
Fair Credit Reporting Act (FCRA). Please refer to your
Metro2 Manual for help in choosing from the pick list.
Country Code
This is the country that the Debtor lives in.
The list of default country codes provided by Collect!
shows only a few of the most used country codes.
Please refer to your Metro2 Manual for help in choosing
from the pick list or adding to it.
Indicator
This field contains a value indicating a special bankruptcy
condition which applies to the debtor cosigner. Please
refer to your Metro2 Manual for help in choosing from the
pick list.
Report Cosigner
This is used to determine if the Debtor has a
cosigner to be reported.
Cosigner
Selecting this button will take you to the Debtor Cosigner form.
If you are reporting Cosigners, all 3 bureaus require that the
Association and ECOA fields be set. The Cosigner creates with
"Not Reported" as the default selection in Association. You
must select either Associated Consumer � Same Address or
Associated Consumer � Different Address from the drop-down
pick list. In the ECOA drop-down, the mass majority of the time
in credit and collections the selection will be either
Joint Contractual Liability or Business/Commercial when the
account is NEW and first being reported.
Any changes/updates to the Cosigner such as 'Delete Borrower'
or 'Consumer Deceased' must be selected from the Cosigner form.
Deleting the Borrower from the Cosigner screen deletes ONLY
the Cosigner, leaving the primary debtor still reported.
Pressing F1 from the Debtor and Cosigner
forms will bring up help for each field in those
forms. This help includes credit bureau reporting
details for entering information in each field that
pertains to credit reporting. Please read this help
carefully, as information sent to credit bureaus must
be in an EXACT format.
Defaults
When reporting a Debtor to the Credit Bureaus, there are
certain settings that need to be reported to the bureaus.
Select this button to display the Credit Report Preferences
form where you can choose default credit reporting settings
at the system level. When you flag a Debtor to be reported
to the Credit Bureau, these default settings will automatically
apply to the Debtor.
You can override these defaults on an individual Debtor level
through the Credit Report Details dialog.
Help
Press this button for help on the Credit Report Details
form and links to related topics.
Cancel
Selecting this button will ignore any changes you have
made and return you to the previous form.
OK
Selecting this button will save any changes
you may have made and return you to the
previous form.
The options used as default values when you report Debtor credit are set in the Credit Report Preferences
form. These settings can be changed here, at the individual Debtor level, if necessary. In most
cases, the defaults should be fine.
Collect! will update some of these settings throughout the life cycle of the debt. For instance,
when an account balance reaches zero and the account is paid in full, Collect! automatically changes
the Status Code that gets reported to the bureau. You may need to adjust settings manually, if you
delete an account from the bureau or close it as "Settled in full," for instance.
Please press F1 from the Credit Report Details form for more information about these settings.
- Select the CBR tab on the Debtor form to access this form.
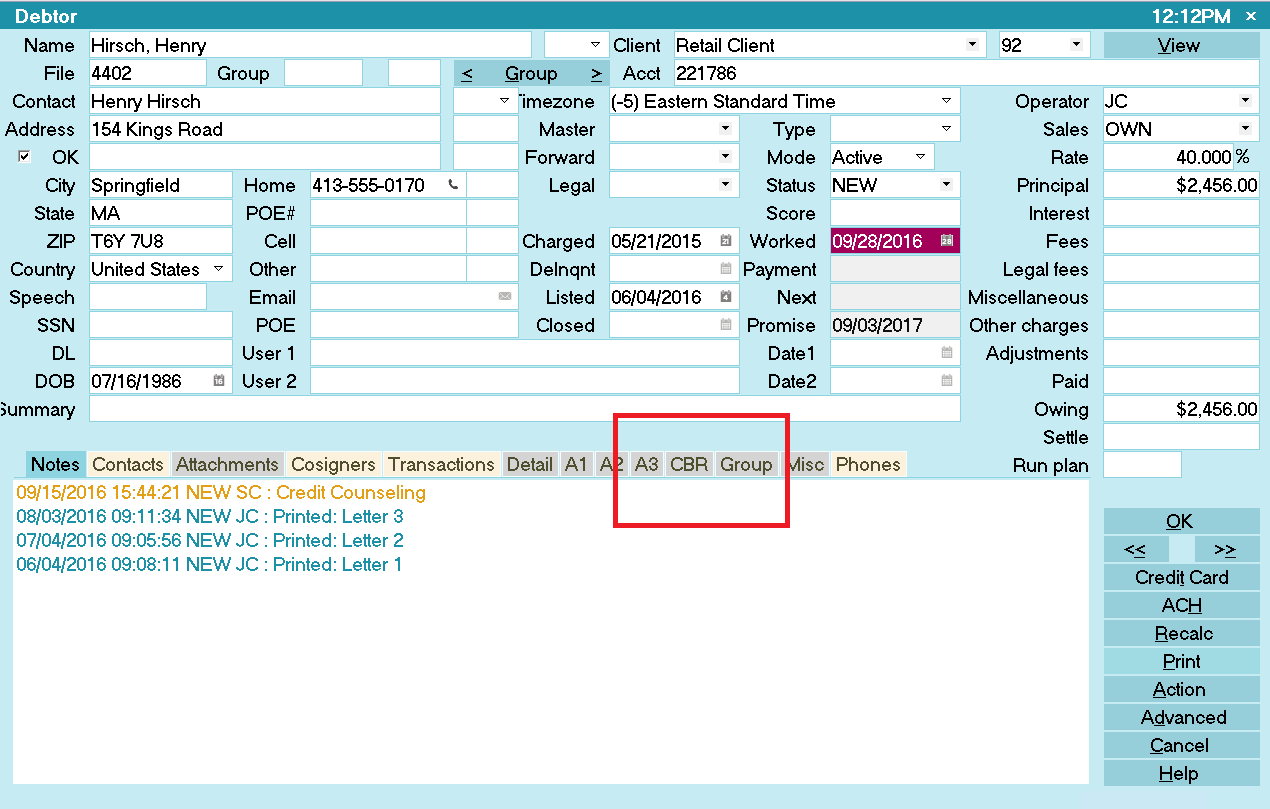
Selecting the CBR tab for the Debtor
- When you select the CBR tab, the Credit Report Details form is displayed.
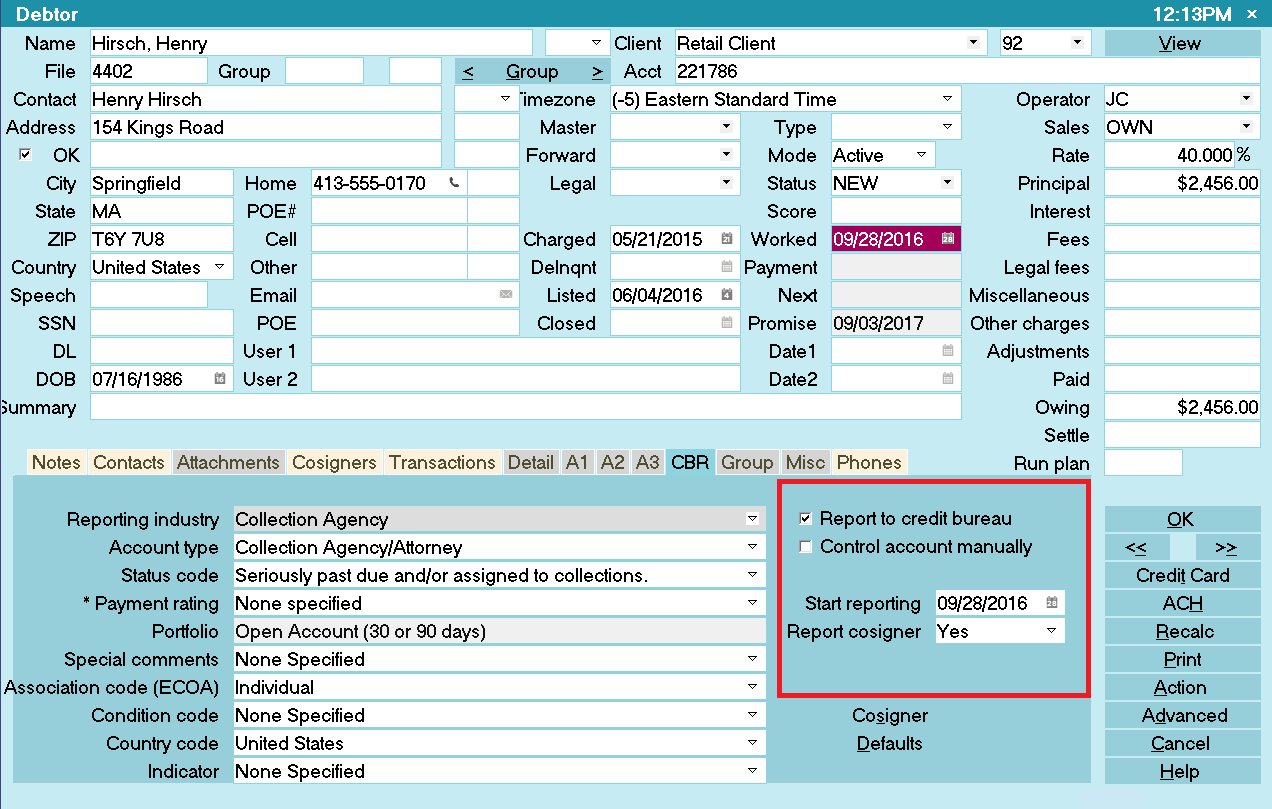
Credit Report Details
- Place a check mark in the Report to credit bureau box. Now this Debtor is set to be reported
to the Credit Bureaus.
- The rest of the fields are set up by default in Collect!, but it is your responsibility to
ensure that they are correct.
Start Reporting Field
Press F2 while in this field will bring up the Calendar where you can select the date that you wish
to start reporting this Debtor to the Credit Bureau. You may also enter a date in the MM/DD/YY format.
WARNING: If you are using Delay Days, this date will populate automatically. Do not change it, unless
are you are fully aware of the implications.
Set The Account's CBR Status
Collect! automatically sets the CBR Account Status as you work your accounts. If you need to manually
change the status due to deleting an account from the bureau or reporting a bankruptcy, you can select
the CBR tab at any time to display the current Credit Report Details and change the settings as needed.
Reporting Cosigners
If you selected YES to report Cosigners, you must switch ON reporting in the Cosigner form for each
cosigner that you wish to report.
Cosigner Settings
If you are reporting Cosigners, additional fields need to be set up on each Cosigner that you are
reporting. Select the COSIGNER tab on the Debtor form to access the Cosigners. Here is an example
setup.
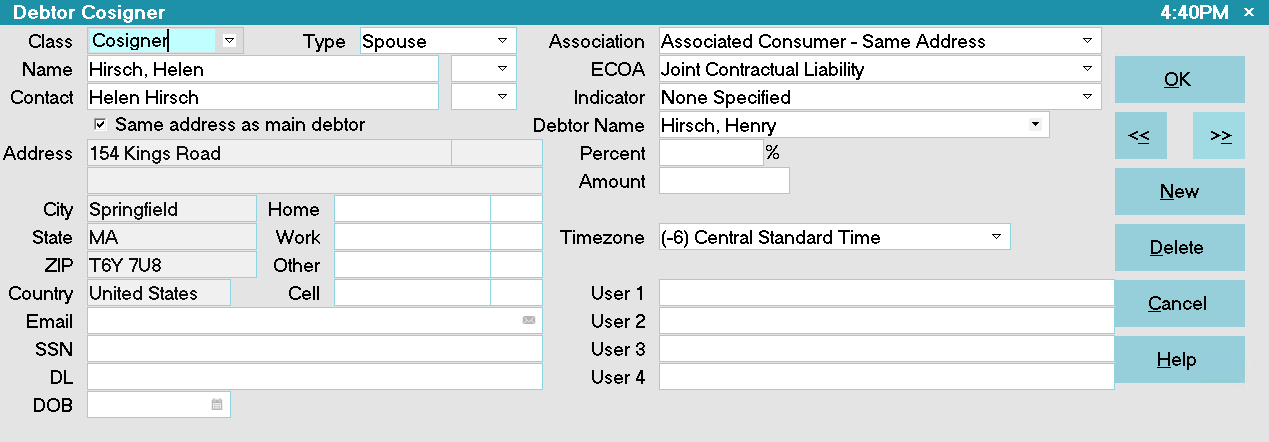
Cosigner with Credit Reporting Setup
Press F1 when you are on the Cosigner form for details. Look for information labeled "FOR CBR:"
Please note that Name and Address fields on the Cosigner form must be filled in correctly, just as
for the Debtor, if you are reporting the Cosigner to the Credit Bureau.
Run A Credit Bureau Report Test
Testing a credit bureau report helps you see what happens in Collect! when you run a credit bureau
report to report a number of accounts to the credit bureau. It will show you where the finished file
is placed. Also, it gives you the opportunity to go through the motions of physically sending the
generated file to your credit bureau provider.
When your provider receives the test file, they, too, will treat it as a test run and let you know
if it is correct. Also, they will supply you with an error report if something is not appropriate
in the data set. Because you will have informed them that it is simply a test run, they will not
automatically update their files with your information.
When you run through this test for credit bureau reporting, do NOT mark the contacts as
done. If the file is accepted, then the accounts will still be prepared for the first live
credit bureau report.
Follow the instructions for How To Run A Credit Bureau Report using only the few debtor accounts
you set up in the first part of preparing for credit bureau reporting.
Keep your test data set small. If the bureau does send back an error report, it is much easier to
deal with correcting the test debtors than correcting hundreds of accounts.
| 
Was this page helpful? Do you have any comments on this document? Can we make it better? If so how may we improve this page.
Please click this link to send us your comments: helpinfo@collect.org