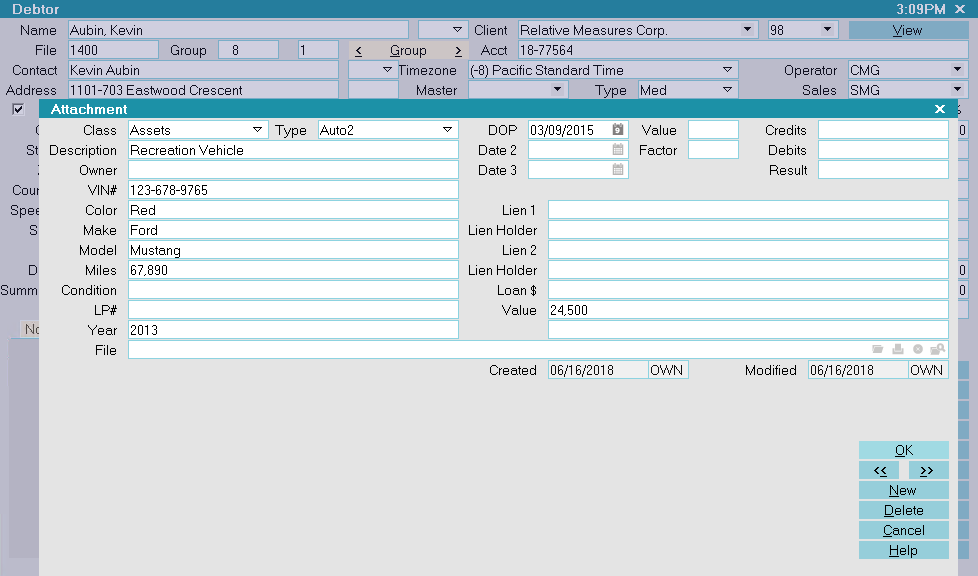
Attachment
The Attachment form may be used to store additional
information about a debtor or an account. You can attach
any kind of information or even different files to your
accounts with an attachment. Several of the fields on
this form are indexed for fast retrieval when reporting or
calculating. As long as Windows is set up to handle the
file type, you can instantly display any type of original
information about any account. Please see the Help topic
How to Use the Attachment Form for details about some of
the many ways you can use the attachment form.
Attachment
Class
This field displays a pick list choice. Use it to
categorize your attachments. Please see the Help
on How To Use Pick Lists for information about
building your own list or adding to the defaults
provided by Collect!.

Type
This is for further categorization.
If you enter Type 1, 2 or 3 here, the A1, A2 and A3
tabs will take you to these attachment types
when you select the tabs A1, A2, and A3 on the
Debtor form. Also those buttons will display orange
when you have attachments that you classified as
these types.
Subclass
This is a hidden field which stores the textual value
of the Type pick list selection. You can insert it as a
column when you are viewing all Attachments. This
makes it easier to examine and locate the exact
information you need when browsing Attachments,
especially if you are using Dynamic Attachments.
You can also use this field in reports.
Description
Enter a description for this attachment. When you
select Browse from the top menu bar and choose
Attachments, your description will be displayed in
the list.
Index 1
Enter information here that you need quick access to.
For example, if this is a Vehicle attachment you would
probably want to enter the VIN number here.
Similarly, if it is an Asset attachment, you might enter
a property identifier here.
You can quickly find attachments with this index by using
the Browse menu Find By option, and selecting Index 1.
Enter the index to search for when prompted.
Index 2
Enter additional information here that you need quick
access to.
For example, if this is a Vehicle attachment you would
probably want to enter more Vehicle Identification data here.
Similarly, if it is an Asset attachment, you might enter
an additional property identifier here.
You can quickly find attachments with this index by using
the Browse menu Find By option, and selecting Index 2.
Enter the index to search for when prompted.
Date 1
This is an indexed date that you can use to quickly locate
attachments by date.
For example, if this is a Vehicle attachment you might enter
the date the vehicle was entered into the system.
You can quickly find attachments with this index by using
the Browse menu Find By option, and selecting Date 1.
Enter the date to search for when prompted.
Date 2
This is another indexed date that you can use to quickly
locate attachments by date.
For example, if this is a Vehicle attachment, you might enter
the date the vehicle was located.
You can quickly find attachments with this index by using
the Browse menu Find By option, and selecting Date 2.
Enter the date to search for when prompted.
Date 3
This is a non-indexed date field.
Use it for anything important to you. This field cannot
be rapidly searched for, so don't plan on building
a report to search for these dates. It will run slowly
if you have a large database.
Value
A numeric field for your use. The field type is a 16-bit
integer that can only store values from -32768 to 32767.
Factor
A numeric field for your use. The field type is a 16-bit
integer that can only store values from -32768 to 32767.
Credits
A currency field for your use.
Debits
A currency field for your use.
Result
A numeric field for your use.
User 8
This field is for your own definition and use.
User 9
This field is for your own definition and use.
User 10
This field is for your own definition and use.
User 11
This field is for your own definition and use.
User 12
This field is for your own definition and use.
User 13
This field is for your own definition and use.
User 14
This field is for your own definition and use.
User 15
This field is for your own definition and use.
User 16
This field is for your own definition and use.
User 17
This field is for your own definition and use.
User 18
This field is for your own definition and use.
User 19
This field is for your own definition and use.
User 20
This field is for your own definition and use.
User 21
This field is for your own definition and use.
File
This can contain a complete filename to any
kind of file attached to this account. You can
even store links to HTML documents or
web sites.
There are four buttons to the right of this field.
These buttons let you:
- Open the file or go to the web site
- Print the file
- Delete the file - CAREFUL!!! Actually deletes!
- Select a file from your system without opening it
This feature lets you attach any kind of file to your
accounts in Collect!. You can attach credit reports or
information returned from some other type of query.
As long as Windows is set up to handle the file type,
you can instantly display any type of original information
about any account. There are many possibilities. You
can even use an import routine to read information,
create a file for the account and attach it to this field
for quick retrieval.
 If you put a URL in this field, Collect! will use
your web browser to go to the web site when
you select the OPEN button.
If you put a URL in this field, Collect! will use
your web browser to go to the web site when
you select the OPEN button.
To remove a file from this field without deleting it,
simply click into the field and backspace to
erase the file from the field. The DELETE
icon actually deletes the file from your PC!
Update Debtor
The Attachments Tab provides you with the ability to store
skip trace or alternate address information which you may have
obtained from other sources such as directories, credit bureaus,
or skip locate information providers. Data you receive may be
manually entered or electronically imported into an Attachment
with the Class "eBureau" and Type "Alternate Address". The
benefit to using this window is that it contains an Update
(debtor) button which will automatically populate the main
debtor screen with your data without your having to manually
transfer the new information yourself.
Please refer to the Help topic Update Debtor for more information.
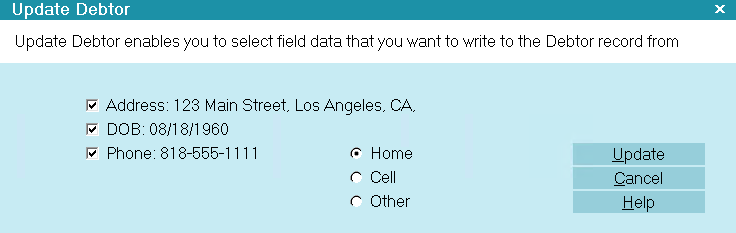
Update Debtor
Created
This field will display the date the attachment
was created.
Created By
This field will display the ID of the operator
who created this attachment.
Modified
This field will display the date the attachment
was last modified.
Modified By
This field will display the ID of the operator
who last modified this attachment.
OK
Selecting this button will save any data
you have entered and return you to the
previous form.
<<
Selecting the BACKWARD navigation button
will take you back to the previous record.
>>
Selecting the FORWARD navigation button
will take you forward to the next record.
New
Select this to open a new attachment form.
Delete
Select this to delete the currently displayed attachment.
Cancel
Select this button to ignore any changes you may
have made and then return to the previous form.
Help
Press this button for help on the Attachment
form and links to related topics.
Open Folder
This button is visible only in the list of Attachments.
Select it to open the Attachment folder for the account.
You can then open any file contained in the account's
Attachment folder. If there are no attachments with an
entry in the File field, selecting this button will do nothing.
Edit
This button is visible only in the list of Attachments.
Select it to open the currently selected Attachment
for editing.
Detail
This button is visible only in the list of Attachments.
Select this to open the highlighted attachment.
| 
Was this page helpful? Do you have any comments on this document? Can we make it better? If so how may we improve this page.
Please click this link to send us your comments: helpinfo@collect.org