How To Use Letter Service
For an agency which has considerable volume of debtor letters
to be printed a day, where time and wear & tear on your printers
are excessive and your staff can't keep up with folding/envelope
stuffing to get your mailings out in a timely manner, you may be
ready to consider outsourcing your daily debtor letter batches
to a professional mail house. The benefit of these service
providers is that they have the industrial equipment to output
your thousands of letters daily without delay and at a cost
savings as compared to what you currently spend on supplies,
equipment, time and labor.
Letter Service is a functionality that allows you to output
to electronic file the "insert" portions of your letters which
are sent to the provider of your choice. You Letter Service provider
has set up your letters in advance and is able to read your
data files, outputting hardcopy letters in their entirety from the
variable data field content only data you provide.
Item Check List of what you need to be able to do, or
have already taken care of doing, in advance of utilizing
the Letter Service feature are:
- You are able to print a letter to one or more debtors.
- Understand and use Letter Contacts on batches of debtor
accounts
- Have contracted with a Letter Service provider and have
already provided them with template output of your letter
templates, or are in the process of having your letter
templates set up with said provider. See the end of this
document for a few providers of this type of service.
- You are able to save and retrieve a file from a prescribed
path on your workstation or from a path on a network drive.
- You have you purchased a license for the add-on Letter
Service module from Administration at 250-391-0466 option 3.
When you use Letter Service, the transmission of your daily
file from your office to your provider can take place by sending
them the file via an email attachment, internet drop-off on a
website or via an online FTP transfer. Our Technical Services team
have successfully installed processes which delivers your daily
file by FTP drop-off using a .bat file in a Windows Scheduler.
Contact us for pricing if you would like to explore this
convenient automation for your own site.
Setup With Your Provider
Assign a numeric code to each of the letters that you will be
using for letter service. Create a full printout of the letter
populated with realistic data so that they can see exactly how
each letter is to look and where all the data insert fields are
within each letter form. Find out from your provider whether they
prefer Ontario or Non-Ontario standard format for the data files,
as you have the choice of which type you can output.
Once your provider has all the letters set up on their end, it is
time to create a test file on your side to submit to them.
 Letter Service output is completely separate and
apart from inhouse hardcopy letter printing.
Your company can still print internally and
generate any letter you need to either on a
per file basis or batch, when needed.
Letter Service output is completely separate and
apart from inhouse hardcopy letter printing.
Your company can still print internally and
generate any letter you need to either on a
per file basis or batch, when needed.

Creating A Debtor Letter For Letter Service
Choose the menu path "Print\ Customize Printing\ Edit Report Templates".
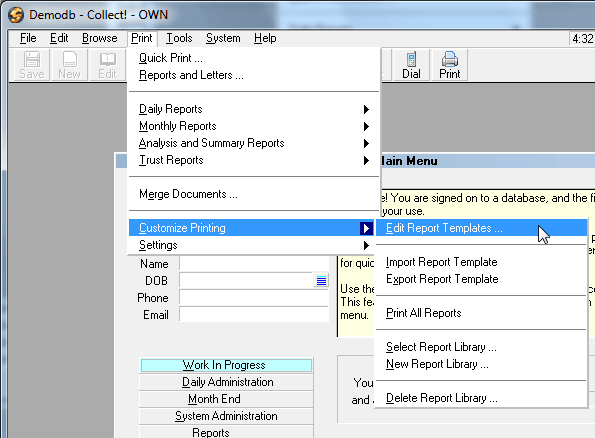
Print Menu - Edit Reports
This will display a list of all reports in your system print menu.

Report Definition List
Use your arrow keys to navigate to the first letter you plan
to use in Letter Service and stop when your letter name is
highlighted. Press your spacebar to highlight this letter name.
Click Ctrl+V to copy, then Ctrl+C to paste. Now you will have
two versions of this letter in your print menu. Rename the new
copy you just made to be LSLetter1 if the original name was
Letter1, for example. You will be making changes to both the
inside of the letter body and the Report Options to change this
to a Letter Service style output.
For simple letters (that do not contain complex use of variables,
conditional logic or record loops), your Report Body will end up
appearing as only the Printable Field Codes showing that are to be
inserted into your letters. The Letter Service company does not need
or want you to have the whole letter, static content and all, in the
text file you will delivery to them daily - just the the variable
data for the individual debtors and the indicators as to which letter
number to use on their end.
Modify Your Letter Report Body
Remove all codes that pertain to formatting (i.e. margins or
lines, boxes), font changes, printer control codes, commented
out lines (being lines beginning with slashes), and all hardcoded
text.
Your original letter that prints out, might look like this:
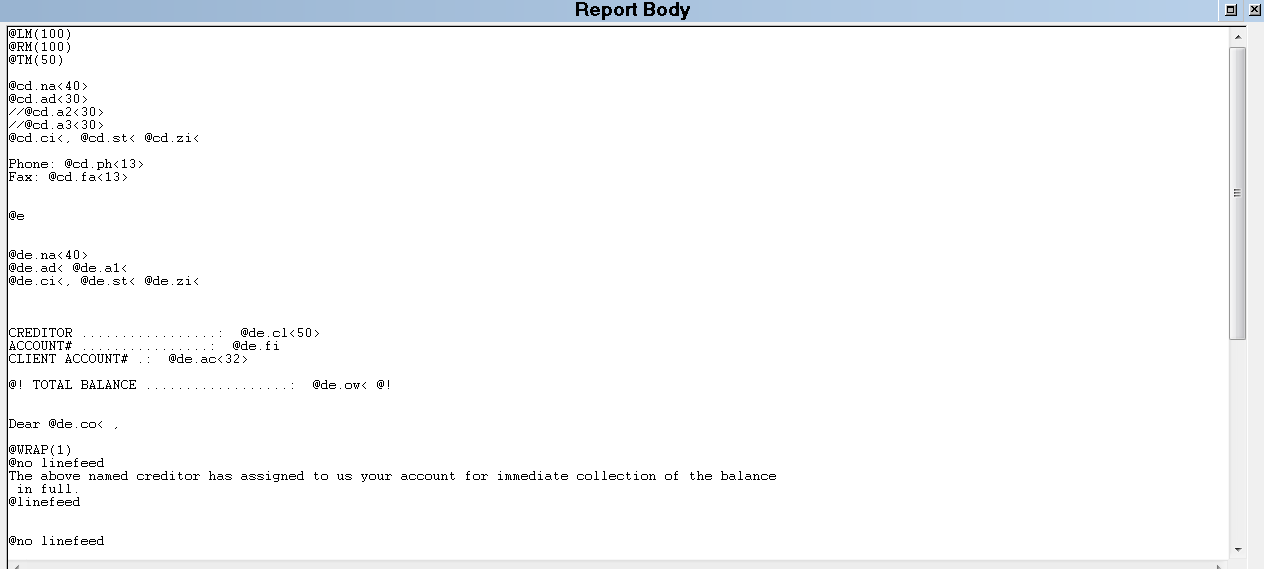
Report Body BEFORE Letter Service Edit
After you have prepared the inside of your LSLetter1, the
Report Body should look like this:
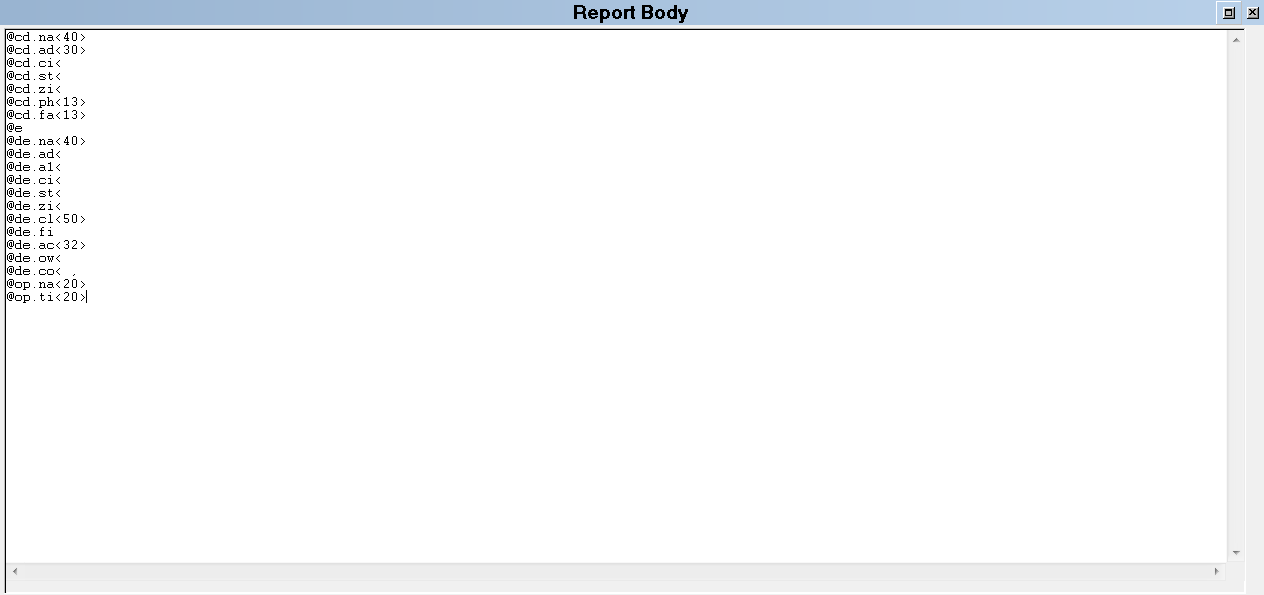
Report Body AFTER Letter Service Edit
Now that you have prepared the inside of the Report Body to
output only that which your provider needs, the next step is to
set the LS options. With the Report Definitions screen still
open, click the Options button in the lower left corner of the
window.
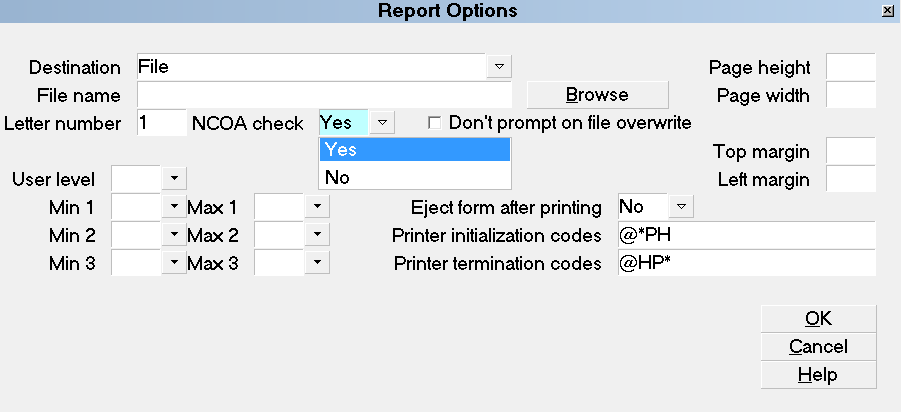
Report Options Screen
You are interested in the upper left area of the Report
Options screen.
Destination
Set this field to "File".
File Name
Leave this blank. When you create a letter service batch
output every day, you will define the filename when prompted
to do so during the creation of the output text file you will
send to your provider.
Letter Number
Enter a number in the Letter Number field, as shown.
This number must be unique to this letter and must
be consistent with the letter format and ID number you
gave to the letter service provider..
ONLY the letters with a number entered in the field
labeled Letter Number will be picked up in the
Letter Service Batch.
Don't Prompt On File Overwrite
If you are using the Collect! Scheduler, it is very
important not to have any prompts which require end
user input on unattended processes. It is recommended
for rollback capability in the event your provider asks
you to resend a file for any reason, that you save a
dated copy of your letter service output files so that
you have ongoing record of what you sent. These may
be deleted after a few weeks and no need to reproduce
one has arisen.
If you will be using the same filename daily for your output
text file, you will be responsible for making and keeping
dated versions of these files wherever is convenient on your
network.
If you want to optimize, have your inhouse IT Tech or contact
our Technical Services department for pricing to have a custom
dated copy of it for audit trail purposes.
NCOA Check
This switch can be checked On if you have enabled this
address checking service with your letter service provider.
This switch checked ON alerts your provider to do an address
check on any account that you have flagged as
Address Not OK. That means the check
box labeled Address OK on the main
debtor screen is switched OFF, indicating that the address
is either not verified or return mail was received previously.
Each site has their own interpretation of this switch being Off
or On. The Letter Service module construes the Address OK switch
being Off as qualifying for an NCOA check.
Test Your Letter
This letter must now be set up a Letter contact on some
test accounts in order to create a test file for your Letter
Service provider. Make sure to send them a pdf test templates
containing ALL of the letters you will be sending them during
the course of normal operations. They need to set up each
letter format separately in THEIR system, just like you had to
set up the letters in your system.
Navigate to your test debtor(s) and click into the Contacts
Tab. Click New to create a new Contact. Choose the Type to
be Letter, then click the drop-down arrow at the far right of
the Description field and navigate to one of your LSLetter
templates and select it. So you can run a full test at once
of all your templates, leave the Due Date as current.
After you have set up a Letter contact for all of your LS
templates, you are ready to create a test output text file.
Running Letter Service On Scheduled Letters
To generate the data file to send to your service provider:
1. Select the menu path "Print\ Daily Reports\ Letter Service
Bureau".
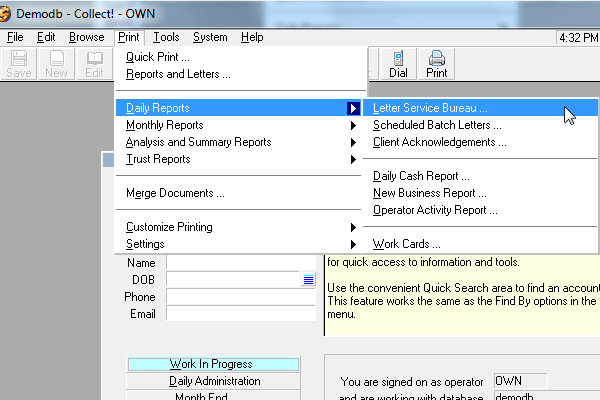
Print - Daily Reports - Letter Service Bureau
2. You will get a Batch Letter Options popup that looks
exactly the same as the one you normally get to print
hardcopy letters inhouse. That is fine, and you are in
the right spot.
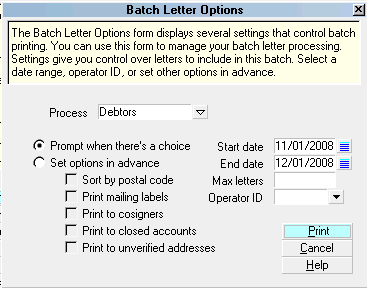
Batch Letter Options
Like with hardcopy printed batches, you have the same
areas of control where you can opt to increase or decrease
the default date range or modify any of the settings on
the screen.
 If you select Set options in advance,
you can eliminate prompts for Address Not OK,
Cosigners and Closed accounts. This frees you
up from having to monitor the batch process and
be available to answer the prompts on a per file
basis because you've already decisioned this for
the whole batch. There will be no prompts to
answer questions if you set this switch.
If you select Set options in advance,
you can eliminate prompts for Address Not OK,
Cosigners and Closed accounts. This frees you
up from having to monitor the batch process and
be available to answer the prompts on a per file
basis because you've already decisioned this for
the whole batch. There will be no prompts to
answer questions if you set this switch.
3. When you are ready, click the PRINT button on the
Batch Letter Options screen to continue. The process knows it
is writing out to a file, it is not really going to print
anything. Most importantly, it does NOT cause any of your
non-letter service letters to be launched: only the templates
you have indicated with a number in the Report Options as having
a Letter Number.
When the next window pops up, you will see that it is called
"Letter Service" and that it has the "Letter service" output
indicated as well as "Save to file only" radio buttons
activated.

Report Output Options
By default, the output file will be saved in
CV11\bin\global\masterdb\letters. You can change
the path and/or the name of the file that is output
as you wish. The singular necessity is that the filename
have the file extension ".txt".
4. Select the PRINT button to output your letter service
file.
NCOA Check Through Letter Service
The NCOA check (National Change Of Address) is an
option that your letter service provider may provide, but
there is an additional fee for each address they attempt
to verify.
As mentioned previously in this page, the NCOA check is
enabled through the Report Options screen on a per Letter
format basis. When NCOA check is enabled for a letter,
the process will output an NCOA code for every debtor or
cosigner letter printed to an unverified address - meaning
the "Address OK" switch on the debtor screen is NOT checked.
Depending on your internal processes, this switch being
unchecked can be a function of return mail previously and/or
a known bad address OR it could be unchecked in the absence of
a formal verification that the address is good. The code
output with the letter service file triggers your letter
service provider to check that address and return NCOA
information to you.
If you did not enable NCOA check and your process
includes debtors with Address OK switches unchecked,
you will be prompted as below, if you had clicked 'Prompt
when there is a choice' in Batch Letter Options.
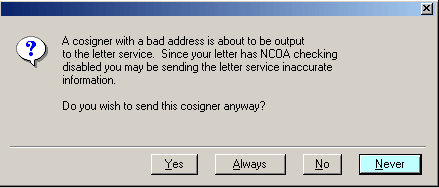
Bad Address Prompt
If you select YES, this debtor's information will be
included in the letter service file, but without the
NCOA code.
If you select NO, the debtor will be ignored and not
output to the file.
If you select ALL, all unverified addresses - meaning any
addresses in your system that have the Address OK switch
unchecked on debtor or cosigner screens - they will be printed
with no further prompts.
You may choose to set options in advance and
select Print to unverified addresses
in Batch Letter Options to output all unchecked
Address OK accounts with no further prompts.
#K#03 Segment
The #K#03 segment is an addition to the letter service
module to match new file format standards required by
letter service providers. This switch is enabled via the
menu path "System\ Preferences\Reports and Printing\Printer
and Report Setup\Insert #K#03 segment".
This is the same setup screen where you
indicate whether you are outputting to
your letter service provider in Ontario
or Non-Ontario letter service output format.
A letter sent to letter service with NCOA enabled will
print letters to debtors with bad addresses preceded by
the #K#02 segment. This tells the letter service that
this debtor has a bad address. It also attaches a "D"
for Debtor and "C" for Cosigner to the File Number.
Example: ^D1400^ for Debtor,
or ^C1400^ for Cosigner.
The Dfilenumber and Cfilenumber are used
by Collect!'s Import NCOA feature
to update records returned from NCOA.
All other debtor letters print normally, with no special
formatting. With the #K#03 Segment switch ON, debtors
with bad addresses will still receive the #K#02 segment,
but in addition, debtors with good addresses will now be
preceded by the #K#03 segment. This means that even
good addresses will have the Dfilenumber or the
Cfilenumber, as described above. That way, you can also
update good addresses when NCOA returns data.
When you use the Import NCOA option to update
records after an NCOA check, Collect! expects
to find the Debtor and Cosigner identifiers.
These will be correct only if you have switched
ON NCOA as described above. If you wish to check
"OK" addresses as well, you need to have the
#K#03 preference set to insert the segment.
Sending To Cosigners
If you chose 'Prompt when there is a choice' in the Batch
Letter Options screen, you will also receive a prompt asking
you if you would like to send the letter to the cosigners,
if your debtors have cosigners.
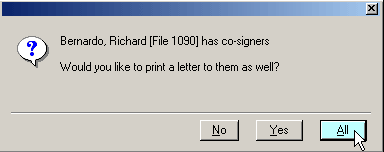
Print To Cosigners Prompt
Select "Set options in advance" to decision all the
questions needed to be answered pre-batch and
negate being prompted on a per file basis
throughout the batch.
The Cosigner Tab can contain many kinds of "other" parties,
inclusive of those that are not responsible on the debt.
You can restrict printing to records with the "Class"
set to "Cosigner" by checking the switch in the menu path
"System\Preferences\Reports and Printing\Printer
and Report Setup", and check the "Restrict to cosigners only".
Refer to the Help Topic, Report and Printer Setups for
more details.
Additional Prompts
You may receive additional popup questions or warnings
depending on situations that Collect! encounters. Answer
YES or NO, according to your requirements.
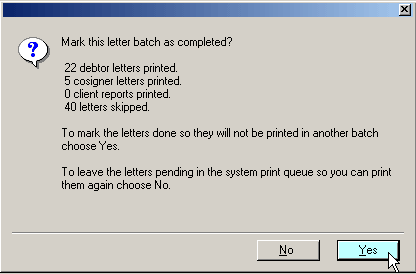
Mark Batch As Completed
This screen will ask whether you would like this letter batch
marked as completed. If you select YES, this batch of
letters will be marked as Completed and it will be removed from
the pending queue.
Prompt To Mark Contacts Done
You will receive a popup message acknowledging how many letters
were processed to the file.
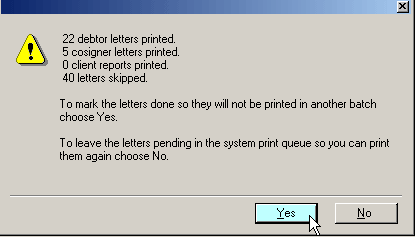
You will also be given the option of printing a summary report
to an operator's WIP List. You do not need to do this unless
your site requires logging of successful batch completions. If
you do opt to receive this, click "Yes" to view the list of
operators, and make your choice of which ID you will send the
batch summary to. The next time you reload the WIP list for
that operator, the Batch Summary Report will show up in their WIP.
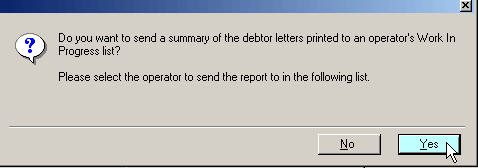
Print Summary Report To WIP List
Address Not OK
If a Debtor or Cosigner was skipped because of a bad address,
the Letter contact is not marked Completed, but is instead left
"In Progress" with an indicator written to the contact's
Attachment field. It will say 0 indicates that the
Debtor was skipped, OR 1 indicates that the Cosigner
was skipped. If the Address OK switch is checked back ON at a
future date, then this contact will be processed the next
time you print your Letter Service file from the date that the
address was put back in OK standing. Using the indicator
as a safeguard, Collect! will not print the same letter twice
to the same Debtor or Cosigner.
You can also view the Application Log via the
menu path \System\ Diagnostics to determine
which Debtors and Cosigners were skipped
when the batch was processed.
Letter Service File
If you would like to confirm that the letters that you wanted
sent out to your mailing house provider were output to the file,
open your output file in Notepad (or the pure text editor of your
choice) and review it. You will need to navigate the path to
where you saved the file, right click on it and use the option to
"Open with" in your windows File Explorer, and open it with Notepad.
 WARNING: Do NOT open these text files in a word processor
application like Word or Wordpad. The control
codes inserted and/or modification of file extensions
will change the nature of the data file, which will
render it unreadable by your letter service provider.
WARNING: Do NOT open these text files in a word processor
application like Word or Wordpad. The control
codes inserted and/or modification of file extensions
will change the nature of the data file, which will
render it unreadable by your letter service provider.
The contents of your file should look something like the following:
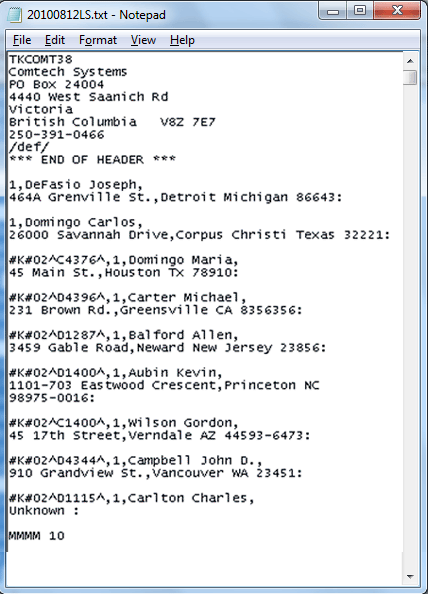
Letter Service File Contents
If you have enabled the switch 'Insert #K#03 segment' in
the Report And Printer Setup, your file would look slightly
different.
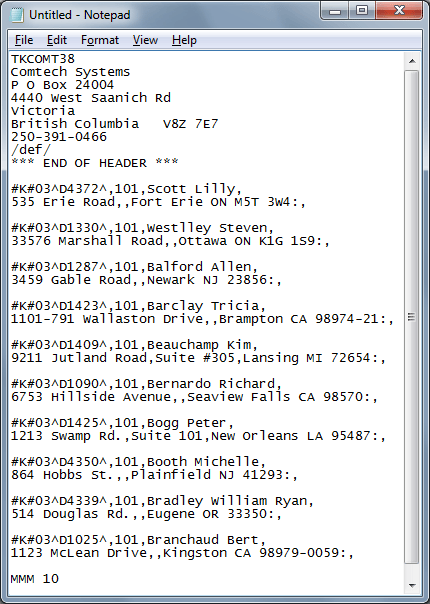
Letter Service File With #K#03 Segment
In this case, the NCOA code will be #K#03 for each
account that does not have a #K#02 segment.
Sending Your File To Letter Service
Now you should be ready to send your data to your Letter Service
provider by the method agreed upon between yourselves and your
provider.
For information about outsourcing your printing to a professional
letter service provider, check your local listings or Internet
searches. To assist you, we have listed a few such established
companies who service this market:
Click here for a list.
See Also
- Letter Service Topics
- NCOA Topics
- Batch Letter Options
|
Was this page helpful? Do you have any comments on this document? Can we make it better? If so how may we improve this page.
Please click this link to send us your comments: helpinfo@collect.org