ACH Step By Step - Part 3 - Recurring Payment Schedule
This "Step-by-Step" series is intended to provide you with an orderly
progression of procedures and procedural considerations.
The actual details and expansive explanations are contained elsewhere in
the Help pages and will be referred to by link to follow at the end of
each page, where applicable.
This Step-by-Step page is dedicated to all aspects concerning Recurring ACH
Payments.
When you have completed a full review of all the steps, you should be:
Posting A Recurring ACH Payments Schedule
You can post an ACH payments schedule for a series of
withdrawals from a payer's bank account to be made at regular
intervals.
 Recurring ACH payments are stored in Collect!
immediately, but they are NOT uploaded to Billing
Tree until a transaction in the series has become
current-dated AND your site has run its batch
Reconcile ACH History process. This is opposite
of how the module manages recurring Credit Card
arrangements. With recurring credit card plans,
the schedule is held exclusively on the Billing
Tree Gateway for PCI compliance and is uploaded to
them once you click Submit.
Recurring ACH payments are stored in Collect!
immediately, but they are NOT uploaded to Billing
Tree until a transaction in the series has become
current-dated AND your site has run its batch
Reconcile ACH History process. This is opposite
of how the module manages recurring Credit Card
arrangements. With recurring credit card plans,
the schedule is held exclusively on the Billing
Tree Gateway for PCI compliance and is uploaded to
them once you click Submit.
To access the menu to reach the debtor banking intake screen,
click the ACH button in the lower right corner of the main Debtor
screen. This will open the ACH Payment Tasks menu.
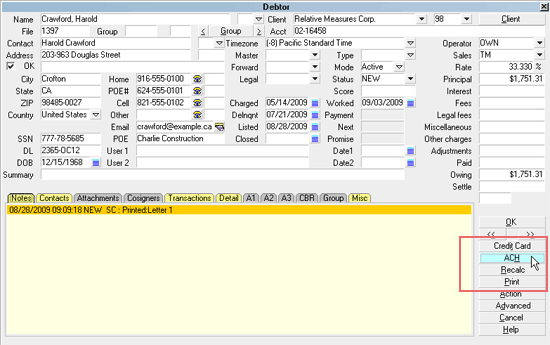
Select the ACH button
 If this is the first time you are accessing this screen,
after signing into Collect!, you will be prompted to enter
your ACH UserId and Password.
If this is the first time you are accessing this screen,
after signing into Collect!, you will be prompted to enter
your ACH UserId and Password.
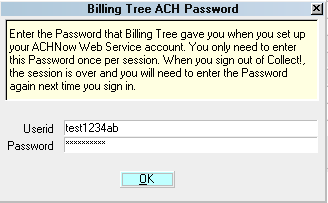
Billing Tree ACH Password
Once you enter your UserID and Password, they stay in effect until
you log out of your current session of Collect!.
If you have entered global login credentials into the
ACH Payments Setup screen, it will be stored
and used each time you login Collect!. You will not be
prompted to enter a Password unless you are any of
User Levels 1, 10 or 99. These levels will always
be prompted and need to simply click OK to
advance to the next screen if there are no changes.
When the ACH Payment Tasks menu is displayed, click the
Recurring Payments button.

Select the RECURRING PAYMENTS button
This will open the Recurring ACH Payments screen. For a detailed
description of each Field on this screen please see Recurring ACH Payments.
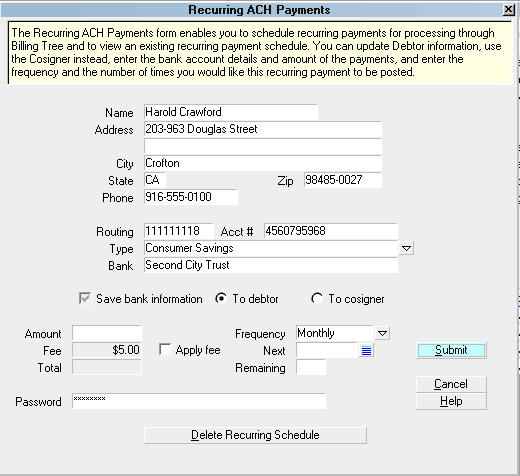
Recurring ACH Payments
Press F1 from the Recurring ACH Payments screen to see
details for each field in this window.
When you are ready to submit the payment schedule, click the
SUBMIT button.
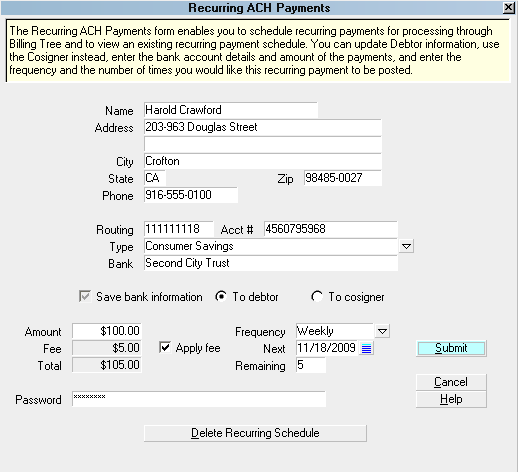
Ready to Submit a Recurring ACH Schedule
The module will give you a popup confirming it has completed
all the internal steps to apply your recurring arrangement
and that the steps were completed successfully.
ACH Schedule Configured Successfully
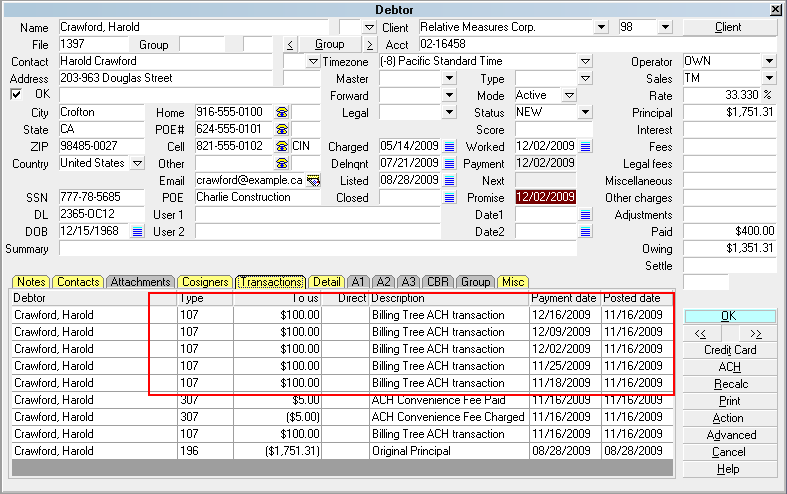
You will see in the Transaction Tab for the debtor that all of the
line items covering your entire arrangement period are now
appearing with Payment Dates entered according to the schedule you
set up.

ACH Transaction Schedule Posted
These post-dated transactions do not affect your current balance
on account because the due dates are in the future and the software
doesn't consider them as finalized transactions until they have
been finalized by the module via Reconcile ACH History as they
come due.
Depending on your site's preference settings in ACH Setup, the
Posted Date will either be blank or contain the date that the
arrangement was created. In both cases, as the payments come
due and are submitted to Billing Tree for processing, the Posted
Dates will become populated with the date they finalized.
The module will not post the convenience fees until each payment
is processed successfully by Billing Tree, as will be triggered
by the return of a confirmation number through the Reconcile
ACH History batch processes.
Recurring ACH payments are not completed until you run Reconcile ACH
History.
Users of CV11.6.2.7 and higher who are also licensed
for the Scheduler Module now have an enhanced automation
with the addition of the Reconcile process being added
to the Scheduler Task list of options. You may run this
process offline and unattended. Contact us at
sales@collect.org for module pricing.
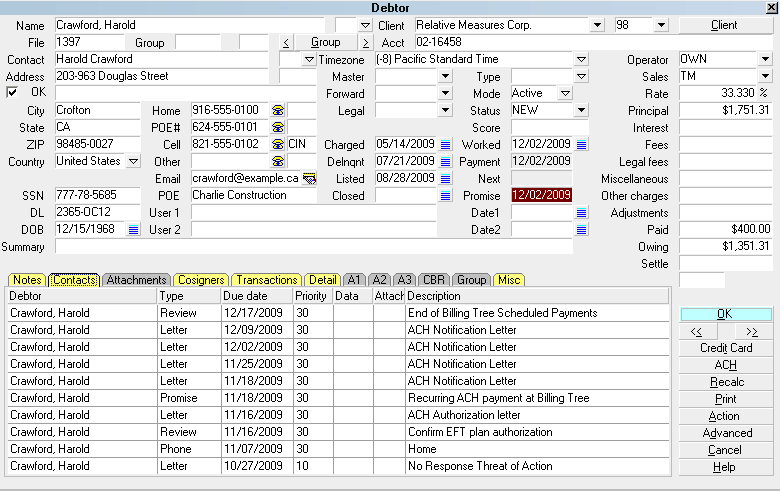
The module creates a Promise Contact that will stay in the
Collector's WIP to assist in keeping track of the the payment
schedule.
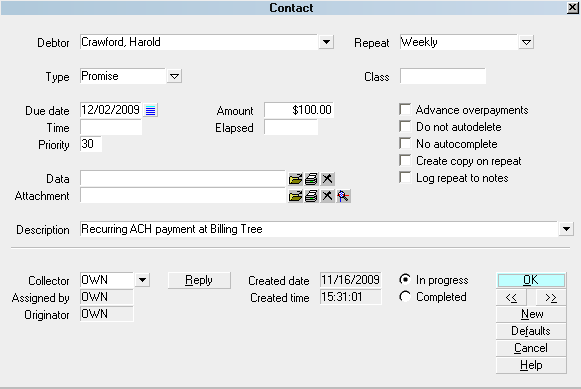
Promise Contact for Recurring ACH Payments
The module creates a Review Contact that is future dated to
remind you of the end of the payment schedule.
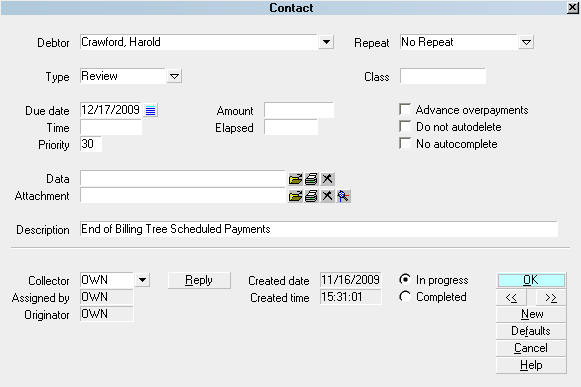
Review Contact for Recurring ACH Payments
EFT notices will be automatically scheduled according to the
options you chose when you set up your EFT Notices Setup.
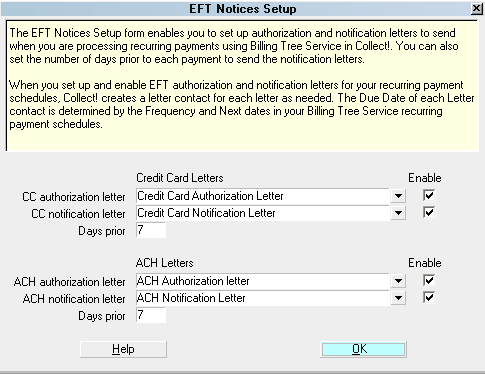
EFT Notices Setup

EFT Notices and Reviews
The following information centers on other knowledge needed about
fields, functions and internal automations pertaining to creating
Recurring ACH Payment arrangements:

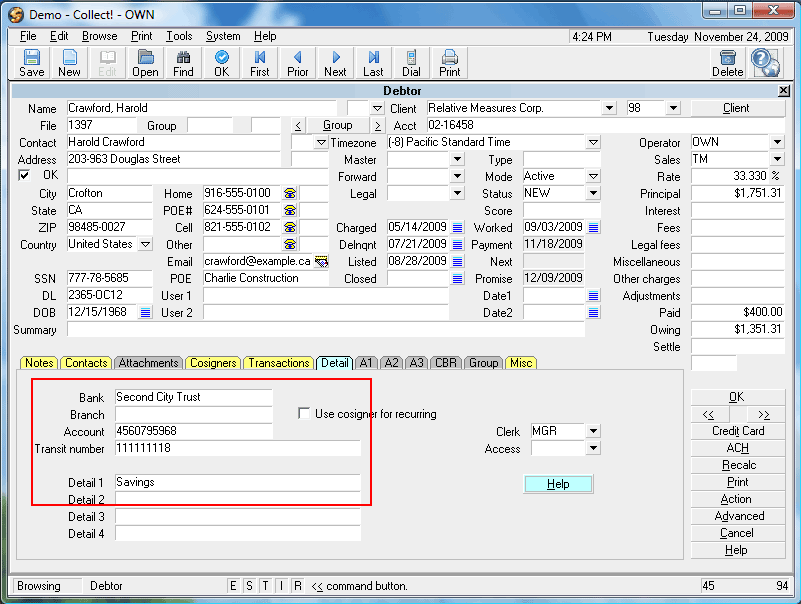
Save Bank Information
The switch to "Save bank information" invokes a writeback
of information as you entered it into the Payment intake
window and stores it in the Debtor Detail Tab OR in the
Cosigner's information, with the Class ACH Payer. Older
versions of Collect! use "Other" as the Class.
This is the example of saved to the Debtor:
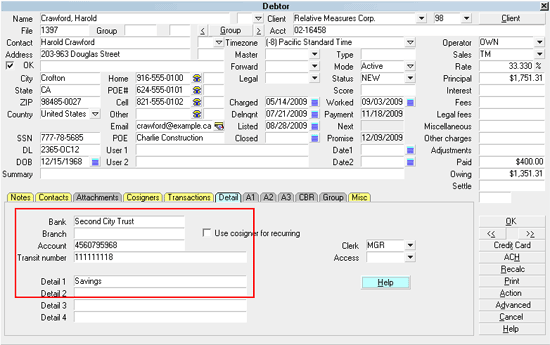
Bank Information Saved to Debtor Detail
Bank is the payer's Bank.
Account is the payer's Bank Account Number.
Transit Number is the Bank ABA routing number.
Detail 1 is the Bank Account type.
The module will overwrite any information that
is currently stored in the Debtor Detail Bank,
Account, ABA and Debtor Detail 1 fields.
Contact Technical Services if you need assistance migrating historical
information that you may have stored in these fields BEFORE you go live
with your ACH payments. A special Attachments Tab window can be created
for you and data migrated so that you retain whatever other information
you may have previously been storing in the Debtor Detail Tab.
Alternatively, you can save the banking information to a Cosigner window,
with the Class designation ACH Payer. Older versions of Collect! use "Other"
as the Class.:
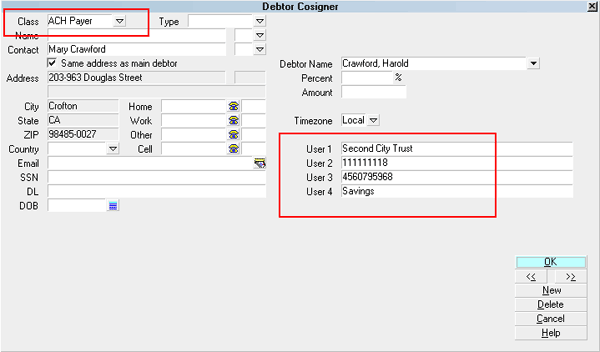
Name, Address and Bank Information Saved to Cosigner
User 1 is the payer's Bank.
User 2 is the Bank ABA routing number.
User 3 is the payer's Bank Account Number.
User 4 is the Bank Account type.
Debtor Detail
Like all the Tabs in the lower portion of Collect! main windows,
the Debtor Detail Tab is a sub-window that is actually a separate entity
from the main Debtor screen. The Detail Tab is pre-configured for use as
a storage site for banking information, and can be utilized for any
end-user defined purpose or preference.
This sub-window becomes a consideration because the module uses it to
store information obtained during the ACH payment screen intake. Bank name,
account and routing numbers are auto-written from the ACH Single or
Recurring payment entry screen into the Detail Tab.
If your company has any data storage convention that uses areas in
the Detail Tab, you may wish to contact Technical Services to
discuss your options to migrate this information
into a special Attachment Tab window we can create for you
BEFORE you rollout live with the module.
This will ensure your data isn't lost and the module's function is not
being impeded by staff removing what it writes into this Tab.
Bank Information Saved to Debtor Detail
Bank is the payer's Bank.
Account is the payer's Bank Account Number.
Transit Number is the Bank ABA routing number.
Detail 1 is the Bank Account type.
Transaction Details
When ACH payments are reconciled, Billing Tree uploads confirmations
to your system and stores the confirmation details to the Transaction
Details Tab for the line item it matches for the debtor. This
information will come as a result of Reconcile ACH History on either a
per debtor or company-wide batch process.
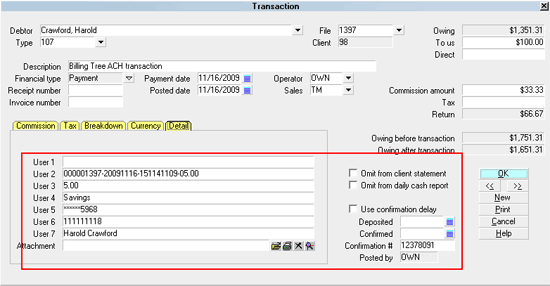
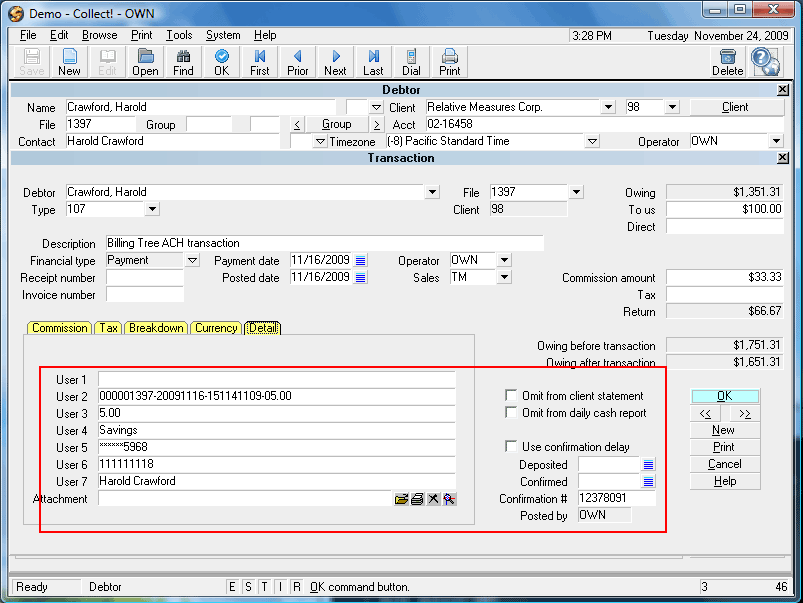
Transaction Details
Banking unique tracking and confirmation details are stored on each debtor
record as follows:
User 2 is a unique
Reference # {filenumber-date-time-fee}.
User 3 is the fee amount.
User 4 is the Bank Account type.
User 5 is the masked Bank Account Number.
User 6 is the Bank's ABA routing number.
User 7 is the Payer, either the Debtor or
the Cosigner.
Confirmation # is a unique Transaction ID
assigned to this ACH payment during the Billing Tree process.
Reconcile ACH Payments
It is necessary to regularly synchronize your system
with Billing Tree's records for ACH payments. This is your
only way of finding out if any transaction has since been
reversed from when your office posted the payment and also,
if there are any unmatched payments your office needs to be
aware of, and whether the Gateway has been in receipt of
external payments directly at the Billing Tree webpage
without having passed through your office or the module at all.
Specifically, the reconciliation process does the following
logical steps:
It surveys your system to see if there are currently any
ACH payments with payment dates which have become due but have
not yet been uploaded to Billing Tree for processing.
It downloads any reversals of payments that Billing
Tree has received since the last time your office has done
a reconciliation and writes a Process Summary Report. See
Reconcile ACH History, topic Processing Summary.
It downloads any external payments it has received which your
site you may not be aware of because the debtor paid directly on the
ACH Gateway using their Collect! file number as the account number.
If collectors are experiencing difficulty with debtors not
wanting to disclose their banking information to strangers
over the phone, this objection can be countered by offering the
debtor the opportunity to pay by themselves at the ACH Gateway.
Just make sure they use their Collect! file number as their unique
account number identifier. Your office will receive the payment
on the next reconciliation after the amount has been processed.
To access the batch process to Reconcile your ACH Payments for the day is located
via the menu path " Daily Administration\ Payments and Charges\Reconcile ACH History".
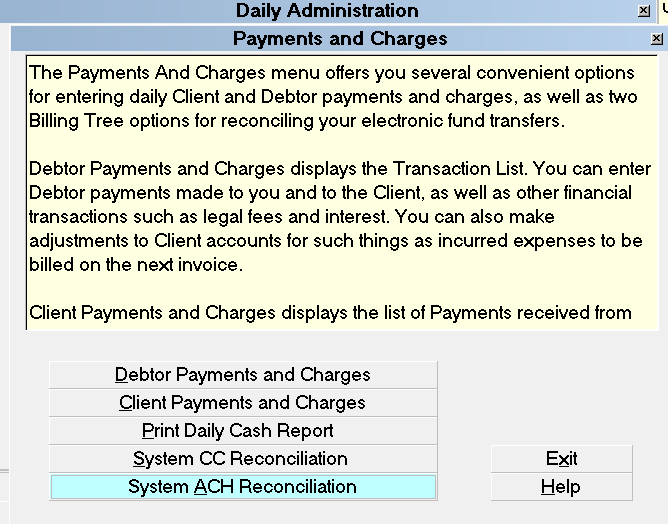
Reconcile ACH History
Select the Reconcile ACH History button to run
your process.
The system maintains records of when it did its last reconcile and
has fail-safes in place to prevent previously downloaded payments
from being posted a second time. You are free to reconcile as
many times as you need to throughout the course of the day.
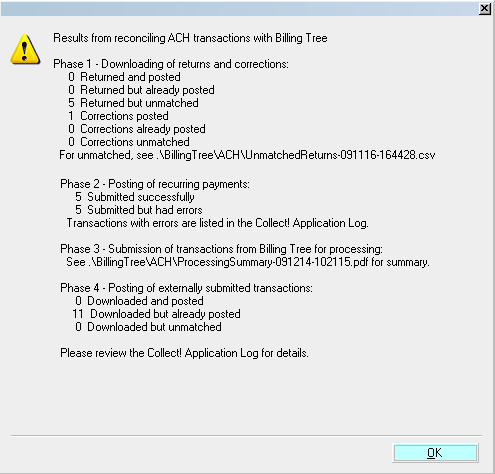
Reconcile ACH History Results
If Billing Tree returns unmatched transactions that require
manual review, they will be stored in an Unmatched Returns
file that bears a current date and time stamp in the
folder along this path "CV11\bin\BillingTree\ACH".
It also writes a detailed log into the path
"CV11\bin\BillingTree\ACH\achnow.txt".
Users of CV11.6.2.7 and higher who are also licensed
for the Scheduler Module now have an enhanced automation
with the addition of the Reconcile process being added
to the Scheduler Task list of options. You may run this
process offline and unattended. Contact us at
sales@collect.org for module pricing.
See Also
- Billing Tree Topics
- Reconcile ACH History
| 
Was this page helpful? Do you have any comments on this document? Can we make it better? If so how may we improve this page.
Please click this link to send us your comments: helpinfo@collect.org