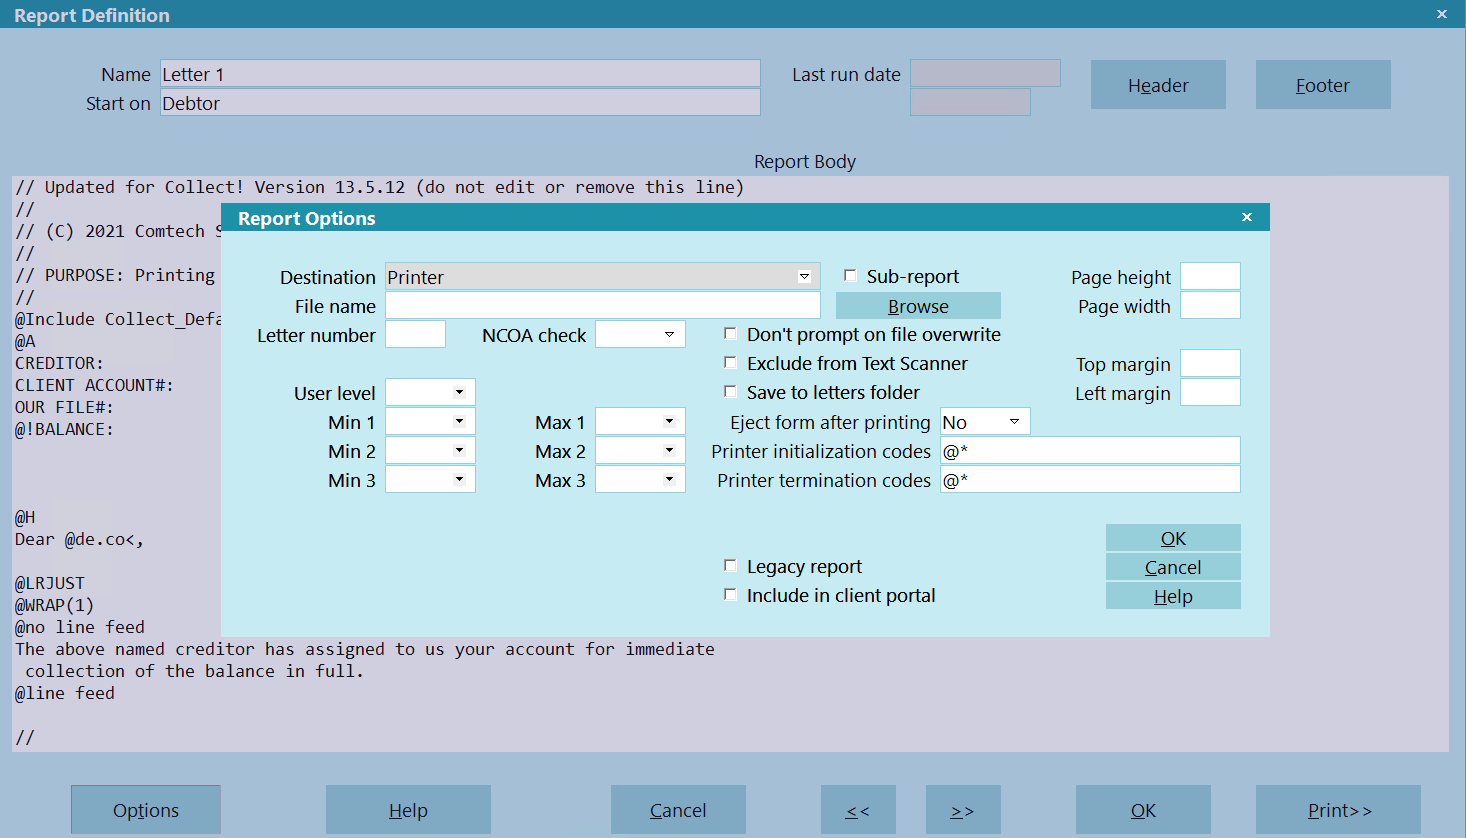
Report Options
The Report Options form stores settings that apply to a
particular report. This allows you to specify different settings for
individual reports depending on your requirements. You can
choose a destination, a filename, user rights, set the margins
and page height, give your report a number and switch on
NCOA check when using letter service.
Report Options
Additional options are available when you select Other
from the Destination field pick list. For instance, you can create
special reports to print out of MS Word or Word Pad using
mail merge.
 You should use this form to enter any custom settings
that you want to apply to your whole report. At the very least, you
should ensure that Collect!'s default settings are restored, by
entering RESET codes in the Printer Initialization Codes and
Printer Termination Codes fields.
You should use this form to enter any custom settings
that you want to apply to your whole report. At the very least, you
should ensure that Collect!'s default settings are restored, by
entering RESET codes in the Printer Initialization Codes and
Printer Termination Codes fields.
 When importing or exporting reports, settings in the
Report Options are imported or exported as well.
When importing or exporting reports, settings in the
Report Options are imported or exported as well.
Destination
Choose an output device from the pick list. Click the arrow
to display the choices. This setting should be filled in,
especially if you intend to print this report in your daily
batch letters.
Printer - Send the report or letter
directly to a printer.
Screen - Preview and edit your
report on the screen before printing.
File - Send your report to a file
which you can later edit using a word processor, or
import into a spreadsheet or database. You can enter
a filename in the field labeled Filename
or enter a filename when the report is printed.
Spreadsheet - Print quickly and easily to
your spreadsheet program.
Browser - Format the report as an HTML
page and view it in the browser.
Other - Use with CSV files or Tab delimited
reports, or in combination with RTF reports. A filename is
entered in the field labeled Filename.
A field labeled Redirect To becomes
visible with this selection and you can enter a filename
or a web site to redirect your report output to.
Email - Send this letter directly to the
account's Email address. When you select "Email" as
your Destination and additional field becomes visible,
a check box labeled "Use SMS." Please refer to Help
topic, SMS Email Setup for more information.

Sub-Report
If this report is called via another report with @REPORT
or @SUBREPORT, and you do not want the report to be run
directly, you can check this box to hide it from the
Report list when users click the Print button.
File Name
Enter the File Name here if you intend to send the
report to a file. By default, files are placed in the root
folder of your Collect! application. You can specify a
drive and the name of an existing folder, if you wish
to be more specific.
Examples:
To save the file in the Collect folder, enter FILENAME.EXT,
for example, myreport.txt.
To save the file on drive F:\ enter F:\FILENAME.EXT,
for example, F:\myreport.txt.
To save the file in F:\ALLREPORTS
enter F:\ALLREPORTS\FILENAME.EXT,
for example, F:\Allreports\myreport.txt.
In this case, the folder ALLREPORTS must already
exist or you will get an error message.
To use this field with *.rtf or *.csv files, enter the path
and name of the file. For example, LETTER1.RTF to
open the RTF file or MAILMERGE.CSV to print to a
CSV file.
When you choose 'File' from the
Destination pick list and enter a complete
path in the File Name field, the
Print Output Options dialog will
automatically display this information
when you choose to print the report. You
will see that 'File' will be marked as the
Destination and the path you entered as
the File Name with be displayed in the
Print Output Options 'Path' field.
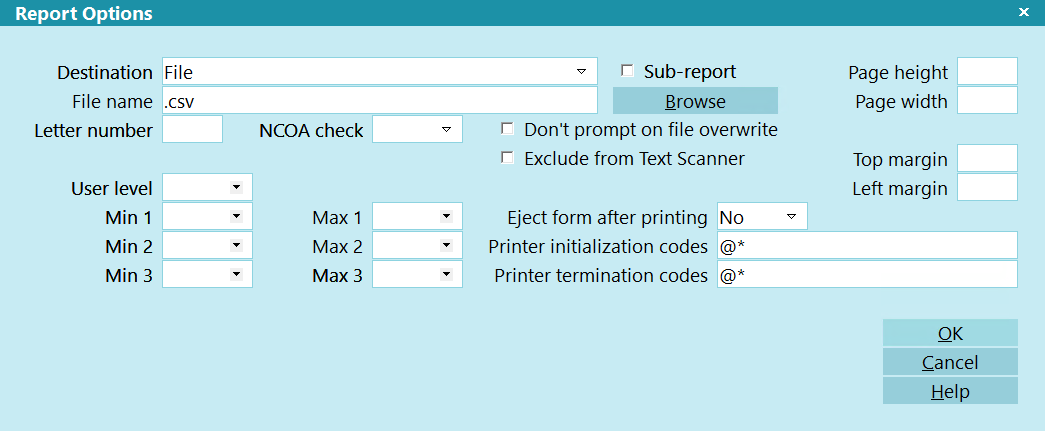
File Name With Date/Time Stamp
If you enter simply the extension, .csv or .rtf (without
the asterisk!) in the File Name field, Collect! will assign
a file name to the report when you print it. Collect adds
an operator, date, time and increment stamp.
For example, OWN-20080305-115656-1.csv.
File Name Setting for OpID/Date/Time Stamp
By default, files are stored in the
Collect\bin\global\masterdb\letters folder.
For example,
Collect\bin\global\masterdb\letters\OWN-20080305-115656-1.csv.
You can also enter your own location. For example,
C:\myfolder\.csv will output your files to C:\myfolder.
For example, C:\myfolder\OWN-20080305-115656-1.csv.
File Name With Use SMS
When you have switched ON "Use SMS" with an Email
destination, you can enter an SMS Domain Name in the
File Name field. Please refer to Help topic,
SMS Email Setup for more information.
Browse
Select the BROWSE button to navigate to a folder of
your choice for saving this report to FILE. Enter a name
for your report and a valid extension, such as CSV or TXT.
Collect! will display the path. When the report is printed,
it will be saved to the folder you selected.
By default, reports are saved to your letters folder
so you do not have to select a folder here. This
is just a convenience for users who need more
flexibility for storing report files.
Letter Number
This is used to identify letter templates being
sent to a letter service provider. The number you
select in this field will match the setup letter
number your provider has created to match that specific
letter. Each letter you plan on sending to the mailing
house needs to have a unique value. This number is
printed in the debtor's information sent to the Letter
Service and is used by them to print each letter
correctly. Generally, samples of the report and report
body codes must be sent to your service provider of choice
as part of your setup process with them.
This field support alphanumeric characters.
When you print your letter batch to a
service bureau, the system will only
output to text file those letters that
have a letter number.
NCOA Check
This switch is used for Letter Service. When it is
switched ON with a check mark, a special code is
included in the Letter Service output file. This tells
the Letter Service to perform a National Change
of Address check on this Debtor.
When printing your Letter Service batch,
switch ON 'Print to unverified addresses'
in Batch Letter Options to force Collect!
to print to all debtors in the batch, even
those with "bad" addresses, which means
the 'Address OK' switch is OFF in the
Debtor form.
Please refer to How To Use Letter Service for
more details.
Don't Prompt On File Overwrite
Switch this ON with a check mark to stop Collect! from
showing you a prompt if you are printing to file and the
file already exists. When this switch is ON, Collect!
will automatically overwrite the existing file that has
the same name as the file you are printing.
Exclude From Text Scanner
Switch this ON with a check mark to exclude this report
or letter from the Text Scanner.
The Text Scanner is a utility under the Customize Printing
menu that allows you to tag Report Definitions, then search
for a string of text. All reports and letters that do not
contain the text will be tagged.
Save To Letters Folder
This box applies to scenarios where files would be saved to
either the Debtor or Client attachment folders.
Switch this ON with a check mark to force any files created
by this report to always save in the Letters folder located
at Collect\bin\global\{dbname}\letters.
User Level
This can be used to limit the Users allowed to print
certain reports. You pick from the list of User levels
and choose one. Anyone with that level or better will
be able to print that letter or report.
For example, if you enter a 10 here, only Users at
level 10 can print this report. If you enter a 20 here,
all Users at levels 10 and 20 are allowed to print the
report. Enter a 60 here, and all Users from levels 10
to level 60 are allowed to print the report.
What actually happens is that when the
User picks the Print command, only
those reports that they are allowed to
print appear in the list of available reports.
Thus, the User is never aware of the
reports they don't have access to.
Min 1
The MIN and MAX fields allow you to set up to 3
ranges of Users per report. A User level that falls
within any of the selected ranges will have access
to the report. Otherwise, they won't be able to run
the report.
Press F2 while on the MIN or MAX field to display a
pick list of User Levels that you can select from.
Example:
Min 1 -- 10 Max 1 -- 20 This range encompasses
all user levels between 10 and 20. They can run
the report.
Max 1
The MIN and MAX fields allow you to set up to 3
ranges of Users per report. A User level that falls
within any of the selected ranges will have access
to the report. Otherwise, they won't be able to run
the report.
Press F2 while on the MIN or MAX field to display a
pick list of User Levels that you can select from.
Example:
Min 1 -- 10 Max 1 -- 20 This range encompasses
all user levels between 10 and 20. They can run
the report.
Min 2
The MIN and MAX fields allow you to set up to 3
ranges of Users per report. A User level that falls
within any of the selected ranges will have access
to the report. Otherwise, they won't be able to run
the report.
Press F2 while on the MIN or MAX field to display a
pick list of User Levels that you can select from.
Example:
Min 2 -- 60 Max 2 -- 80 This range encompasses
all user levels between 60 and 80. They can run
the report.
Max 2
The MIN and MAX fields allow you to set up to 3
ranges of Users per report. A User level that falls
within any of the selected ranges will have access
to the report. Otherwise, they won't be able to run
the report.
Press F2 while on the MIN or MAX field to display a
pick list of User Levels that you can select from.
Example:
Min 2 -- 60 Max 2 -- 80 This range encompasses
all user levels between 60 and 80. They can run
the report.
Min 3
The MIN and MAX fields allow you to set up to 3
ranges of Users per report. A User level that falls
within any of the selected ranges will have access
to the report. Otherwise, they won't be able to run
the report.
Press F2 while on the MIN or MAX field to display
a pick list of User Levels that you can select from.
Example:
Min 3 -- 90 Max 3 -- 95 This range encompasses
all user levels between 90 and 95. They can run
the report.
Max 3
The MIN and MAX fields allow you to set up to 3
ranges of Users per report. A User level that falls
within any of the selected ranges will have access
to the report. Otherwise, they won't be able to run
the report.
Press F2 while on the MIN or MAX field to display
a pick list of User Levels that you can select from.
Example:
Min 3 -- 90 Max 3 -- 95 This range encompasses
all user levels between 90 and 95. They can run
the report.
RANGES
Using each Min/Max value, we have set three
separate ranges for the report.
Min 1 -- 10 Max 1 -- 20 All users with user levels from 10 to 20
Min 2 -- 60 Max 2 -- 80 All users with user levels from 60 to 80
Min 3 -- 90 Max 3 -- 95 All users with user levels from 90 to 95
So any operators with a user level between 10
and 20, 60 and 80, and 90 to 95 can run this report.
Operators who do not fall within these ranges will
not even see the report when they view the list
of reports.
Page Height
This field is normally not needed. If you are using
Print via Device Context, your printer will automatically
handle the page height. This field does come into
play when you are printing to Printer Stream, or
controlling the number of lines to force the printer
to print headers and footers for more demanding
report layouts.
This field specifies the number of lines that can be
printed on a page. Typically, this is 66 lines for
dot matrix printers and 60 lines for laser printers.
If your report uses small fonts, you can set the page
height to 88, or to whatever works for the paper size
you are printing on.
Page Width
This field is normally not needed. If you are using
Print via Device Context, your printer will automatically
handle the page width. This field does come into play
when you are printing to Printer Stream, or controlling
the width manually to force the printer to print a
particularly demanding format or layout.
This specifies the number of columns that will fit on
the page. If you are printing and you find that lines
are being chopped off on the right edge, try increasing
the page width.
Normally the width is 80 characters for standard
Courier font 10 cpi and 132 characters for a
standard Courier compressed font.
Top Margin
This tells the printer the number of lines to be left
blank at the top of each page. It is an easy way to
print to paper you already have letterhead printed on.
If you leave this blank, you can leave the right
number of empty lines in the report body itself to
adjust the text down below the pre-printed letter
head paper.
Margin settings can also be controlled
by using graphic commands. See
How To Position Text And Graphics
for details.
When printing to the screen, the top
margin is ignored. After you review or
edit the letter, you can print with the
F5 key and you can then specify a top
margin before printing.
Left Margin
This field specifies the number of columns on the
left of the page to skip before printing each line. If
you have a left margin that applies to the complete
report, this is an easy way to control the left margin.
Examples:
Specify 5 for a margin of 1/2 inch.
Specify 10 for a margin of 1 inch.
Specify 15 for a margin of 1 1/2 inches
If you wish to have different left margins set in
different sections of the report, then leave this field
blank and control your left margins within the
report with the @LM command in the report body.
Margin settings can also be controlled
by using graphic commands. See
How To Position Text And Graphics
for details.
When printing to the screen, the left
margin is ignored. After you review or
edit the letter, you can print with the
F5 key and you can then specify a left
margin before printing.
You should not try not to use the Left Margin
and @LM commands in the same report. Left
Margin uses characters and depends on the size
of the font. The @LM command uses 100ths
of an inch. Combining these two can produce
erratic results.
Eject Form After Printing
This function causes the printer to feed a new page
into the printer after printing a report. Normally,
this should always be set to NO.
Use the @f command at the bottom of your
Report Body if you want to feed a new
page after printing your report.
Printer Initialization Codes
This command allows you to set up
printer control codes to be executed before the
report or letter is printed. This includes page
orientation and custom fonts. Also, you can ensure
that certain default settings are being used for
this report. Using Initializing codes will also help
the printer to swap its internal code pages, if you
need to print letters that are of different languages.
One letter French, the next Spanish, and then back
to English for example.
When different reports are printed at the
same time, formatting from one report
can carry over to another, with
undesirable effects. To ensure that this
does not happen, enter appropriate
codes here.
For instance, if you want to set the printer command
codes back to their default values, set the print
orientation to portrait, and set the print font to A.
To do this, enter the following command line:
@*PA
The * will force a reset of the printer, the P will set
the page orientation to Portrait, the A will set
the printer font to Courier 10 cpi.
Another example sets the page orientation to
landscape and uses a smaller font.
@*LF
The * will force a reset of the printer, the L will set
the page orientation to Landscape, the F will set the
printer font to Courier 16.66 cpi or compressed font.
Printer Termination Codes
Enter the printer control codes to be executed after
the report or letter has been printed. Codes entered
in the Printer Initialization Codes field must be "turned
off" in the Printer Termination Codes fields. Otherwise,
the report's formatting may carry into the next letter or
report that you print.
When different reports are printed at the
same time, formatting from one report
can carry over to another, with
undesirable effects. To ensure that this does
not happen, enter appropriate codes here.
If you want to reset the printer control codes back
to their default values, reverse the order of the codes
entered in the Printer Initialization Codes field to
"turn off" each setting.
For example, using the sample codes shown above,
in Printer Initialization Codes, we will enter the
appropriate termination codes for each case.
@AP* turns off @*PA
@FL* turns off @*LF
Please refer to Printer Control Code for information
on codes that can be used.
Using Termination codes will also help
the printer to swap its internal code pages
if you need to print letters that are of
different languages. One letter French,
the next Spanish and then back to
English for example.
Redirect To
This field is visible only when you select Other in
the Destination field.
Use this field to enter a document that you want
your report to print to. For instance, you can use this
for merging data from Collect! into a label template
created in MS Word. Enter the name of the template
here. Place both the template and the file to merge
in the same folder.
Send the report to a CSV file and use the Redirect To
field to specify an MS Word template DOC to open
with merged data from Collect!. Place both the template
and the file to merge in the same folder.
You can use a relative path here, for
example, ".\styles\mailmerge.csv" (that is a
dot and a slash and then the folder name
and filename.)
This field can hold the name of a file to print to when
you are producing a tab delimited report.
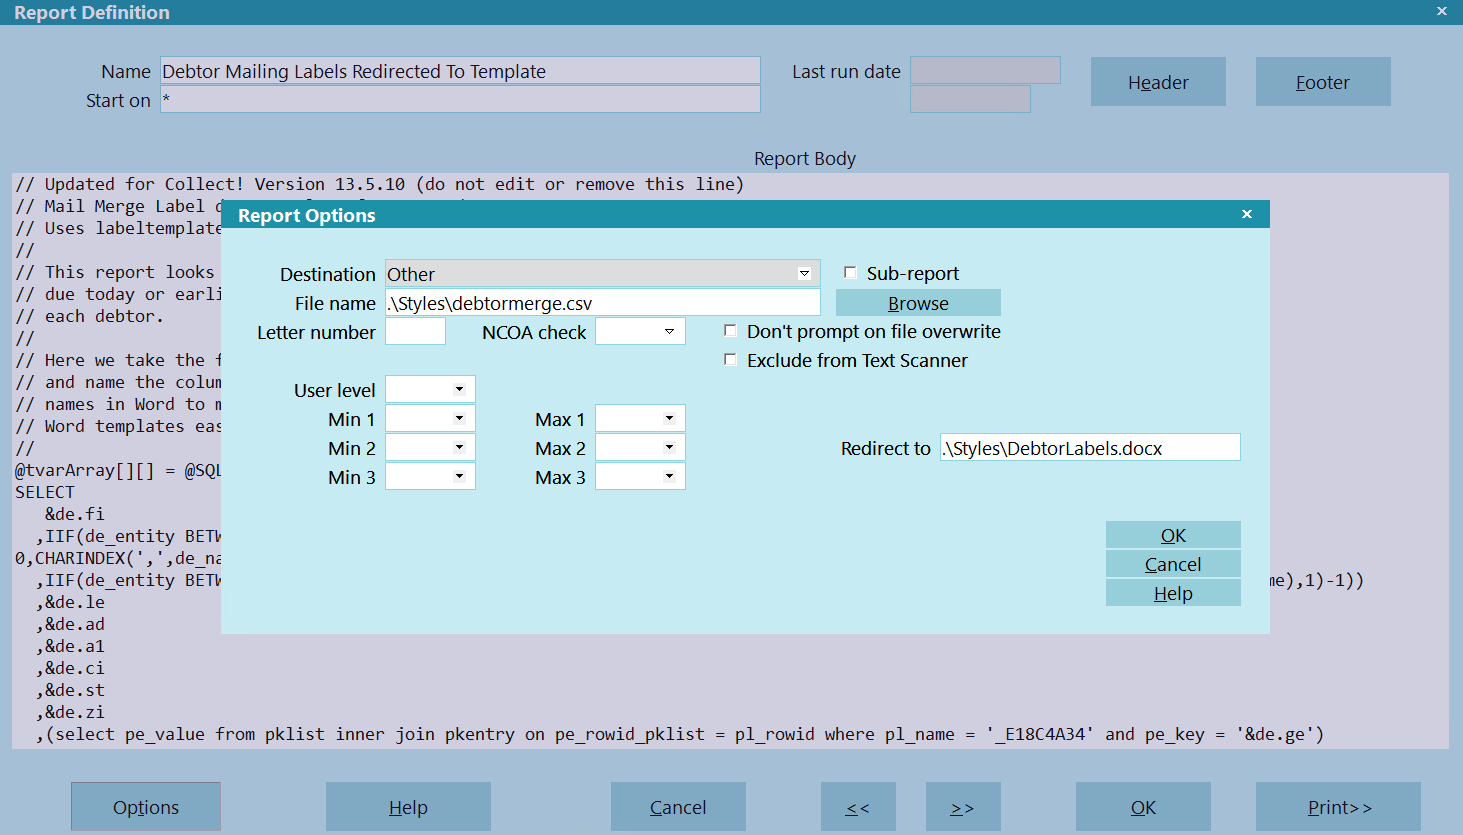
Report Options with Other Destination and Redirect To
If you put a URL in this field, Collect! will use
your web browser to go to the web site when
you print the report.
Use SMS
This check box is visible only when you have selected "Email"
as the Destination for your report. When you switch it ON with
a check mark, you can type an SMS Domain Name into the
File Name field. If you leave the File Name field blank, Collect!
will use the Default Domain Name set in the SMS Email
Setup form. Please refer to Help topic, SMS Email Setup for
more information.
Legacy Report
In version 14, we are normalizing the Report Writer syntax. As part of that process, some poor coding
habits cause reports to no longer work. Check this option to invoke "Legacy" behavior. This box also
applies to reports called via the Collect! REST API.
Include In Client Portal
Check this box to include the report or letter in the Client Portal. Reports in the Client Portal
must be Started on either Client or Debtor.
 WARNING: Any report that has this box enabled will be visible to Clients. Please ensure that the
Report Body is coded appropriately for security.
WARNING: Any report that has this box enabled will be visible to Clients. Please ensure that the
Report Body is coded appropriately for security.
Help
Select this for help on the Report Options form
and links to related topics on creating and printing
reports and letters.
Cancel
Select this button to ignore any changes you may
have made and then return to the previous form.
OK
Selecting this button will save any data you have
entered and return you to the previous form.
| 
Was this page helpful? Do you have any comments on this document? Can we make it better? If so how may we improve this page.
Please click this link to send us your comments: helpinfo@collect.org