Upgrading Your Collect! Version 11
This topic discusses upgrading Collect! Version 11 databases
to the latest Collect! release, using the automated update
patch procedure.
 These instructions are for all Collect! Version 11.2
and Version 11.3 databases. For versions CV11.0 and
CV11.1, please refer to Help topic, Upgrading Your
Collect! Version 11_0 or 11_1.
These instructions are for all Collect! Version 11.2
and Version 11.3 databases. For versions CV11.0 and
CV11.1, please refer to Help topic, Upgrading Your
Collect! Version 11_0 or 11_1.
If you are running Collect! Version 11.4, you can
apply the latest Version 11.6 patch to your
Collect! system. A full upgrade is not necessary.
Please consult Technical Services if you are not sure
what to do.
To download patches, please login to the Collect! Member Center and
select the patch which is appropriate for your site and upgrade intent.
If you are not currently a Member and would like to inquire about upgrading
options, please contact us.
It is recommended that you have a recent backup of
your Collect! system prior to any upgrade procedure.
 Please refer to Help topic, Preparing To Upgrade Your Database
before upgrading.
Please refer to Help topic, Preparing To Upgrade Your Database
before upgrading.
Preparing Your Databases
Perform these steps on your Server!
1. Make sure you have user 99/99 and Exclusive for all steps.
2. Ensure that you have run a full internal maintenance
on your databases, with all options selected as outlined
in the Help topic, Preparing To Upgrade Your Database.
3. Examine and clean up all data, removing blank or unnecessary
records in your Collect! databases and CV11 folder.
The automated upgrade procedure copies all relevant
files from your cv11 folder. If you have " copy of"
of files and "copy of" folders in the cv11
folder, please move them to another folder for
safe keeping prior to upgrading.
4. Ensure that your working Collect! folder is named
simply "cv11" and that you do not have other folders named "cv11"
on your computer. The automated upgrade looks only for
a folder named simply "cv11."
This folder MUST be on the root of your drive, for
example, C:\cv11 or D:\cv11
and NOT C:\my documents\cv11
The upgrade procedure looks on every drive, starting with your
C:\ drive. If it does not find a cv11 folder on the C:\drive, then
it will look on other drives on your computer.

Upgrading Large Databases
Collect! copies your entire cv11 contents to its upgrade folder prior
to upgrading, excluding help, snapshots and backup folders. This
process may take quite a while if you have a very large database.
Please refer to Help topic, Custom Upgrade for Technicians for details.
Performing The Upgrade
1. Make sure your cv11 Server is shut down. To ensure that no
files are being held by the operating system, reboot your server.
2. Install the latest Collect! Version 11 Build 5 on your computer.
By default, Collect! will install to a cv116 directory. New shortcuts
on your desktop will be named "cv116," "cv116 Server" and so on,
so that they do not conflict with your existing cv11 system.
3. Start Collect! Version 11 by selecting the icon
named cv116. After you enter your Company
Name, Collect! will prompt you when it sees that you have a cv11
folder on your computer.
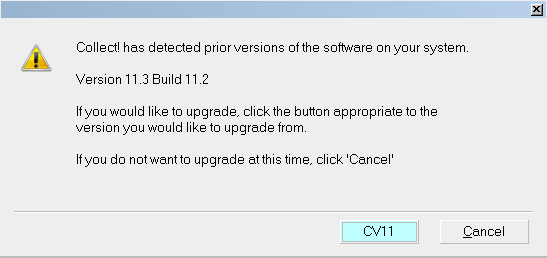
Prompt to Begin Automated Upgrade
If you do not see this prompt, please look in the "cv116\bin"
folder and delete the "upgrade" folder.
Then start Collect! again.
3. Select the CV11 button to begin the upgrade process. Collect!
will proceed to copy and upgrade DATA, DEMO, PROS and
any other databases you may have in your Collect! Version 11.2,
or DATADB, DEMODB, PROSDB and any other databases
you may have in your Collect! Version 11.3.
Depending on the size of your prior cv11 folder,
this step may take a long time. Be patient,
Collect! is copying all of the files and folders
from your Collect! Version 11.2 or Version 11.3.
Alternatively, you can prepare the upgrade folder
yourself, referring to Help topic, Custom Upgrade
for Technicians.
Migrate Utility
As the upgrade process proceeds, you will notice a lot of activity
going on in the utility windows as Collect! copies and "migrates"
your database. Migrating is a procedure whereby the Version 11.2
and Version 11.3 databases are "reprogrammed" to work with the
new database engine. It is way faster that the "old" upgrading
procedure and does not change any of your data.
Completing The Upgrade
1. When the upgrade is finished, sign into DATADB to complete the
upgrade. You MUST use a Level 99 operator!!!
Then sign into each of the other databases as well so that Collect!
can finish the upgrade on each database. You MUST use
a Level 99 operator!!!
2. Input your new license into Collect! Version 11.
3. Rename your old Collect! "cv11" folder to cv11old and then
rename the new cv116 folder to "cv11."
4. Ensure that all shortcuts point to the new cv11 install.
User Ids And Passwords
User IDs and Passwords will be migrated to the new Collect!
databases. If the upgrade cannot decipher an Operator's
Password for any reason, for instance, if the Password is missing
or is in asterisks, then the upgrade resets the password to lower
case User ID and switches ON "Must change password next login."
Any passwords that were changed by the upgrade
will be noted in the "_upgradelog.txt" file
located in the "bin\upgrade" sub-folder.
If an Operator cannot sign in with their old password, please
check the upgrade log. The Operator should sign in with
their User ID in lower case as the Password and they will
be prompted to enter a new Password.
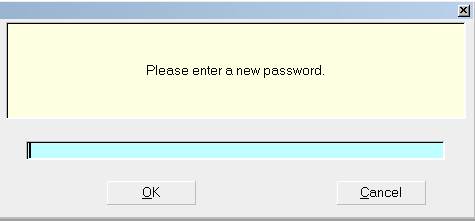
Prompt to Enter a new Password
Selecting the CANCEL button will return you to
the Welcome to Collect! screen.
Ini Files
The upgrade does not transfer your connect.ini or your
rdmserver.ini files, as these are not compatible with Version 11.6.
If you had special settings in these files, you may need to add
these settings to the new connect.ini and rdmserver.ini files.
Web Host
Many changes have been made to the Web Host. You may want
to take advantage of the new Web Host. However, if you have
your own customized pages, do not copy over them! Otherwise,
you can copy the Demodb Web Host into your Masterdb if desired.
If you have your own SSL Certificates, the upgrade will bring
them over when it upgrades your Web Host.
Technical Notes
During the automated upgrade procedure, Collect! copies
your entire cv11 folder (except for snapshot, doc, export
and backup folders) and performs the upgrade on this
copy. Your original cv11 folder is left intact.
Alternatively, you can place a copy of your Collect! into
the upgrade folder as described in Help topic,
Custom Upgrade for Technicians.
Collect! stores your original bin, catalog, syslog and config
files in the new cv11\bin\upgrade folder. You can delete these,
but please do not remove the folder or Collect! will prompt to
upgrade again the next time you sign into Collect! at the Server.
In other words, Collect! looks for an "upgrade" folder in the
new cv11\bin folder. If it finds one, it hides the upgrade prompts.
During the upgrade, Collect! backs up the existing MASTERDB,
DEMODB, and PROSDB folders into the cv11\_migback folder,
along with the bin, catalog and other files. You can delete this
folder. It contains the databases shipped by default with
Collect!, not your data.
Summary
The automated upgrade procedure copies all the relevant files
and folders from Collect! Version 11.2 or Version 11.3 and
upgrades all databases to Version 11.6. This process uses a
very fast and efficient utility called the "migrate utility." The
time it takes to upgrade is a mere fraction of the time it takes
to do the manual upgrade procedures. Also the automated upgrade is
less prone to user error, and involves very few steps.
See Also
- Upgrading Your Collect!
|
Was this page helpful? Do you have any comments on this document? Can we make it better? If so how may we improve this page.
Please click this link to send us your comments: helpinfo@collect.org