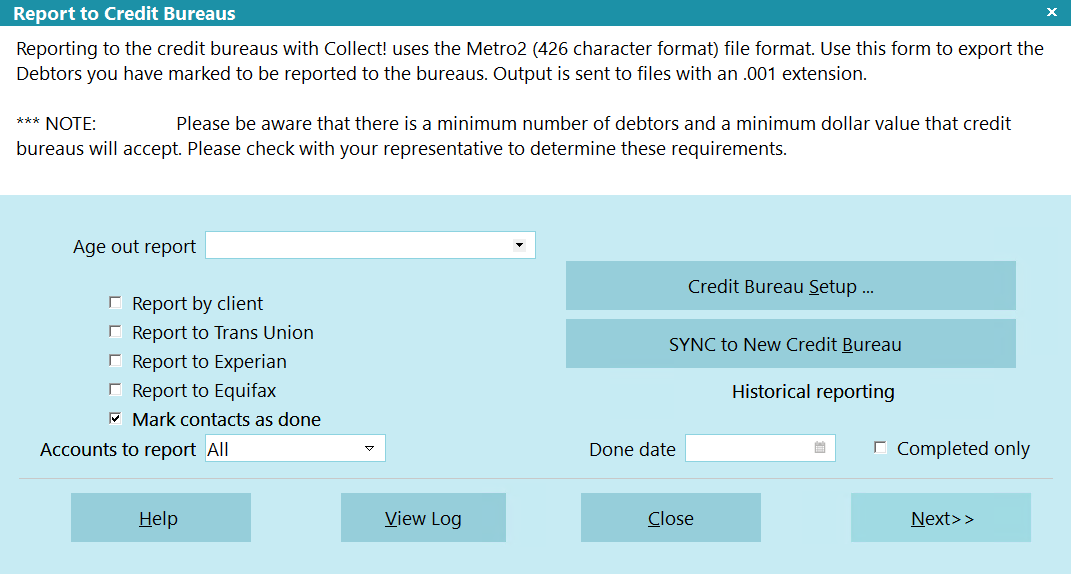
Report To Credit Bureaus
Reporting to the credit bureaus with Collect! uses the
Metro2 (426 character format) file format. Use this form
to export the Debtors you have marked to be reported to the
bureaus. Output is sent to files with an .001 extension.
 Please be aware that there is a minimum number of
debtors and a minimum dollar value that credit bureaus will accept.
Please check with your representative to determine these
requirements.
Please be aware that there is a minimum number of
debtors and a minimum dollar value that credit bureaus will accept.
Please check with your representative to determine these
requirements.
Credit Reporting is a three step process. First, print a Summary
Report to review the accounts being reported. Second, select the
bureaus you want to send to and create the disk files or save the
file to your hard drive, e.g. C:\ N.B. Be sure
to check the log to correct any errors. It is most important to
correct errors before sending to Credit Bureau. Finally, you can
mark the contacts done. Please note that you must correct
all errors before marking as done.
Before using the Report To Credit Bureaus form, setup
the details of your reporting specifications using the
Credit Bureau Setup form, the Credit Report Preferences form
and the information given you by your credit reporting agency.
 You can also schedule credit bureau reports to run
using Collect!'s Scheduler.
You can also schedule credit bureau reports to run
using Collect!'s Scheduler.
Credit Reporting Process
 WARNING: Reporting credit is a legal matter. You are
responsible for ensuring that the information you are sending
is accurate and complete. Do not report credit without being
ABSOLUTELY SURE about your legal rights and the legal
rights of the person or entity you are reporting.
WARNING: Reporting credit is a legal matter. You are
responsible for ensuring that the information you are sending
is accurate and complete. Do not report credit without being
ABSOLUTELY SURE about your legal rights and the legal
rights of the person or entity you are reporting.
This is a high-level overview of the process. For more information, please
refer to the Help topic How to Run a Credit Bureau Report.

Step 1
Select Tools from the top menu bar and then select
Credit Reporting from the drop-down choices. This will
display the Report to Credit Bureaus dialog.
First, print a Summary Report. It is important to review the output
to be sure the desired accounts are being reported. This creates
a report that you can print and keep for your records.
Step 2
Next, if applicable, select the Age Out report that you want
to run to mark older accounts for deletion from the credit
bureaus.
Step 3
Next, select the bureaus you want to send to, and create the
files. Ensure that the log is free of errors.
During this step, you have a chance to correct any
errors the system detects in your credit reporting information.
These errors can be invalid addresses, incorrect or missing
dates, and any other information.
During this step, you typically want to send the output to
drive C (see the Help on Credit Bureau Setup), and only
select one bureau to send to. After the file has been created,
select the View Log button to review any errors. The files in which
the errors are found are listed in the log. Go to each file listed and
correct the error.
Only after you have corrected all errors should you make a final
pass to create the files you will send to the credit bureaus.
Then you can proceed to step 3
Step 4
Finally, you can Mark the Contacts as Done so the system
knows they have been reported.
WARNING: Only take this step after you have completed
step 2 and all errors have been corrected.
Age Out Report
After a period of time, you may have to close accounts due to
their age. If this applies to you, you can select a report here
to run you process to mark the accounts for deletion from the
credit bureaus. This process will run first, then proceed with
the rest of the export process.
The report that you use must Start On Anywhere in the
Report Definition and there must not be any tagged
records in the background.
Report By Client
If report by client is switched ON, a client list will appear.
Select the client to report for.
Tagging multiple clients will not work. Please select
only one Client.
Before doing this you must set up the Client User2, User3, and
User4 fields with values specific to the credit bureau being
reported to.
User 2 = Trans union codes
User 3 = Experian codes
User 4 = Equifax codes
Each user field should contain 4 numbers separated by commas
(control number[5]) , (grantor code[10]), (center code[3]), (area
code[3]), (identification number[10]) The number in brackets
represents the maximum number of characters for each code. You do
not need to put spaces before or after the commas.
Examples:
TRANS UNION
Client User 2 = 12345,1234567890,123,123,1235467890
EXPERIAN
Client User 3 = 54321,0987654321,321,321,0987654321
EQUIFAX
Client User 4 = 35125,5328598124,451,271,5328598124
If any numbers at the end are left out, the defaults will be used
from the Credit Bureau Setup dialog. If there is only a Control
Number present then it will be used, and the remaining 3 values
will be default ones. This applies only to values missing at the
end of the list.
Please do not simply supply a Grantor Code, for
instance, and expect it to work. The first number in
the list is always assumed to be the Control Number,
the second is always assumed to be the Grantor
Code, etc.
Examples:
INPUT (CONTROL NUMBER)
control number = overrides default
grantor code   = default
center code    = default
area code      = default
identification = default
INPUT (CONTROL NUMBER, GRANTOR CODE)
control number = overrides default
grantor code   = overrides default
center code    = default
area code      = default
identification = default
INPUT (CONTROL NUMBER, GRANTOR CODE, CENTER CODE)
control number = overrides default
grantor code   = overrides default
center code    = overrides default
area code      = default
identification = default
INPUT (CONTROL NUMBER, GRANTOR CODE, CENTER CODE, AREA CODE)
control number = overrides default
grantor code   = overrides default
center code    = overrides default
area code      = overrides default
identification = default
INPUT (CONTROL NUMBER, GRANTOR CODE, CENTER CODE, AREA CODE, IDENTIFICATION NUMBER)
control number = overrides default
grantor code   = overrides default
center code    = overrides default
area code      = overrides default
identification = overrides default
It will only work in the order specified above. You
cannot override the Center Code unless the Grantor
Code and Control Number are also overridden. In other
words, you can only override a code if the codes prior
to it are overridden as well.
Report AS Client
WARNING: This option is only for 3rd party agencies that are reporting on behalf of their
client. When the above Report by Client box is selected, this box is visible.
Select a client to report as them. The Client must have the applicable credit
bureau settings in the applicable user 2 to 4 fields as outlined above.
Report To Trans Union
A check in this field tells the system to use the values
defined for Trans Union in the Credit Bureau Setup, and
to export the Debtors in the metro tape format. The name
of the output file will be {dbname}_TU.001. If a file with
this name exists, it will be overwritten.
Report To Experian
A check in this field tells the system to use the values
defined for Experian in the Credit Bureau Setup and to
export the Debtors in the metro tape format. The name
of the output file will be {dbname}_EXP.001. If a file with
this name exists, it will be overwritten.
Report To Equifax
A check in this field tells the system to use the values
defined for Equifax in the Credit Bureau Setup, and to
export the Debtors in the metro tape format. The name
of the output file will be {dbname}_EFX.001. If a file with
this name exists, it will be overwritten.
Equifax also requires that the Client details (K1 segment)
be sent with each Debtor. This can be set by selecting the
check box labeled Send Client Detail in Reports
in the Client Settings form.
Mark Contacts AS Done
A check in this field tells the system that it is OK to mark
all Metro contacts as done. When you have successfully
completed your credit bureau report, you will be prompted to
mark the contacts as done. This step has to be taken to
insure that proper reporting has taken place.
If the system reports errors, choose View Log
to find the errors. Fix them and run your report
again.
The next time a transaction takes place, if the Debtor has a
check in the Report to credit bureau field, a new Metro
contact is automatically scheduled. Access the
Credit Report Details form by selecting the CBR tab
on the Debtor form. The Report to credit bureau switch is
in the Credit Report Details form.
WARNING: Only take this step after you have
completed step 2 and all errors have been
corrected. Press F1 for details.
Accounts To Report
Select which accounts to include in the report. The default
is All. If All is selected, the standard behavior will occur
where all accounts are run to a single Metro2 file. If
Consumer is selected, then only accounts where the Legal Entity
is 0 (not set) or greater than 99 will be processed and outputted
to a file post-fixed with _CON in the filename. If Commercial
is selected, then only accounts where the Legal Entity is between
1 and 99 will be processed and outputted to a file post-fixed with
_COM in the filename.
Credit Bureau Setup
Selecting this will take you to the Credit Bureau Setup form
where you can enter settings for reporting to credit bureaus.
Sync To New Credit Bureau
Select this to run your first credit report to an additional
bureau. There are a few steps to this procedure so please
refer to help documentation first.
Historical Reporting
There are times when you may want to report to credit
bureaus in a fashion that is not covered by the normal
scheduled events. For instance, you may need to rerun
a report that was already completed.
The historical reporting section is designed to handle these
anomalous reporting procedures. You can specify a date
and run your report on completed or uncompleted contacts.
Done Date
Done Date is used only for historical reporting.
It works with the Completed Only switch to
determine historical reporting behavior.
If you switch ON 'Completed Only', then Collect! will
look for Metro contacts that were marked DONE on
the particular date you select here.
If you leave 'Completed Only' switched OFF, then
Collect! will look for IN PROGRESS Metro contacts
PRIOR to the particular date you select here.
Completed Only
Completed Only is used only for historical
reporting.
Switch this ON to include only completed Metro
contacts in this historical credit bureau report.
Leave this switch OFF to include only In Progress
Metro contacts in this historical credit bureau report.
Help
Press this button for help on the Report To Credit Bureaus
dialog and links to related topics.
View Log
Selecting this will display the results of your credit bureau
reporting session. If the system reported errors, you can
find the details by viewing this Log and fix them.
If you don't usually clear the contents of this log
when asked to "Clear Log" after viewing it,
you may need to scroll to the bottom of the
log to see the most recent session entries.
Close
Select this button to close this form without reporting to
credit bureaus and return to the previous screen.
Next
Selecting this will take you to the next step of the credit
bureau reporting session, depending on the selection you
have made. Either the report will be processed or a summary
report will be printed.
| 
Was this page helpful? Do you have any comments on this document? Can we make it better? If so how may we improve this page.
Please click this link to send us your comments: helpinfo@collect.org