To Do List
The To Do list shows in progress contacts scheduled for
the operator you are signed in as. The list displays all
contact types and priorities, or a filtered list based on
selection criteria you set in the Work In Progress form.
The list shows today's contacts first then all others,
oldest first. The sort order for contacts with identical
dates is Priority level, then contact Type, and finally the
Debtor's Name.
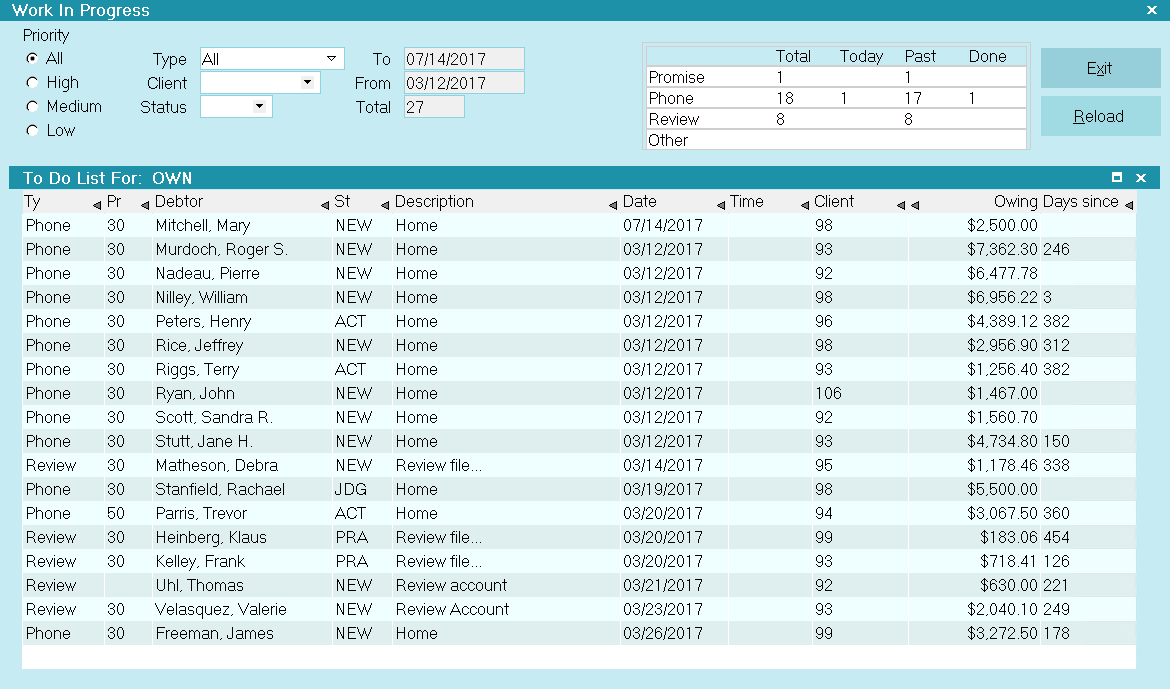
Work In Progress To Do List
Choosing A Contact In The List
To select a contact use the Arrow keys to highlight
a contact and press Enter or select the item line
in the To Do List.
When you pick an item from the To Do List, different
things happen depending on the type of contact you
are working.
If it is a Phone contact, the Dialer dialog box might
be displayed to give you a chance to dial the number.
Or, the number might dial automatically, if you have
Auto Dialer and it is set to dial without prompting.
If it is an Email contact saved as a draft, the Send Mail
form will display when you pick this item from the list.
Other contact types simply display the Debtor form.

Locked Records
If the record you are attempting to display is currently
locked, Collect! will automatically move to the next item
in the list.
Viewing A Sub WIP List
To filter the WIP List to only show contacts of a certain kind,
return to the top half of the Work In Progress from and
choose your criteria.
 You can press Esc to move from the To Do List to
the Work In Progress form. Press F1 in the Work In Progress
form for explanations of criteria choices.
You can press Esc to move from the To Do List to
the Work In Progress form. Press F1 in the Work In Progress
form for explanations of criteria choices.
For example, to review all accounts with Phone calls
scheduled, press Esc, then click Type in the WIP
form and choose Phone for contact Type. The To Do
List changes to display only Phone contacts.
Selecting A Contact From The To Do List
Each line item in the To Do List represents and displays
an individual contact. When you select the contact
the Debtor form will open for the Debtor who is the
subject of the contact.
 If you are setup for automatic dialing and the
contact is a Phone Type, you may see a Dial Phone
dialog instead or Collect! may actually alert your
Auto Dialer to begin dialing the number remarked in
the contact.
If you are setup for automatic dialing and the
contact is a Phone Type, you may see a Dial Phone
dialog instead or Collect! may actually alert your
Auto Dialer to begin dialing the number remarked in
the contact.
Viewing The Contact Details
When the Debtor form is displayed, you will notice an
extra line below the Summary field.
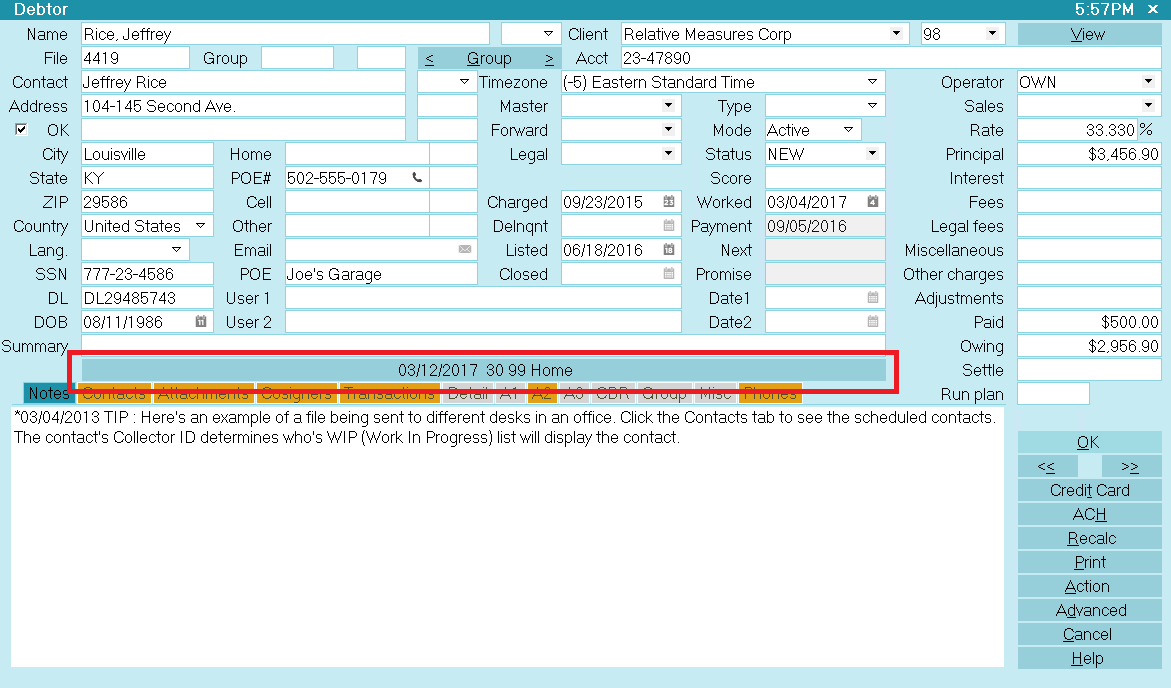
To Do Contact displayed in Summary
The cursor arrow is pointing to this line in the image above.
This is information about the contact you are working. Click
on this line to open the Contact form.
Words Of Caution
* * *
When you are done with the contact, you should mark it 'Done.'
If further work is required, schedule a new contact. Do not simply
make changes to the contact that you have opened, assuming
that this suffices as a new contact! There is an order of events
that Collect! follows regarding contacts that you work. If contacts
are setup to be marked 'Done' whenever they are worked, this
contact will be marked 'Done' regardless of your changes. With
no pending contact, the Debtor will slip from sight. (Maybe
happily for him, but not for you or your Client!)
* * *
Sorting The To Do List
Click any column heading, listed below, to sort the contacts
in the To Do List by the chosen column. One click sorts the
contacts in Ascending order and another click sorts them in
Descending order. Click a different column and that becomes
the sort criterion.
List Headings are as follows:
Type
The type of contact such as Letter or Phone call.
This field shows at a glance, what type of action
is required for this contact. For example, if it is
a Phone contact, you will make a call. If it is a
Review, you will review the file.
Please refer to Help topic Contact for a complete
list of contact types.
Priority
Priority is automatically set by Collect! based on
the Priority levels you set up in your contact
Plans. They can also be modified individually
when you edit a Debtor's contacts. Click on the
heading of the Priority column to sort in order of
Priority Level.
Debtor
This is the Name of the Debtor you will be contacting
when you work this contact. When you select the
name, it will bring up the Debtor form for this Debtor.
Status
The current status of the Debtor. This field is updated
automatically if there is a change to the Debtor's
status. Collect! reads the value from the Debtor form
as it loads the contacts.
If you choose to build a sub WIP based on Debtor
Status Code, this field will display the same Status for
each of the contacts shown in the resulting To Do List
and a yellow 'S' will display in the Status Bar at the bottom
of Collect!'s screen, indicating that you are viewing a
sub WIP and not the entire To Do List of contacts.
Description
This is a description of the contact taken from the
Description field of the Contact form. The information
in this field depends on the Type of Contact you are
working.
Letter Type displays the name of the letter that will be
printed for this Debtor.
Phone Type displays the phone number, i.e. WORK
or HOME etc.
Review Type displays notes entered in the field by
the operator.
Date
This column displays the DUE DATE of the contact.
This is the date that the contact was scheduled to
be dealt with. It is useful for alerting you to older
contacts.
The default format is MM/DD/YY but your setup of
Collect! may display dates in a different format.
Time
This column displays the TIME assigned to the
contact. Only contacts that have a time requirement
will have an entry in this field. At the time in the
field, a prompt will pop up on your screen to go to the
contact. This only works when you are working accounts
from your WIP List.
If you do not need a time prompt for an
account, it is recommended that you leave
this field blank when scheduling contacts.
Client
The ID number of the Client whose Debtor
is the subject of the contact.
Owing
The total amount still owed by the Debtor. This field is
filled from the Debtor form. Collect! automatically updates
the information so that it is current when the WIP List
is loaded.
Time Zone
This field holds a POSITIVE or NEGATIVE
integer indicating the Timezone of the
account to which this contact is attached.
Timezones are standard integer values calculated
from GMT (Greenwich Mean Time). You can set a
Range of times to display by selecting the RELOAD
button to open the Reload Work In Progress List.
The control file that manages Debtor timezones
is called setzone.ctf and is stored in your
"\Collect\masterdb\control" folder.
If you have created a custom pick list for the
Client or Debtor Timezone, then the Timezone
column in the To Do List will display whatever is
displayed on the Client or the Debtor.
Score
This field displays the value in the Debtor's Score field.
This is a sortable field. It is also able to be displayed in
the Work In Progress List.
Days Since Last Payment
This field displays the number of days since the debtor's last
payment.
Contact Operator
This is meant to be used in conjunction with the Load Contacts for Group
option on the WIP Options form and/or the Load contacts for operator
selector on the Reload Work in Progress List form. When a team leader
or manager is navigating contacts for another operator, this columns
will identify the operator that the contact in the list belongs to.
Other Fields
The To Do list also displays a variety of other debtors
fields like the phone numbers and extension fields. Right-
click the To Do list header bar and select Insert Field
for more information.
| 
Was this page helpful? Do you have any comments on this document? Can we make it better? If so how may we improve this page.
Please click this link to send us your comments: helpinfo@collect.org