Report Definition
The Report Definition list contains all reports that are present
in your system. You can build your own reports to print any
information that you have stored in Collect!. Many sample
reports are available that you may modify to suit your
requirements.
When you select a report from the Report Definition list, the
Report Definition form will display your chosen report's design
and codes. Select a report to open the Report Definition form.
Report Definition
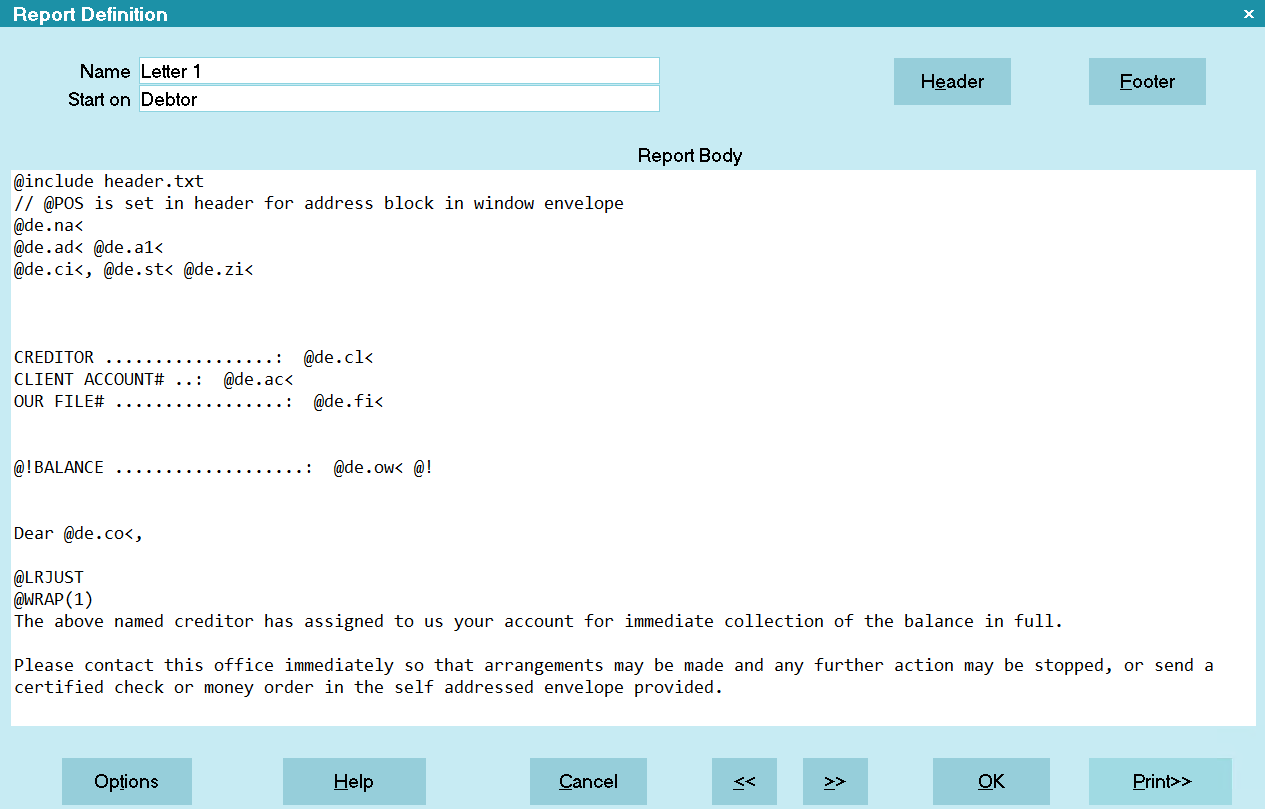
The Report Definition form is used to create and edit
reports. This is the user interface for Collect!'s report
writer. The Report Definition form has several sections
outlined below.
Name
This is the exact name of the report. Choose a name
that clearly identifies your report. This name will help
you when you need to choose a report in one of
Collect!'s other forms or pick lists, such as when
scheduling a Letter Contact.
If you change the Name of the report, be sure to update
any references to it in your contact plans or letter contacts!

Start On
This is the form which must be currently displayed
when you start printing the report. Select the Start On
arrow to display a list of choices called "Report can be
printed from." Your choice is a very important part of your
report design. It determines where in Collect! your report
will start to pull its data. For instance, if your report starts
on " Debtor," then you have to be on a Debtor or viewing the
list of Debtors to print the report.
 If you are NOT on the right form, you will
not be able to access your Report when you
try to view Reports and Letters.
If you are NOT on the right form, you will
not be able to access your Report when you
try to view Reports and Letters.
Select Print from the top menu bar and then select Reports
and Letters. You will only see reports that can be printed from
the form you are currently viewing. For instance, if you are on
the Debtor form and you select this menu option, you will see
a Print Report list of reports. When those reports were defined,
the Start On field was set to Debtor. Reports that "Start On"
Client will not be in the Print Report list at this time.
However, if you are on the Client form and you pull down
the Print menu and choose Reports and Letters, the list
of reports that is displayed will not have the same reports
in it as the list above. Instead, it will show the reports
that "Start On" Client and not ones that "Start On" Debtor.
Some reports are defined to "Start On" ANYWHERE. They will
show up in the Print Report list no matter what form you are on.
 The Report Definition list displays the name of
the "Start On" form for each listed report.
The Report Definition list displays the name of
the "Start On" form for each listed report.
Some reports are defined to "Start On" INTERNAL. This is a
special case for a few built-in reports that may be printed
from the Print menu, Daily, Monthly, Analysis and Trust Reports.
Any of the internal reports may be replaced with your
own customized version. To make Collect! run your
own custom reports via the Print menu, Daily,
Monthly, Analysis and Trust reports, change the
Start On to something other than INTERNAL,
depending on the particulars of your report, and
place your own report codes in the Report Body
of the report.
Header
Some reports may have column headings and other text
that you want to print at the top of each page. These may
be defined in the Header section.
Please refer to How To Use Headers And Footers for more
information.
Footer
Some reports may have text that you want to appear
at the bottom of each page of the report. This may be
defined in the Footer section.
Please refer to How To Use Headers And Footers for more
information.
Report Body
This is the section where you actually create or edit your
report template. It may contain text, printable information
codes for database fields and symbols for formatting fonts
and margins. It may also contain commands for printing
your company logo, printing boxes and lines and other
graphics.
If you are modifying or viewing an existing report,
this "window" will show the actual code in this report.
A new report will show nothing in the Report Body until
you click into it. Then the text editor will present you with
a blank screen where you can begin to design your
report.
Function Keys
F1 Help............. Opens up this Help topic
F2 Pick............. Pick from database fields and other items
F5 Print............ Print all your notes
F7 Delete........... Delete the current line
F8 Save and Exit.... Save the report and exit
Text Editor
Use this window to create or edit reports. Press F2 to
see a list of common types of codes you can use in
your report. Press F8 to save any changes you make
in this window. Please refer to How to Build Reports or Letters
for complete information on creating reports and letters.
Word Wrapping in the Report Writer
When you type in the Collect! report body the font is a common
courier 10cpi character set. There are many benefits to this, lists are
easier to line up for example. When you print the report, it will print in
the FONT that you have chosen, thus the difference in looks. That is
why the layout of the report body is very basic and manual. You must
control the line lengths, with the particular font you are using. Therefore
if you change the font, move the margins or edit paragraphs you will
have to take care of the line length.
If you are using a non-fixed length font in your template, that's fine but
it means that you will be able to fit more than the standard 80
characters on a line. As you are typing, when you come within 2
characters of the right window edge, Collect! will word wrap the
line for you automatically. This may not be what you desire.
You can look in the status bar at the bottom of the
report body to see the exact line (row) and column (character)
that the cursor is on at the moment. This may help guide you
when correcting your lines.
Correct Line Length in Your Report
1. Type your text into the editor.
2. Go to the end of any line that prints too short and press
the DELETE key. This will bring up the line from below up to
the line you are on.
3. You should then go to the word you think should be at the
end of that line and press ENTER to have the text to the right
of your cursor drop to the line below.
4. Repeat this process till all lines are far enough to the right.
You see there is no right margin. It's just word wrapping
at 80 characters when you type. This is because if you used a
fixed length font, that's where your page would end.
As mentioned above, you can keep track of how many characters
to the right you are, by paying attention to the bottom left corner
of the report writer. This is your cursor's position within the
report body. Non-fixed length fonts can be up to 132 characters
to the line.
Options
Select this button to display the Report Options form
where you may enter additional settings for the report
or ensure that Collect!'s defaults are restored.
This is where you set a font, page orientation, printing
output destination, Letter Service letter number, and
other options such as security access levels and
default margins. Also, the Report Options are used for
special printing requirements like printing to a third party
word processor letter or mailing label template.
Press F1 when you have opened the Report Options form
to see details of the possible settings.
Print
This button allows you to test print your report
right from the Report Definition that you are designing
or viewing. You may be prompted to choose a record or
set of records to include in the report when you print it.
Select this button to print a test report sample, ONLY. Do
not attempt to print an actual report from this form!
Be aware that some reports cannot be
adequately tested from the Report Definition
form and MUST printed from the form that the
report Start's On.
To do this, finish viewing or designing your report.
Exit to the Main Menu and choose the form that your report
is meant to Start On. Select Print from the top menu bar
and then select Reports and Letters from the drop-down
choices.
Your report should display in the Report Definition list
and you can select it and print it.
Help
Press this button for help on the Report Definition
form and links to many topics related to reports
and printing.
Cancel
Select this button to ignore any changes you may
have made and return to the previous screen
OK
Select this button to save any changes you may
have made and return to the previous screen.
Delete
This button is visible only on the list of all
Report Definitions. Select this to delete the
highlighted item from the database.
Edit
This button is visible only on the list of all
Report Definitions. Select this to open and
modify the highlighted item.
New
Select this to open a new blank Report Definition form.
<<
Select this button to scroll down one page
in the list of Report Definitions.
>>
Select this button to scroll up one page
in the list of Report Definitions.
Moving Reports In The Report Definition List
As you develop your own reports, you may want to
reorder the reports as they appear in the list so that
the reports that you use most often are at the top
when the list opens. To do this, you can copy and
paste reports in the list.
1. Select Print from the top menu bar
and then select Edit Reports from the drop-down
choices.
2. When the Report Definition list appears,
scroll to the report you wish to move. Make sure
the report is highlighted in black.
3. Select the Edit menu from the top menu bar and
then select Copy from the drop-down choices. Collect!
will prompt you that the report has been copied to the
Clipboard. Select OK.
4. Scroll to the place where you want the report to be
moved to. Collect! will paste the report beneath the
report that you select. So go up one more.
5. Select the Edit menu from the top menu bar and
then select Paste from the drop-down choices. Collect!
will paste the report into the new location.
6. Once the report has been pasted in its new location,
be sure to delete the original from the old location. You
want to avoid having more than one report with the
same name.
Delete Reports From The List
You can press DELETE when you have a report selected.
This will delete it from the list of reports.
If you need to delete more than one report, here are the
steps to select multiple reports for deletion.
1. Select Print from the top menu bar and then select
Customize Printing, Edit Report Templates. When you
are looking at the list of reports, use your Spacebar to
highlight the ones you want to delete. Be very careful
that you only select the ones you want!
2. When you are finished selecting, select Edit from
the top menu bar and then select View Tags. Confirm that
these are the ones you want to delete.
3. Press the DELETE key on your keyboard and
say YES to ALL.
Summary
Please refer to How To topics and the Help Index
for additional information on Report Design and
Printing procedures.
Collect! ships with many sample reports that you
can use or modify. Pull down the Print menu and
choose Customize Printing, Edit Report Templates
to view the Report Definition list of all reports in Collect!.
Also, additional reports are available in the Collect! report
folder. See Report Sample to view these reports.
Reports may also be downloaded from our
web site at www.collect.org
Comtech Systems Inc. is available on a contractual
basis for designing your custom reports.
| 
Was this page helpful? Do you have any comments on this document? Can we make it better? If so how may we improve this page.
Please click this link to send us your comments: helpinfo@collect.org