Payment Plan Setup Basics
The Payment Plan feature was designed for our users who
are credit grantors. Collect! automatically handles background
tasks for your company when you set up a payment plan
for your clients. If you repeatedly enter the same details
for your plans, you may automatically enter defaults for
each new plan by setting them in the Payment Plan Setup form.
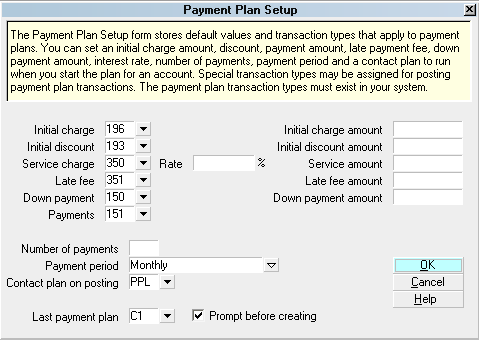
Payment Plan Setup form
Accessing Payment Plan Setup
The Payment Plan Setup form may be accessed in many ways.
Providing you have access to the various menus and
forms, you can use one of the following ways to get
to the Payment Plan Setup form.
1. Select System from the top menu bar in
Collect! and then select Preferences from the drop-down
choices. This will display the System Setup menu.
Select the PLANS AND REFERENCES TABLES button to
display the Plans, Tables and Defaults menu. Select the
PAYMENT PLAN SETUP button and the Payment Plan Setup
form will appear.
2. Or, you may gain access to Payment Plan Setup from
the Main Menu. Select the SYSTEM ADMINISTRATION button
to display the System Administration menu. Select the
SETUP AND CONFIGURATION button to display the
System Setup menu. Select the PLANS AND REFERENCES
TABLES button to display the Plans, Tables and Defaults menu.
form. Select the PAYMENT PLAN SETUP button and the
Payment Plan Setup form will appear.
3. Another method to gain access to the Payment Plan Setup form
is through any debtor account. When you have a Debtor form
displayed, you may select the Principal field to display the
Financial Detail form. Select the tab labeled Payment Plan
to display the Payment Plan form. Select the button labeled
SETUP near the bottom of this form to open the Payment Plan Setup
form.

See Also
- Payment Plan Topics
|
Was this page helpful? Do you have any comments on this document? Can we make it better? If so how may we improve this page.
Please click this link to send us your comments: helpinfo@collect.org