Debtor Basics
This document will introduce you to the Debtor form.
The Debtor record is the heart of Collect!. Ninety percent
of your work takes place here. A Debtor record is attached
to an appropriate Client record. Then, any financial
information that affects the balance of the debtor is recorded
from the Debtor record. Contact events, letters, financial
transactions, cosigners or others, are all attached to the
debtor account.
Simply put, a Debtor record can be any information at all that
you would like to keep as a historical account of actions, as
well as any financial information, such as fees, interest,
payments and so forth.
Generally, two important areas of information relate to your
Debtor. One is debtor demographics and the other is money.
We will use these two separate categories to familiarize you
with the Debtor form.
Debtor Information
The Debtor form itself stores all address and personal information
about the account. There are fields for address, phones, SSN and
so forth. Additional fields provide account tracking with Mode,
Status, Operator, Sales and several Date fields, such as Listed,
Worked and Promise.
 You should press F1 when you are viewing the Debtor
form to see an explanation for each one of the fields on the form.
You should press F1 when you are viewing the Debtor
form to see an explanation for each one of the fields on the form.
For debtor information that doesn't seem to fit on the Debtor form,
Collect! has several extra records that you can use. These
are accessed through the tabs at the bottom of each Debtor
record.
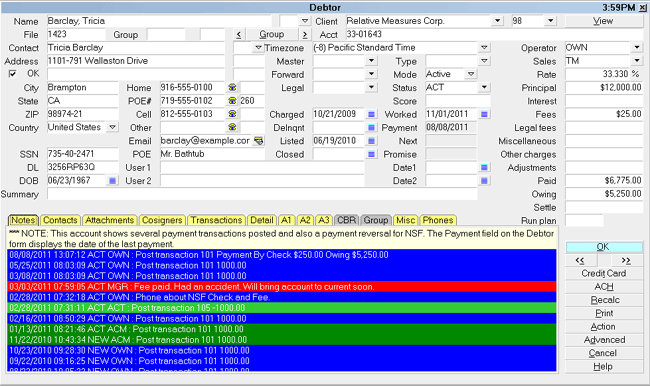
Debtor form
Notes contains free form comments with Date, Operator and
Status stamp.
Debtor Detail is generally used for storing bank account information.
Cosigners or other related parties may be stored in the Debtor
Cosigner form.
The Attachment form can store many fields of related information.
You can have multiple types of attachments for all sorts of
information.
Contacts can be created for working the account and these
may be viewed through the tab labeled Contacts.
The Misc tab contains extra fields and switches for additional
customized uses.
Debtor records may also be grouped together for easily tracking
information for accounts entered previously, either for the same
client or belonging to different clients. The Group tab displays
all the members in the group.

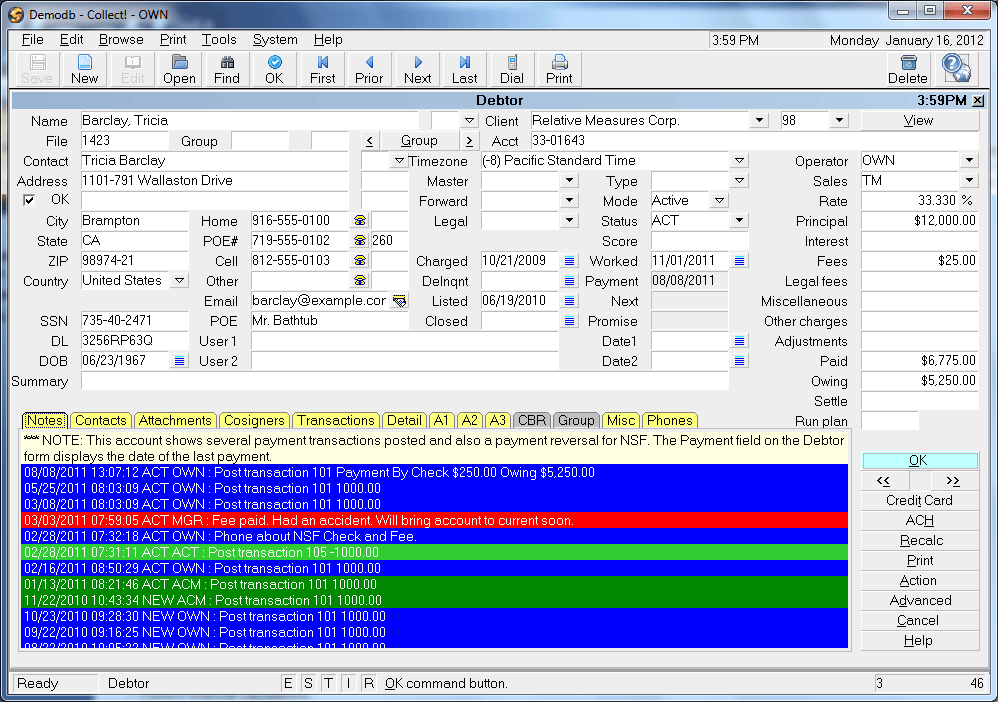
Debtor Financials
Collect! excels in its flexible handling of debtor financial details.
This is an area where you can create a "paper trail" for anything
that affects the account financially.
There are several fields on the Debtor form that display
financial values for the account.
Principal and Judgement, Interest, Fees, and Rate are stored
in the Financial Detail form, accessed by selecting the Principal
field.
Any transaction posted to the account may be entered and
viewed through the Transactions tab. Transactions are totaled
and displayed in the appropriate field.
There are six financial types that you can use when posting
transactions to the account. Each one has its own totals
field on the Debtor form.
Paid displays payment type transaction totals. The Payment
field displays the date of the last payment.
The Adjustments field is populated with the total of all
transactions that are flagged as adjustments.
The Fees field is populated with the total of all transactions
that are flagged as fees.
Legal, Miscellaneous and Other fields are populated with
totals for the corresponding transactions flagged as those
types when posted to the account.
And finally, the Owing field is populated with the result of all
the other financial field values.
When you select the Owing field, a Debtor Financial Summary
appears. This form summarizes the totals, paid to date values,
and remaining amount owing on the account. Interest and/or
an outstanding promise can be found in the Current column,
as amounts needed to bring the account to current.
Accessing Debtor
The Debtor form may be accessed in many ways. Providing you
have access to the various menus and forms, you can use one
of the following ways to get to the Debtor form.
1. Using the menu bar at the top of Collect!, select
Browse to display the drop-down menu. Select All Debtors,
Active Debtors or Closed Debtors from this menu and the
list of the appropriate Debtors will appear.
2. From the Main Menu, select the Daily Administration
button to display the Daily Administration menu. Select
the New Business button to display the New Business menu.
Select the button labeled Debtors to display the list
of existing debtors currently in your database.
3. Using the methods listed in Accessing Client, open
a Client form. With the Client form on the screen, simply
select the window labeled Debtors to activate the
client Debtors list for this client.
4. Using the menu bar at the top of Collect!, select
Browse to display the drop-down menu. Select Find By
from this menu and a submenu will display with various
fields listed to search by. Select one of the search
types and follow the prompts to gain access to the list
of successful matches.
5. On any other form that has a drop-down selection field
to access a debtor, simply press F2 or select the down
arrow to the right of the field to display a list of debtors in
your system currently.
See Also
- How To Enter A New Debtor
| 
Was this page helpful? Do you have any comments on this document? Can we make it better? If so how may we improve this page.
Please click this link to send us your comments: helpinfo@collect.org