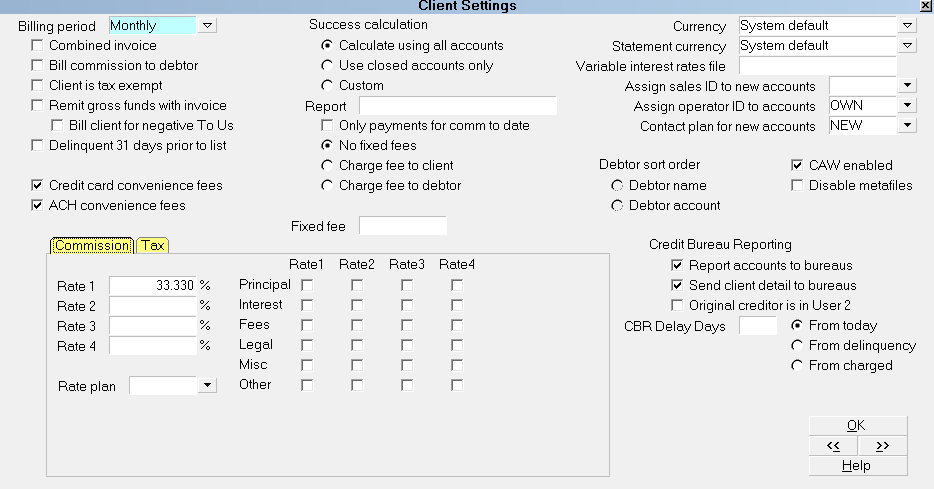
Client Settings Basics
The Client Advanced Settings screen stores values and
preferences used by the system to help you automate
your operation while reducing manual steps needed to
complete frequent/repetitive tasks.
It is located by clicking the Advanced button which
resides in the lower right corner of the main Client
screen. It is a very important setup screen as it is where
significant Preferences settings are set for each individual
Client.
Understanding the impact these Preferences settings
allows your office to get the most out of the system
as well as properly configure your Clients to have
trouble-free data management with your office.
Example 1: your Client keeps telling you that they
want a " Gross Remit Statement" from you. If your staff don't
know that this is a 2-switch decision in the Advanced
Settings screen of the Client, you won't be able to
accommodate their requirement. The Client will not be pleased
when they keep receiving a "Net Statement".
Example 2: your Client keeps calling to complain
because the commission being charged on their Statement
is the 'old' rate. If your staff are telling you that
they changed the Client's rate as requested and they
don't know why the system just won't charge the new rate,
somebody on the team didn't update the Shelf Inventory
when the 'old' rate changed. Client Advanced Settings
does not affect shelf inventory retroactively. There
are other steps to be taken, which are discussed in the
topic "Mass Update Commission Rate".
All staff who will be administratively responsible for
clerical tasks in your organization need to be conversant
with the Advanced Settings screen and how the settings
affect outcomes in other areas of the software.
A few of the important functions controlled from the
Advanced Settings screen are:
- Remit Type; Net, Gross or Combined
- Commission rate(s) or Rate Plan
- Tax, if applicable
- Credit bureau enabled or disabled
- Credit card and check by phone convenience fees enabled or disabled
- Charging other fixed fees
- Assigning collectors and inside salesperson IDs
- Recovery (success) calculations
- Initializing automated collection strategies
Be aware that all system preference switch settings
are configured to be changes made on a go forward basis,
and will not retroactively update existing inventory. If you have
a change that must be both retroactive and go forward, contact
Technical Services for a consult on usage of a Writeback report or
Contact Plan with an Edit event to auto-update all of the debtors
for the target client with the new information. Depending on
complexity and number of fields to be modified, there may be some
charge at the Technical Services timed services billable rate.
When assessing what to do with a Setting that a particular
Client doesn't use, before discarding any in-place settings,
consider what might be involved if there is a later need for it.
You may have to come back and revisit all Debtors because the
decision wasn't made previously and this setting is now needed.
Example: If you anticipate that you will be
Credit Bureau Reporting in the future and
you know (as you are entering Clients into your system for
the first time) that many of these Clients will be wanting
you to report on their behalf, then check the Credit Reporting
box NOW to save time having to revisit every Client to update
this switch later.
Advanced Client Settings Screen
Accessing Advanced Client Settings
The Advanced Client Settings screen may be accessed
only one way. If your Operator level has permissions
to this screen, it is accessible by clicking the
"Advanced" button in the lower right hand corner of
the Client screen. A whole new window will open,
displaying a full screen of option switches which
need to be carefully completed.

See Also
- Client Topics
| 
Was this page helpful? Do you have any comments on this document? Can we make it better? If so how may we improve this page.
Please click this link to send us your comments: helpinfo@collect.org