How To Install Collect!
This topic outlines installing Collect! for the first time. If you are upgrading from a previous
version, please refer to the Help topic How to Upgrade Collect!.
Installing Collect! is very easy if a few basic requirements are already in place. First, you need
to simply install your version of Collect!. If you are the only person who will be signing into the
system, you can simply install it on your workstation. If you want other people in your office to
access the system, you plan to grow to add more users to your system, or you have a server in place
that is setup to manage your backups, you will need to install it on your server with the following
requirements:
 Your Server meets our
System Requirements Your Server meets our
System Requirements
You Must Be On The Server!
You must have Administrator
privileges on the Server.
We will take three basic steps to install and set up Collect!
- Install MS SQL Server.
- Install the Collect! software.
- Start Collect! on your Server to let it set itself up.
This document provides you with detailed instructions and tips for successful installation and setup.
Installing Ms SQL Server On The Server
You will need to obtain the installation media from microsoft.com. MS SQL Server Express supports
up to 10GB of data for free. If your database is larger than that, you will need to contact a Microsoft
reseller to obtain a license. For the purposes of Collect!, the Standard edition will do. You will
need the following installation media:
- Database Server (MS SQL Express)
- SQL Server Management Studio
For detailed instructions, please refer to the Help Topic How to Install Microsoft SQL Server.

Installing Collect! On The Server
- If you downloaded the Collect! installation file, double-click the installation icon on your
Desktop. This will begin the installation wizard and in a moment the installation window will
appear.
- Installation begins. You will see the Welcome window. Select NEXT to continue.
The License Agreement asks you to read and be aware of the terms within the
Collect! Terms of Use. Select the "I agree" button to continue, if you agree to the terms of
use.
- The Installation Type screen is displayed. If you accept the default settings,
the full application will be installed on your server. Please refers to the Help topics
How to Install the Collect! Client or How to Upgrade Collect! for more information on the Client
installation or patching Collect!. Select NEXT to proceed.
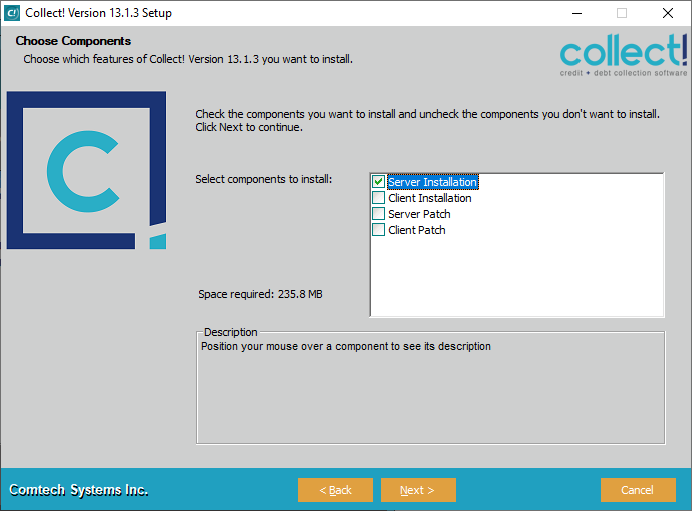
Installation Type
- The Choose Install Location screen is displayed. If you accept the default
settings, the Default folder installation will be installed to the default
directory, C:\CV13. Select NEXT to proceed.
 SELECT FOLDER TO INSTALL INTO: The Browse For Folder dialog allows you to
set the path where you want to install the software. We recommend using the root of your
hard drive. (i.e. C:\CV13 or D:\Collect) It will
be easier for your technical staff and our technical support personnel if you install to a
root drive. Please DO NOT install the software to the Program Files folder! It is important
to know where you are installing Collect!. Select the CHANGE button to select a new path.
Select NEXT to continue.
SELECT FOLDER TO INSTALL INTO: The Browse For Folder dialog allows you to
set the path where you want to install the software. We recommend using the root of your
hard drive. (i.e. C:\CV13 or D:\Collect) It will
be easier for your technical staff and our technical support personnel if you install to a
root drive. Please DO NOT install the software to the Program Files folder! It is important
to know where you are installing Collect!. Select the CHANGE button to select a new path.
Select NEXT to continue.
- The MSSQL Server Information screen requires that you fill in the information
for your MS SQL Installation. Enter your server's internal IP address, the port that you want
the Collect! file service to run on (default is 2530), and the MS SQL instance name. Select
NEXT when finished.
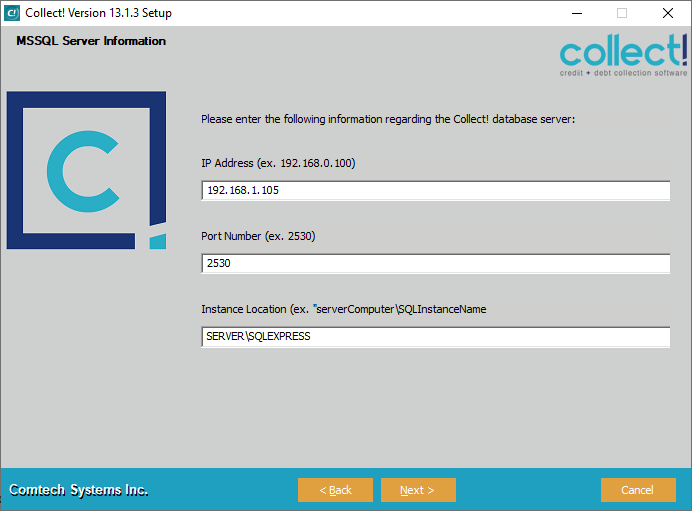
MS SQL Server Information
- The Confirm Installation screen lists the details of your selections. If you
are satisfied, select NEXT to begin the installation and copying of files.
- Installing. The software is now being installed to your computer. This may
take a few minutes. Sometimes certain phases appear not to be moving, but be patient, things
are happening. When the installation has completed copying files, the Installation Wizard will
inform you.
- Run import.bat. Collect! will automatically launch Collect\default\import.bat
to load the template databases. The demodb contains sample information for testing and the
masterdb is blank. The server name and server admin name will automatically fill in, but you
can overwrite and type in something else. The password field will not automatically fill in,
so you will have to type in your password when prompted. When you are ready to load the
databases, you will have to type 'YES' to proceed. This is case sensitive and should be in
ALL CAPS.
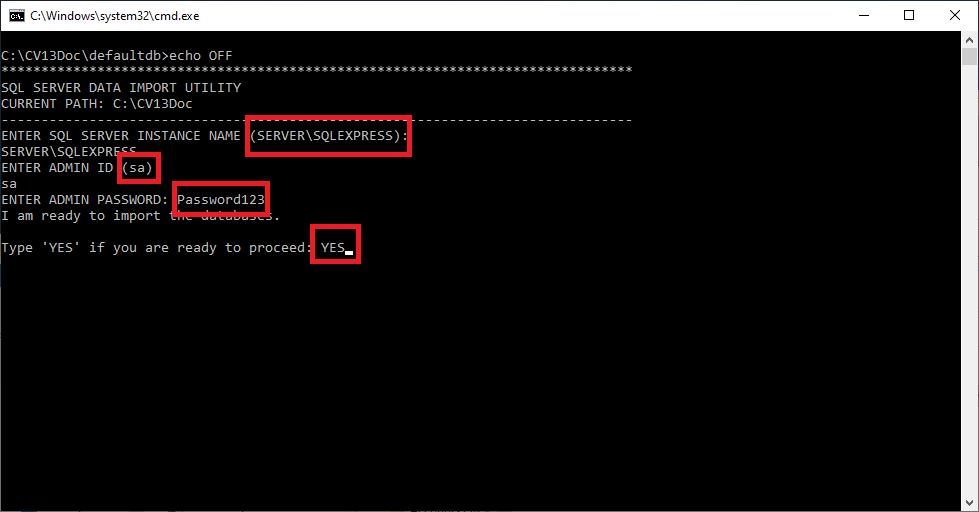
Load the Databases
- Installation Wizard Complete. Setup is finished installing Collect!.
Select option "Launch Collect! when installation finishes" and you will be
taken right into Collect! when you select the FINISH button.
- Contact us for a License. The installation process will create a 30 day evaluation license.
Signing Into Collect!
- Open Collect! via the desktop shortcut. You will see your computer or domain account, then
click Login.
- Collect! will ask you for your Company Name and your Name, in two separate prompts. This
information is displayed in the About Collect! form for identification purposes when
contacting support.
- The Starting Right help page is now displayed in your Internet browser. Please bookmark this
for future reference. Close your browser to see the Welcome to Collect! screen.
- Click the Select Database button to choose a database. The Demonstration Database (demodb)
contains sample information. The Master Database (masterdb) is a blank database with a single
test client and debtor.
- Click START to sign into the selected database and have a look around. We have set up the
DemoDb to show you many features of the Collect! program. Press F1 for help information on the
current screen you are looking at.
 When you open Collect!, it will automatically create the data source for the connection to the
database.
When you open Collect!, it will automatically create the data source for the connection to the
database.

ODBC Data Source
Collect! On Your Workstations
If you are not the only one using Collect!, you are ready to set up access to Collect! on your
workstations. Please refer to How to Network Collect! for helpful information and details. The steps
in this document are ideal for most sites.
Multiple IP Addresses
If you are running multiple network cards with multiple IP addresses, you will need to specify which
IP address that Collect! will have to use. This is done in the Collect\bin\fsrv.ini file. Open the
file, fill in the correct IP address, then place an upper carrot '^' in front of the word host.
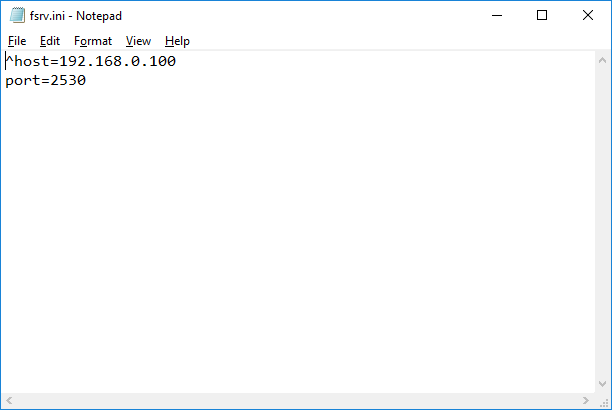
fsrv.ini File
| 
Was this page helpful? Do you have any comments on this document? Can we make it better? If so how may we improve this page.
Please click this link to send us your comments: helpinfo@collect.org