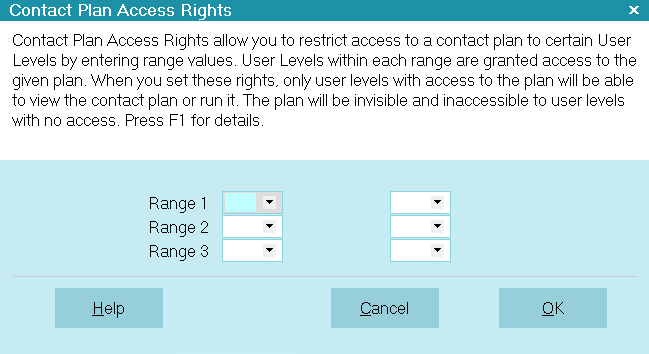
Contact Plan Access Rights
Contact Plan Access Rights allow you to restrict
access to a contact plan to certain User Levels
by entering range values. User Levels within each
range are granted access to the given plan.
When you set these rights, only user levels with
access to the plan will be able to view the contact
plan or run it. The plan will be invisible and inaccessible
to user levels with no access. Press F1 for details.
 To use this option, you must switch
ON "Cache contact plans" in the WIP Options form.
Please refer to the section below entitled Cache Contact
Plans.
To use this option, you must switch
ON "Cache contact plans" in the WIP Options form.
Please refer to the section below entitled Cache Contact
Plans.
Accessing Contact Plan Access Rights
There is only one way to access the Contact Plan
Access Rights form. Open the contact plan that you
want to set up with access rights, using one of the ways
described in Contact Plan Basics.
When you are viewing the contact plan, select the
SECURITY button. This will display the Contact Plan
Access Rights form.
Contact Plan Access Rights

Contact Plan Security Levels
Collect! enables you to set up to 3 ranges of Users per
Contact plan. A User level within any of the selected
ranges will have access to the Contact Plan. Otherwise,
they won't be able to run the plan.
When a user accesses the list of contact
plans, all plans will be displayed. However, they will not
be able to run plans if they do not have security clearance.
Range 1
Pressing F2 while on the From or To fields will display
a pick list of User Levels that you can select from.
Range 2
Pressing F2 while on the From or To fields will display
a pick list of User Levels that you can select from.
Range 3
Pressing F2 while on the From or To fields will display
a pick list of User Levels that you can select from.
Help
Press this button for help on the Contact Plan Access Rights
form and links to related topics.
Cancel
Select this button to ignore any changes you may
have made and then return to the previous form.
OK
Selecting this button will save any changes
you may have made and then returns you to the
previous form.
Cache Contact Plans
Enable Cache Contacts Plans for all
operators
- Select System from the top menu bar and then
select Preferences from the drop-down choices.
This will display the System Setup menu.
- Select Plans and Reference Tables to display
the Plans, Tables and Defaults menu.
- Select WIP Options to display the WIP Options
form.
- Put a check mark in the box labeled
Cache contact plans.
- Select the OK button to save your settings in the
collect.cfg in Collect!'s program folder.
In addition, you may save these settings for
the current operator at this time. Select "Save As
Default" and then choose "Yes." An additional *.cfg file
will be created for the operator. Collect! looks for
a *.cfg file for the particular operator when it loads
the WIP List. If it doesn't find one, it loads the settings
found in the collect.cfg instead.
Enable Cache Contact Plans for a
single operator
- From the WIP List, select the RELOAD button.
This will display the Reload Work In Progress List
form.
- Select the down arrow next to the field
labeled Load contacts for operator
to view the list of operators. Select the operator
whose settings you want to customize.
- Select the WIP OPTIONS button to display
the WIP Options form.
- Put a check mark in the box labeled
Cache contact plans.
- Select the SAVE AS DEFAULT button. Select
YES when the prompt is displayed.
- Select the OK button to close the WIP Options
form and again to close the Reload Work In Progress
List form.
These custom settings are saved in a *.cfg file for the
operator you selected. When you load the operator's WIP List,
Collect! will find the *.cfg file for this operator in Collect!'s
program folder. If there is no *.cfg file for an operator, Collect!
will load the settings from the collect.cfg instead.
 Once you have saved the Operator Configuration
for an operator, you can use the Copy Operator Configuration
feature, to set the same settings for all operators in your
system with the same User Level.
Once you have saved the Operator Configuration
for an operator, you can use the Copy Operator Configuration
feature, to set the same settings for all operators in your
system with the same User Level.
Schedule If User Level
You can also schedule events to trigger off the User Level
of the Operator who owns the Debtor the plan is run on.
Select os.ul from the Schedule If
pick list and then for your criteria, put in the number of
the User Level or range of numbers for User Levels.
Schedule If User Level does not depend on the level of the
Operator who runs the plan. Rather, it evaluates the security
level of the Operator whose ID is displayed on the Debtor form
when the plan is run.
| 
Was this page helpful? Do you have any comments on this document? Can we make it better? If so how may we improve this page.
Please click this link to send us your comments: helpinfo@collect.org