SSL Keys And Certs
Web Host gives you a convenient way to make your
database accessible remotely using the Internet.
However, information sent over the Internet must be
encrypted to provide security. A Secure Socket Layer,
or SSL, creates a secure communications channel between
your Server and your client's browser and encrypts data
that is transmitted.
Each Server that wants to use SSL needs to present a
valid X.509 certificate to the client's browser. It also
needs a private key to decrypt the incoming data. By
default, these security files are created automatically
for you when you open the Web Host. It is only necessary
to start Web Host with the /W1s argument to enable SSL
functionality.
Installing A Security Certificate
 It is highly recommended that you acquire a valid
security certificate from a recognized Certificate Authority
rather than relying on creating your own, self-signed
certificates through SSL Keys and Certs.
It is highly recommended that you acquire a valid
security certificate from a recognized Certificate Authority
rather than relying on creating your own, self-signed
certificates through SSL Keys and Certs.
To install the certificate returned to you from the Certificate
Authority:
1. Shut down the Web Host.
2. Make copies of the webhost.crt, webhost.rsa, webhost.req
and webhost.dh files.
3. Rename the *.crt file you received to webhost.crt, copy it to
the CV11\bin folder.
4. Rename the *.key file you received to webhost.rsa, copy it
to the CV11\bin folder.
5. Restart Web Host.

Accessing SSL Keys And Certs
For your convenience, the SSL Keys And Certs form allows
you to enter all the information needed if you want to update
the security files for using Web Host in secure mode.
DO NOT use this feature to update certificates from
a Certificate Authority!

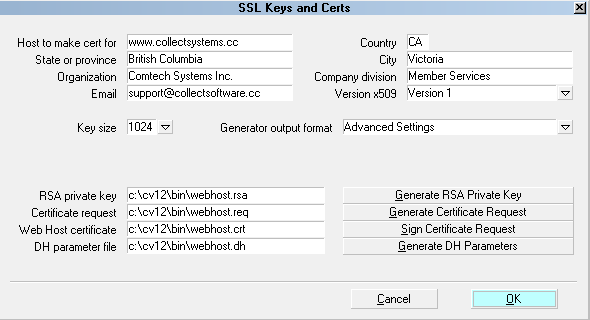
SSL Keys and Certs form
The information entered in this form is used in the
creation of RSA Private Keys, Certificates and
Certificate Requests. Your personal information is
displayed in the certificate that is created.
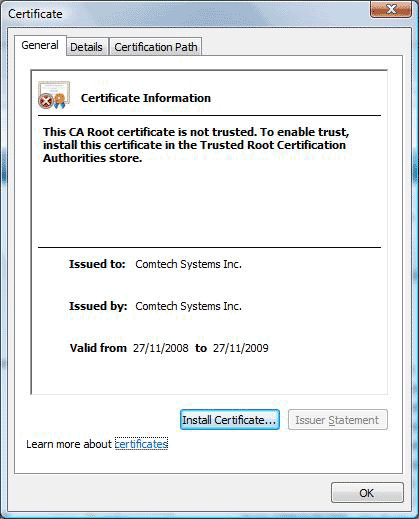
SSL Certificate
In the Details section of the certificate, the subject
information displays details that you entered in the
fields on the SSL Keys And Certs form.
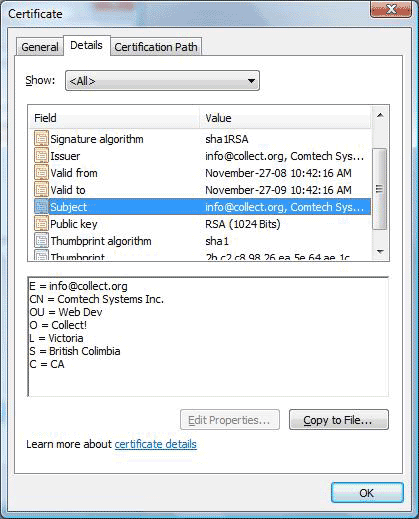
SSL Certificate Subject Information
There is only one way to reach the SSL Keys and Certs
screen.
1. Open Collect! as you would normally and stop at the
Main Menu.
2. Select System from the top menu bar and then select
Network and Environment from the drop-down choices.
This will display a submenu of additional choices.
3. Select Security Certificates to open the SSL Keys And Certs
form and enter the information needed to generate your certificate.
After you have entered your information:
Select the button labeled Generate Stunnel
PEM File to create the stunnel.pem
file in the location displayed to the left of the button.
By default, this file contains the RSA Private Key,
Certificate and DH parameters.
If you select ADVANCED from the
Generator Output Format pick list, other
options are available and additional buttons
become visible.
Host To Make Cert For
Enter the Host Name to be used during the
generation of certificate requests.
State Or Province
Enter the state or province in which you reside.
Organization
Enter your company name here.
Email
Enter a valid email address to be used as a
reference to contact you relating to your
certificate.
Country
Enter the two character code of the country
you are in.
City
Enter the name of your city here.
Company Division
Enter the name of the section or division
of your company that the certificate is being
created for.
Version X509
When submitting a certificate request to certain
certificate authorities they may require a specific
X.509 version. From the pick list, select the version
to be used when generating a Certificate Request.
Version 1: Set Collect! to use Version 1 of the X.509
standard.
Version 3: Set Collect! to use Version 3 of the X.509
standard.
Key Size
Select a size to specify the security strength of
your Private Key. This value is in bits. Two choices
are given. (A key size smaller than 1024 is a
potential security risk, and larger than 2048
doesn't actually increase the security strength
but just adds overhead.)
Generator Output Format
Select one of the options from the pick list.
Basic:
Not needed.
This will produce an older style Stunnel PEM file
which contains an RSA Private Key and Certificate.
Basic with DH:
Not needed.
This will produce an Stunnel PEM file which contains
an RSA Private Key, Certificate, and DH Parameters. The
DH Parameters are required when using the most recent
version of Stunnel. For best security, please use the most
recent Stunnel to patch any known vulnerabilities.
Advanced Settings:
Not needed.
Select this to view additional choices which allow you
to generate each specific option individually and
specify a unique file for each option, if necessary.
Stunnel PEM File
Not needed.
This is the path where Collect! will produce the stunnel.pem
file to be used directly with Stunnel.
Generate Stunnel PEM File
Not needed.
Select this to generate the Stunnel PEM file in the location
displayed in the Stunnel PEM file field. This file contains
the RSA Private Key, Certificate and DH parameters.
Advanced Settings
Not needed.
The Advanced Settings are visible only when you
select "Advanced Settings" from the 'General output
format' pick list. These may be used to create RSA
Private Keys, Certificates, Certificate Requests and
DH Parameters. If you already have your own Private
Key, for instance, you may want to generate a
Certificate Request to submit to a Certificate Authority.
Advanced Settings
Rsa Private Key
Enter the location where your RSA Private Key
will be created.
Certificate Request
Enter the location where your Certificate Request
will be created.
Web Host Certificate
Enter the location where your Web Host Certificate
will be created.
Dh Parameter File
Not needed.
Enter the location where the file that stores your
DH Parameters will be created.
Generate Rsa Private Key
Select the Generate RSA Private Key button to
create an RSA Private Key using the key size
specified in the Key Size field.
This will produce a webhost.rsa file. This key will
be stored in the location entered in the RSA Private
Key field. This will overwrite any RSA Private
Key (webhost.rsa) file in this location.
Generate Certificate Request
Select the Generate Certificate Request button
to create an X.509 Certificate Request using the
RSA Private Key located in the RSA Private
Key field.
This will produce a webhost.req file. This file will
be created in the location entered in the Certificate
Request field. This will overwrite any Certificate
Request (webhost.req) file in this location.
Sign Certificate Request
Select the Sign Certificate Request button to
self sign the Certificate Request located in the
Certificate Request field using the RSA Private
Key located in the RSA Private Key field.
This will produce a webhost.crt file. This signed
Certificate will be created in the location entered
in the Web Host Certificate field. This will overwrite
any Web Host Certificate (webhost.crt) file in
this location.
Generate Dh Parameters
Not needed.
Select the Generate DH Parameters button to
generate Diffie-Hell man parameters.
This will produce a webhost.dh file in the location
displayed in the 'DH parameter file' field.
Viewing The Key And Certificate Files
When you use the SSL Keys And Certs function, files are
produced in the folders that you specified in the SSL Keys
and Certs screen.
The available options are:
- webhost.req - the certificate request
- webhost.rsa - the private key
- webhost.crt - the signed certificate
The certificate (webhost.crt), may be viewed by
selecting it.
You may view the contents of the request (webhost.req),
and the key (webhost.rsa) files in a simple text editor.
Creating A Third Party SSL Certificate For Web Host
Purchase an SSL Certificate from a 3rd Party Vendor.
Configure the Certificate by doing the following:
1. Open the webhost.req file with Windows© WordPad.
2. Copy the entire file.
3. Paste it into the Vendor's CSR box overwriting everything
previously there.
4. Set the Server Type to Other.
5. Submit configuration.
When your Certificate is created, do the following to install it IF received by email:
1. Open the webhost.crt file with Windows© WordPad
and delete the contents.
2. Open the email.
3. Copy the Certificate from Beginning to End.
Do not copy the Intermediate Certificate Section if
one is provided.
4. Paste the Certificate code into the webhost.crt and save the file.
5. If an Intermediate certificate is provided, copy the Certificate from
Beginning to End.
6. Open Windows© WordPad as a new blank document.
7. Paste the certificate.
8. Save the file in the CV11/bin folder as intermediate.crt.
When your Certificate is created, do the following to install it IF received as a ZIP file:
1. Delete the webhost.crt file.
2. Open and Extract the ZIP File to the CV11/bin folder.
3. Rename the Certificate (usually named as hostdomain.crt)
to webhost.crt.
4. If an Intermediate certificate is provided, leave it in the
CV11/bin folder.
Summary
The SSL Keys And Certs form enables you to update the
security files used by Web Host when you enable secure
mode by using the /W1s argument in the Web Host icon.
The information entered in this form is used in the creation of
RSA Private Keys, Certificates and Certificate Requests.
 WARNING: Collect! is not responsible for the security
of your data over the Internet. Tools
provided are for your convenience. A qualified
technician is required to ensure that they are
used to your best advantage.
WARNING: Collect! is not responsible for the security
of your data over the Internet. Tools
provided are for your convenience. A qualified
technician is required to ensure that they are
used to your best advantage.
It is highly recommended that you acquire a valid
security certificate from a recognized Certificate Authority
rather than relying on creating your own, self-signed
certificates through SSL Keys and Certs.
See Also
- Trusted Hosts
- Web Host Topics
|
Was this page helpful? Do you have any comments on this document? Can we make it better? If so how may we improve this page.
Please click this link to send us your comments: helpinfo@collect.org