How To Setup Credit Bureau Reporting
Once you have set up your account with the Credit Bureau(s)
of your choice, you should have the information needed to
set up credit reporting in Collect!.
We will go through several steps in this topic:
Setting Company Details
Your Company Details need to be entered. Some of this
information is output to the credit bureau file. Also, in the
DETAIL tab for the Company Details form there is one
setting you need to use ONLY IF you are a Credit Grantor.
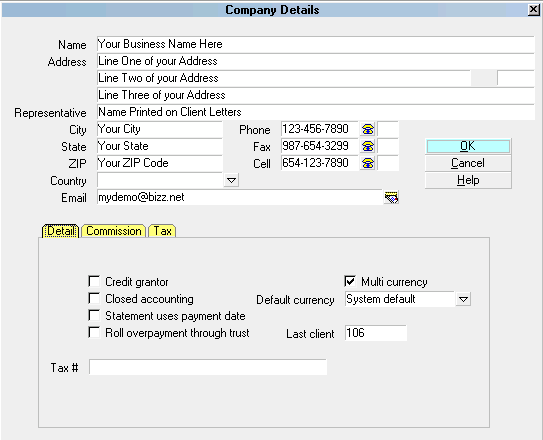
Company Details
The 'Credit Grantor' field is only switched ON if you are
reporting as a Credit Grantor. This setting affects other
credit reporting settings so only switch it ON if you are
a Credit Grantor.

Credit Bureau Setup
The Credit Bureau Setup form holds many global settings
for your Credit Bureau information.
 When you set up your Account/Contract with the
Credit Bureau of you choice, they supply some information
that will help you set up the fields in the Credit Bureau Setup form.
When you set up your Account/Contract with the
Credit Bureau of you choice, they supply some information
that will help you set up the fields in the Credit Bureau Setup form.
Open the Credit Bureau Setup form using one of the methods
shown in Credit Bureau Setup Basics.
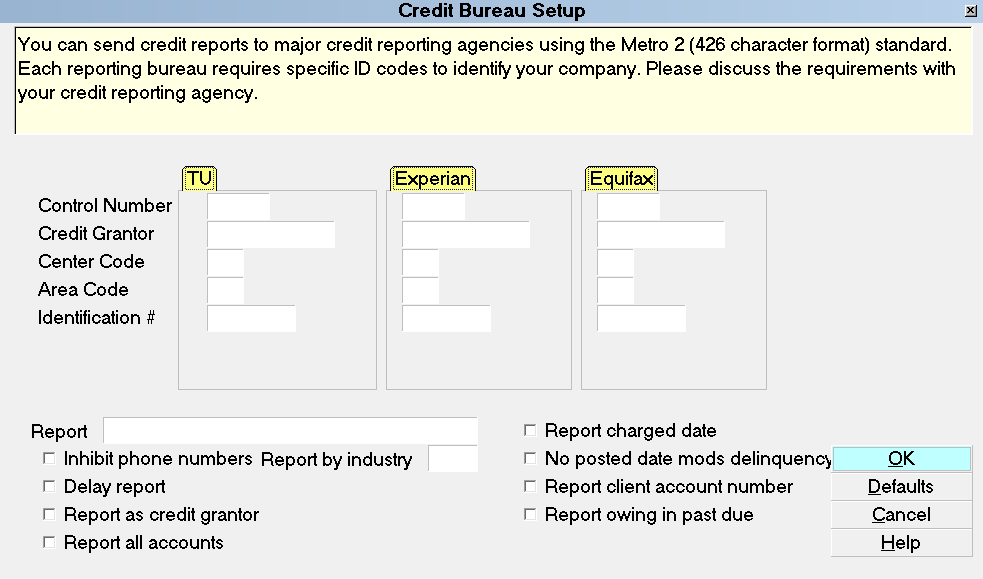
Credit Bureau Setup
Now that you are looking at the Credit Bureau Setup form,
let's discuss the fields. You will notice that there are 3 rows
of fields called TU (Trans Union), Experian and Equifax.
These are the names of the Credit Bureaus. Here you will
input your member information from the Credit Bureau.
You can report to one or several bureaus. If you are reporting
to Trans Union, you will fill in the fields under TU. If you are
reporting to Experian, you will fill in the fields under Experian.
If you are reporting to Equifax, you will fill in the fields under
Equifax. Please refer to information below for more details.
Let's discuss each field under each Credit Bureau's name.
Before going on, make sure you know which
Credit Bureau or Credit Bureaus you will be reporting to
and that you have the information the Credit Bureau
supplied to you in front of you to help you fill in the fields.
Default Values For CBR Settings
Your unique subscriber codes will be placed at the top of the
file that Collect! creates for you to send to the credit bureau.
- If reporting to Equifax and/or Trans Union, place the
Subscriber ID they give you into the " Credit Grantor" field.
- If reporting to Experian, place the D-Number into
the "Control Number" field.
- Other fields are filled with defaults as shown in the screen shot.
It is important to fill in all fields for the credit bureau(s) of your
choice in the Credit Bureau Setup form. Only a few fields
hold actual values as indicated below. The rest of the fields
should be filled with a default value, such as zeroes and one,
as shown.
Credit Bureau Setup Settings
Control Number
The Program Identifier or Control Number contains a unique
identification record number assigned to you by the credit
reporting agency. Unless otherwise specified, fill this field
with 00001. (Alpha numeric, length 5)
If you are reporting to Experian, place the D-Number
into the Control Number field.
Credit Grantor
This field is called either the Subscriber Code or
the Membership Number by the credit bureaus. (Alpha
numeric, length 10)
If you are reporting to Equifax and/or Trans Union,
place the ID they give you into the Credit Grantor field.
Center Code
The Computer Center Code uniquely identifies which
data processing center generated the tape.
Unless otherwise specified fill with 001. (Alpha numeric, length 3)
Area Code
The Area Code is used only if the data processing center
produces files for more than one location. It contains an
identity code, which should be developed by the subscribe
for the location whose data is being reported.
Unless otherwise specified fill with 001. (Alpha numeric, length 3)
Identification #
The Identification Number is used to uniquely identify a credit
grantor. Report your internal code to identify each branch, office
and/or credit center where information is verified. This number
must be unique and at least five digits long. Note that the entire
field should never be zero, blank or 9 filled. This field must be
consistent on a month to month basis. Notify your credit bureau
representative before changing this code.
Unless otherwise specified fill with 0000001. (Alpha numeric, length 7)
Drive
The Drive Letter specifies the disk drive where Collect! will
create your Credit Reporting file. If you enter C, you may get
a file permission error in some operating systems. It is
recommended that you map a drive to use for your credit
bureau reporting files.
The resulting file names in this example would be:
TU.001 -- TU stands for Trans Union Credit Bureau
EXP.001 -- EXP stands for Experian.
EFX.001 -- EFX stands for is Equifax.
These are all the required fields.
Optional Fields
The rest of the settings on the Credit Bureau Setup form
are optional and depend on your requirements.
Inhibit Phone Numbers
Switch ON 'Inhibit phone numbers' to prevent Collect!
from sending phone numbers to the credit bureau.
The output file will contain all zeroes in the phone
number position. This ensures debtor privacy if
you have unlisted phone numbers in your database.
This is a global setting, it cannot be set on an
individual account basis.
Delay Report
When you first report credit on an account, you can schedule
the report to be sent later, rather than immediately. The date
can be changed manually.
To delay reporting, when turning on credit reporting, place a
check mark in the box by pressing the spacebar or left-clicking
the mouse when the cursor is in this field. The Delay Days
field should now be visible.
Delay Days
This field is visible only when you have chosen to Delay Report.
Enter the number of days you would like to delay before sending
of this report.
Report As Credit Grantor
Switch this ON with a check mark if you are reporting as a
Credit Grantor. If you are not sure, please leave this switch
OFF and discuss your reporting status with your CBR
representative.
Leave this switch OFF if you are operating a collection agency.
If you are not sure if you are a credit grantor,
discuss this with your CBR representative.
Report By Industry
You can enter a specific Reporting Industry to include
in your report. Only Debtors with this setting in the
Credit Report Details Reporting Industry field will be
processed for reporting.
This enables you to keep all your Collections accounts
together in one report and all your Mortgage Loan accounts
in a different report, for instance.
Valid Industry Codes are:
0 - Check Credit
1 - Collection Agency
2 - Credit Card
3 - Credit Union
4 - Debt Counselor
5 - Educational
6 - Family Support
7 - Government Agency
8 - Installment Loan
9 - Loan Finance
A - Mortgage Loan
B - Retail
C - Sales Finance
D - Savings And Loans
E - Service And Professionals
These are also the choices for Reporting Industry
found in the CBR tab for each Debtor.
Report Charged Date
For credit grantors, switch this ON to report the Charged Date
instead of the Listed Date as the credit bureau report's Date
Opened. This only works when you have the 'Credit Grantor'
switch enabled, as well.
If you are reporting returned checks, Collect!
automatically reports the Charged Date.
No Posted Date Mods Delinquency
When this is switched ON, Collect! uses the Payment
Date of the promise transaction as the Delinquency
Date rather than allowing the default 30 day delay
in determining delinquency.
This is used only in Credit Grantor mode.
Report Client Account Number
When this switch is ON, the Client Account Number
field (Acct on the Debtor form) is transmitted as the
account identifier to the Credit Bureaus.
By default, Collect! uses the Debtor File Number as the
ID for credit bureau reporting. It is recommended that
you leave Report Client Account Number switched OFF
and let Collect! report using the Debtor File Number,
unless you are sure you need to do otherwise.
This only sends ALPHANUMERICS. Special
characters and spaces are discarded.
Sending Client Account Number is useful for those who
have previously reported accounts through another system.
It gives a user the opportunity to import the old reported file
number into Collect!'s account number. Then, switching ON
Report Client Account Number would place the account
number in the credit reporting output file.
If you switch this ON, you must have a unique
account number for every reported debtor and the account
number must not change while you are reporting the
account. If there is no account number on a debtor account,
or there is a duplicate account number, the CBR vendor will
fail the record.
TECHNICAL:
This is sent as Base Segment Field #7 - Consumer Account Number.
Report Owing In Past Due
Switch this ON with a check mark to report the Debtor's Owing
in the Past Due position of the CBR file. Normally, this field is
zero filled if you are not a credit grantor, but you can use
this switch to fill it with the Owing.
Here is a screen shot of each Credit Bureau setup with default
information as described above.
Credit Bureau Setup Settings
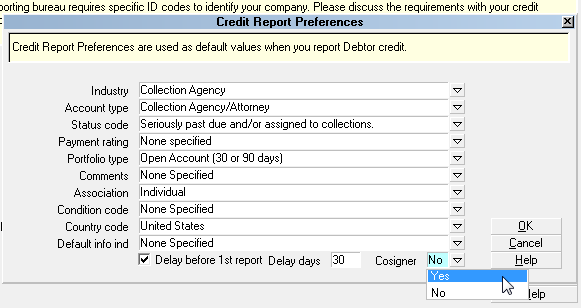
Defaults
At the bottom of the Credit Bureau Setup form, you will notice
a DEFAULTS button. When you select this button, the
Credit Report Preferences form is displayed. All the settings are
set by default in Collect!. They are the most common settings
used by the Credit Bureau. You can change these settings to
meet your criteria. Contact your Credit Bureau if you have any
difficulties with these fields.
If you have Cosigners and you wish to report
them, please choose Yes in the Cosigner box at the bottom
right hand side of the Credit Report Preferences form.
Credit Report Preferences
Credit Report Preferences
Select the DEFAULTS button on the Credit Bureau Setup
form to view the Credit Report Preferences. These default
settings are used for every account you switch ON
for reporting. They can be changed globally or on a
per debtor basis.
Credit Report Preferences
Default values from the Metro 2 Standard are provided for
normal collection and credit management. If you are not
sure which default values you should use, please discuss
with your credit bureau representative.
Press F1 from the Credit Report Preferences
form for information about the fields on this form.
Client Type
The Client Type field is used. In credit reporting terms,
this is the Creditor Classification.
Open one of the Clients you wish to report and select the
down arrow beside the Type field and pick a
Creditor Classification from the list of choices.
You must choose a valid creditor classification
for each Client that you intend to report. If the choice you
need is not in this list, please discuss this with your
representative as these choices come directly from the
Credit Reporting Guidelines.
Client Settings
The Client Settings form stores several selections used by
Collect! when reporting is switched ON for a Debtor and
when the file is produced.
1. Open one of the Clients you wish to report and select the
ADVANCED button.
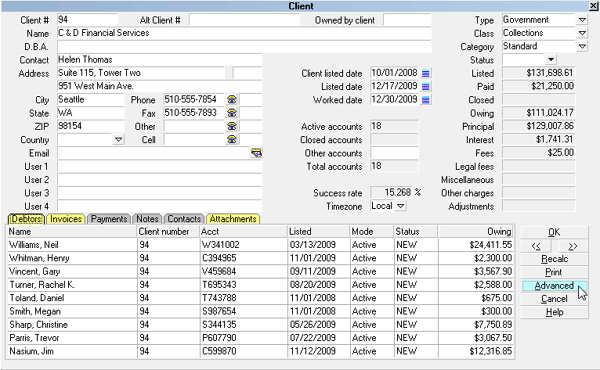
Client Form with Advanced Button Highlighted
2. Select ADVANCED and the Client Settings form will now
be displayed.
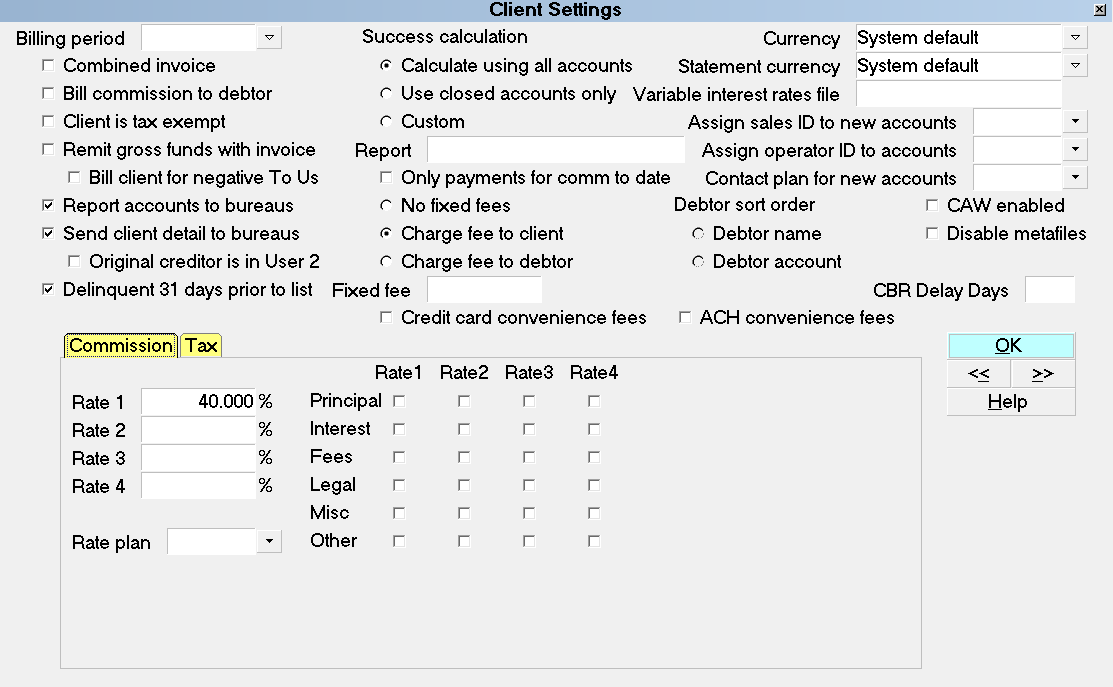
Client Settings Form
You will notice in the Client Settings form, that on the left side,
three of the boxes relating to Credit Bureau reporting are checked.
Report accounts to bureaus When this is
checked, Collect! knows that the Client is set to report credit.
When this Switch is off, Collect will warn you that it is not set
up to report credit.
Send client detail to bureaus When this is
checked, the client's details will be sent to the Bureau. This is
a requirement for Collection Agency reporting.
Delinquent 31 days prior to list Turn this
switch ON to automatically fill in the debtor delinquency dates
to 31 days prior to the Listed Date. This ensures that your
debtors will be set up with a Delinquency Date, by default.
If this switch is OFF, you have to manually fill in the delinquency
date each time you set up an account for reporting to the
Credit Bureau.
 It is always better to put in the exact Delinquency Date,
if it is known, whenever you set up an account for reporting
to credit bureaus.
It is always better to put in the exact Delinquency Date,
if it is known, whenever you set up an account for reporting
to credit bureaus.
*** IMPORTANT*** You must provide a delinquency date for
all accounts reported to the Credit Bureau. The delinquency
date appears on the Debtor form and is defined as the date
of the first delinquency that led to the derogatory status
being reported.
K1 Segment Original Creditor Client Detail
You must be sure put a check in the box labeled Send
client detail to bureaus in the Client Settings form to
send the K1 segment.
The date an account is charged off or placed for collection
is not the delinquency date. The delinquency date should be
the date the account became 31 days past due. The date
of the delinquency is necessary to purge accounts from
the Credit Bureau database in accordance with the
Fair Credit Reporting Act (FCRA).
Debtor Information
 WARNING: Reporting credit is a legal matter. You are
responsible for ensuring that the information you are sending
is accurate and complete. Do not report credit without being
ABSOLUTELY SURE about your legal rights and the legal
rights of the person or entity you are reporting.
WARNING: Reporting credit is a legal matter. You are
responsible for ensuring that the information you are sending
is accurate and complete. Do not report credit without being
ABSOLUTELY SURE about your legal rights and the legal
rights of the person or entity you are reporting.
Many fields on the Debtor form are included in the credit
report, so you need to make sure they are filled in correctly.
When sending reports to credit bureaus, it is the user's
responsibility to make sure that the name and the address
fields are in the required format.
Press F1 from the Debtor and Cosigner forms
to view details for entering information that pertains to
credit reporting. Information sent to credit bureaus
must be in an EXACT format.
The following information is entered in the Debtor form.
Open each of the Debtors you wish to report and review
the fields explained below.
File Number
By default, Collect! sends the Debtor File Number of the
account to the credit bureau. Once you start reporting to
the credit bureaus, the Debtor's File Number must not
change while the account is being reported.
You must not have duplicate File Numbers in your
database. This is Collect!'s UNIQUE identifier for each
account.
Name
The Name of the Debtor entered as ' Last, First Middle
Initial'. Please ensure your spelling is correct. If you do
not type a comma in the name, Collect! will assume the
name is a business name.
Multiple last names must be hyphenated. e.g. Van-Deusen, Jack.
Only enter one Debtor's Name in this field. If you
have a Cosigner, use the Cosigner form.
Generation
Use this field for generation, not the Name field. (Jr., Sr., II, III, etc.)
Address
For accurate reporting of addresses, checkout the handbook
called Postal Addressing Standards at your local US Post
Office. Use standard postal abbreviations for type of street.
For example, 'Pkwy' for Parkway or 'St' for Street
There are two acceptable address formats. Please note that
the commas between City and State are required where shown
below, and Address Line 1 is interpreted as a contact name
only if there are no numbers in the field.
- Format 1:
- Address = street address
- Addr1 = blank
- City = city
- State = state
- Zip = zip
- Country = country code
- Format 2:
- Address = street address
- Addr1 = suite or apartment number
- City = city
- State = state
- Zip = zip
- Country = country code
Do not include the # symbol in the apartment
number. The Credit Bureau rejects addresses with the #
sign. If no zip code is found, the address lines are ignored
and not reported.
Addr 1
Do not use words like "Suite", "Apt.", etc. or the '#' symbol,
just enter the Number of the suite or apartment.
City
Truncate the rightmost portion of this field to 20 characters,
or use the standard 13-character U.S. Postal Service city
abbreviations.
State
Enter the State or Province code in this field. Us the correct
Postal Service codes.
For Example: WA for Washington
ZIP Codes
The zip code may be either 5 or 9 digits for U.S. zip codes,
or 6 digits for Canadian postal codes.
For example: 12345-6789 or 123456789 for U.S.
and X2Y 3Z4 or X2Y3Z4 for Canada.
Country
Enter the standard two-character country abbreviation.
SSN
If SSN is not known, zero - or 9 - fill all positions.
DOB
Date of Birth must be entered. If the month and day are
not known, use 0101. The year is required.
Please refer to F1 help from the Debtor form
for additional information regarding fields for credit
bureau reporting.
Delinquency Date
You MUST provide a Delinquency Date for all
accounts reported to credit bureaus. The Delinquency
Date appears on the Debtor form and is defined as the date
of the first delinquency that led to the derogatory status
being reported.
If you do not fill in a Delinquency Date, the credit reporting
function will use the Charged date, also known as the 'Date
of Last Service' or 'Service Date' and will issue warnings
to you.
The date an account is charged off or placed for
collection, is NOT the Delinquency Date. The Delinquency Date
should be the date the account became 31 days past due.
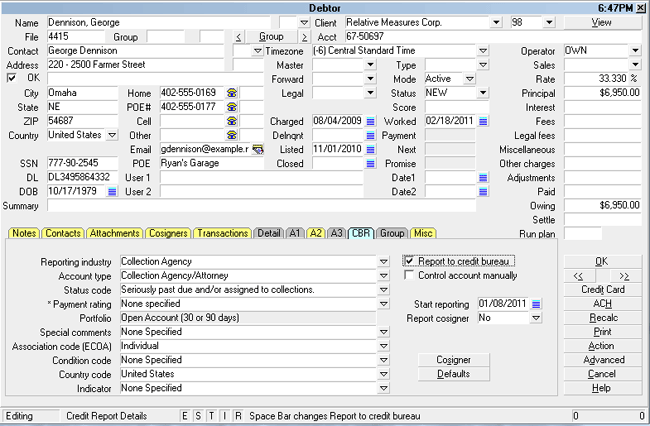
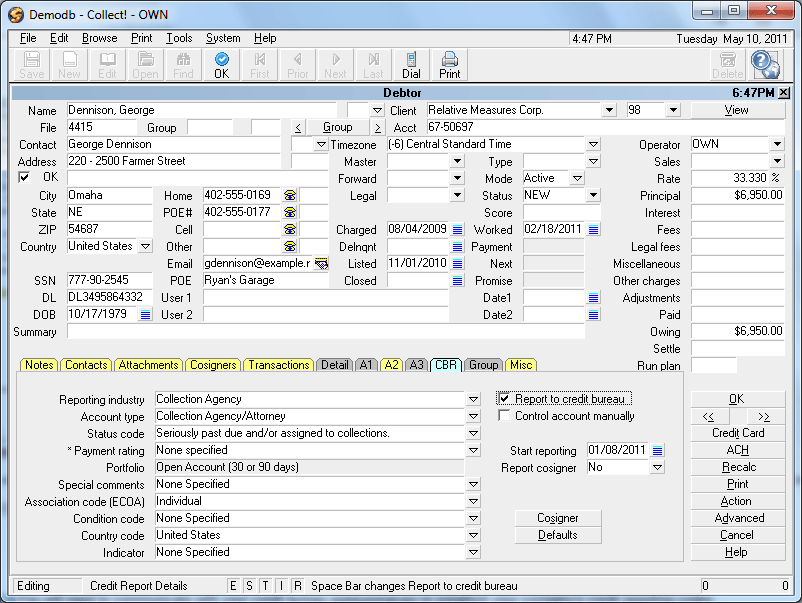
Credit Report Details
This form holds all the current settings for an individual who
is being reported. This is where you switch ON credit bureau
reporting for an account. Most of the fields fill automatically
based on your other settings. Any field can be changed as
needed provided you follow correct reporting practices.
Debtor with Credit Report Details
The options used as default values when you report Debtor
credit are set in the Credit Report Preferences form. These
settings can be changed here, at the individual Debtor level,
if necessary. In most cases, the defaults should be fine.
Collect! will update some of these settings throughout the
life cycle of the debt. For instance, when an account balance
reaches zero and the account is paid in full, Collect!
automatically changes the Status Code that gets reported
to the bureau. You may need to adjust settings manually, if
you delete an account from the bureau or close it as "Settled
in full," for instance.
Please press F1 from the Credit Report Details form
for more information about these settings.
1. Select the CBR tab on the Debtor form to access this form.
Selecting the CBR tab for the Debtor
2. When you select the CBR tab, the Credit Report Details
form is displayed.

Credit Report Details
3. Place a check mark in the Report to credit bureau box.
Now this Debtor is set to be reported to the Credit Bureaus.
4. The rest of the fields are set up by default in Collect!, but it is
your responsibility to ensure that they are correct.
Start Reporting Field
Press F2 while in this field will bring up the Calendar where
you can select the date that you wish to start reporting
this Debtor to the Credit Bureau. You may also enter
a date in the MM/DD/YY format.
Set The Account's CBR Status
Collect! automatically sets the CBR Account Status as you
work your accounts. If you need to manually change the
status due to deleting an account from the bureau or
reporting a bankruptcy, you can select the CBR tab at
any time to display the current Credit Report Details and
change the settings as needed.
Reporting Cosigners
If you selected YES to report Cosigners, you must switch ON
reporting in the Cosigner form for each cosigner that you
wish to report.
Cosigner Settings
If you are reporting Cosigners, additional fields need to be
set up on each Cosigner that you are reporting. Select the
COSIGNER tab on the Debtor form to access the Cosigners.
Here is an example setup.
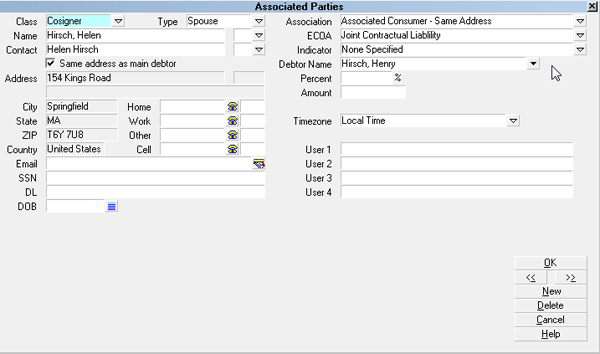
Cosigner with Credit Reporting Setup
Press F1 when you are on the Cosigner form for details.
Look for information labeled "FOR CBR:"
Please note that Name and Address fields on the Cosigner
form must be filled in correctly, just as for the Debtor, if
you are reporting the Cosigner to the Credit Bureau.
Summary
Credit Reporting setup must be completed in several areas
of Collect! as described in this topic. Once you have set up
all the areas, Collect! automatically updates accounts as
needed so that the information that is output to your file
is always the latest information for each debtor. It is your
responsibility to examine this data and make sure you are
satisfied with the results. If needed, you can manually change
settings for special cases such as deleting accounts from
the bureau.
WARNING: Reporting to Credit Bureaus is a legal matter
and you may be sued for providing incorrect or out of date
information! Collect! cannot take responsibility for the correctness
of the data that you submit. You must verify your data!
See Also
- How To Run A Credit Bureau Report
- Credit Bureau Reporting Topics
| 
Was this page helpful? Do you have any comments on this document? Can we make it better? If so how may we improve this page.
Please click this link to send us your comments: helpinfo@collect.org