How To Layout Report Pages
Graphics commands for page layout allow you to
control text and image positions with exact precision.
Justify text, word wrap, place text and images
anywhere in your report. Very professional results are
possible with some knowledge of Collect!'s report
writer.
These commands must be supplied coordinates
in 1/100ths of an inch, i.e. 100 = 1 inch.
 Use the Print Preview "Ruler" feature to map out
the exact coordinates to use with these commands!
Simply press r on your keyboard as soon
as the Print Preview displays and then use your mouse to
drag the crosshairs. Read the exact coordinates displayed
in the Print Preview title bar.
Use the Print Preview "Ruler" feature to map out
the exact coordinates to use with these commands!
Simply press r on your keyboard as soon
as the Print Preview displays and then use your mouse to
drag the crosshairs. Read the exact coordinates displayed
in the Print Preview title bar.
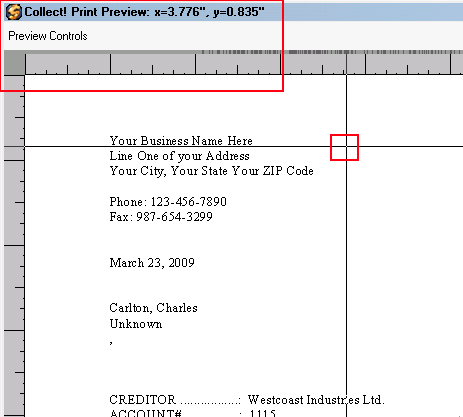
Print Preview Ruler with Coordinates
The graphics commands in these examples for page layout
begin with the @RECT command to define the page area
you are formatting. Within this area you can wrap your text
with the @WRAP command, and left justify or right justify,
using @LJUST and @RJUST.
 @WRAP, @LJUST, @RJUST and @LRJUST
commands may also be used without the @RECT command.
Please see examples at the end of this topic.
@WRAP, @LJUST, @RJUST and @LRJUST
commands may also be used without the @RECT command.
Please see examples at the end of this topic.
Illustrations are followed by syntax of each command used.
To illustrate this:
Here is @RECT with a border so that it is visible.
@RECT(50,50,250,250,1,0)
@RECT
@RECT(50,50,250,250,1,0)
Now I add some text but I don't turn on wrapping or justifying.
@RECT
Now I add some text but I don't
|
|
turn on wrapping or justifying.
|
|
@RECT(50,50,250,250,1,0)
@WRAP(1)
Now I add some text and I turn on wrapping so that the text stays within the boundaries.
@WRAP(0) **Note-this turns off the wrapping.
@RECT
@WRAP(0) turns off the word wrapping.
Now I add some text and I turn on wrapping
so that the text stays within the boundaries.
|
|
To Left justify:
@RECT(50,50,250,250,1,0)
@WRAP(1)
@LJUST
Dear @de.na
It has come to our attention that your account of @de.ow is outstanding.
@WRAP(0)
@RECT
Dear Debtor Name,
It has come to our attention that
your account of Debtor Owing is
outstanding.
|
|
Justification settings stay in effect until you enter a new setting.
To Right justify:
@RECT(50,50,250,250,1,0)
@WRAP(1)
@RJUST
@d
Please remit payment to @cd.na
You may reach us at @cd.ph
@WRAP(0)
@RECT
Today's Date
Please remit payment to:
Company Name
You may reach us at:
Company Phone
|
|
Justification settings stay in effect until you enter a new setting.
To do Full Justification:
@RECT(50,50,250,250,1,0)
@LRJUST
This text is left and right justified within the active rectangle.
This works with DC margin commands and also with
Report Options Left margin settings.
@RECT
This text is left and right justified
within the active rectangle. This
works with DC margin commands
and also with Report Options Left
margin settings.
|
|
Justification settings stay in effect until you enter a new setting.
RECT
The @RECT command allows you to position a block of text and
other output in the Report Body. It defines a temporary rectangle
that bounds all subsequent DC commands until it is terminated by
an @RECT with no arguments.
You can use the @RECT command to set your left and right, top
and bottom page margins with a single command and blockquote
sections of your report. Place the command on its own line in the
report writer. It will affect all following codes and text until you
switch it off with another @RECT command with no arguments.
All output is relative to the top left corner of the defined
rectangle.
@RECT - defines an active sub rectangle within
a report page. Any output occurring within an @RECT block will be
directed to the rectangle.
SYNTAX: @RECT(left,top,width,height,border,clip)
Left: Left margin in 100ths of an
inch.
The value is measured from the LEFT edge of the
page. (e.g. 100 = 1 inch 125 = 1 1/4 inches etc.
Top: Top margin in 1/100ths
of an inch.
The value is measured from the TOP edge of the page.
Width: Represents the WIDTH of the rectangle
in 1/100ths of an inch.
Height: Represents the HEIGHT of the
rectangle in 1/100ths of an inch.
Border: Bordered with thin line?
0 = No border
1 = BorderRect style 1
2 = BorderRect style 2
Clip: Clips text that renders past
the right boundary.
0 = No clipping
1 = clip text. If any text spills over the edge of the rectangle,
it will be clipped out. This only works for text, NOT
database field output or variables.
DC Printing Samples:
//This defines a rectangle whose position starts at 1x1
//inches from the top left of the page and is 1x1 inches in area.
//The word hello is will appear at the top left of the rectangle.
//The second @RECT with no arguments terminates the one above.
@RECT(100,100,100,100,0,0) //Initiator
Hello!
@RECT //Terminator
You can use the @RECT command to set your left and right, top
and bottom page margins with a single command, justify text and
blockquote sections of your report.
@RECT(100,100,600,950,0,0) //Initiator
Start the text of your Report Body and your page will be formatted
automatically with a 1 inch margin all around.
@RECT //Terminator
//End of Samples

Nested RECT Commands
Use a second @RECT to indent a whole paragraph or area of your
report, including text, lines, boxes or images. When @RECT's are
nested, the second @RECT is defined relative to the prior one.
DC Printing Sample:
//@RECT can be nested
@RECT(100,100,600,950,0,0)
This block of text starts 1 inch form the top left of the page and
automatically wraps when 6 inches of text is printed on a
line. This formatting will hold for 9.5 inches of page length.
Next, another @RECT command will be nested in
this one so that a particular area is indented.
@RECT(100,100,400,400,1,0)
This area starts 2 inches from the left and 2 inches from
the top of the page. (Remember, this is relative to the first @RECT
command.) The text in this area will wrap after 4 inches
of text is printed. The size of the indented area is 4x4 inches.
Next, we terminate both rectangles.
@RECT
@RECT
Wrap
The @WRAP function wraps text automatically when a report is
printed. It can be used with the @RECT command and also
with margins set in Report Options, or using @LM and @RM.
@WRAP
SYNTAX: @WRAP(value)
@WRAP(0) - Word wrapping off
@WRAP(1) - Word wrapping on
DC Printing Sample 1:
//Create A rectangle xy = 100 wh = 300 with border
//
@varText = This text is right aligned.
@varLongText* = This line of text is right aligned and word
wrapped as you can see in this very, very, very long line.
@RECT(100,100,300,300,1,0)
@varText>
@WRAP(1)
@varLongText>
@varLongText>
@WRAP(0)
@RECT
//End of Sample 1
DC Printing Sample 2:
//Set Left and Right margins and wrap text blocks within them.
//
@LM(100)
@RM(100)
@WRAP(1)
@no line feed
This is a very long line of text. It can also be several paragraphs.
It does not matter how much text you use or how long the
paragraph is. Within the line feed commands, the text will wrap.
@line feed
@no line feed
If you want to do several paragraphs within the WRAP command,
just make sure you use the line feed commands to begin and
end each paragraph.
@line feed
@WRAP(0)
//End Sample 2
Ljust
This command Left justifies text output within the active
rectangle.
SYNTAX: @LJUST
DC Printing Sample:
@RECT(50,50,250,250,1,0)
@WRAP(1)
@LJUST
Dear @de.na
It has come to our attention that your account of @de.ow is outstanding.
@WRAP(0)
@RECT
Justification stays in effect until you use a different justification
command.
Rjust
This command Right justifies text output within the active
rectangle.
SYNTAX: @RJUST
DC Printing Sample:
@RECT(50,50,250,250,1,0)
@WRAP(1)
@RJUST
@d
Please remit payment to @cd.na
You may reach us at @cd.ph
@WRAP(0)
@RECT
Lrjust
This command both Left and Right justifies text output within
the active rectangle.
SYNTAX: @LRJUST
DC Printing Sample:
@RECT(50,50,250,250,1,0)
@WRAP(1)
@LRJUST
@d
Please remit payment to @cd.na
You may reach us at @cd.ph
@WRAP(0)
@RECT
Justification stays in effect until you use a different justification
command. Use @WRAP with the justification commands to
wrap text within the rectangle.
Wrap And Justify Without RECT
You can wrap and justify blocks of text without using the @RECT
command to define your formatting area.
For example, using the example given above for the @WRAP
command, you can add justifying to the text, as well, while
not using the @RECT command.
@WRAP(1)
@LJUST
@no line feed
This is a very long line of text. It can also be several paragraphs.
It does not matter how much text you use or how long the
paragraph is. Within the line feed commands, the text will wrap.
@line feed
@no line feed
If you want to do several paragraphs within the WRAP command,
just make sure you use the line feed commands to begin and
end each paragraph.
@line feed
@WRAP(0)
// End of example
See Also
- Report Sample to view sample reports and letters
- Report Topics Index for a list of all report and letter topics
|
Was this page helpful? Do you have any comments on this document? Can we make it better? If so how may we improve this page.
Please click this link to send us your comments: helpinfo@collect.org